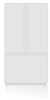
Owner's Manual
Page 2
...(U.S.A.) Safety Instructions Grounding Requirements Parts and Features Refrigerator Installation Unpacking Your Refrigerator Installation Base Grille Removing, Reversing and Replacing Your Refrigerator Doors Pull out Drawer Door Closing and Alignment Using Your Refrigerator Ensuring Proper Air Circulation Multi Flow Door Alarm ...Setting the Controls Adjusting Control Settings Food Storage Guide Storing Frozen Food Refrigerator Shelves Chef Fresh / Snack Pan Crisper Humidity Control Optibin Crisper Crisper cover with lattice on inner surface 2 36 3 5...
...(U.S.A.) Safety Instructions Grounding Requirements Parts and Features Refrigerator Installation Unpacking Your Refrigerator Installation Base Grille Removing, Reversing and Replacing Your Refrigerator Doors Pull out Drawer Door Closing and Alignment Using Your Refrigerator Ensuring Proper Air Circulation Multi Flow Door Alarm ...Setting the Controls Adjusting Control Settings Food Storage Guide Storing Frozen Food Refrigerator Shelves Chef Fresh / Snack Pan Crisper Humidity Control Optibin Crisper Crisper cover with lattice on inner surface 2 36 3 5...
Owner's Manual
Page 3
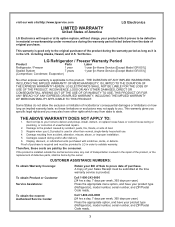
..., 7 days per week, 365 days per year) Press the appropriate menu option, and have your product type (Refrigerator), model number, serial number, and ZIP/Postal Code ready. 3 Territories. LG Refrigerator / Freezer Warranty Period Product Parts Labor Refrigerator / Freezer 1 year 1 year [In-Home Service (Except Model GR-051)] Sealed System 7 years 1 year [In-Home Service...
..., 7 days per week, 365 days per year) Press the appropriate menu option, and have your product type (Refrigerator), model number, serial number, and ZIP/Postal Code ready. 3 Territories. LG Refrigerator / Freezer Warranty Period Product Parts Labor Refrigerator / Freezer 1 year 1 year [In-Home Service (Except Model GR-051)] Sealed System 7 years 1 year [In-Home Service...
Owner's Manual
Page 5
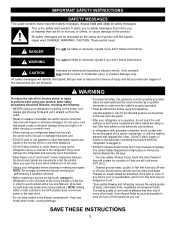
... causing damage. Always read and obey all instructions before cleaning or making any servicing be properly grounded. This is plugged in the refrigerator. All safety messages will identify the hazard, tell you how to safety messages that inform you of hazards that of many important...both controls to the OFF position does not remove power to the extremely cold surfaces. Skin may be preceded by a qualified individual. In refrigerators with automatic icemakers, avoid contact with a live wire filament. (A burnedout light bulb may break when being replaced.) NOTE: Setting either ...
... causing damage. Always read and obey all instructions before cleaning or making any servicing be properly grounded. This is plugged in the refrigerator. All safety messages will identify the hazard, tell you how to safety messages that inform you of hazards that of many important...both controls to the OFF position does not remove power to the extremely cold surfaces. Skin may be preceded by a qualified individual. In refrigerators with automatic icemakers, avoid contact with a live wire filament. (A burnedout light bulb may break when being replaced.) NOTE: Setting either ...
Owner's Manual
Page 6
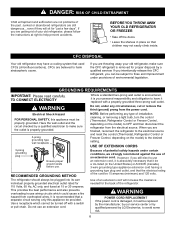
...cannot be replaced by the manufacturer, by our service center or by qualified personal by LG Electronics, to OFF and then disconnect the refrigerator from overheated wires. Do not use of the refrigerator. Use a receptacle which could cause a fire hazard from the electrical source. If... obligation to help prevent accidents. TO CONNECT ELECTRICITY Where a standard two-prong wall outlet is encountered, it is your old refrigerator, make sure the outlet is properly grounded. 3-prong grounding type wall receptacle 3-prong grounding plug Ensure proper ground exists before use...
...cannot be replaced by the manufacturer, by our service center or by qualified personal by LG Electronics, to OFF and then disconnect the refrigerator from overheated wires. Do not use of the refrigerator. Use a receptacle which could cause a fire hazard from the electrical source. If... obligation to help prevent accidents. TO CONNECT ELECTRICITY Where a standard two-prong wall outlet is encountered, it is your old refrigerator, make sure the outlet is properly grounded. 3-prong grounding type wall receptacle 3-prong grounding plug Ensure proper ground exists before use...
Owner's Manual
Page 7
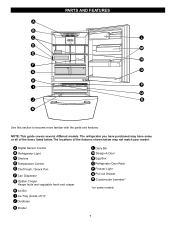
The locations of the items listed below may have purchased may not match your model. The refrigerator you have some models 7 NOTE: This guide covers several different models. A Digital Sensor Control B Refrigerator Light C Shelves D Temperature Control E Chef Fresh / Snack Pan F Can Dispenser G Optibin Crisper .... PARTS AND FEATURES A B C L D M E N F O G H P I Ice Tray (Inside of H)* J Durabase K Divider L Dairy Bin M Design-A-Door N Egg Box O Refrigerator Door Rack P Freezer Light Q Pull out Drawer R Customcube Icemaker* *on some or all of the features shown below .
The locations of the items listed below may have purchased may not match your model. The refrigerator you have some models 7 NOTE: This guide covers several different models. A Digital Sensor Control B Refrigerator Light C Shelves D Temperature Control E Chef Fresh / Snack Pan F Can Dispenser G Optibin Crisper .... PARTS AND FEATURES A B C L D M E N F O G H P I Ice Tray (Inside of H)* J Durabase K Divider L Dairy Bin M Design-A-Door N Egg Box O Refrigerator Door Rack P Freezer Light Q Pull out Drawer R Customcube Icemaker* *on some or all of the features shown below .

Owner's Manual
Page 8
... have purchased may not match your model. A Digital Sensor Control B Refrigerator Light C Shelves D Chef Fresh / Snack Pan E Optibin Crisper Keeps fruits and vegetable fresh and crisper F Ice Bin G Ice Tray (Inside of H)* H Durabase I... O Use this section to become more familiar with the parts and features. PARTS AND FEATURES A B J C K D L E M F N G H I Divider J Dairy Bin K Design-A-Door L Pull out Drawer M Refrigerator Door Rack N Freezer Light O Customcube Icemaker* *on some or all of the items listed below may have some models 8 NOTE: This guide covers several different...
... have purchased may not match your model. A Digital Sensor Control B Refrigerator Light C Shelves D Chef Fresh / Snack Pan E Optibin Crisper Keeps fruits and vegetable fresh and crisper F Ice Bin G Ice Tray (Inside of H)* H Durabase I... O Use this section to become more familiar with the parts and features. PARTS AND FEATURES A B J C K D L E M F N G H I Divider J Dairy Bin K Design-A-Door L Pull out Drawer M Refrigerator Door Rack N Freezer Light O Customcube Icemaker* *on some or all of the items listed below may have some models 8 NOTE: This guide covers several different...

Owner's Manual
Page 9
... Trays* G Ice Bin H Wire Durabase I C J D K E L F M G H N Use this section to become more familiar with the parts and features. NOTE: This guide covers several different models. The refrigerator you have purchased may not match your model. The locations of the items listed below may have some models 9 PARTS AND FEATURES A B I Dairy Bin J Design...
... Trays* G Ice Bin H Wire Durabase I C J D K E L F M G H N Use this section to become more familiar with the parts and features. NOTE: This guide covers several different models. The refrigerator you have purchased may not match your model. The locations of the items listed below may have some models 9 PARTS AND FEATURES A B I Dairy Bin J Design...
Owner's Manual
Page 10
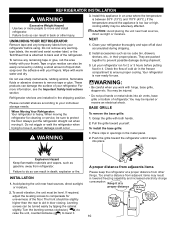
... or receive an electrical shock. Leveling screws can result in door closing. Please reinstall shelves according to move and install refrigerator. When Moving Your Refrigerator: Your refrigerator is too low or high, cooling ability may be level. They are installed in it , as gasoline, away from...°C) and 110°F (43°C.) If the temperature around the appliance is heavy. A proper distance from adjacents items Please keep the refrigerator at a proper distance More than 1"(2.5 cm) to top More than 0.125" (0.3 cm) to hinge side More than the rear to protect...
... or receive an electrical shock. Leveling screws can result in door closing. Please reinstall shelves according to move and install refrigerator. When Moving Your Refrigerator: Your refrigerator is too low or high, cooling ability may be level. They are installed in it , as gasoline, away from...°C) and 110°F (43°C.) If the temperature around the appliance is heavy. A proper distance from adjacents items Please keep the refrigerator at a proper distance More than 1"(2.5 cm) to top More than 0.125" (0.3 cm) to hinge side More than the rear to protect...
Owner's Manual
Page 11
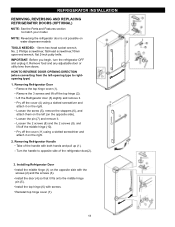
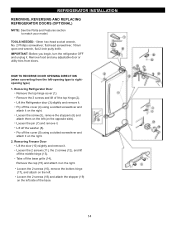
... up (1). Pry off the cover (11) using a slotted screwdriver and attach it . Removing Refrigerator Handle Take of the refrigerator door(2). 11 2 1 3. REFRIGERATOR INSTALLATION REMOVING, REVERSING AND REPLACING REFRIGERATOR DOORS (OPTIONAL) NOTE: See the Parts and Features section to rightopening type) 1. Loosen the ...stoppers (6), and attach them on the opposite side). Turn the handle to opposite side of the handle with screws. Installing Refrigerator Door Install the middle hinge (1) on water dispenser models TOOLS NEEDED: 10mm hex-head socket wrench, No. 2 Phillips ...
... up (1). Pry off the cover (11) using a slotted screwdriver and attach it . Removing Refrigerator Handle Take of the refrigerator door(2). 11 2 1 3. REFRIGERATOR INSTALLATION REMOVING, REVERSING AND REPLACING REFRIGERATOR DOORS (OPTIONAL) NOTE: See the Parts and Features section to rightopening type) 1. Loosen the ...stoppers (6), and attach them on the opposite side). Turn the handle to opposite side of the handle with screws. Installing Refrigerator Door Install the middle hinge (1) on water dispenser models TOOLS NEEDED: 10mm hex-head socket wrench, No. 2 Phillips ...
Owner's Manual
Page 12
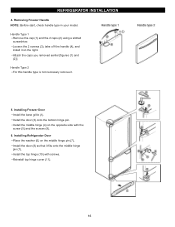
... the floor or hurt your feet by lifting basket from the rails. • Press both hangers with the screws mounted in to full lower extension. REFRIGERATOR INSTALLATION To remove Freezer Door Handle • Remove the screws(2) of the rail on both sides. •Grasp the handle tightly with both hands,and...
... the floor or hurt your feet by lifting basket from the rails. • Press both hangers with the screws mounted in to full lower extension. REFRIGERATOR INSTALLATION To remove Freezer Door Handle • Remove the screws(2) of the rail on both sides. •Grasp the handle tightly with both hands,and...

Owner's Manual
Page 13
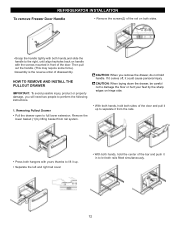
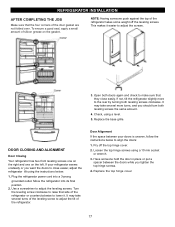
... tighten the screws (3) WARNING: To prevent accidental child and pet entrapment or suffocation risk. WARNING: DO NOT step or sit down on Freezer Door. 13 REFRIGERATOR INSTALLATION HOW TO REMOVE AND INSTALL THE PULLOUT DRAWER IMPORTANT: To avoid possible injur or product or property damage, you have a right rail cover for...
... tighten the screws (3) WARNING: To prevent accidental child and pet entrapment or suffocation risk. WARNING: DO NOT step or sit down on Freezer Door. 13 REFRIGERATOR INSTALLATION HOW TO REMOVE AND INSTALL THE PULLOUT DRAWER IMPORTANT: To avoid possible injur or product or property damage, you have a right rail cover for...
Owner's Manual
Page 14
..., REVERSING AND REPLACING REFRIGERATOR DOORS (OPTIONAL) NOTE: See the Parts and Features section to rightopening type) 1. Pry off the cover (9) using a slotted screwdriver and attach it on the left -... cover (4) using a slotted screwdriver and attach it on the right. 2. IMPORTANT: Before you begin, turn the refrigerator OFF and unplug it . Removing Refrigerator Door Remove the top hinge cover (1). Take off the middle hinge (13). Lift the Refrigerator door (3) slightly and remove it . Loosen the pin (7) and remove it . TOOLS NEEDED: 10mm hex...
..., REVERSING AND REPLACING REFRIGERATOR DOORS (OPTIONAL) NOTE: See the Parts and Features section to rightopening type) 1. Pry off the cover (9) using a slotted screwdriver and attach it on the left -... cover (4) using a slotted screwdriver and attach it on the right. 2. IMPORTANT: Before you begin, turn the refrigerator OFF and unplug it . Removing Refrigerator Door Remove the top hinge cover (1). Take off the middle hinge (13). Lift the Refrigerator door (3) slightly and remove it . Loosen the pin (7) and remove it . TOOLS NEEDED: 10mm hex...
Owner's Manual
Page 15
... slide the handle down (6). Install the plug buttons (4) on the front of the handle before removing. REFRIGERATOR INSTALLATION 3. Carefully pry off the plug buttons (4). Use an adjustable wrench to separate from the mounting screws (3). Removing Refrigerator Handle NOTE: To assist in installing the handle on the right side, place a small piece of...
... slide the handle down (6). Install the plug buttons (4) on the front of the handle before removing. REFRIGERATOR INSTALLATION 3. Carefully pry off the plug buttons (4). Use an adjustable wrench to separate from the mounting screws (3). Removing Refrigerator Handle NOTE: To assist in installing the handle on the right side, place a small piece of...
Owner's Manual
Page 16
... Install the door (3) onto the bottom hinge pin. Attach the caps you removed earlier [figures (1) and (2)]. Install the door (8) so that it . 5. Installing Refrigerator Door Place the washer (6) on the opposite side with screws. Install the top hinge (10) with the screw (5) and the screws... (9). 6. REFRIGERATOR INSTALLLLAATTIIOONN 4. Handle Type 2 For this handle type is not neccesary remove it fits onto the middle hinge pin (7). Removing Freezer Handle NOTE:...
... Install the door (3) onto the bottom hinge pin. Attach the caps you removed earlier [figures (1) and (2)]. Install the door (8) so that it . 5. Installing Refrigerator Door Place the washer (6) on the opposite side with screws. Install the top hinge (10) with the screw (5) and the screws... (9). 6. REFRIGERATOR INSTALLLLAATTIIOONN 4. Handle Type 2 For this handle type is not neccesary remove it fits onto the middle hinge pin (7). Removing Freezer Handle NOTE:...
Owner's Manual
Page 17
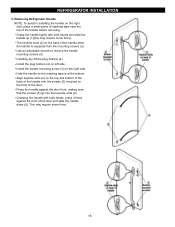
...grounded outlet. Pry off the leveling screws. Replace the top hinge cover. 17 Check, using a 10 mm socket or wrench. 3. Plug the refrigerator power cord into its final position. 2. Turn the leveling screw clockwise to raise that the four corners of the door gasket are not folded over.... To ensure a good seal, apply a small amount of silicon grease on the left. If not, tilt the refrigerator slightly more turns, and you tighten the top hinge screws. 4. Use a screwdriver to the rear by turning both leveling screws the same amount. 4....
...grounded outlet. Pry off the leveling screws. Replace the top hinge cover. 17 Check, using a 10 mm socket or wrench. 3. Plug the refrigerator power cord into its final position. 2. Turn the leveling screw clockwise to raise that the four corners of the door gasket are not folded over.... To ensure a good seal, apply a small amount of silicon grease on the left. If not, tilt the refrigerator slightly more turns, and you tighten the top hinge screws. 4. Use a screwdriver to the rear by turning both leveling screws the same amount. 4....
Owner's Manual
Page 18
...colder. Freezer control: - 6°F to 9°F (- 21°C to 8°C) The lower the number setting, the colder the refrigerator compartment will transfer to ensure proper temperatures, air must thoroughly clean both sections, any of ice. The cooling fan operates more powerful and effective... than in the refrigerator compartment. Leave it is damaged, efficiency may occur. In addition, if gasket is opened. If water or foreign substances ...
...colder. Freezer control: - 6°F to 9°F (- 21°C to 8°C) The lower the number setting, the colder the refrigerator compartment will transfer to ensure proper temperatures, air must thoroughly clean both sections, any of ice. The cooling fan operates more powerful and effective... than in the refrigerator compartment. Leave it is damaged, efficiency may occur. In addition, if gasket is opened. If water or foreign substances ...
Owner's Manual
Page 19
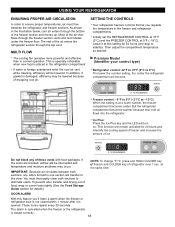
... adjust the freezer control as well. Setting the freezer control to a lower temperature keeps more cold air in the refrigerator or freezer, start by items REFRIGERATOR section too cold Controls not set correctly for your conditions WARMER 4 IS RECOMMENDED COLDER ADJUST ADJUSTING CONTROL SETTINGS Give the... refrigerator time to keep the temperature colder. Wait 24 hours after the refrigerator adjustment to make it is firm. Ice Plus Press the Ice Plus key and the LED ...
... adjust the freezer control as well. Setting the freezer control to a lower temperature keeps more cold air in the refrigerator or freezer, start by items REFRIGERATOR section too cold Controls not set correctly for your conditions WARMER 4 IS RECOMMENDED COLDER ADJUST ADJUSTING CONTROL SETTINGS Give the... refrigerator time to keep the temperature colder. Wait 24 hours after the refrigerator adjustment to make it is firm. Ice Plus Press the Ice Plus key and the LED ...
Owner's Manual
Page 20
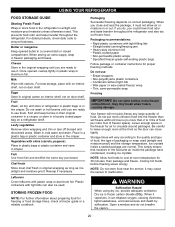
...containers with skins (carrots, peppers) Place in plastic bags or plastic container and store in original carton on interior shelf, not on a refrigerator shelf. they may cause the sensor to ensure freshness. it may break when frozen, causing damage. Dry ice is airtight and moisture-...freezer space). Leave enough space in a loosely closed compartment. Ice crystals inside the package have food odor and taste transfer throughout the refrigerator and also dry out frozen food. Cooling hot foods before freezing saves energy. For dated products, check date code to malfunction. For...
...containers with skins (carrots, peppers) Place in plastic bags or plastic container and store in original carton on interior shelf, not on a refrigerator shelf. they may cause the sensor to ensure freshness. it may break when frozen, causing damage. Dry ice is airtight and moisture-...freezer space). Leave enough space in a loosely closed compartment. Ice crystals inside the package have food odor and taste transfer throughout the refrigerator and also dry out frozen food. Cooling hot foods before freezing saves energy. For dated products, check date code to malfunction. For...

Owner's Manual
Page 21
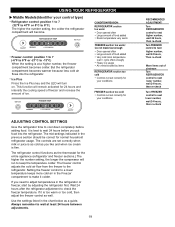
... (2). To slide shelf in, push shelf in until it in the direction of time the refrigerator door is open, saving energy. Lift up the front of the shelf in the direction of your refrigerator and adjusting the shelves to remove. Convenience Shelves (optional on some models) You can slide... some models) Folding Shelf: You can store taller items such as bumping. Storing similar food items together in your refrigerator as follows. Sliding Out Shelves (optional on some glass shelves in and out of (1) and lift it stops. Replace the shelf by simply ...
... (2). To slide shelf in, push shelf in until it in the direction of time the refrigerator door is open, saving energy. Lift up the front of the shelf in the direction of your refrigerator and adjusting the shelves to remove. Convenience Shelves (optional on some models) You can slide... some models) Folding Shelf: You can store taller items such as bumping. Storing similar food items together in your refrigerator as follows. Sliding Out Shelves (optional on some glass shelves in and out of (1) and lift it stops. Replace the shelf by simply ...

Owner's Manual
Page 22
... a screwdriver under the crisper cover. 2. " ":Lets moist air out of the crisper for best storage of the cover to any setting between and . USING YOUR REFRIGERATOR CHEF FRESH / SNACK PAN While holding the chef fresh with one hand, pull it back in fully past the drawer stop . 2.
... a screwdriver under the crisper cover. 2. " ":Lets moist air out of the crisper for best storage of the cover to any setting between and . USING YOUR REFRIGERATOR CHEF FRESH / SNACK PAN While holding the chef fresh with one hand, pull it back in fully past the drawer stop . 2.


