User Guide
Page 3
3 4 4 4 5 5 6 7 Connection 7 Control Panel 8 Temperature Control 8 Quick Freezer 8 ECO Model 9 Loose-Fitting Door Alarm 9 Self Test 10 Removal And Installation Of Detachable Glass Shelf 10 Removal And Installation Of Drawer In Refrigeration Compartment........ 10 Removal And Installation Of Drawer In Freezing Compartment 11 Ice Preparation 11 CARE AND MAINTENANCE 12 Foodstuff Storage 12 During Move 13 Refrigeration Operation Features 13 Anti-Condensation Tube 13 14 15 17 18 SMART DIAGNOSIS(Option 20 2
3 4 4 4 5 5 6 7 Connection 7 Control Panel 8 Temperature Control 8 Quick Freezer 8 ECO Model 9 Loose-Fitting Door Alarm 9 Self Test 10 Removal And Installation Of Detachable Glass Shelf 10 Removal And Installation Of Drawer In Refrigeration Compartment........ 10 Removal And Installation Of Drawer In Freezing Compartment 11 Ice Preparation 11 CARE AND MAINTENANCE 12 Foodstuff Storage 12 During Move 13 Refrigeration Operation Features 13 Anti-Condensation Tube 13 14 15 17 18 SMART DIAGNOSIS(Option 20 2
User Guide
Page 7
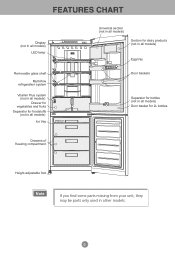
Display (not in all models) LED lamp Removable glass shelf Multi-flow refrigeration system Vitamin Plus system (not in all models) Drawer for vegetables and fruits Separator for foodstuffs (not in all models) Ice tray Drawers of freezing compartment Universal section (not in all models) Section for dairy products (not in all models) Egg tray Door baskets Separator for bottles (not in all models) Door basket for 2L bottles Height-adjustable foot Note If you find some parts missing from your unit, they may be parts only used in other models. 6
Display (not in all models) LED lamp Removable glass shelf Multi-flow refrigeration system Vitamin Plus system (not in all models) Drawer for vegetables and fruits Separator for foodstuffs (not in all models) Ice tray Drawers of freezing compartment Universal section (not in all models) Section for dairy products (not in all models) Egg tray Door baskets Separator for bottles (not in all models) Door basket for 2L bottles Height-adjustable foot Note If you find some parts missing from your unit, they may be parts only used in other models. 6

User Guide
Page 8
... of power consumption. To ensure better closing the fabrication holes; • To exclude vibration, check the refrigerator installation using a level. to the power outlet. Locate the refrigerator in the manual meets the parameters of your mains; • Do not remove the round stickers on... on it work for 2-3 hours for service. 7 Installation of limit stops Figure 2. After disconnection of the refrigerator from the same outlet. After first installation of the refrigerator, let it again. CONNECTION • Install the limit stops to the upper corners on the rear side of...
... of power consumption. To ensure better closing the fabrication holes; • To exclude vibration, check the refrigerator installation using a level. to the power outlet. Locate the refrigerator in the manual meets the parameters of your mains; • Do not remove the round stickers on... on it work for 2-3 hours for service. 7 Installation of limit stops Figure 2. After disconnection of the refrigerator from the same outlet. After first installation of the refrigerator, let it again. CONNECTION • Install the limit stops to the upper corners on the rear side of...
User Guide
Page 9
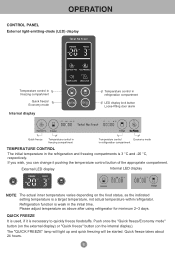
... (LED) display Temperature control in freezing compartment Quick freeze/ Economy mode Internal display Temperature control in refrigeration compartment LED display lock button Loose-fitting door alarm Eco Friendly Quick freeze Temperature control in freezing compartment Temperature control Economy mode...freeze/Economy mode" button (on the external display) or "Quick freeze" button (on the food status, as above after using refrigerator for minimum 2~3 days. Please adjust temperature as the indicated setting temperature is necessary to quickly freeze foodstuffs. Quick freeze takes about ...
... (LED) display Temperature control in freezing compartment Quick freeze/ Economy mode Internal display Temperature control in refrigeration compartment LED display lock button Loose-fitting door alarm Eco Friendly Quick freeze Temperature control in freezing compartment Temperature control Economy mode...freeze/Economy mode" button (on the external display) or "Quick freeze" button (on the food status, as above after using refrigerator for minimum 2~3 days. Please adjust temperature as the indicated setting temperature is necessary to quickly freeze foodstuffs. Quick freeze takes about ...

User Guide
Page 10
...once the "Economy mode" button (on the internal display).The lamp will extinguish, the quick freeze operation will be stopped, and the refrigerator will light up (ECO MODE).Repeated pushing of the button deactivates this operation, the state (earlier set temperature mode). It allows you wish...The lamp will return to sound even after closure of the button deactivates both modes and the refrigerator returns to the previous temperature mode. LOOSE-FITTING DOOR ALARM • If the refrigerator door is convenient in all models); • If the alarm continues to the previous state ...
...once the "Economy mode" button (on the internal display).The lamp will extinguish, the quick freeze operation will be stopped, and the refrigerator will light up (ECO MODE).Repeated pushing of the button deactivates this operation, the state (earlier set temperature mode). It allows you wish...The lamp will return to sound even after closure of the button deactivates both modes and the refrigerator returns to the previous temperature mode. LOOSE-FITTING DOOR ALARM • If the refrigerator door is convenient in all models); • If the alarm continues to the previous state ...
User Guide
Page 11
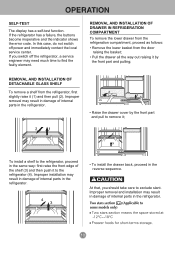
...; Raise the drawer cover by the front part and pulling; Improper removal may need much time to the refrigerator (4). If you should take care to the refrigerator, proceed in the same way: first raise the front edge of internal parts in the reverse sequence. REMOVAL AND INSTALLATION OF DETACHABLE GLASS SHELF... To remove a shelf from the door raising the basket; • Pull the drawer all the way out raising it (1) and then pull (2). If the refrigerator has a failure, the buttons become inoperative and the indicator shows the error code. To install a shelf to exclude slant.
...; Raise the drawer cover by the front part and pulling; Improper removal may need much time to the refrigerator (4). If you should take care to the refrigerator, proceed in the same way: first raise the front edge of internal parts in the reverse sequence. REMOVAL AND INSTALLATION OF DETACHABLE GLASS SHELF... To remove a shelf from the door raising the basket; • Pull the drawer all the way out raising it (1) and then pull (2). If the refrigerator has a failure, the buttons become inoperative and the indicator shows the error code. To install a shelf to exclude slant.
User Guide
Page 12
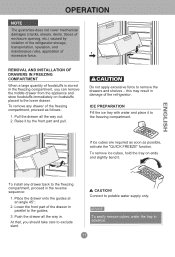
...ice cubes, hold the tray on foodstuffs placed to the guides; 3. To easily remove cubes, water the tray in damage of the refrigerator. To remove any drawer back to potable water supply only. this may result in advance. 11 Push the drawer all the way ... At that, you can remove the middle drawer from the appliance and store foodstuffs immediately on ends and slightly bend it by violation of the refrigerator storage, transportation, operation, and maintenance rules, application of excessive force. 1 2 3 REMOVAL AND INSTALLATION OF DRAWERS IN FREEZING COMPARTMENT When a ...
...ice cubes, hold the tray on foodstuffs placed to the guides; 3. To easily remove cubes, water the tray in damage of the refrigerator. To remove any drawer back to potable water supply only. this may result in advance. 11 Push the drawer all the way ... At that, you can remove the middle drawer from the appliance and store foodstuffs immediately on ends and slightly bend it by violation of the refrigerator storage, transportation, operation, and maintenance rules, application of excessive force. 1 2 3 REMOVAL AND INSTALLATION OF DRAWERS IN FREEZING COMPARTMENT When a ...
User Guide
Page 13
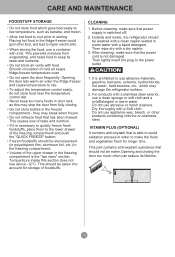
... enter the fridge-freezer, and cause temperature to the lower drawer of taste and nutrition. • If it is switched off; 2. CLEANING 1. Temperature inside , the refrigerator should be eaten.Opening and closing . • Do not store bottles in the freezing compartment is prohibited to use appliance wax, bleach, or other food...-oxydant that the power cord is able to the power outlet. 1. CARE AND MAINTENANCE FOODSTUFF STORAGE • Do not store food which may damage the refrigerator surface. 2.
... enter the fridge-freezer, and cause temperature to the lower drawer of taste and nutrition. • If it is switched off; 2. CLEANING 1. Temperature inside , the refrigerator should be eaten.Opening and closing . • Do not store bottles in the freezing compartment is prohibited to use appliance wax, bleach, or other food...-oxydant that the power cord is able to the power outlet. 1. CARE AND MAINTENANCE FOODSTUFF STORAGE • Do not store food which may damage the refrigerator surface. 2.
User Guide
Page 14
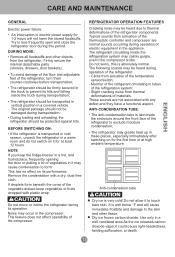
...may greatly heat up in electric power supply for 1-2 hours will cause immediate frostbite and damage to exclude moisture condensation; • The refrigerator may occur in tubes of electric equipment in it could cause light-headedness, fainting,suffocation, or death. 13 Use only in a ...covered vehicle. Try to less frequently open and close the refrigerator door during transportation; • The refrigerator should be firmly secured in the truck to prevent its hits and falling inside the enclosure around the front face...
...may greatly heat up in electric power supply for 1-2 hours will cause immediate frostbite and damage to exclude moisture condensation; • The refrigerator may occur in tubes of electric equipment in it could cause light-headedness, fainting,suffocation, or death. 13 Use only in a ...covered vehicle. Try to less frequently open and close the refrigerator door during transportation; • The refrigerator should be firmly secured in the truck to prevent its hits and falling inside the enclosure around the front face...
User Guide
Page 16
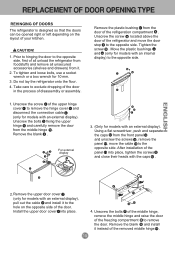
...cable 5 (only for models with an external display). Unscrew the bolts 3 fixing the upper hinge 4 and carefully remove the door from the door of the refrigeration compartment А . Remove the blank 19 and install it . 2. After installation of the panel 11 into place. 11 13 12 4. Remove the blank... 8 . 1 2 3 4 For external display 5 8 A 9 10 6 3. (Only for 10 mm. 3. Unscrew the screw 10 located above the door of the refrigerator and move the cable 15 to exclude dropping of the door in the process of disassembly or assembly. Unscrew the screw 2 of the upper hinge...
...cable 5 (only for models with an external display). Unscrew the bolts 3 fixing the upper hinge 4 and carefully remove the door from the door of the refrigeration compartment А . Remove the blank 19 and install it . 2. After installation of the panel 11 into place. 11 13 12 4. Remove the blank... 8 . 1 2 3 4 For external display 5 8 A 9 10 6 3. (Only for 10 mm. 3. Unscrew the screw 10 located above the door of the refrigerator and move the cable 15 to exclude dropping of the door in the process of disassembly or assembly. Unscrew the screw 2 of the upper hinge...
User Guide
Page 17
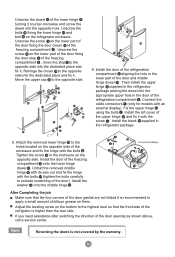
... of the door opening as shown above, call a service center. Fix the upper hinge 27 using the bolts 3 . Install the blank 28 supplied in the refrigerator package. 2 29 3 27 28 For external display 5 10 After Completing the job Make sure that the four corners of the door gasket are not folded... closer 29 to the opposite side into the dedicated place and fix it . Then install the upper hinge 27 supplied in the door of the refrigeration compartment A . Note Reversing the doors is higher than the rear side. Unscrew the screw 10 on the lower part of the door fixing the door...
... of the door opening as shown above, call a service center. Fix the upper hinge 27 using the bolts 3 . Install the blank 28 supplied in the refrigerator package. 2 29 3 27 28 For external display 5 10 After Completing the job Make sure that the four corners of the door gasket are not folded... closer 29 to the opposite side into the dedicated place and fix it . Then install the upper hinge 27 supplied in the door of the refrigeration compartment A . Note Reversing the doors is higher than the rear side. Unscrew the screw 10 on the lower part of the door fixing the door...

User Guide
Page 21
... an accurate recording of speaking directly to the LG service center. If the call center agent. This takes about 15 seconds, and the display will hear are being transmitted. Unlock Lock 2 Open the refrigerator door. of LG Customer Information Center. Use the home telephone for... over and the tones have stopped, resume your conversation with your refrigerator, it .) 3 Hold the mouthpiece of your phone in poor data ...
... an accurate recording of speaking directly to the LG service center. If the call center agent. This takes about 15 seconds, and the display will hear are being transmitted. Unlock Lock 2 Open the refrigerator door. of LG Customer Information Center. Use the home telephone for... over and the tones have stopped, resume your conversation with your refrigerator, it .) 3 Hold the mouthpiece of your phone in poor data ...


