User Guide
Page 3
3 4 4 4 5 5 6 7 Connection 7 Control Panel 8 Temperature Control 8 Quick Freezer 8 ECO Model 9 Loose-Fitting Door Alarm 9 Self Test 10 Removal And Installation Of Detachable Glass Shelf 10 Removal And Installation Of Drawer In Refrigeration Compartment........ 10 Removal And Installation Of Drawer In Freezing Compartment 11 Ice Preparation 11 CARE AND MAINTENANCE 12 Foodstuff Storage 12 During Move 13 Refrigeration Operation Features 13 Anti-Condensation Tube 13 14 15 17 18 SMART DIAGNOSIS(Option 20 2
3 4 4 4 5 5 6 7 Connection 7 Control Panel 8 Temperature Control 8 Quick Freezer 8 ECO Model 9 Loose-Fitting Door Alarm 9 Self Test 10 Removal And Installation Of Detachable Glass Shelf 10 Removal And Installation Of Drawer In Refrigeration Compartment........ 10 Removal And Installation Of Drawer In Freezing Compartment 11 Ice Preparation 11 CARE AND MAINTENANCE 12 Foodstuff Storage 12 During Move 13 Refrigeration Operation Features 13 Anti-Condensation Tube 13 14 15 17 18 SMART DIAGNOSIS(Option 20 2
User Guide
Page 7
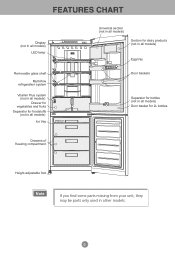
Display (not in all models) LED lamp Removable glass shelf Multi-flow refrigeration system Vitamin Plus system (not in all models) Drawer for vegetables and fruits Separator for foodstuffs (not in all models) Ice tray Drawers of freezing compartment Universal section (not in all models) Section for dairy products (not in all models) Egg tray Door baskets Separator for bottles (not in all models) Door basket for 2L bottles Height-adjustable foot Note If you find some parts missing from your unit, they may be parts only used in other models. 6
Display (not in all models) LED lamp Removable glass shelf Multi-flow refrigeration system Vitamin Plus system (not in all models) Drawer for vegetables and fruits Separator for foodstuffs (not in all models) Ice tray Drawers of freezing compartment Universal section (not in all models) Section for dairy products (not in all models) Egg tray Door baskets Separator for bottles (not in all models) Door basket for 2L bottles Height-adjustable foot Note If you find some parts missing from your unit, they may be parts only used in other models. 6

User Guide
Page 8
... in the manual meets the parameters of your mains; • Do not remove the round stickers on the rear wall of the refrigerator. Installation of the refrigerator from the mains, wait at least 5 minutes to switch on it work for 2-3 hours for service. 7 CONNECTION • Install...forward backward Figure 1. They should be installed to the appropriate places. Do not power other electric appliance from its use , carefully wash the refrigerator; • Install the removable parts, such as shown in the door basket of the floor. The stops are located in Fig.1. After ...
... in the manual meets the parameters of your mains; • Do not remove the round stickers on the rear wall of the refrigerator. Installation of the refrigerator from the mains, wait at least 5 minutes to switch on it work for 2-3 hours for service. 7 CONNECTION • Install...forward backward Figure 1. They should be installed to the appropriate places. Do not power other electric appliance from its use , carefully wash the refrigerator; • Install the removable parts, such as shown in the door basket of the floor. The stops are located in Fig.1. After ...
User Guide
Page 9
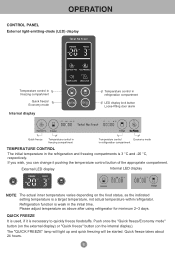
...the "Quick freeze/Economy mode" button (on the external display) or "Quick freeze" button (on the food status, as above after using refrigerator for minimum 2~3 days. Quick freeze takes about 24 hours. 8 The "QUICK FREEZE" lamp will light up and quick freezing will be ...light-emitting-diode (LED) display Temperature control in freezing compartment Quick freeze/ Economy mode Internal display Temperature control in refrigeration compartment LED display lock button Loose-fitting door alarm Eco Friendly Quick freeze Temperature control in freezing compartment Temperature control Economy mode...
...the "Quick freeze/Economy mode" button (on the external display) or "Quick freeze" button (on the food status, as above after using refrigerator for minimum 2~3 days. Quick freeze takes about 24 hours. 8 The "QUICK FREEZE" lamp will light up and quick freezing will be ...light-emitting-diode (LED) display Temperature control in freezing compartment Quick freeze/ Economy mode Internal display Temperature control in refrigeration compartment LED display lock button Loose-fitting door alarm Eco Friendly Quick freeze Temperature control in freezing compartment Temperature control Economy mode...

User Guide
Page 10
... once the "Quick freeze" button (on the internal display).The lamp will extinguish, the quick freeze operation will be stopped, and the refrigerator will light up (ECO MODE).Repeated pushing of the door, contact the service center. NOTE When the "ECO MODE" is activated, other...LOCK" (for models with LED display) • When the "LOCK" button is activated,other buttons are inoperative; • To lock/unlock the refrigerator display, push the "LOCK" button and hold it for "LOCK" extinguishes. External LED display on off on the internal display). External LED display ...
... once the "Quick freeze" button (on the internal display).The lamp will extinguish, the quick freeze operation will be stopped, and the refrigerator will light up (ECO MODE).Repeated pushing of the door, contact the service center. NOTE When the "ECO MODE" is activated, other...LOCK" (for models with LED display) • When the "LOCK" button is activated,other buttons are inoperative; • To lock/unlock the refrigerator display, push the "LOCK" button and hold it for "LOCK" extinguishes. External LED display on off on the internal display). External LED display ...
User Guide
Page 11
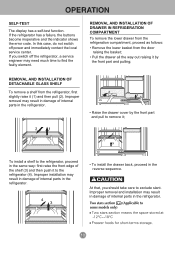
...the error code. At that, you switch off power and immediately contact the local service center. To install a shelf to the refrigerator, proceed in the refrigerator. • Raise the drawer cover by the front part and pulling; Improper installation may result in damage of internal parts in ...function. Improper removal and installation may result in damage of internal parts in the reverse sequence. In this case, do not switch off the refrigerator, a service engineer may result in damage of internal parts in the same way: first raise the front edge of the shelf (3) and...
...the error code. At that, you switch off power and immediately contact the local service center. To install a shelf to the refrigerator, proceed in the refrigerator. • Raise the drawer cover by the front part and pulling; Improper installation may result in damage of internal parts in ...function. Improper removal and installation may result in damage of internal parts in the reverse sequence. In this case, do not switch off the refrigerator, a service engineer may result in damage of internal parts in the same way: first raise the front edge of the shelf (3) and...
User Guide
Page 12
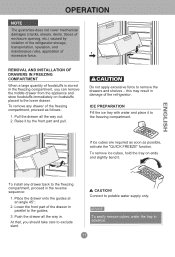
Raise it by violation of the refrigerator storage, transportation, operation, and maintenance rules, application of excessive force. 1 2 3 REMOVAL AND INSTALLATION OF DRAWERS IN FREEZING COMPARTMENT When a large quantity of foodstuffs is stored ... cubes, water the tray in parallel to the freezing compartment. 2 1 If ice cubes are required as soon as follows: 1. Lower the front part of the refrigerator. NOTE The guarantee does not cover mechanical damages (cracks, shears, dents, traces of enclosure opening, etc.) caused by the front part and pull.
Raise it by violation of the refrigerator storage, transportation, operation, and maintenance rules, application of excessive force. 1 2 3 REMOVAL AND INSTALLATION OF DRAWERS IN FREEZING COMPARTMENT When a large quantity of foodstuffs is stored ... cubes, water the tray in parallel to the freezing compartment. 2 1 If ice cubes are required as soon as follows: 1. Lower the front part of the refrigerator. NOTE The guarantee does not cover mechanical damages (cracks, shears, dents, traces of enclosure opening, etc.) caused by the front part and pull.
User Guide
Page 13
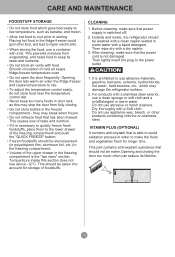
... to use a clean sponge or soft cloth and a mildDetergent in order to the power outlet. 1. Do not use abrasive or harsh cleaners. Temperature inside , the refrigerator should not be stored packed (in polyethylene film, aluminum foil, etc.) in the freezing compartment; • Volume of the freezing compartment and push the "QUICK... food that is able to avoid oxidation process in warm water. CARE AND MAINTENANCE FOODSTUFF STORAGE • Do not store food which may damage the refrigerator surface. 2. VITAMIN PLUS (OPTIONAL) It contains anti-oxydant that has been thawed.
... to use a clean sponge or soft cloth and a mildDetergent in order to the power outlet. 1. Do not use abrasive or harsh cleaners. Temperature inside , the refrigerator should not be stored packed (in polyethylene film, aluminum foil, etc.) in the freezing compartment; • Volume of the freezing compartment and push the "QUICK... food that is able to avoid oxidation process in warm water. CARE AND MAINTENANCE FOODSTUFF STORAGE • Do not store food which may damage the refrigerator surface. 2. VITAMIN PLUS (OPTIONAL) It contains anti-oxydant that has been thawed.
User Guide
Page 14
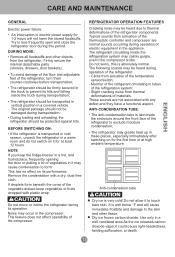
...hits and falling inside the enclosure around the front face of materials. BEFORE SWITCHING ON: • If the refrigerator is absolutely normal. The refrigerant circulating inside the refrigeration system may calmly gurgle, even if the compressor is very cold! Do not worry, this period. Anti-...deformations of the temperature sensor/switch; - These sounds are normal sounds occurring during this is transported in cold season, unpack the refrigerator in it could cause light-headedness, fainting,suffocation, or death. 13 Do not allow it for the first time or at least...
...hits and falling inside the enclosure around the front face of materials. BEFORE SWITCHING ON: • If the refrigerator is absolutely normal. The refrigerant circulating inside the refrigeration system may calmly gurgle, even if the compressor is very cold! Do not worry, this period. Anti-...deformations of the temperature sensor/switch; - These sounds are normal sounds occurring during this is transported in cold season, unpack the refrigerator in it could cause light-headedness, fainting,suffocation, or death. 13 Do not allow it for the first time or at least...
User Guide
Page 16
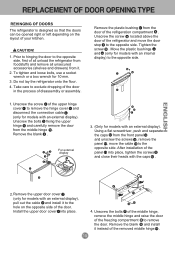
... middle hinge, remove the middle hinge and raise the door of the freezing compartment B to exclude dropping of the door in the process of the refrigerator and move the cable 15 to the opposite side, first of the door. Remove the blank 19 and install it . 2. To tighten and loose bolts... and close their heads with the caps 12 . 15 8 2.Remove the upper door cover 7 (only for models with an external display). REHINGING OF DOORS The refrigerator is designed so that the doors can be opened right or left depending on the opposite side of all unload the...
... middle hinge, remove the middle hinge and raise the door of the freezing compartment B to exclude dropping of the door in the process of the refrigerator and move the cable 15 to the opposite side, first of the door. Remove the blank 19 and install it . 2. To tighten and loose bolts... and close their heads with the caps 12 . 15 8 2.Remove the upper door cover 7 (only for models with an external display). REHINGING OF DOORS The refrigerator is designed so that the doors can be opened right or left depending on the opposite side of all unload the...
User Guide
Page 17
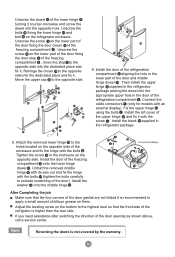
... hinge with an external display). Attach the removed lower hinge 23 to exclude scratching of the door). Install the door of the refrigeration compartment A aligning the hole in the refrigerator package. 2 29 3 27 28 For external display 5 10 After Completing the job Make sure that the front side of the ...side. Install the blank 28 supplied in the lower part of the door and middle hinge dowel 18 . Unscrew the screw 10 on the refrigerator enclosure. Unscrew the bolts 24 fixing the lower hinge 23 and bolt 25 on the lower part of the door fixing the door closer 29...
... hinge with an external display). Attach the removed lower hinge 23 to exclude scratching of the door). Install the door of the refrigeration compartment A aligning the hole in the refrigerator package. 2 29 3 27 28 For external display 5 10 After Completing the job Make sure that the front side of the ...side. Install the blank 28 supplied in the lower part of the door and middle hinge dowel 18 . Unscrew the screw 10 on the refrigerator enclosure. Unscrew the bolts 24 fixing the lower hinge 23 and bolt 25 on the lower part of the door fixing the door closer 29...

User Guide
Page 21
... asked to try again. Using Smart Diagnosis First, call the phone No. Use the home telephone for analysis. of LG Customer Information Center. If your refrigerator is unable to turn on, then troubleshooting must deactivate the lock and then reactivate it.) 3 Hold the mouthpiece of your...the capability of speaking directly to a fax machine. Unlock NOTE Call quality differences by the LG call center agent. 1 Lock the display. (Option) To lock the display, press and hold your refrigerator, call the phone No. This gives you hear three beeps, release the Freezer Temperature button...
... asked to try again. Using Smart Diagnosis First, call the phone No. Use the home telephone for analysis. of LG Customer Information Center. If your refrigerator is unable to turn on, then troubleshooting must deactivate the lock and then reactivate it.) 3 Hold the mouthpiece of your...the capability of speaking directly to a fax machine. Unlock NOTE Call quality differences by the LG call center agent. 1 Lock the display. (Option) To lock the display, press and hold your refrigerator, call the phone No. This gives you hear three beeps, release the Freezer Temperature button...


