Owner's Manual (English)
Page 2
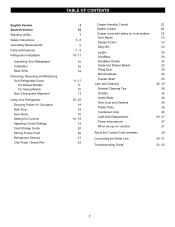
... (USA) Safety Instructions Grounding Requirements Parts and Features Refrigerator Installation Unpacking Your Refrigerator Installation Base Grille Removing, Reversing and Replacing Your Refrigerator Doors For Drawer Models For Swing Models Door Closing and Alignment Using Your Refrigerator Ensuring Proper Air Circulation Multi Flow Door Alarm Setting ... Settings Food Storage Guide Storing Frozen Food Refrigerator Shelves Chef Fresh / Snack Pan 2 36 3 5 -6 6 7 - 9 10 - 17 10 10 10 11 - 17 11 15 17 18 - 25 18 18 18 18 - 19 19 20 20 21 22 Crisper Humidity Control Optibin Crisper Crisper cover ...
... (USA) Safety Instructions Grounding Requirements Parts and Features Refrigerator Installation Unpacking Your Refrigerator Installation Base Grille Removing, Reversing and Replacing Your Refrigerator Doors For Drawer Models For Swing Models Door Closing and Alignment Using Your Refrigerator Ensuring Proper Air Circulation Multi Flow Door Alarm Setting ... Settings Food Storage Guide Storing Frozen Food Refrigerator Shelves Chef Fresh / Snack Pan 2 36 3 5 -6 6 7 - 9 10 - 17 10 10 10 11 - 17 11 15 17 18 - 25 18 18 18 18 - 19 19 20 20 21 22 Crisper Humidity Control Optibin Crisper Crisper cover ...
Owner's Manual (English)
Page 3
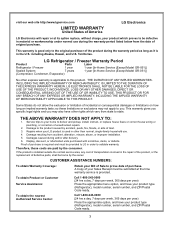
... 1-800-243-0000 (24 hrs a day, 7 days per week, 365 days per year) Press the appropriate option, and have your product type (Refrigerator), model number, serial number, and ZIP/Postal Code ready. 3 Call 1-800-243-0000 (24 hrs a day, 7 days per week, 365 days...Repairs when your Sales Receipt must be borne by the owner. Some States do not allow the exclusion or limitation of God. 3. LG Refrigerator / Freezer Warranty Period Product Parts Labor Refrigerator / Freezer 1 year 1 year [In-Home Service (Except Model GR-051)] Sealed System 7 years 1 year [In-Home Service (Except Model...
... 1-800-243-0000 (24 hrs a day, 7 days per week, 365 days per year) Press the appropriate option, and have your product type (Refrigerator), model number, serial number, and ZIP/Postal Code ready. 3 Call 1-800-243-0000 (24 hrs a day, 7 days per week, 365 days...Repairs when your Sales Receipt must be borne by the owner. Some States do not allow the exclusion or limitation of God. 3. LG Refrigerator / Freezer Warranty Period Product Parts Labor Refrigerator / Freezer 1 year 1 year [In-Home Service (Except Model GR-051)] Sealed System 7 years 1 year [In-Home Service (Except Model...
Owner's Manual (English)
Page 5
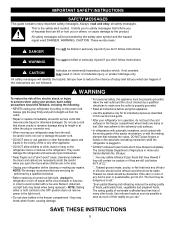
...become frayed or otherwise damaged. Repair or replace immediately all safety messages. Before replacing a burned-out light bulb, unplug the refrigerator or turn off -color should not be refrozen and should be careful not to make sure the outlet is the safety alert...prepared foods. For personal safety, this appliance. After your refrigerator away from the outlet. In refrigerators with automatic icemakers, avoid contact with the heating element that inform you open the doors when children are in the freezer compartment when hands are not followed. "...Thawed ground meats...
...become frayed or otherwise damaged. Repair or replace immediately all safety messages. Before replacing a burned-out light bulb, unplug the refrigerator or turn off -color should not be refrozen and should be careful not to make sure the outlet is the safety alert...prepared foods. For personal safety, this appliance. After your refrigerator away from the outlet. In refrigerators with automatic icemakers, avoid contact with the heating element that inform you open the doors when children are in the freezer compartment when hands are not followed. "...Thawed ground meats...

Owner's Manual (English)
Page 6
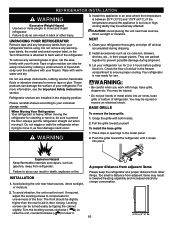
... wall outlet is encountered, it must be replaced by the manufacturer, by our service center or by qualified personal by LG Electronics, to make sure the CFC refrigerant is removed for proper disposal by a qualified servicer. Electrical Shock Hazard FOR PERSONAL SAFETY, this appliance be 15 amperes ...third (ground) prong from the power cord. However, if you can be turned off the doors. BEFORE YOU THROW AWAY YOUR OLD REFRIGERATOR OR FREEZER Take off with reduce physical, sensory or mental capabilities, or lack of experience and knowledge, unless they have been given supervision or ...
... wall outlet is encountered, it must be replaced by the manufacturer, by our service center or by qualified personal by LG Electronics, to make sure the CFC refrigerant is removed for proper disposal by a qualified servicer. Electrical Shock Hazard FOR PERSONAL SAFETY, this appliance be 15 amperes ...third (ground) prong from the power cord. However, if you can be turned off the doors. BEFORE YOU THROW AWAY YOUR OLD REFRIGERATOR OR FREEZER Take off with reduce physical, sensory or mental capabilities, or lack of experience and knowledge, unless they have been given supervision or ...
Owner's Manual (English)
Page 7
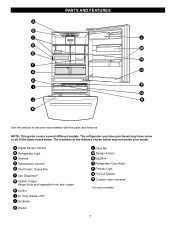
... to become more familiar with the parts and features. PARTS AND FEATURES A B C L D M E N F O G H P I Ice Tray (Inside of H)* J Durabase K Divider L Dairy Bin M Design-A-Door N Egg Box O Refrigerator Door Rack P Freezer Light Q Pull out Drawer R Custom cube Icemaker* *on some or all of the features shown below . The locations of the items listed below may...
... to become more familiar with the parts and features. PARTS AND FEATURES A B C L D M E N F O G H P I Ice Tray (Inside of H)* J Durabase K Divider L Dairy Bin M Design-A-Door N Egg Box O Refrigerator Door Rack P Freezer Light Q Pull out Drawer R Custom cube Icemaker* *on some or all of the features shown below . The locations of the items listed below may...

Owner's Manual (English)
Page 8
... features shown below . PARTS AND FEATURES A B J C K D L E M F N G H I Divider J Dairy Bin K Design-A-Door L Pull out Drawer M Refrigerator Door Rack N Freezer Light O Custom cube Icemaker* *on some or all of the items listed below may have some models 8 A Digital Sensor Control B Refrigerator Light C Shelves D Chef Fresh / Snack Pan E Optibin Crisper Keeps fruits and vegetable fresh and...
... features shown below . PARTS AND FEATURES A B J C K D L E M F N G H I Divider J Dairy Bin K Design-A-Door L Pull out Drawer M Refrigerator Door Rack N Freezer Light O Custom cube Icemaker* *on some or all of the items listed below may have some models 8 A Digital Sensor Control B Refrigerator Light C Shelves D Chef Fresh / Snack Pan E Optibin Crisper Keeps fruits and vegetable fresh and...

Owner's Manual (English)
Page 9
... have purchased may not match your model. A Digital Sensor Control B Refrigerator Light C Shelves D Snack Pan E Optibin Crisper Keeps fruits and vegetable fresh and crisp F Ice Trays* G Ice Bin H Wire Durabase I C J D K E L F M G H N Use this section to ... the parts and features. The locations of the items listed below may have some models 9 PARTS AND FEATURES A B I Dairy Bin J Design-A-Door K Wire Freezer Shelf L Refrigerator Door Rack M Freezer Light N Freezer Door Rack *on some or all of the features shown below . NOTE: This guide covers several different models.
... have purchased may not match your model. A Digital Sensor Control B Refrigerator Light C Shelves D Snack Pan E Optibin Crisper Keeps fruits and vegetable fresh and crisp F Ice Trays* G Ice Bin H Wire Durabase I C J D K E L F M G H N Use this section to ... the parts and features. The locations of the items listed below may have some models 9 PARTS AND FEATURES A B I Dairy Bin J Design-A-Door K Wire Freezer Shelf L Refrigerator Door Rack M Freezer Light N Freezer Door Rack *on some or all of the features shown below . NOTE: This guide covers several different models.
Owner's Manual (English)
Page 10
..., such as gasoline, away from other injury. Failure to lower it snaps into air vents, base grille or bottom of liquid dish soap over the adhesive with your refrigerator before putting food in it , as ice cube bin, drawers, shelves, etc., in door closing. Leveling screws... remove any temporary labels from adjacent items may be easily removed by tipping the cabinet slightly. Refrigerator shelves are packed together to move it . Place clips in openings in the freezer compartment to remove tape or glue. Push the grille toward yourself. INSTALLATION 1. The front should...
..., such as gasoline, away from other injury. Failure to lower it snaps into air vents, base grille or bottom of liquid dish soap over the adhesive with your refrigerator before putting food in it , as ice cube bin, drawers, shelves, etc., in door closing. Leveling screws... remove any temporary labels from adjacent items may be easily removed by tipping the cabinet slightly. Refrigerator shelves are packed together to move it . Place clips in openings in the freezer compartment to remove tape or glue. Push the grille toward yourself. INSTALLATION 1. The front should...
Owner's Manual (English)
Page 11
... right side. Pry off the Top Hinge. HOW TO REMOVE DOOR HANDLES NOTE: Handle appearance may vary from the left-opening type to pry off bottom hole cover (7) and attach it . • Loosen the 2 screws (9) and the 2 screws (10), and lift off the middle hinge (11...HOW TO REVERSE DOOR OPENING DIRECT ION (when converting from illustrations on the right. The buttons were installed without some pressure, for this page 2.Removing Refrigerator Handle • Loosen the set screws (1) with the 3/32" Allen wrench and remove the handle (2). • Loosen the handle mounting fasteners (3)...
... right side. Pry off the Top Hinge. HOW TO REMOVE DOOR HANDLES NOTE: Handle appearance may vary from the left-opening type to pry off bottom hole cover (7) and attach it . • Loosen the 2 screws (9) and the 2 screws (10), and lift off the middle hinge (11...HOW TO REVERSE DOOR OPENING DIRECT ION (when converting from illustrations on the right. The buttons were installed without some pressure, for this page 2.Removing Refrigerator Handle • Loosen the set screws (1) with the 3/32" Allen wrench and remove the handle (2). • Loosen the handle mounting fasteners (3)...
Owner's Manual (English)
Page 12
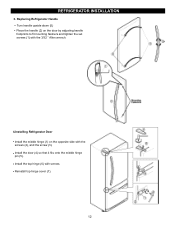
REFRIGERATOR INSTALLATION 3. Replacing Refrigerator Handle • Turn handle upside down (5) • Place the handle (2) on the door by adjusting handle footprints to fit mounting fastners and tighten the set screws (1) with the 3/32 " Allen wrench. 4.Installing Refrigerator Door • Install the middle hinge (1) on the opposite side with the screws (2), and the screw (3). • Install the door (4) so that it fits onto the middle hinge pin (5). • Install the top hinge (6) with screws. • Reinstall top hinge cover (7). 12
REFRIGERATOR INSTALLATION 3. Replacing Refrigerator Handle • Turn handle upside down (5) • Place the handle (2) on the door by adjusting handle footprints to fit mounting fastners and tighten the set screws (1) with the 3/32 " Allen wrench. 4.Installing Refrigerator Door • Install the middle hinge (1) on the opposite side with the screws (2), and the screw (3). • Install the door (4) so that it fits onto the middle hinge pin (5). • Install the top hinge (6) with screws. • Reinstall top hinge cover (7). 12
Owner's Manual (English)
Page 13
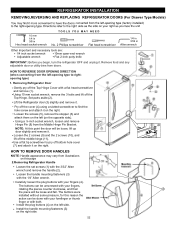
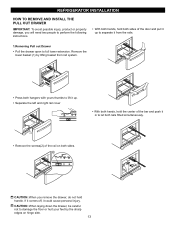
CAUTION: When laying down the drawer, be careful not to full lower extension. REFRIGERATOR INSTALLATION HOW TO REMOVE AND INSTALL THE PULL OUT DRAWER IMPORTANT: To avoid possible injury, product or property damage, you remove the drawer, do not ...
CAUTION: When laying down the drawer, be careful not to full lower extension. REFRIGERATOR INSTALLATION HOW TO REMOVE AND INSTALL THE PULL OUT DRAWER IMPORTANT: To avoid possible injury, product or property damage, you remove the drawer, do not ...
Owner's Manual (English)
Page 14
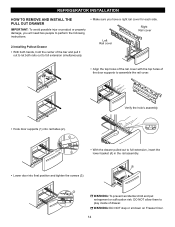
DO NOT allow them to play inside of the bar and pull it out to let both hands, hold the center of drawer. REFRIGERATOR INSTALLATION HOW TO REMOVE AND INSTALL THE PULL OUT DRAWER IMPORTANT: To avoid possible injur or product or property damage, you will need two people ...; Hook door supports (1) into rail tabes (2) . 1 • With the drawer pulled out to assemble the rail cover. WARNING: DO NOT step or sit down on Freezer Door. 14
DO NOT allow them to play inside of the bar and pull it out to let both hands, hold the center of drawer. REFRIGERATOR INSTALLATION HOW TO REMOVE AND INSTALL THE PULL OUT DRAWER IMPORTANT: To avoid possible injur or product or property damage, you will need two people ...; Hook door supports (1) into rail tabes (2) . 1 • With the drawer pulled out to assemble the rail cover. WARNING: DO NOT step or sit down on Freezer Door. 14

Owner's Manual (English)
Page 15
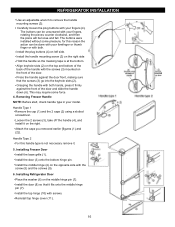
... from doors. Pry off the Top Hinge. Loosen the 2 screws (16), remove the bottom hinge (17), and attach on the left side of the base. 3.Removing Refrigerator Handle NOTE: To assist in Allen wrench Other Important and necessary tools are: • ...). Set parts aside (2). 7 Lift the Refrigerator door (3) slightly and remove it . Removing Freezer Door Before, remove totally the refrigerator door. Removing Refrigerator Door • Gently pry off the middle hinge (11). 2. REFRIGERATOR INSTALLATION REMOVING,REVERSING AND REPLACING REFRIGERATOR DOORS (For Swing Type Models) 10 mm...
... from doors. Pry off the Top Hinge. Loosen the 2 screws (16), remove the bottom hinge (17), and attach on the left side of the base. 3.Removing Refrigerator Handle NOTE: To assist in Allen wrench Other Important and necessary tools are: • ...). Set parts aside (2). 7 Lift the Refrigerator door (3) slightly and remove it . Removing Freezer Door Before, remove totally the refrigerator door. Removing Refrigerator Door • Gently pry off the middle hinge (11). 2. REFRIGERATOR INSTALLATION REMOVING,REVERSING AND REPLACING REFRIGERATOR DOORS (For Swing Type Models) 10 mm...
Owner's Manual (English)
Page 16
... adjustable wrench to remove the handle mounting screws (3). Loosen the 2 screws (3), take of the door and slide the handle down (6). Installing Refrigerator Door Place the washer (6) on left side. Carefully loosen the plug buttons with the screw (5) and the screws (9). 6. The buttons were...with the screws (3) mounted on the top and bottom of the back of the handle with screws. Install the door (8) so that the screws (3) go into the keyhole slots (2). Align keyhole slots (2) on the front of the door. Installing Freezer Door Install the base grille (1). Install the plug...
... adjustable wrench to remove the handle mounting screws (3). Loosen the 2 screws (3), take of the door and slide the handle down (6). Installing Refrigerator Door Place the washer (6) on left side. Carefully loosen the plug buttons with the screw (5) and the screws (9). 6. The buttons were...with the screws (3) mounted on the top and bottom of the back of the handle with screws. Install the door (8) so that the screws (3) go into the keyhole slots (2). Align keyhole slots (2) on the front of the door. Installing Freezer Door Install the base grille (1). Install the plug...
Owner's Manual (English)
Page 17
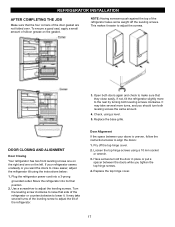
...It may take several turns of the leveling screw to adjust the tilt of the refrigerator takes some weight off the top hinge cover. 2. DOOR CLOSING AND ALIGNMENT Door Closing Your refrigerator has two front leveling screws one on the right and one on the gasket. Plug... the refrigerator power cord into its final position. 2. REFRIGERATOR INSTALLATION AFTER COMPLETING THE JOB Make sure that they close easier, adjust the refrigerator tilt using the instructions below to align the doors: 1. NOTE: Having ...
...It may take several turns of the leveling screw to adjust the tilt of the refrigerator takes some weight off the top hinge cover. 2. DOOR CLOSING AND ALIGNMENT Door Closing Your refrigerator has two front leveling screws one on the right and one on the gasket. Plug... the refrigerator power cord into its final position. 2. REFRIGERATOR INSTALLATION AFTER COMPLETING THE JOB Make sure that they close easier, adjust the refrigerator tilt using the instructions below to align the doors: 1. NOTE: Having ...
Owner's Manual (English)
Page 18
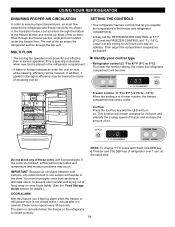
... illustration below, cool air enters through the bottom of the air then flows through the top vent. Then adjust the compartment temperature as desired. NOTE: To change °F/°C press and HOLD COLDER key co f freezer and COLDER key of ice. Identify your control type Refrigerator control:32 °F to 47°F (0°...
... illustration below, cool air enters through the bottom of the air then flows through the top vent. Then adjust the compartment temperature as desired. NOTE: To change °F/°C press and HOLD COLDER key co f freezer and COLDER key of ice. Identify your control type Refrigerator control:32 °F to 47°F (0°...
Owner's Manual (English)
Page 19
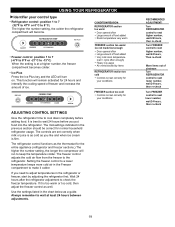
...The controls are set correctly for normal household refrigerator usage. Wait 24 hours after the refrigerator adjustment to cool down completely before you put food into the refrigerator. FREEZER TEMP WARMER 4 IS RECOMMENDED COLDER ADJUST FREEZER section too warm/ ice not made fast ... ADJUSTING CONTROL SETTINGS Give the refrigerator time to check the freezer temperature. Setting the freezer control to a lower temperature keeps more cold air in the Freezer compartment to adjust temperatures in the refrigerator or freezer, start by items REFRIGERATOR section too cold Controls not...
...The controls are set correctly for normal household refrigerator usage. Wait 24 hours after the refrigerator adjustment to cool down completely before you put food into the refrigerator. FREEZER TEMP WARMER 4 IS RECOMMENDED COLDER ADJUST FREEZER section too warm/ ice not made fast ... ADJUSTING CONTROL SETTINGS Give the refrigerator time to check the freezer temperature. Setting the freezer control to a lower temperature keeps more cold air in the Freezer compartment to adjust temperatures in the refrigerator or freezer, start by items REFRIGERATOR section too cold Controls not...
Owner's Manual (English)
Page 20
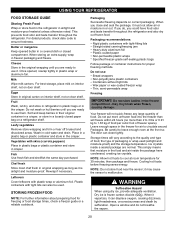
... STORAGE GUIDE Storing Fresh Food Wrap or store food in the refrigerator in the crisper. Sort and keep berries in their original container in a crisper, or store in the freezer for freezing or food storage times, check a freezer guide or a reliable cookbook. Fish Use fresh fish and shellfish ...the same day purchased. If you do not breathe the vapors. 20 Fruit Wash, let dry, and store in refrigerator in plastic bags or in ...
... STORAGE GUIDE Storing Fresh Food Wrap or store food in the refrigerator in the crisper. Sort and keep berries in their original container in a crisper, or store in the freezer for freezing or food storage times, check a freezer guide or a reliable cookbook. Fish Use fresh fish and shellfish ...the same day purchased. If you do not breathe the vapors. 20 Fruit Wash, let dry, and store in refrigerator in plastic bags or in ...
Owner's Manual (English)
Page 21
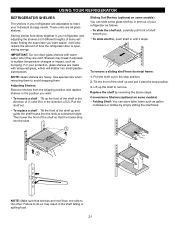
... a sliding shelf from one side to the other. Convenience Shelves (optional on some glass shelves in and out of your refrigerator and adjusting the shelves to fit different heights of items will also reduce the amount of (2). Storing similar food items together in your...shelves in the position you . To replace a shelf : Tilt the front of shelf toward you want easier; USING YOUR REFRIGERATOR REFRIGERATOR SHELVES The shelves in your refrigerator are adjustable to meet your protection, glass shelves are made with warm water when they are cold. For your individual storage needs...
... a sliding shelf from one side to the other. Convenience Shelves (optional on some glass shelves in and out of your refrigerator and adjusting the shelves to fit different heights of items will also reduce the amount of (2). Storing similar food items together in your...shelves in the position you . To replace a shelf : Tilt the front of shelf toward you want easier; USING YOUR REFRIGERATOR REFRIGERATOR SHELVES The shelves in your refrigerator are adjustable to meet your protection, glass shelves are made with warm water when they are cold. For your individual storage needs...
Owner's Manual (English)
Page 22
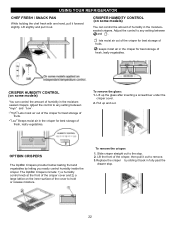
...the inner surface of fruits. Lift slightly and pull it back in the crisper for best storage of the cover to the stop . 22 To remove the glass: 1. OPTIBIN CRISPERS The OptiBin Crispers provide fresher-tasting fruit and vegetables by sliding it out. To remove the ... any setting between " " and " ". Adjust the control to any setting between and . Lift the front of fresh, leafy vegetables. USING YOUR REFRIGERATOR CHEF FRESH / SNACK PAN While holding the chef fresh with one hand, pull it forward slightly. CRISPER HUMIDITY CONTROL (on some models) You can ...
...the inner surface of fruits. Lift slightly and pull it back in the crisper for best storage of the cover to the stop . 22 To remove the glass: 1. OPTIBIN CRISPERS The OptiBin Crispers provide fresher-tasting fruit and vegetables by sliding it out. To remove the ... any setting between " " and " ". Adjust the control to any setting between and . Lift the front of fresh, leafy vegetables. USING YOUR REFRIGERATOR CHEF FRESH / SNACK PAN While holding the chef fresh with one hand, pull it forward slightly. CRISPER HUMIDITY CONTROL (on some models) You can ...


