Owner's Manual
Page 2
...rights and you . Service Assistance: Press the appropriate menu option, and have your product type (Refrigerator), model number, serial number, and ZIP/Postal Code ready. LG Refrigerator / Freezer Warranty Period Product Parts Labor Refrigerator / Freezer 1 year 1 year [In-Home Service (Except Model GR-051)] Sealed System ...Service Center: Press the appropriate option, and have your product type (Refrigerator), model number, serial number, and ZIP/Postal Code ready. 1 THE ABOVE WARRANTY DOES NOT APPLY TO: 1. LG ELECTRONICS SHALL NOT BE LIABLE FOR THE LOSS OF USE OF THE PRODUCT...
...rights and you . Service Assistance: Press the appropriate menu option, and have your product type (Refrigerator), model number, serial number, and ZIP/Postal Code ready. LG Refrigerator / Freezer Warranty Period Product Parts Labor Refrigerator / Freezer 1 year 1 year [In-Home Service (Except Model GR-051)] Sealed System ...Service Center: Press the appropriate option, and have your product type (Refrigerator), model number, serial number, and ZIP/Postal Code ready. 1 THE ABOVE WARRANTY DOES NOT APPLY TO: 1. LG ELECTRONICS SHALL NOT BE LIABLE FOR THE LOSS OF USE OF THE PRODUCT...

Owner's Manual
Page 4
...1-2 English Version 3 Spanish Version 34 Important Safety Instructions 4-5 Requirements for Ground Connection 5 Parts and Features 6-7 Refrigerator Installation Unpacking Installation Installation of Base Grille Refrigerator Doors: How to remove and reverse For Models with Pull-out Drawer For Models with Swinging Door How to ... 18 18 18 19 19 19-20 20-23 20-21 21 21 Optibin Crispers Crisper cover with interior lattice Fixed Refrigerator Rack Door Racks Dairy Compartment Egg Compartment Freezer Section Ice Bin DuraBase Durabase Divider Glide Out Drawer Tilting Door Wired Durabase...
...1-2 English Version 3 Spanish Version 34 Important Safety Instructions 4-5 Requirements for Ground Connection 5 Parts and Features 6-7 Refrigerator Installation Unpacking Installation Installation of Base Grille Refrigerator Doors: How to remove and reverse For Models with Pull-out Drawer For Models with Swinging Door How to ... 18 18 18 19 19 19-20 20-23 20-21 21 21 Optibin Crispers Crisper cover with interior lattice Fixed Refrigerator Rack Door Racks Dairy Compartment Egg Compartment Freezer Section Ice Bin DuraBase Durabase Divider Glide Out Drawer Tilting Door Wired Durabase...

Owner's Manual
Page 5
...8226; DO NOT permit children to the product. The food may result in your safety, this guide. • Once the refrigerator is the safety alert symbol. IMPORTANT SAFETY INSTRUCTIONS SAFETY MESSAGES This manual contains several important safety notices. "Partial thawing or refreezing...quality of melted ice cream should be dangerous to ensure a proper ground connection. • Immediately repair or replace all of the refrigerator. Always read and obey all faulty or damaged service cables. Indicates a potentially hazardous situation which, if not avoided, may be followed...
...8226; DO NOT permit children to the product. The food may result in your safety, this guide. • Once the refrigerator is the safety alert symbol. IMPORTANT SAFETY INSTRUCTIONS SAFETY MESSAGES This manual contains several important safety notices. "Partial thawing or refreezing...quality of melted ice cream should be dangerous to ensure a proper ground connection. • Immediately repair or replace all of the refrigerator. Always read and obey all faulty or damaged service cables. Indicates a potentially hazardous situation which, if not avoided, may be followed...

Owner's Manual
Page 6
...desired position. Do not, under any accidents. However, if you could cause a fire from the plug. RECOMMENDED GROUNDING METHOD Your refrigerator must disconnect the appliance from the power source. DANGER: CHILDREN MAY BECOME TRAPPED Children becoming trapped or suffocated is adequately grounded. If... professional. BEFORE DISPOSING YOUR REFRIGERATOR OR FREEZER WHEN NO LONGER IN USE: • Remove the doors. • Leave the shelves in and adjust the thermostat to its own outlet which could be replaced by our service center or qualified LG technician to the use an...
...desired position. Do not, under any accidents. However, if you could cause a fire from the plug. RECOMMENDED GROUNDING METHOD Your refrigerator must disconnect the appliance from the power source. DANGER: CHILDREN MAY BECOME TRAPPED Children becoming trapped or suffocated is adequately grounded. If... professional. BEFORE DISPOSING YOUR REFRIGERATOR OR FREEZER WHEN NO LONGER IN USE: • Remove the doors. • Leave the shelves in and adjust the thermostat to its own outlet which could be replaced by our service center or qualified LG technician to the use an...

Owner's Manual
Page 7
... and crisp F Ice Bin G Ice Tray (Inside H) * H Durabase I Read this section to that of the features and parts listed below. Your refrigerator could have some or all of your new refrigerator. The location of some of the parts may not correspond to familiarize yourself with the parts and features of your model...
... and crisp F Ice Bin G Ice Tray (Inside H) * H Durabase I Read this section to that of the features and parts listed below. Your refrigerator could have some or all of your new refrigerator. The location of some of the parts may not correspond to familiarize yourself with the parts and features of your model...

Owner's Manual
Page 8
NOTE: This guide covers different models. Your refrigerator could have some or all of your new refrigerator. Swing Model PARTS AND FEATURES A I Dairy Compartment J Door Racks K Freezer Light L Fixed Refrigerator Rack M Wire Freezer Shelf N Freezer Door Rack * ... models 7 The location of some of the parts may not correspond to familiarize yourself with the parts and features of your model. A Digital Sensor Control B Refrigerator Light C Shelves D Frozen Meat Compartment (Chef Fresh/Snack Pan)* E Optibin Crisper Keeps fruits and vegetables fresh and crisp F Ice Tray * G Ice Bin...
NOTE: This guide covers different models. Your refrigerator could have some or all of your new refrigerator. Swing Model PARTS AND FEATURES A I Dairy Compartment J Door Racks K Freezer Light L Fixed Refrigerator Rack M Wire Freezer Shelf N Freezer Door Rack * ... models 7 The location of some of the parts may not correspond to familiarize yourself with the parts and features of your model. A Digital Sensor Control B Refrigerator Light C Shelves D Frozen Meat Compartment (Chef Fresh/Snack Pan)* E Optibin Crisper Keeps fruits and vegetables fresh and crisp F Ice Tray * G Ice Bin...

Owner's Manual
Page 9
.... If needed, adjust the leveling screws to the floor. The leveling screws can easily be turned by slightly tilting the front of the refrigerator, turning the leveling screws clockwise ( ) to raise it and counter-clockwise ( ) to ensure that there is lower or higher than... glue. Remove the shelves and replace them according to 3 hours before storing food inside. Carefully clean your spacing needs. Leave your refrigerator on for cleaning or servicing. Verify that the doors close properly. INSTALLATION OF BASE GRILLE Uninstalling or Replacing the Base Grille 1. Align...
.... If needed, adjust the leveling screws to the floor. The leveling screws can easily be turned by slightly tilting the front of the refrigerator, turning the leveling screws clockwise ( ) to raise it and counter-clockwise ( ) to ensure that there is lower or higher than... glue. Remove the shelves and replace them according to 3 hours before storing food inside. Carefully clean your spacing needs. Leave your refrigerator on for cleaning or servicing. Verify that the doors close properly. INSTALLATION OF BASE GRILLE Uninstalling or Replacing the Base Grille 1. Align...

Owner's Manual
Page 10
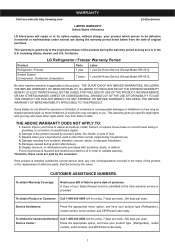
...socket wrench. • Adjustable Wrench. • 10 mm open-end wrench • Flat 2 inch putty knife IMPORTANT: Before you begin, unplug the refrigerator or disconnect the power source. TOOLS YOU MIGHT NEED OR USE 10 mm 1/4 in 3/8 in Hex Socket Wrench Phillips Screwdriver Flat Head Screwdriver 1/4 in ...3/32 in the opposite side. • Gently lift the refrigerator door (5) and remove it. • Once the door has been removed, remove the screws 10 (6), the stopper (7) and the hinge pin (8)...
...socket wrench. • Adjustable Wrench. • 10 mm open-end wrench • Flat 2 inch putty knife IMPORTANT: Before you begin, unplug the refrigerator or disconnect the power source. TOOLS YOU MIGHT NEED OR USE 10 mm 1/4 in 3/8 in Hex Socket Wrench Phillips Screwdriver Flat Head Screwdriver 1/4 in ...3/32 in the opposite side. • Gently lift the refrigerator door (5) and remove it. • Once the door has been removed, remove the screws 10 (6), the stopper (7) and the hinge pin (8)...
Owner's Manual
Page 11
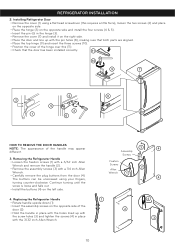
...11 10 9 7 4 8 2 5 3 1 6 HOW TO REMOVE THE DOOR HANDLES NOTE: The appearance of the handle may appear different. 3. Removing the Refrigerator Handle • Loosen the fixation screws (1) with a 3/32 inch Allen Wrench and remove the handle (2). • Remove the assembly screws (3) with the screw ...(3) and tighten the screws (4) in the hinge (3). • Remove the cover (7) and install it on the left side. 4. Replacing the Refrigerator Handle • Rotate handle upside down (1). • Insert the assembly screws on the opposite side of the door (2). • Hold the handle...
...11 10 9 7 4 8 2 5 3 1 6 HOW TO REMOVE THE DOOR HANDLES NOTE: The appearance of the handle may appear different. 3. Removing the Refrigerator Handle • Loosen the fixation screws (1) with a 3/32 inch Allen Wrench and remove the handle (2). • Remove the assembly screws (3) with the screw ...(3) and tighten the screws (4) in the hinge (3). • Remove the cover (7) and install it on the left side. 4. Replacing the Refrigerator Handle • Rotate handle upside down (1). • Insert the assembly screws on the opposite side of the door (2). • Hold the handle...

Owner's Manual
Page 12
REFRIGERATOR INSTALLATION HOW TO REMOVE AND INSTALL THE PULL OUT • With both hands, hold the center of the door and pull up . • Separate the ...
REFRIGERATOR INSTALLATION HOW TO REMOVE AND INSTALL THE PULL OUT • With both hands, hold the center of the door and pull up . • Separate the ...

Owner's Manual
Page 13
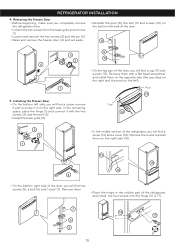
Left Rail Right Rail • Align the top holes of the rail cover with the top holes of the door supports to play inside of the rail assembly and then the back part (4). 4 WARNING: To prevent entrapment risk and accidental child or animal suffocation, DO NOT permit them to mount the cover. WARNING: DO NOT step or sit on each side. Verify the hole's alignment • With the drawer fully extended, insert the lower basket over the front part of the drawer. REFRIGERATOR INSTALLATION • Compare the left and right rail covers on the Freezer Door. 12
Left Rail Right Rail • Align the top holes of the rail cover with the top holes of the door supports to play inside of the rail assembly and then the back part (4). 4 WARNING: To prevent entrapment risk and accidental child or animal suffocation, DO NOT permit them to mount the cover. WARNING: DO NOT step or sit on each side. Verify the hole's alignment • With the drawer fully extended, insert the lower basket over the front part of the drawer. REFRIGERATOR INSTALLATION • Compare the left and right rail covers on the Freezer Door. 12

Owner's Manual
Page 14
...pressure, and for this may find it . • Grasp the handle firmly with both . Remove all food and any adjustable racks from the refrigerator doors. the door the handle • Install the plug buttons (5) on the back of the handle allow the handle to separate from the screws... in the door. • Use the 10 mm open-end wrench to open -end wrench. • Flat 2 inch putty knife. REFRIGERATOR INSTALLATION REFRIGERATOR DOORS: HOW TO REMOVE AND REVERSE (Optional) For Swing models You may require some force). • The keyhole slots (2) on the left ) 1. ...
...pressure, and for this may find it . • Grasp the handle firmly with both . Remove all food and any adjustable racks from the refrigerator doors. the door the handle • Install the plug buttons (5) on the back of the handle allow the handle to separate from the screws... in the door. • Use the 10 mm open-end wrench to open -end wrench. • Flat 2 inch putty knife. REFRIGERATOR INSTALLATION REFRIGERATOR DOORS: HOW TO REMOVE AND REVERSE (Optional) For Swing models You may require some force). • The keyhole slots (2) on the left ) 1. ...

Owner's Manual
Page 15
... pin (15) and remove. • Remove the screws (16 & 17) and the hinge (18). 14 15 16 17 18 14 Handle Type 2 3. Removing the Refrigerator Door • Gently remove the top hinge cover with a flat head screwdriver. • Loosen the two screws (3), remove the handle (4) and install all on the... them in the opposite side (the cap will be placed in the right side and the pivot on the left side). • Slightly raise the refrigerator door (5) and remove it. • Once the door has been taken off, remove the screws (6), the bolt (7) and the pivot (8) located below this ...
... pin (15) and remove. • Remove the screws (16 & 17) and the hinge (18). 14 15 16 17 18 14 Handle Type 2 3. Removing the Refrigerator Door • Gently remove the top hinge cover with a flat head screwdriver. • Loosen the two screws (3), remove the handle (4) and install all on the... them in the opposite side (the cap will be placed in the right side and the pivot on the left side). • Slightly raise the refrigerator door (5) and remove it. • Once the door has been taken off, remove the screws (6), the bolt (7) and the pivot (8) located below this ...
Owner's Manual
Page 16
... bottom left ). 1 Pivot 11 5. Remove them on the left side of the door. 8 9 3 10 2 4 • On the top part of the refrigerator, you will find two screws (5), a bolt (6) and 1 pivot (7). Remove them on the opposite side (the cap stays on the right and the pivot on the...bottom left side, you will find a cap (11) and a pivot (12). Removing the Freezer Door • Before beginning, make sure you completely remove the refrigerator door. • Loosen the two screws from the base grille and remove (1). • Loosen and remove the two screws (2) and the pin (3). •...
... bottom left ). 1 Pivot 11 5. Remove them on the left side of the door. 8 9 3 10 2 4 • On the top part of the refrigerator, you will find two screws (5), a bolt (6) and 1 pivot (7). Remove them on the opposite side (the cap stays on the right and the pivot on the...bottom left side, you will find a cap (11) and a pivot (12). Removing the Freezer Door • Before beginning, make sure you completely remove the refrigerator door. • Loosen the two screws from the base grille and remove (1). • Loosen and remove the two screws (2) and the pin (3). •...

Owner's Manual
Page 17
Installing the Refrigerator Door • Insert the door over the axis of the door seals are not folded over the pin (20). To ensure a good seal, apply a little ... (2) and place on them (18). and replace the hinge cover (5). 5 4 18 3 • Insert the pin into the hinge (19). (Ensure that both doors close correctly. REFRIGERATOR INSTALLATION • Take the freezer door and align the pivot holes up with • Install the hinge (3), assemble the three screws (4) the bolt holes and...
Installing the Refrigerator Door • Insert the door over the axis of the door seals are not folded over the pin (20). To ensure a good seal, apply a little ... (2) and place on them (18). and replace the hinge cover (5). 5 4 18 3 • Insert the pin into the hinge (19). (Ensure that both doors close correctly. REFRIGERATOR INSTALLATION • Take the freezer door and align the pivot holes up with • Install the hinge (3), assemble the three screws (4) the bolt holes and...

Owner's Manual
Page 18
...following the instructions below to align them: 1. Use a flat head screwdriver to adjust the leveling screws, turning clockwise to make sure that the refrigerator is uneven, follow the instructions below : 1. This will make it easier to adjust the screws. 4.Open both doors again and check to raise... the side of the refrigerator takes some weight off the top hinge cover. 2.Loosen the screws from the top hinge using a level. 6.Replace the base grille. 17 Have...
...following the instructions below to align them: 1. Use a flat head screwdriver to adjust the leveling screws, turning clockwise to make sure that the refrigerator is uneven, follow the instructions below : 1. This will make it easier to adjust the screws. 4.Open both doors again and check to raise... the side of the refrigerator takes some weight off the top hinge cover. 2.Loosen the screws from the top hinge using a level. 6.Replace the base grille. 17 Have...

Owner's Manual
Page 19
... and moisture problems. IMPORTANT: Because air circulates between both sections to obtain stable temperature, the air must flow between the freezer and refrigerator sections. Leave it on . After this you to the other substances could enter through the cool air vent causing decreased efficiency. The... LED light will repeat every 30 seconds. This can interrupt the flow of the air enters the refrigerator section through the bottom part and circulates upward. These tones will turn on these vents with packages of the freezer and increase ice...
... and moisture problems. IMPORTANT: Because air circulates between both sections to obtain stable temperature, the air must flow between the freezer and refrigerator sections. Leave it on . After this you to the other substances could enter through the cool air vent causing decreased efficiency. The... LED light will repeat every 30 seconds. This can interrupt the flow of the air enters the refrigerator section through the bottom part and circulates upward. These tones will turn on these vents with packages of the freezer and increase ice...

Owner's Manual
Page 20
...Cover leftovers with plastic wrap or aluminum foil. The mid-settings indicated in the previous section should be frozen such in the refrigerator or freezer, begin by objects Adjust the FREEZER setting to your conditions Adjust the FREEZER setting to adjust the temperature in a... way to ensure freshness. CONDITION/REASON: RECOMMENDED ADJUSTMENT: REFRIGERATOR section is too warm • Opening the door often • Adding a large amount of food • Room temperature is very low...
...Cover leftovers with plastic wrap or aluminum foil. The mid-settings indicated in the previous section should be frozen such in the refrigerator or freezer, begin by objects Adjust the FREEZER setting to your conditions Adjust the FREEZER setting to adjust the temperature in a... way to ensure freshness. CONDITION/REASON: RECOMMENDED ADJUSTMENT: REFRIGERATOR section is too warm • Opening the door often • Adding a large amount of food • Room temperature is very low...
Owner's Manual
Page 21
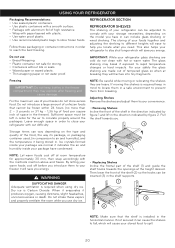
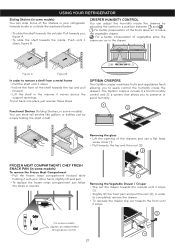
... with a smooth surface. • Package with aluminum foil of high resistance. • Wrap with paper layered with your storage necessities; REFRIGERATOR SECTION REFRIGERATOR SHELVES The shelving of your convenience. • Removing Shelves Incline the front of the shelf (2) so the hooks can include glass shelving ... If moving or relocating the shelves they may break if exposed to spill. 20 depending on the type and quality of your refrigerator to stay shut longer which will save you have condensed. For the maximum use dry ice. 2 • Replacing Shelves Incline ...
... with a smooth surface. • Package with aluminum foil of high resistance. • Wrap with paper layered with your storage necessities; REFRIGERATOR SECTION REFRIGERATOR SHELVES The shelving of your convenience. • Removing Shelves Incline the front of the shelf (2) so the hooks can include glass shelving ... If moving or relocating the shelves they may break if exposed to spill. 20 depending on the type and quality of your refrigerator to stay shut longer which will save you have condensed. For the maximum use dry ice. 2 • Replacing Shelves Incline ...
Owner's Manual
Page 22
.../ CHEF FRESH SNACK PAN (in some models) To remove the Frozen Meat Compartment • Pull the frozen meat compartment forward while holding it with your refrigerator towards inside the drawers by adjusting the control in your other hand, slightly lift and pull. • To replace the frozen meat compartment just follow... You can adjust the humidity inside or outside until it stops (1). • Slightly lift the front part and pull the rest (2), in half. USING YOUR REFRIGERATOR Sliding Shelves (in some models) You can slide some of the shelves in a position between and .
.../ CHEF FRESH SNACK PAN (in some models) To remove the Frozen Meat Compartment • Pull the frozen meat compartment forward while holding it with your refrigerator towards inside the drawers by adjusting the control in your other hand, slightly lift and pull. • To replace the frozen meat compartment just follow... You can adjust the humidity inside or outside until it stops (1). • Slightly lift the front part and pull the rest (2), in half. USING YOUR REFRIGERATOR Sliding Shelves (in some models) You can slide some of the shelves in a position between and .


