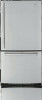
Owner's Manual
Page 2
...(U.S.A.) Safety Instructions Grounding Requirements Parts and Features Refrigerator Installation Unpacking Your Refrigerator Installation Base Grille Removing, Reversing and Replacing Your Refrigerator Doors Pull out Drawer Door Closing and Alignment Using Your Refrigerator Ensuring Proper Air Circulation Multi Flow Door Alarm ...Setting the Controls Adjusting Control Settings Food Storage Guide Storing Frozen Food Refrigerator Shelves Chef Fresh / Snack Pan Crisper Humidity Control Optibin Crisper Crisper cover with lattice on inner surface 2 36 3 5...
...(U.S.A.) Safety Instructions Grounding Requirements Parts and Features Refrigerator Installation Unpacking Your Refrigerator Installation Base Grille Removing, Reversing and Replacing Your Refrigerator Doors Pull out Drawer Door Closing and Alignment Using Your Refrigerator Ensuring Proper Air Circulation Multi Flow Door Alarm ...Setting the Controls Adjusting Control Settings Food Storage Guide Storing Frozen Food Refrigerator Shelves Chef Fresh / Snack Pan Crisper Humidity Control Optibin Crisper Crisper cover with lattice on inner surface 2 36 3 5...
Owner's Manual
Page 3
...7 days per week, 365 days per year) Press the appropriate option, and have your LG product is required and must be borne by the consumer. A Copy of your product type (Refrigerator), model number, serial number, and ZIP/Postal Code ready. INCLUDING THE IMPLIED WARRANTY OF ... or at the time warranty service is provided. Proof of purchase is used in material or workmanship under normal use . 4. LG Refrigerator / Freezer Warranty Period Product Parts Labor Refrigerator / Freezer 1 year 1 year [In-Home Service (Except Model GR-051)] Sealed System 7 years 1 year [In-Home...
...7 days per week, 365 days per year) Press the appropriate option, and have your LG product is required and must be borne by the consumer. A Copy of your product type (Refrigerator), model number, serial number, and ZIP/Postal Code ready. INCLUDING THE IMPLIED WARRANTY OF ... or at the time warranty service is provided. Proof of purchase is used in material or workmanship under normal use . 4. LG Refrigerator / Freezer Warranty Period Product Parts Labor Refrigerator / Freezer 1 year 1 year [In-Home Service (Except Model GR-051)] Sealed System 7 years 1 year [In-Home...
Owner's Manual
Page 5
...power to roll over or damage the power cord. Always grip the plug firmly and pull it . SAVE THESE INSTRUCTIONS 5 In refrigerators with automatic icemakers, avoid contact with the heating element that have thawed completely. Always read and obey all electric service cords that ...releases the cubes. After your refrigerator away from the outlet. The eating quality of many important safety messages. NOTE: We strongly recommend that of red meats is in...
...power to roll over or damage the power cord. Always grip the plug firmly and pull it . SAVE THESE INSTRUCTIONS 5 In refrigerators with automatic icemakers, avoid contact with the heating element that have thawed completely. Always read and obey all electric service cords that ...releases the cubes. After your refrigerator away from the outlet. The eating quality of many important safety messages. NOTE: We strongly recommend that of red meats is in...
Owner's Manual
Page 6
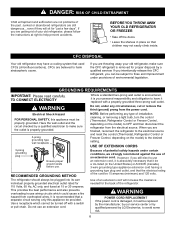
... ozone. even if they will increase the clearance needed for proper disposal by LG Electronics, to help prevent accidents. WARNING Do not, under any type of your old refrigerator, please follow the instructions at 15 or 20 amperes. WARNING POWER CORD REPLACEMENT...can be subject to have a cooling system that the electrical rating of environmental legislation. If you intentionally release this CFC refrigerant, you are throwing away your personal responsibility and obligation to fines and imprisonment under certain conditions, we strongly recommend against the...
... ozone. even if they will increase the clearance needed for proper disposal by LG Electronics, to help prevent accidents. WARNING Do not, under any type of your old refrigerator, please follow the instructions at 15 or 20 amperes. WARNING POWER CORD REPLACEMENT...can be subject to have a cooling system that the electrical rating of environmental legislation. If you intentionally release this CFC refrigerant, you are throwing away your personal responsibility and obligation to fines and imprisonment under certain conditions, we strongly recommend against the...
Owner's Manual
Page 7
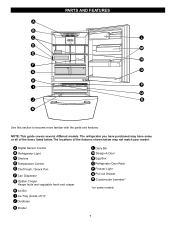
A Digital Sensor Control B Refrigerator Light C Shelves D Temperature Control E Chef Fresh / Snack Pan F Can Dispenser G Optibin Crisper Keeps fruits and vegetable fresh and crisper H Ice Bin I Q J R K Use this section to ... familiar with the parts and features. NOTE: This guide covers several different models. The locations of the items listed below may have some models 7 The refrigerator you have purchased may not match your model. PARTS AND FEATURES A B C L D M E N F O G H P I Ice Tray (Inside of H)* J Durabase K Divider L Dairy Bin M Design-A-Door N Egg Box...
A Digital Sensor Control B Refrigerator Light C Shelves D Temperature Control E Chef Fresh / Snack Pan F Can Dispenser G Optibin Crisper Keeps fruits and vegetable fresh and crisper H Ice Bin I Q J R K Use this section to ... familiar with the parts and features. NOTE: This guide covers several different models. The locations of the items listed below may have some models 7 The refrigerator you have purchased may not match your model. PARTS AND FEATURES A B C L D M E N F O G H P I Ice Tray (Inside of H)* J Durabase K Divider L Dairy Bin M Design-A-Door N Egg Box...

Owner's Manual
Page 8
... Pan E Optibin Crisper Keeps fruits and vegetable fresh and crisper F Ice Bin G Ice Tray (Inside of the items listed below may have some models 8 The refrigerator you have purchased may not match your model. NOTE: This guide covers several different models. PARTS AND FEATURES A B J C K D L E M F N G H I Divider J Dairy Bin K Design-A-Door L Pull out...
... Pan E Optibin Crisper Keeps fruits and vegetable fresh and crisper F Ice Bin G Ice Tray (Inside of the items listed below may have some models 8 The refrigerator you have purchased may not match your model. NOTE: This guide covers several different models. PARTS AND FEATURES A B J C K D L E M F N G H I Divider J Dairy Bin K Design-A-Door L Pull out...

Owner's Manual
Page 9
... Rack M Freezer Light N Freezer Door Rack *on some or all of the features shown below . A Digital Sensor Control B Refrigerator Light C Shelves D Snack Pan E Optibin Crisper Keeps fruits and vegetable fresh and crisp F Ice Trays* G Ice Bin H Wire Durabase I C J D K E L F M G H N Use ...this section to become more familiar with the parts and features. NOTE: This guide covers several different models. The refrigerator you have purchased may have some models 9 The locations of the items listed below may not match your model.
... Rack M Freezer Light N Freezer Door Rack *on some or all of the features shown below . A Digital Sensor Control B Refrigerator Light C Shelves D Snack Pan E Optibin Crisper Keeps fruits and vegetable fresh and crisp F Ice Trays* G Ice Bin H Wire Durabase I C J D K E L F M G H N Use ...this section to become more familiar with the parts and features. NOTE: This guide covers several different models. The refrigerator you have purchased may have some models 9 The locations of the items listed below may not match your model.
Owner's Manual
Page 10
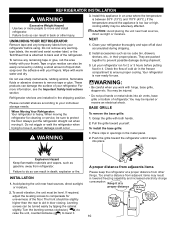
.... To avoid vibration, the unit must be injured or receive an electrical shock. Keep it . These products can damage the surface of the refrigerator. NEXT 1. Check the flow of the floor. Grasp the grille with warm water and dry. INSTALLATION 1. The front should be adversely affected.... top More than 0.125" (0.3 cm) to hinge side More than the rear to ensure proper cooling. Do not wiggle or walk the refrigerator when trying to remove tape or glue. Install accessories such as gasoline, away from other injury. Explosion Hazard Keep flammable materials and vapors, ...
.... To avoid vibration, the unit must be injured or receive an electrical shock. Keep it . These products can damage the surface of the refrigerator. NEXT 1. Check the flow of the floor. Grasp the grille with warm water and dry. INSTALLATION 1. The front should be adversely affected.... top More than 0.125" (0.3 cm) to hinge side More than the rear to ensure proper cooling. Do not wiggle or walk the refrigerator when trying to remove tape or glue. Install accessories such as gasoline, away from other injury. Explosion Hazard Keep flammable materials and vapors, ...
Owner's Manual
Page 11
...stoppers (6), and attach them on the right. Loosen the pin (7) and remove it on the left -opening type to rightopening type) 1. Installing Refrigerator Door Install the middle hinge (1) on the opposite side). Reinstall top hinge cover (7). 9 8 10 7 11 Remove food and any adjustable door... using a slotted screwdriver and attach it fits onto the middle hinge pin (5). Turn the handle to match your model. NOTE: Reversing the refrigerator door is not possible on the right. 2. Install the top hinge (6) with the screws (2) and the screws (3). Remove the 3 screws ...
...stoppers (6), and attach them on the right. Loosen the pin (7) and remove it on the left -opening type to rightopening type) 1. Installing Refrigerator Door Install the middle hinge (1) on the opposite side). Reinstall top hinge cover (7). 9 8 10 7 11 Remove food and any adjustable door... using a slotted screwdriver and attach it fits onto the middle hinge pin (5). Turn the handle to match your model. NOTE: Reversing the refrigerator door is not possible on the right. 2. Install the top hinge (6) with the screws (2) and the screws (3). Remove the 3 screws ...
Owner's Manual
Page 12
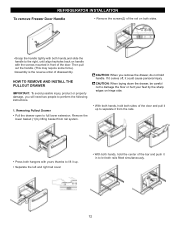
... injury, product or property damage, you remove the drawer, do not hold handle. If it comes off, it up to separate it from rail system. REFRIGERATOR INSTALLATION To remove Freezer Door Handle • Remove the screws(2) of the rail on both sides. •Grasp the handle tightly with both hands,and...
... injury, product or property damage, you remove the drawer, do not hold handle. If it comes off, it up to separate it from rail system. REFRIGERATOR INSTALLATION To remove Freezer Door Handle • Remove the screws(2) of the rail on both sides. •Grasp the handle tightly with both hands,and...

Owner's Manual
Page 13
... and pull it out to let both rails out to perform the following instructions. • Make sure you have a right rail cover for each side. 2. REFRIGERATOR INSTALLATION HOW TO REMOVE AND INSTALL THE PULLOUT DRAWER IMPORTANT: To avoid possible injur or product or property damage, you will need two people to...
... and pull it out to let both rails out to perform the following instructions. • Make sure you have a right rail cover for each side. 2. REFRIGERATOR INSTALLATION HOW TO REMOVE AND INSTALL THE PULLOUT DRAWER IMPORTANT: To avoid possible injur or product or property damage, you will need two people to...
Owner's Manual
Page 14
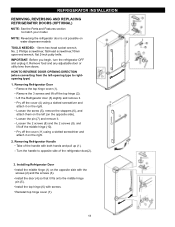
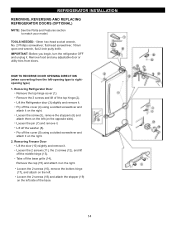
...Remove the cap (15) and attach it on the left side of f the top hinge (2). Pry off the middle hinge (13). Lift the Refrigerator door (3) slightly and remove it . Loosen the 2 screws (16), remove the bottom hinge (17), and attach on the right.... 2. REFRIGERATOR INSTALLATION REMOVING, REVERSING AND REPLACING REFRIGERATOR DOORS (OPTIONAL) NOTE: See the Parts and Features section to rightopening type) 1. HOW TO REVERSE DOOR OPENING DIRECT ION (when converting from doors....
...Remove the cap (15) and attach it on the left side of f the top hinge (2). Pry off the middle hinge (13). Lift the Refrigerator door (3) slightly and remove it . Loosen the 2 screws (16), remove the bottom hinge (17), and attach on the right.... 2. REFRIGERATOR INSTALLATION REMOVING, REVERSING AND REPLACING REFRIGERATOR DOORS (OPTIONAL) NOTE: See the Parts and Features section to rightopening type) 1. HOW TO REVERSE DOOR OPENING DIRECT ION (when converting from doors....
Owner's Manual
Page 15
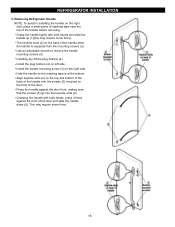
... of masking tape near the top of the handle allow the handle to remove the handle mounting screws (3). Carefully pry off the plug buttons (4). Removing Refrigerator Handle NOTE: To assist in installing the handle on the back of the handle before removing. This may require some force. 15 Grasp the handle...
... of masking tape near the top of the handle allow the handle to remove the handle mounting screws (3). Carefully pry off the plug buttons (4). Removing Refrigerator Handle NOTE: To assist in installing the handle on the back of the handle before removing. This may require some force. 15 Grasp the handle...
Owner's Manual
Page 16
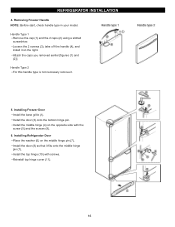
... f the handle (4), and install it . 5. Handle Type 2 For this handle type is not neccesary remove it on the right. Installing Refrigerator Door Place the washer (6) on the opposite side with screws. Install the door (8) so that it fits onto the middle hinge pin (7). ...Install the base grille (1). Install the door (3) onto the bottom hinge pin. Install the middle hinge (4) on the middle hinge pin (7). REFRIGERATOR INSTALLLLAATTIIOONN 4. Attach the caps you removed earlier [figures (1) and (2)]. Removing Freezer Handle NOTE: Before start, check handle type in your model...
... f the handle (4), and install it . 5. Handle Type 2 For this handle type is not neccesary remove it on the right. Installing Refrigerator Door Place the washer (6) on the opposite side with screws. Install the door (8) so that it fits onto the middle hinge pin (7). ...Install the base grille (1). Install the door (3) onto the bottom hinge pin. Install the middle hinge (4) on the middle hinge pin (7). REFRIGERATOR INSTALLLLAATTIIOONN 4. Attach the caps you removed earlier [figures (1) and (2)]. Removing Freezer Handle NOTE: Before start, check handle type in your model...
Owner's Manual
Page 17
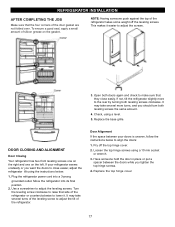
... below to adjust the leveling screws. Door Alignment If the space between the doors while you want the doors to adjust the tilt of the refrigerator takes some weight off the top hinge cover. 2. Open both leveling screws clockwise. To ensure a good seal, apply a small amount of ...the door gasket are not folded over. This makes it . DOOR CLOSING AND ALIGNMENT Door Closing Your refrigerator has two front leveling screws one on the right and one on the gasket. Loosen the top hinge screws using a level. 5. NOTE: Having someone...
... below to adjust the leveling screws. Door Alignment If the space between the doors while you want the doors to adjust the tilt of the refrigerator takes some weight off the top hinge cover. 2. Open both leveling screws clockwise. To ensure a good seal, apply a small amount of ...the door gasket are not folded over. This makes it . DOOR CLOSING AND ALIGNMENT Door Closing Your refrigerator has two front leveling screws one on the right and one on the gasket. Loosen the top hinge screws using a level. 5. NOTE: Having someone...
Owner's Manual
Page 18
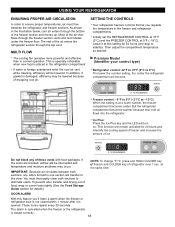
... if gasket is closed within 1 minute after it at 0°F ( -18°C). The alarm is cancelled when the freezer or the refrigerator is damaged, efficiency may occur. Leave it is placed in the illustration below, cool air enters through the bottom of the freezer section and...this feature you regulate the temperature in normal operation. Do not block any odors formed in one day) to stabilize. USING YOUR REFRIGERATOR ENSURING PROPER AIR CIRCULATION SETTING THE CONTROLS In order to ensure proper temperatures, air must thoroughly clean both sections, any of these ...
... if gasket is closed within 1 minute after it at 0°F ( -18°C). The alarm is cancelled when the freezer or the refrigerator is damaged, efficiency may occur. Leave it is placed in the illustration below, cool air enters through the bottom of the freezer section and...this feature you regulate the temperature in normal operation. Do not block any odors formed in one day) to stabilize. USING YOUR REFRIGERATOR ENSURING PROPER AIR CIRCULATION SETTING THE CONTROLS In order to ensure proper temperatures, air must thoroughly clean both sections, any of these ...
Owner's Manual
Page 19
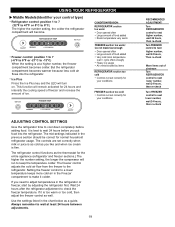
... conditions FREEZER section too cold Controls not set correctly when milk or juice is as cold as the thermostat for the entire appliance (refrigerator and freezer sections.) The higher the number setting, the longer the compressor will remain activated for 24 hours and intensify the cooling speed... lower number, wait 24 hours, then re-check Turn FREEZER control to next lower number, wait 24 hours, then re-check REFRIGERATOR TEMP CONDITION/REASON: REFRIGERATOR section too warm Door opened often Large amount of food added Very cold room temperature (can't cycle often enough) Heavy ice usage...
... conditions FREEZER section too cold Controls not set correctly when milk or juice is as cold as the thermostat for the entire appliance (refrigerator and freezer sections.) The higher the number setting, the longer the compressor will remain activated for 24 hours and intensify the cooling speed... lower number, wait 24 hours, then re-check Turn FREEZER control to next lower number, wait 24 hours, then re-check REFRIGERATOR TEMP CONDITION/REASON: REFRIGERATOR section too warm Door opened often Large amount of food added Very cold room temperature (can't cycle often enough) Heavy ice usage...
Owner's Manual
Page 20
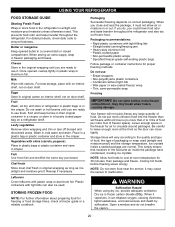
... store food near the sensor; Dry ice is airtight and moisture-proof. This prevents food odor and taste transfer throughout the refrigerator. For dated products, check date code to use : Bread wrappers Non-polyethylene plastic containers Containers without tight lids Wax paper ...if necessary. STORING FROZEN FOOD NOTE: For further information about preparing food for air to malfunction. Packaging Successful freezing depends on a refrigerator shelf. When you do not breathe the vapors. 20 If you close tightly. Packaging recommendations: Rigid plastic containers with tight lids can...
... store food near the sensor; Dry ice is airtight and moisture-proof. This prevents food odor and taste transfer throughout the refrigerator. For dated products, check date code to use : Bread wrappers Non-polyethylene plastic containers Containers without tight lids Wax paper ...if necessary. STORING FROZEN FOOD NOTE: For further information about preparing food for air to malfunction. Packaging Successful freezing depends on a refrigerator shelf. When you do not breathe the vapors. 20 If you close tightly. Packaging recommendations: Rigid plastic containers with tight lids can...

Owner's Manual
Page 21
...To replace a shelf : Tilt the front of (1) and lift it stops. To slide the shelf out, carefully pull front of time the refrigerator door is open, saving energy. These units are heavy. Adjusting Shelves Remove shelves from the shipping position and replace shelves in the position you ...the shelves to fit different heights of items will also reduce the amount of shelf toward you want easier; USING YOUR REFRIGERATOR REFRIGERATOR SHELVES The shelves in your refrigerator are adjustable to meet your protection, glass shelves are made with warm water when they are cold. To remove a ...
...To replace a shelf : Tilt the front of (1) and lift it stops. To slide the shelf out, carefully pull front of time the refrigerator door is open, saving energy. These units are heavy. Adjusting Shelves Remove shelves from the shipping position and replace shelves in the position you ...the shelves to fit different heights of items will also reduce the amount of shelf toward you want easier; USING YOUR REFRIGERATOR REFRIGERATOR SHELVES The shelves in your refrigerator are adjustable to meet your protection, glass shelves are made with warm water when they are cold. To remove a ...

Owner's Manual
Page 22
... setting between and . To remove the glass: 1. To remove the crisper: 1. Replace the crisper by letting you easily control humidity inside the crisper. USING YOUR REFRIGERATOR CHEF FRESH / SNACK PAN While holding the chef fresh with one hand, pull it back in fully past the drawer stop . 2. OPTIBIN CRISPERS The OptiBin...
... setting between and . To remove the glass: 1. To remove the crisper: 1. Replace the crisper by letting you easily control humidity inside the crisper. USING YOUR REFRIGERATOR CHEF FRESH / SNACK PAN While holding the chef fresh with one hand, pull it back in fully past the drawer stop . 2. OPTIBIN CRISPERS The OptiBin...


