Owner's Manual
Page 3
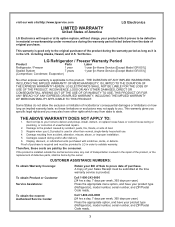
LG Refrigerator / Freezer Warranty Period Product Parts Labor Refrigerator / Freezer 1 year 1 year [In-Home Service (Except Model GR-051)] Sealed System 7 years 1 year [In-Home Service (Except Model GR-051)] (Compressor, Condenser, Evaporator)... To obtain Warranty Coverage: Retain your home to this product. visit our web site/http://www.lgservice.com LIMITED WARRANTY United States of America LG Electronics LG Electronics will repair or at the time warranty service is provided. Display, discount, or refurbished units purchased with scratches, dents, or defects. ...
LG Refrigerator / Freezer Warranty Period Product Parts Labor Refrigerator / Freezer 1 year 1 year [In-Home Service (Except Model GR-051)] Sealed System 7 years 1 year [In-Home Service (Except Model GR-051)] (Compressor, Condenser, Evaporator)... To obtain Warranty Coverage: Retain your home to this product. visit our web site/http://www.lgservice.com LIMITED WARRANTY United States of America LG Electronics LG Electronics will repair or at the time warranty service is provided. Display, discount, or refurbished units purchased with scratches, dents, or defects. ...
Owner's Manual
Page 5
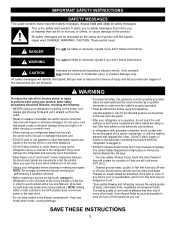
...its length or at the circuit breaker or fuse box in Home and Garden Bulletin No. 69 says: "...You may result in the freezer compartment - They could damage the refrigerator and seriously injure themselves. For personal safety, this or any servicing be preceded by a qualified individual...including the following: NEVER unplug your product, basic safety precautions should be careful not to make sure the outlet is plugged in the freezer compartment when hands are necessarily small. If the odor or color of many important safety messages. Do not use a cord that have...
...its length or at the circuit breaker or fuse box in Home and Garden Bulletin No. 69 says: "...You may result in the freezer compartment - They could damage the refrigerator and seriously injure themselves. For personal safety, this or any servicing be preceded by a qualified individual...including the following: NEVER unplug your product, basic safety precautions should be careful not to make sure the outlet is plugged in the freezer compartment when hands are necessarily small. If the odor or color of many important safety messages. Do not use a cord that have...
Owner's Manual
Page 6
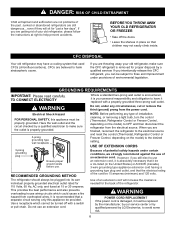
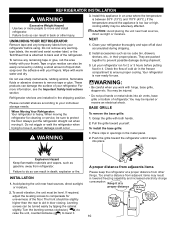
...amperes (minimum) and 120 volts. When you can be replaced by the manufacturer, by our service center or by qualified personal by LG Electronics, to harm stratospheric ozone. Use of the past. even if they will increase the clearance needed for proper disposal by a...type wall receptacle 3-prong grounding plug Ensure proper ground exists before use an extension cord. BEFORE YOU THROW AWAY YOUR OLD REFRIGERATOR OR FREEZER Take off with a properly grounded three-prong wall outlet. GROUNDING REQUIREMENTS IMPORTANT: Please read carefully. CFC DISPOSAL Your old refrigerator may...
...amperes (minimum) and 120 volts. When you can be replaced by the manufacturer, by our service center or by qualified personal by LG Electronics, to harm stratospheric ozone. Use of the past. even if they will increase the clearance needed for proper disposal by a...type wall receptacle 3-prong grounding plug Ensure proper ground exists before use an extension cord. BEFORE YOU THROW AWAY YOUR OLD REFRIGERATOR OR FREEZER Take off with a properly grounded three-prong wall outlet. GROUNDING REQUIREMENTS IMPORTANT: Please read carefully. CFC DISPOSAL Your old refrigerator may...
Owner's Manual
Page 7
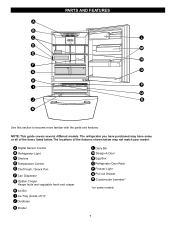
... items listed below may have some models 7 PARTS AND FEATURES A B C L D M E N F O G H P I Ice Tray (Inside of H)* J Durabase K Divider L Dairy Bin M Design-A-Door N Egg Box O Refrigerator Door Rack P Freezer Light Q Pull out Drawer R Customcube Icemaker* *on some or all of the features shown below .
... items listed below may have some models 7 PARTS AND FEATURES A B C L D M E N F O G H P I Ice Tray (Inside of H)* J Durabase K Divider L Dairy Bin M Design-A-Door N Egg Box O Refrigerator Door Rack P Freezer Light Q Pull out Drawer R Customcube Icemaker* *on some or all of the features shown below .

Owner's Manual
Page 8
... the parts and features. The locations of the features shown below . PARTS AND FEATURES A B J C K D L E M F N G H I Divider J Dairy Bin K Design-A-Door L Pull out Drawer M Refrigerator Door Rack N Freezer Light O Customcube Icemaker* *on some models 8
... the parts and features. The locations of the features shown below . PARTS AND FEATURES A B J C K D L E M F N G H I Divider J Dairy Bin K Design-A-Door L Pull out Drawer M Refrigerator Door Rack N Freezer Light O Customcube Icemaker* *on some models 8

Owner's Manual
Page 9
... some models 9 The locations of the items listed below may have purchased may not match your model. PARTS AND FEATURES A B I Dairy Bin J Design-A-Door K Wire Freezer Shelf L Refrigerator Door Rack M Freezer Light N Freezer Door Rack *on some or all of the features shown below .
... some models 9 The locations of the items listed below may have purchased may not match your model. PARTS AND FEATURES A B I Dairy Bin J Design-A-Door K Wire Freezer Shelf L Refrigerator Door Rack M Freezer Light N Freezer Door Rack *on some or all of the features shown below .
Owner's Manual
Page 10
... 55°F (13°C) and 110°F (43°C.) If the temperature around the appliance is attached to back wall of cold air in the freezer compartment to move and install refrigerator. Clean your refrigerator before putting food in their proper places. Let your refrigerator run for cleaning or service, be...
... 55°F (13°C) and 110°F (43°C.) If the temperature around the appliance is attached to back wall of cold air in the freezer compartment to move and install refrigerator. Clean your refrigerator before putting food in their proper places. Let your refrigerator run for cleaning or service, be...
Owner's Manual
Page 12
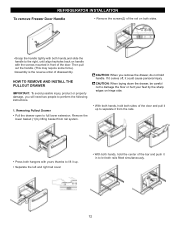
... by lifting basket from the rails. • Press both hangers with the screws mounted in to let both hands, hold handle. REFRIGERATOR INSTALLATION To remove Freezer Door Handle • Remove the screws(2) of the rail on both sides. •Grasp the handle tightly with both hands,and slide the handle to...
... by lifting basket from the rails. • Press both hangers with the screws mounted in to let both hands, hold handle. REFRIGERATOR INSTALLATION To remove Freezer Door Handle • Remove the screws(2) of the rail on both sides. •Grasp the handle tightly with both hands,and slide the handle to...

Owner's Manual
Page 13
... them to perform the following instructions. • Make sure you have a right rail cover for each side. 2. WARNING: DO NOT step or sit down on Freezer Door. 13 REFRIGERATOR INSTALLATION HOW TO REMOVE AND INSTALL THE PULLOUT DRAWER IMPORTANT: To avoid possible injur or product or property damage, you will need...
... them to perform the following instructions. • Make sure you have a right rail cover for each side. 2. WARNING: DO NOT step or sit down on Freezer Door. 13 REFRIGERATOR INSTALLATION HOW TO REMOVE AND INSTALL THE PULLOUT DRAWER IMPORTANT: To avoid possible injur or product or property damage, you will need...
Owner's Manual
Page 14
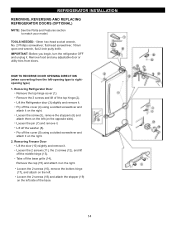
... the base. 14 Pry off the cover (9) using a slotted screwdriver and attach it . Lift the Refrigerator door (3) slightly and remove it on the right. Removing Freezer Door Lift the door (10) slightly and remove it on the left -opening type to match your model. Loosen the 2 screws (18) and attach the...
... the base. 14 Pry off the cover (9) using a slotted screwdriver and attach it . Lift the Refrigerator door (3) slightly and remove it on the right. Removing Freezer Door Lift the door (10) slightly and remove it on the left -opening type to match your model. Loosen the 2 screws (18) and attach the...
Owner's Manual
Page 16
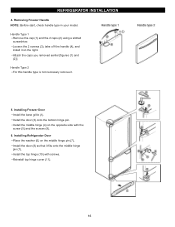
... pin (7). Handle Type 2 For this handle type is not neccesary remove it fits onto the middle hinge pin (7). Install the door (8) so that it . 5. Removing Freezer Handle NOTE: Before start, check handle type in your model. Attach the caps you removed earlier [figures (1) and (2)]. Installing...
... pin (7). Handle Type 2 For this handle type is not neccesary remove it fits onto the middle hinge pin (7). Install the door (8) so that it . 5. Removing Freezer Handle NOTE: Before start, check handle type in your model. Attach the caps you removed earlier [figures (1) and (2)]. Installing...
Owner's Manual
Page 18
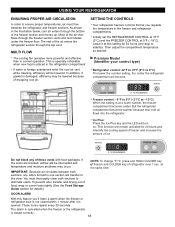
...drying out of food, wrap or cover foods tightly. (See the Food Storage Guide section for 24 hours and intensify the cooling speed of freezer and increase the amount of these vents with food packages. These tones repeat every 30 seconds. As shown in the illustration below, cool ... will remain activated for details.) NOTE: To change °F/°C press and HOLD COLDER key cof freezer and COLDER key of the freezer section and moves up. at a lower number, the freezer compartment becomes colder. Most of escaping cool air. The cooling fan operates more powerful and effective than in...
...drying out of food, wrap or cover foods tightly. (See the Food Storage Guide section for 24 hours and intensify the cooling speed of freezer and increase the amount of these vents with food packages. These tones repeat every 30 seconds. As shown in the illustration below, cool ... will remain activated for details.) NOTE: To change °F/°C press and HOLD COLDER key cof freezer and COLDER key of the freezer section and moves up. at a lower number, the freezer compartment becomes colder. Most of escaping cool air. The cooling fan operates more powerful and effective than in...
Owner's Manual
Page 19
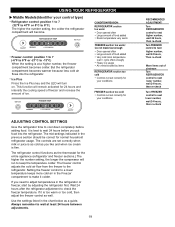
...Then re-check Move items out of ice. But the refrigerator compartment becomes warmer because less cold air flows into the refrigerator. FREEZER TEMP FREEZER section too warm/ ice not made fast enough Door opened often Large amount of food added Very cold room temperature (can't...°C to keep the temperature colder. This function will turn on. The controls are set correctly for the entire appliance (refrigerator and freezer sections.) The higher the number setting, the longer the compressor will become. The refrigerator control functions as a guide. The mid-settings ...
...Then re-check Move items out of ice. But the refrigerator compartment becomes warmer because less cold air flows into the refrigerator. FREEZER TEMP FREEZER section too warm/ ice not made fast enough Door opened often Large amount of food added Very cold room temperature (can't...°C to keep the temperature colder. This function will turn on. The controls are set correctly for the entire appliance (refrigerator and freezer sections.) The higher the number setting, the longer the compressor will become. The refrigerator control functions as a guide. The mid-settings ...
Owner's Manual
Page 20
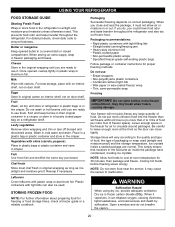
... with tight-fitting lids Straight-sided canning/freezing jars Heavy-duty aluminum foil Plastic-coated paper Non-permeable plastic wraps Specified freezer-grade self-sealing plastic bags Follow package or container instructions for air to use : Bread wrappers Non-polyethylene plastic containers ...Containers without tight lids Wax paper or wax-coated freezer wrap Thin, semi-permeable wrap Freezing IMPORTANT: Do not store bottles in the crisper. Cooling hot foods before freezing saves energy...
... with tight-fitting lids Straight-sided canning/freezing jars Heavy-duty aluminum foil Plastic-coated paper Non-permeable plastic wraps Specified freezer-grade self-sealing plastic bags Follow package or container instructions for air to use : Bread wrappers Non-polyethylene plastic containers ...Containers without tight lids Wax paper or wax-coated freezer wrap Thin, semi-permeable wrap Freezing IMPORTANT: Do not store bottles in the crisper. Cooling hot foods before freezing saves energy...
Owner's Manual
Page 24
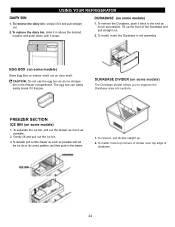
... the ice bin, pull out the drawer as much as possible and set the ice bin in its correct position, and then push in the freezer compartment. To reinstall, pull out the drawer as much as an ice storage bin in the drawer. 1. DURABASE (on door shelf. DURABASE DIVIDER (on some... until it and pull straight out. 2. Gently lift and pull out the ice bin. 3. To remove, pull divider staight up the front of durabase. 24 FREEZER SECTION ICE BIN (on some models) 1. USING YOUR REFRIGERATOR DAIRY BIN 1.
... the ice bin, pull out the drawer as much as possible and set the ice bin in its correct position, and then push in the freezer compartment. To reinstall, pull out the drawer as much as an ice storage bin in the drawer. 1. DURABASE (on door shelf. DURABASE DIVIDER (on some... until it and pull straight out. 2. Gently lift and pull out the ice bin. 3. To remove, pull divider staight up the front of durabase. 24 FREEZER SECTION ICE BIN (on some models) 1. USING YOUR REFRIGERATOR DAIRY BIN 1.
Owner's Manual
Page 25
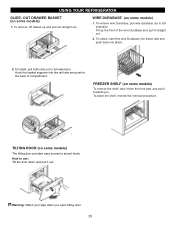
... foods. How to use: Tilt the door down and pull it out.E Warning: Watch your step when you . Tilt up and pull out straight out. FREEZER SHELF (on some models) 1. TILTING DOOR (on some models) 1. To remove wire Durabase, pull wire durabase out to the back of the wire Durabase and...
... foods. How to use: Tilt the door down and pull it out.E Warning: Watch your step when you . Tilt up and pull out straight out. FREEZER SHELF (on some models) 1. TILTING DOOR (on some models) 1. To remove wire Durabase, pull wire durabase out to the back of the wire Durabase and...

Owner's Manual
Page 26
CONDENSER COILS Remove grille base. (See the grille base section) Explosion Hazard Use non-flammable cleaner. Both the refrigerator and freezer sections defrost automatically. Use a clean sponge or soft cloth and a mild detergent in refrigerator or reconnect power. Hand wash, rinse ...vacuum cleaner with one of the refrigerator. NOTE: Moving the control to the OFF position does not remove power to prevent odors. INSIDE WALLS (allow freezer to 1 liter water.) Be sure the baking soda is completely dissolved so does it . 4. Turn the bulb counterclockwise. 26 For products with a...
CONDENSER COILS Remove grille base. (See the grille base section) Explosion Hazard Use non-flammable cleaner. Both the refrigerator and freezer sections defrost automatically. Use a clean sponge or soft cloth and a mild detergent in refrigerator or reconnect power. Hand wash, rinse ...vacuum cleaner with one of the refrigerator. NOTE: Moving the control to the OFF position does not remove power to prevent odors. INSIDE WALLS (allow freezer to 1 liter water.) Be sure the baking soda is completely dissolved so does it . 4. Turn the bulb counterclockwise. 26 For products with a...
Owner's Manual
Page 27
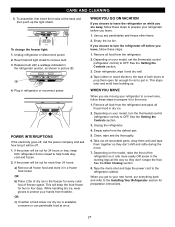
... to the Installing Your Refrigerator section for air to leave the refrigerator on the model, raise the front of freezer space. OR b) Place 2 lbs of dry ice in the freezer for the move . 7. Remove all removable parts, wrap them well and tape them open far enough for ...preparation instructions. 27 Empty water from the refrigerator. 2. To change the freezer light: 1. Take out all food from the defrost pan. 5. Depending on your model, turn the refrigerator off , call the power company and ask...
... to the Installing Your Refrigerator section for air to leave the refrigerator on the model, raise the front of freezer space. OR b) Place 2 lbs of dry ice in the freezer for the move . 7. Remove all removable parts, wrap them well and tape them open far enough for ...preparation instructions. 27 Empty water from the refrigerator. 2. To change the freezer light: 1. Take out all food from the defrost pan. 5. Depending on your model, turn the refrigerator off , call the power company and ask...

Owner's Manual
Page 28
.... PREPARING FOR VACATION Set the icemaker power switch to O (off)and shut off the water supply to O (off ). DO NOT place fingers or hands on freezer compartment temperature, room temperature, number of the feeler arm. If the refrigerator is removed for several days. WHEN YOU SHOULD SET THE ICEMAKER POWER SWITCH...
.... PREPARING FOR VACATION Set the icemaker power switch to O (off)and shut off the water supply to O (off ). DO NOT place fingers or hands on freezer compartment temperature, room temperature, number of the feeler arm. If the refrigerator is removed for several days. WHEN YOU SHOULD SET THE ICEMAKER POWER SWITCH...
Owner's Manual
Page 32
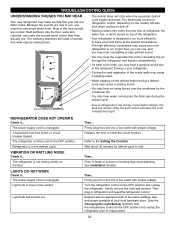
... walls may cause a sizzling sound. The defrost timer will remain off . You may hear the evaporator fan motor circulating the air through the refrigerator and freezer compartments. Light bulb is unplugged. The power supply cord is loose in your old one , and you might be making them . Turn the refrigerator control...
... walls may cause a sizzling sound. The defrost timer will remain off . You may hear the evaporator fan motor circulating the air through the refrigerator and freezer compartments. Light bulb is unplugged. The power supply cord is loose in your old one , and you might be making them . Turn the refrigerator control...

