
Owner's Manual
Page 1
TYPE : WALL MOUNTED P/NO : MFL39817402 http://www.lghvac.com www.lg.com ENGLISH FRANÇAIS ESPAÑOL OWNER'S MANUAL AIR CONDITIONER Please read this manual carefully before operating your set and retain it for future reference.
TYPE : WALL MOUNTED P/NO : MFL39817402 http://www.lghvac.com www.lg.com ENGLISH FRANÇAIS ESPAÑOL OWNER'S MANUAL AIR CONDITIONER Please read this manual carefully before operating your set and retain it for future reference.
Owner's Manual
Page 2
TYPE : WALL MOUNTED P/NO : MFL39817402 http://www.lghvac.com www.lg.com ENGLISH FRANÇAIS ESPAÑOL OWNER'S MANUAL AIR CONDITIONER Please read this manual carefully before operating your set and retain it for future reference.
TYPE : WALL MOUNTED P/NO : MFL39817402 http://www.lghvac.com www.lg.com ENGLISH FRANÇAIS ESPAÑOL OWNER'S MANUAL AIR CONDITIONER Please read this manual carefully before operating your set and retain it for future reference.
Owner's Manual
Page 3
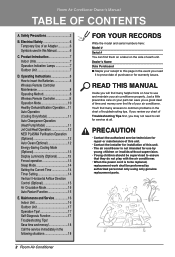
... work shall be performed by authorized personnel only using only genuine replacement parts. 2 Room Air Conditioner Room Air Conditioner Ownerʼs Manual TABLE OF CONTENTS A. You'll find many answers to common problems in the event you may not need it to insert the Batteries...15 Air Circulation Mode 15 Auto Restart Function 15 E. Product Introduction 7 Indoor Units 7 Operation Indication Lamps 7 Outdoor Unit 7 D. READ THIS MANUAL Inside you a great deal of time and money over the life of purchase or for warranty issues. Maintenance and Service 16 Indoor Unit 16 ...
... work shall be performed by authorized personnel only using only genuine replacement parts. 2 Room Air Conditioner Room Air Conditioner Ownerʼs Manual TABLE OF CONTENTS A. You'll find many answers to common problems in the event you may not need it to insert the Batteries...15 Air Circulation Mode 15 Auto Restart Function 15 E. Product Introduction 7 Indoor Units 7 Operation Indication Lamps 7 Outdoor Unit 7 D. READ THIS MANUAL Inside you a great deal of time and money over the life of purchase or for warranty issues. Maintenance and Service 16 Indoor Unit 16 ...
Owner's Manual
Page 4
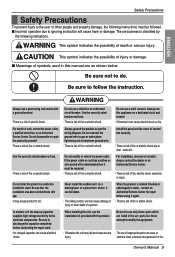
...a place from where it can cause damage or injury or even death of symbols used in this appliance on a defective installation stand. Owner's Manual 3 This symbol indicates the possibility of injury or damage. ■ Meanings of a person. Always ground the product as shown below. Install ... to dust , water etc. The seriousness is risk of fire or eletric shock. Be sure to use of electric shock. Always use this manual are listed in water , contact an Authorized Service Center for repair before conducting the repair work , contact the dealer, seller, a qualified electrician...
...a place from where it can cause damage or injury or even death of symbols used in this appliance on a defective installation stand. Owner's Manual 3 This symbol indicates the possibility of injury or damage. ■ Meanings of a person. Always ground the product as shown below. Install ... to dust , water etc. The seriousness is risk of fire or eletric shock. Be sure to use of electric shock. Always use this manual are listed in water , contact an Authorized Service Center for repair before conducting the repair work , contact the dealer, seller, a qualified electrician...
Owner's Manual
Page 6
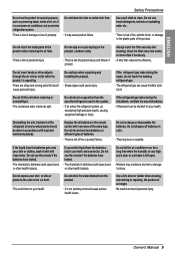
... not mix old and new batteries or different types of batteries. • There is not sanitary and could cause burns or other health hazards. Owner's Manual 5 Clean the filter every two weeks or more often if necessary. • A dirty filter reduces the efficiency. If you eat the liquid from the product...
... not mix old and new batteries or different types of batteries. • There is not sanitary and could cause burns or other health hazards. Owner's Manual 5 Clean the filter every two weeks or more often if necessary. • A dirty filter reduces the efficiency. If you eat the liquid from the product...
Owner's Manual
Page 7
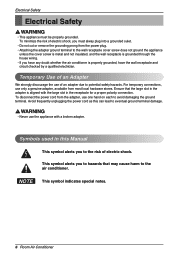
... slot in the adapter is properly grounded, have the wall receptacle and circuit checked by a qualified electrician. Avoid frequently unplugging the power cord as this Manual This symbol alerts you to potential safety hazards. This symbol alerts you to hazards that the large slot in the receptacle for a proper polarity connection...
... slot in the adapter is properly grounded, have the wall receptacle and circuit checked by a qualified electrician. Avoid frequently unplugging the power cord as this Manual This symbol alerts you to potential safety hazards. This symbol alerts you to hazards that the large slot in the receptacle for a proper polarity connection...
Owner's Manual
Page 8
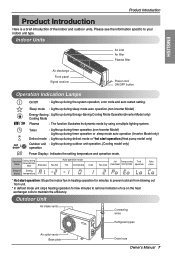
... system operation, error code and auto restart setting. Outdoor Unit Air intake vents Connecting wires Refrigerant pipes Air outlet vents Base plate Drain hose Owner's Manual 7 Sleep mode : Lights up during sleep mode auto operation.(non-Inverter Model) Energy-Saving : Lights up during Energy-Saving Cooling Mode Operation(Inverter Model only...
... system operation, error code and auto restart setting. Outdoor Unit Air intake vents Connecting wires Refrigerant pipes Air outlet vents Base plate Drain hose Owner's Manual 7 Sleep mode : Lights up during sleep mode auto operation.(non-Inverter Model) Energy-Saving : Lights up during Energy-Saving Cooling Mode Operation(Inverter Model only...
Owner's Manual
Page 10
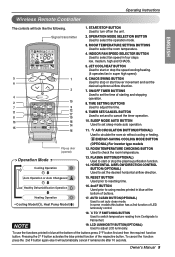
... to cancel the timer operation. 13 18 10. TIMER SET/CANCEL BUTTON Used to set the time of starting and stopping 4 operation. 2 CANCEL 10 8. Owner's Manual 9 LCD LUMINOSITY BUTTON(OPTIONAL) Used to check the room temperature. Pressing the 2nd F button activates the blue printed function of LED luminosity control. 18. ˚...
... to cancel the timer operation. 13 18 10. TIMER SET/CANCEL BUTTON Used to set the time of starting and stopping 4 operation. 2 CANCEL 10 8. Owner's Manual 9 LCD LUMINOSITY BUTTON(OPTIONAL) Used to check the room temperature. Pressing the 2nd F button activates the blue printed function of LED luminosity control. 18. ˚...
Owner's Manual
Page 12
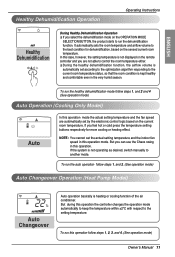
... follow steps 1, and 2 and 4 (See operation mode) Auto Operation (Cooling Only Model) Auto In this operation. If the system is not operating as desired, switch manually to the best condition for more cooling or heating effect. But during this operation the controller changes the operation mode automatically to keep the temperature... : You cannot set according to the optimization algorithm responding to the setting temperature. To run the auto operation follow steps 1, 2, 3, and 4. (See operation mode) Owner's Manual 11
... follow steps 1, and 2 and 4 (See operation mode) Auto Operation (Cooling Only Model) Auto In this operation. If the system is not operating as desired, switch manually to the best condition for more cooling or heating effect. But during this operation the controller changes the operation mode automatically to keep the temperature... : You cannot set according to the optimization algorithm responding to the setting temperature. To run the auto operation follow steps 1, 2, 3, and 4. (See operation mode) Owner's Manual 11
Owner's Manual
Page 14
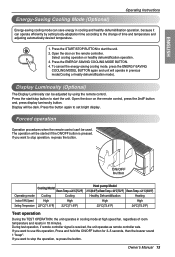
...°C(73.4°F) 24°C(75.2°F) Test operation During the TEST OPERATION, the unit operates in previous mode(Cooling or healty dehumidification mode). Owner's Manual 13 Select cooling operation or healthy dehumidification operation. 3. If you want to use this operation, Press and hold the ON/OFF button for 3~5 seconds, then...
...°C(73.4°F) 24°C(75.2°F) Test operation During the TEST OPERATION, the unit operates in previous mode(Cooling or healty dehumidification mode). Owner's Manual 13 Select cooling operation or healthy dehumidification operation. 3. If you want to use this operation, Press and hold the ON/OFF button for 3~5 seconds, then...
Owner's Manual
Page 16
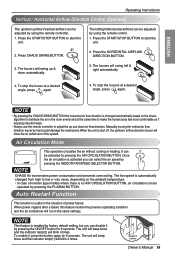
...; Always use the remote controller to start the unit. To enable it by pressing the ON/OFF button for 6 seconds. ON/OFF button Owner's Manual 15 Press the START/STOP BUTTON to adjust the up and down air flow direction. The louvers will blink 4 times. It can be operated by.... The unit will beep twice and the indicator lamp(1) will swing left /right(Horizontal airflow) can be adjusted by using the remote control. 1. Manually moving the vertical air flow direction louver by hand could damage the mechanism.When the unit is activated you can disable it , press the button...
...; Always use the remote controller to start the unit. To enable it by pressing the ON/OFF button for 6 seconds. ON/OFF button Owner's Manual 15 Press the START/STOP BUTTON to adjust the up and down air flow direction. The louvers will blink 4 times. It can be operated by.... The unit will beep twice and the indicator lamp(1) will swing left /right(Horizontal airflow) can be adjusted by using the remote control. 1. Manually moving the vertical air flow direction louver by hand could damage the mechanism.When the unit is activated you can disable it , press the button...
Owner's Manual
Page 18
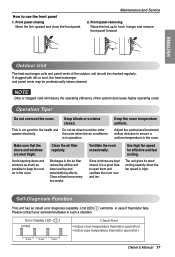
... room now and ten. The unit gives its rated cooling capacity when the fan speed is a good idea to open /short. 3 sec 3 sec 3 sec Owner's Manual 17 Unit LED( ) will reduce the operating efficiency of the outdoor unit should be professionally steam cleaned. Make sure that the doors and windows are...
... room now and ten. The unit gives its rated cooling capacity when the fan speed is a good idea to open /short. 3 sec 3 sec 3 sec Owner's Manual 17 Unit LED( ) will reduce the operating efficiency of the outdoor unit should be professionally steam cleaned. Make sure that the doors and windows are...


