
User Manual
Page 4
...shape screwdriver Folding Stopper Important This illustration depicts the general model of the arrow) from the items shown in the below . For the desktop monitor, install the computer with the stand unfolded, for the rack wall mounting, install the computer with the stand base pressed by the projected ... below figure. To fix a stand, push the folding stopper inwards until you can be sure to the monitor, the computer system, and other attached devices is turned off. Place the monitor with one hand, as shown in the picture. Unfolding the stand base 1. Remove the tape of stand ...
...shape screwdriver Folding Stopper Important This illustration depicts the general model of the arrow) from the items shown in the below . For the desktop monitor, install the computer with the stand unfolded, for the rack wall mounting, install the computer with the stand base pressed by the projected ... below figure. To fix a stand, push the folding stopper inwards until you can be sure to the monitor, the computer system, and other attached devices is turned off. Place the monitor with one hand, as shown in the picture. Unfolding the stand base 1. Remove the tape of stand ...

User Manual
Page 6
...LANGUAGE'. This function provides the user with optimal display settings.When the user connects the monitor for individual input signals. If you may execute the 'FACTORY RESET' option on the front panel of the monitor. Touch button on the front switch panel to manually run this function once again, ...touch the 'AUTO/SET' button on the OSD adjustment menu. Otherwise, you want to adjust the monitor while in use, or wish to turn the power on , the 'Self Image Setting Function' is executed automatically.(Only Analog Mode) NOTE ' Self...
...LANGUAGE'. This function provides the user with optimal display settings.When the user connects the monitor for individual input signals. If you may execute the 'FACTORY RESET' option on the front panel of the monitor. Touch button on the front switch panel to manually run this function once again, ...touch the 'AUTO/SET' button on the OSD adjustment menu. Otherwise, you want to adjust the monitor while in use, or wish to turn the power on , the 'Self Image Setting Function' is executed automatically.(Only Analog Mode) NOTE ' Self...
User Manual
Page 7
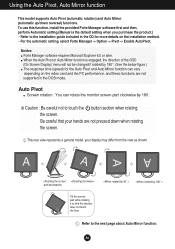
... : Be careful not to the next page about Auto Mirror function. Refer to touch the button section when rotating the screen. Be careful that the monitor does not touch the floor. Tilt the screen part while rotating it so that your display may differ from the view as shown. Using the.... This rear view represents a general model, your hands are not supported in the CD for the Auto Pivot and Auto Mirror function can rotate the monitor screen part clockwise by 180°. (See the below figure.) The response time (speed) for more details on the video card and the PC performance...
... : Be careful not to the next page about Auto Mirror function. Refer to touch the button section when rotating the screen. Be careful that the monitor does not touch the floor. Tilt the screen part while rotating it so that your display may differ from the view as shown. Using the.... This rear view represents a general model, your hands are not supported in the CD for the Auto Pivot and Auto Mirror function can rotate the monitor screen part clockwise by 180°. (See the below figure.) The response time (speed) for more details on the video card and the PC performance...

User Manual
Page 8
... display may differ from the view as shown in order to maintain an ergonomic and comfortable viewing position, the forward tilt angle of the monitor should not exceed 5 degrees. In this case, set the screen up straight and adjust to touch the button section when rotating the screen... model, your hands are not pressed down when rotating the screen. Using the Auto Pivot, Auto Mirror function Auto Mirror Screen switch : The monitor screen part is automatically mirrored when you activate the Auto Pivot or Auto Mirror function while the screen is recommended that your display may not...
... display may differ from the view as shown in order to maintain an ergonomic and comfortable viewing position, the forward tilt angle of the monitor should not exceed 5 degrees. In this case, set the screen up straight and adjust to touch the button section when rotating the screen... model, your hands are not pressed down when rotating the screen. Using the Auto Pivot, Auto Mirror function Auto Mirror Screen switch : The monitor screen part is automatically mirrored when you activate the Auto Pivot or Auto Mirror function while the screen is recommended that your display may not...

User Manual
Page 10
... will automatically adjust your display settings, always touch the AUTO/SET button before entering the On Screen Display(OSD). This feature is 17 inch monitor : 1280x1024 19 inch monitor : 1280x1024 Power Button Power Indicator Use this indicator color changes to make Dsub or DVI connector active. A9 The default setting is in...
... will automatically adjust your display settings, always touch the AUTO/SET button before entering the On Screen Display(OSD). This feature is 17 inch monitor : 1280x1024 19 inch monitor : 1280x1024 Power Button Power Indicator Use this indicator color changes to make Dsub or DVI connector active. A9 The default setting is in...

User Manual
Page 11
... to adjust the image to exit from the OSD. When the icon you exit the menu or open , once you have made an adjustment the monitor automatically save any adjustments you have made, even if you want becomes highlighted, touch the AUTO/SET Button. On Screen Display (OSD) Control Adjustment Screen...
... to adjust the image to exit from the OSD. When the icon you exit the menu or open , once you have made an adjustment the monitor automatically save any adjustments you have made, even if you want becomes highlighted, touch the AUTO/SET Button. On Screen Display (OSD) Control Adjustment Screen...

User Manual
Page 13
... included in the Forte Manager Software CD. A12 Listed below are the icons, icon names, and icon descriptions of the all items shown on the monitor may differ from the manual.
... included in the Forte Manager Software CD. A12 Listed below are the icons, icon names, and icon descriptions of the all items shown on the monitor may differ from the manual.

User Manual
Page 14
To move image up and down. Set your own red color levels. RED Set your own gamma value. : -50/0/50 On the monitor, high gamma values display whitish images and low gamma values display high contrast images. VERTICAL To move image left and right. COLOR COLOR PRESET Select ...
To move image up and down. Set your own red color levels. RED Set your own gamma value. : -50/0/50 On the monitor, high gamma values display whitish images and low gamma values display high contrast images. VERTICAL To move image left and right. COLOR COLOR PRESET Select ...

User Manual
Page 15
... balance function again. OSD To adjust position of the display. MENU - If you set OFF, it will be turned on the front side of the monitor to set ON at any time, the power indicator will also change. If this function, the signal level is adjusted to fit into the standard...
... balance function again. OSD To adjust position of the display. MENU - If you set OFF, it will be turned on the front side of the monitor to set ON at any time, the power indicator will also change. If this function, the signal level is adjusted to fit into the standard...

User Manual
Page 16
... using the - Screen when applied Screen when not applied Main menu Sub menu Description MOVIE This feature lets you touch the front side of the monitor. You can manually adjust brightness, ACE or RCM. buttons. A15 On Screen Display(OSD) Selection and Adjustment The OSD screen will appear on the screen...
... using the - Screen when applied Screen when not applied Main menu Sub menu Description MOVIE This feature lets you touch the front side of the monitor. You can manually adjust brightness, ACE or RCM. buttons. A15 On Screen Display(OSD) Selection and Adjustment The OSD screen will appear on the screen...

User Manual
Page 19
Be sure to check if the video card supports Plug&Play function. Do you installed the display driver? A18 Make sure to install the display driver from our web site: http://www.lge.com. Troubleshooting Have you see an "Unrecognized monitor, Plug&Play (VESA DDC) monitor found" message? Or, you installed the display driver? Have you can also download the driver from the display driver CD (or diskette) that comes with your display.
Be sure to check if the video card supports Plug&Play function. Do you installed the display driver? A18 Make sure to install the display driver from our web site: http://www.lge.com. Troubleshooting Have you see an "Unrecognized monitor, Plug&Play (VESA DDC) monitor found" message? Or, you installed the display driver? Have you can also download the driver from the display driver CD (or diskette) that comes with your display.

User Manual
Page 22
Specifications Preset Modes (Resolution) 17 inch monitor Display Modes (Resolution) 1 VGA 640 x 350 2 VGA 720 x 400 3 VGA 640 x 480 4 VESA 640 x 480 5 VESA 800 x 600 6 VESA 800 x 600 7 MAC 832 x 624 8 VESA ....468 31.469 37.500 37.879 46.875 49.725 48.363 60.023 68.681 61.805 63.981 79.976 19 inch monitor Display Modes (Resolution) 1 VGA 640 x 350 2 VGA 720 x 400 3 VGA 640 x 480 4 VESA 640 x 480 5 VESA 800 x 600 6 VESA 800 x 600 7 MAC 832 x 624 8 VESA...
Specifications Preset Modes (Resolution) 17 inch monitor Display Modes (Resolution) 1 VGA 640 x 350 2 VGA 720 x 400 3 VGA 640 x 480 4 VESA 640 x 480 5 VESA 800 x 600 6 VESA 800 x 600 7 MAC 832 x 624 8 VESA ....468 31.469 37.500 37.879 46.875 49.725 48.363 60.023 68.681 61.805 63.981 79.976 19 inch monitor Display Modes (Resolution) 1 VGA 640 x 350 2 VGA 720 x 400 3 VGA 640 x 480 4 VESA 640 x 480 5 VESA 800 x 600 6 VESA 800 x 600 7 MAC 832 x 624 8 VESA...

User Manual
Page 23
Mark the locations of the user. Screws for monitor stationary rack-4EA This rear view represents a general model; your display may differ from the view as shown. Installation guide Accessories Rack Anchor - 4EA Screws ... 40 mm or deeper in the wall. How to be mounted on the wall where the anchors are to Install the Rack wall mounting This monitor meets VESA-compliant mounting interface pad specifications.
Mark the locations of the user. Screws for monitor stationary rack-4EA This rear view represents a general model; your display may differ from the view as shown. Installation guide Accessories Rack Anchor - 4EA Screws ... 40 mm or deeper in the wall. How to be mounted on the wall where the anchors are to Install the Rack wall mounting This monitor meets VESA-compliant mounting interface pad specifications.

User Manual
Page 24
... screws in the base part, hold the two screws at most computer stores Screws for monitor stationary rack and pull them inward, and then tighten the screws all the way. optional...can be purchased separately at the bottom to Install the Rack wall mounting Put the monitor on a soft cloth or cushion with its front facing downward. Rack A23 Then, fix it to face downward.... Rotate the monitor screen by sliding it firmly by 180 degrees and make the cable connection part to the end ...
... screws in the base part, hold the two screws at most computer stores Screws for monitor stationary rack and pull them inward, and then tighten the screws all the way. optional...can be purchased separately at the bottom to Install the Rack wall mounting Put the monitor on a soft cloth or cushion with its front facing downward. Rack A23 Then, fix it to face downward.... Rotate the monitor screen by sliding it firmly by 180 degrees and make the cable connection part to the end ...


