Owner's Manual (English)
Page 4
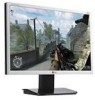
...Display Before setting up carefully and face the front side Important Do not remove and re-install the stand frequently, it "click". 3. Once assembled take the monitor up the monitor, ensure that the power to the monitor, the computer system, and other attached devices is turned off. Make sure... you push it until you hear it could damage the stand. A3 REAR FRONT REAR FRONT Place the monitor with its front facing downward ...
...Display Before setting up carefully and face the front side Important Do not remove and re-install the stand frequently, it "click". 3. Once assembled take the monitor up the monitor, ensure that the power to the monitor, the computer system, and other attached devices is turned off. Make sure... you push it until you hear it could damage the stand. A3 REAR FRONT REAR FRONT Place the monitor with its front facing downward ...

Owner's Manual (English)
Page 5
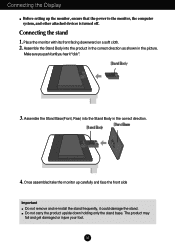
Put a cushion or soft cloth on the product as it follows and turn the Stand Base in the arrow direction until you hear a "click." 5. Change your hold on a flat surface. The Stand base part 4. A4 Place the monitor face down on the cushion or soft cloth. Hold the product as it follows and lift up the Stand slightly. Pull out the Stand to remove. Connecting the Display To remove the Stand: 1. 2. The Head part 3.
Put a cushion or soft cloth on the product as it follows and turn the Stand Base in the arrow direction until you hear a "click." 5. Change your hold on a flat surface. The Stand base part 4. A4 Place the monitor face down on the cushion or soft cloth. Hold the product as it follows and lift up the Stand slightly. Pull out the Stand to remove. Connecting the Display To remove the Stand: 1. 2. The Head part 3.

Owner's Manual (English)
Page 6
Separate the Stand Body by lifting it as pressing the arrow on the Stand Body while holding the Stand Base with the other hand. 2. Connecting the Display To remove the Stand Base: 1. A5 The body of the Stand and the Stand Base are successfully separated.
Separate the Stand Body by lifting it as pressing the arrow on the Stand Body while holding the Stand Base with the other hand. 2. Connecting the Display To remove the Stand Base: 1. A5 The body of the Stand and the Stand Base are successfully separated.
Owner's Manual (English)
Page 22
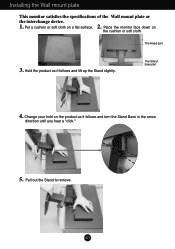
The Head part 3. Change your hold on the product as it follows and turn the Stand Base in the arrow direction until you hear a "click." 5. Pull out the Stand to remove. The Stand base part 4. Hold the product as it follows and lift up the Stand slightly. Place the monitor face down on a flat surface. A21 Installing the Wall mount plate This monitor satisfies the specifications of the Wall mount plate or the interchange device. 1. 2. Put a cushion or soft cloth on the cushion or soft cloth.
The Head part 3. Change your hold on the product as it follows and turn the Stand Base in the arrow direction until you hear a "click." 5. Pull out the Stand to remove. The Stand base part 4. Hold the product as it follows and lift up the Stand slightly. Place the monitor face down on a flat surface. A21 Installing the Wall mount plate This monitor satisfies the specifications of the Wall mount plate or the interchange device. 1. 2. Put a cushion or soft cloth on the cushion or soft cloth.


