Owner's Manual (English)
Page 2
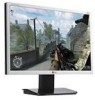
... a short period of time. Important Precautions This unit has been engineered and manufactured to ensure your personal safety, however improper use may result in the specifications of this manual or listed on a sloping shelf unless properly secured. To Avoid Personal Injury : Do not place the display on the display. Do not...
... a short period of time. Important Precautions This unit has been engineered and manufactured to ensure your personal safety, however improper use may result in the specifications of this manual or listed on a sloping shelf unless properly secured. To Avoid Personal Injury : Do not place the display on the display. Do not...
Owner's Manual (English)
Page 14
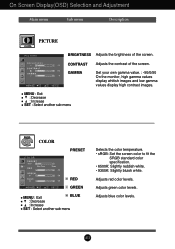
GAMMA Set your own gamma value. : -50/0/50 On the monitor, high gamma values display whitish images and low gamma values display high contrast images. MENU : Exit : Decrease : Increase SET : Select another sub-menu COLOR COLOR...: Exit BLUE : Decrease : Increase SET : Select another sub-menu Selects the color temperature. • sRGB: Set the screen color to fit the SRGB standard color specification. • 6500K: Slightly reddish white. • 9300K: Slightly bluish white. Adjusts green color levels. Adjusts blue color levels. On Screen Display(OSD) Selection and Adjustment...
GAMMA Set your own gamma value. : -50/0/50 On the monitor, high gamma values display whitish images and low gamma values display high contrast images. MENU : Exit : Decrease : Increase SET : Select another sub-menu COLOR COLOR...: Exit BLUE : Decrease : Increase SET : Select another sub-menu Selects the color temperature. • sRGB: Set the screen color to fit the SRGB standard color specification. • 6500K: Slightly reddish white. • 9300K: Slightly bluish white. Adjusts green color levels. Adjusts blue color levels. On Screen Display(OSD) Selection and Adjustment...
Owner's Manual (English)
Page 16
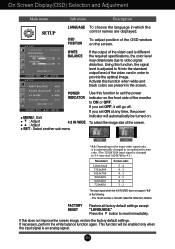
...- Using this function to set OFF, it is automatically changed to an optimized screen ratio. (The 1280X1024 input signal is different the required specifications, the color level may deteriorate due to ON or OFF. If you set ON at any time, the power indicator will go off.... another sub-menu Use this function, the signal level is adjusted to provide the optimal image. The 19 inch monitor is an analog signal. WHITE BALANCE If the output of the monitor to video signal distortion. Activate this does not improve the screen image, restore the factory default settings....
...- Using this function to set OFF, it is automatically changed to an optimized screen ratio. (The 1280X1024 input signal is different the required specifications, the color level may deteriorate due to ON or OFF. If you set ON at any time, the power indicator will go off.... another sub-menu Use this function, the signal level is adjusted to provide the optimal image. The 19 inch monitor is an analog signal. WHITE BALANCE If the output of the monitor to video signal distortion. Activate this does not improve the screen image, restore the factory default settings....
Owner's Manual (English)
Page 17
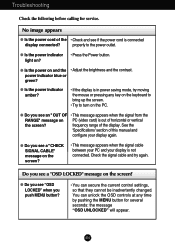
... Check the following before calling for several seconds: the message "OSD UNLOCKED" will appear. G Is the power indicator • Press the Power button. See the 'Specifications' section of the • Check and see a "OSD LOCKED" message on the PC. power indicator blue or green? Do you see a "CHECK SIGNAL CABLE" message...
... Check the following before calling for several seconds: the message "OSD UNLOCKED" will appear. G Is the power indicator • Press the Power button. See the 'Specifications' section of the • Check and see a "OSD LOCKED" message on the PC. power indicator blue or green? Do you see a "CHECK SIGNAL CABLE" message...
Owner's Manual (English)
Page 20
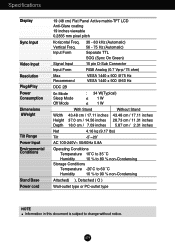
Specifications Display Sync Input Video Input Resolution Plug&Play Power Consumption Dimensions &Weight Tilt Range Power Input Environmental Conditions Stand Base Power cord 19 (48 cm) Flat Panel Active matrix-TFT LCD Anti-Glare coating 19 inches viewable 0.2835 mm pixel pitch Horizontal Freq. 30 - 83 kHz (Automatic) Vertical Freq. 56 - 75 Hz (Automatic) Input...
Specifications Display Sync Input Video Input Resolution Plug&Play Power Consumption Dimensions &Weight Tilt Range Power Input Environmental Conditions Stand Base Power cord 19 (48 cm) Flat Panel Active matrix-TFT LCD Anti-Glare coating 19 inches viewable 0.2835 mm pixel pitch Horizontal Freq. 30 - 83 kHz (Automatic) Vertical Freq. 56 - 75 Hz (Automatic) Input...
Owner's Manual (English)
Page 21
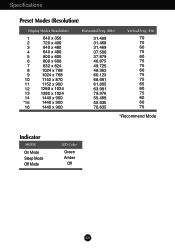
Specifications Preset Modes (Resolution) Display Modes (Resolution) 1 640 x 350 2 720 x 400 3 640 x 480 4 640 x 480 5 800 x 600 6 800 x 600 7 832 x 624 8 1024 x 768 9 1024 x 768 10 ...
Specifications Preset Modes (Resolution) Display Modes (Resolution) 1 640 x 350 2 720 x 400 3 640 x 480 4 640 x 480 5 800 x 600 6 800 x 600 7 832 x 624 8 1024 x 768 9 1024 x 768 10 ...
Owner's Manual (English)
Page 22
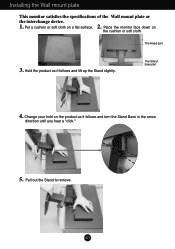
Put a cushion or soft cloth on the product as it follows and turn the Stand Base in the arrow direction until you hear a "click." 5. Hold the product as it follows and lift up the Stand slightly. Change your hold on a flat surface. Place the monitor face down on the cushion or soft cloth. A21 The Head part 3. The Stand base part 4. Pull out the Stand to remove. Installing the Wall mount plate This monitor satisfies the specifications of the Wall mount plate or the interchange device. 1. 2.
Put a cushion or soft cloth on the product as it follows and turn the Stand Base in the arrow direction until you hear a "click." 5. Hold the product as it follows and lift up the Stand slightly. Change your hold on a flat surface. Place the monitor face down on the cushion or soft cloth. A21 The Head part 3. The Stand base part 4. Pull out the Stand to remove. Installing the Wall mount plate This monitor satisfies the specifications of the Wall mount plate or the interchange device. 1. 2.
