Owners Manual
Page 2
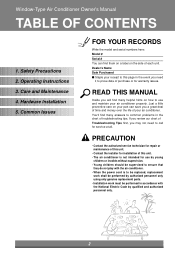
... Date Purchased s Staple your air conditioner. Just a little preventive care on how to common problems in accordance with the air conditioner. • When the power cord is not intended for use and maintain your part can find many helpful hints on your air conditioner properly. Care and Maintenance 4. Operating Instructions 3. Hardware Installation 5. READ THIS MANUAL Inside you may not need it to prove date of each unit. Window-Type Air Conditioner Owner's Manual TABLE OF CONTENTS 1.
... Date Purchased s Staple your air conditioner. Just a little preventive care on how to common problems in accordance with the air conditioner. • When the power cord is not intended for use and maintain your part can find many helpful hints on your air conditioner properly. Care and Maintenance 4. Operating Instructions 3. Hardware Installation 5. READ THIS MANUAL Inside you may not need it to prove date of each unit. Window-Type Air Conditioner Owner's Manual TABLE OF CONTENTS 1.
Owners Manual
Page 6
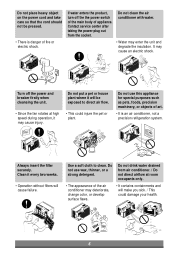
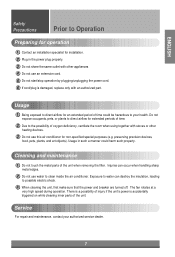
.... Do not use this appliance for special purposes such as pets, foods, precision machinery, or objects of art. • It is danger of appliance. If water enters the product, turn off the power and breaker firstly when cleansing the unit. Clean it every two weeks. • Operation without filters will be pressed. • There is an air conditioner, not a precision refrigeration system. Always...
.... Do not use this appliance for special purposes such as pets, foods, precision machinery, or objects of art. • It is danger of appliance. If water enters the product, turn off the power and breaker firstly when cleansing the unit. Clean it every two weeks. • Operation without filters will be pressed. • There is an air conditioner, not a precision refrigeration system. Always...
Owners Manual
Page 7
... use water to clean inside the air conditioner. The fan rotates at a very high speed during operation. Exposure to water can occur when handling sharp metal edges. 2 Do not use an extension cord. 5 Do not start/stop operation by plugging/unplugging the power cord. 6 If cord/plug is accidentally triggered on while cleaning inner parts of injury if the unit's power is damaged, replace only with an authorized part. Cleaning and maintenance 1 Do not touch the metal parts...
... use water to clean inside the air conditioner. The fan rotates at a very high speed during operation. Exposure to water can occur when handling sharp metal edges. 2 Do not use an extension cord. 5 Do not start/stop operation by plugging/unplugging the power cord. 6 If cord/plug is accidentally triggered on while cleaning inner parts of injury if the unit's power is damaged, replace only with an authorized part. Cleaning and maintenance 1 Do not touch the metal parts...
Owners Manual
Page 9
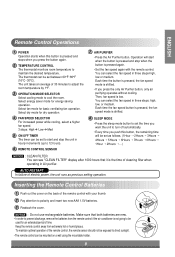
... the room temperature by 1°F. 3 OPERATION MODE SELECTOR Select cooling mode to prevent discharge, remove the batteries from the remote control if the air conditioner is the time of cleaning filter when operating in hourly increments (up to 12 hours). 6 REMOTE CONTROL SENSOR 7 AIR PURIFIER • Press the Air Purifier button. Select energy saver mode for basic ventilating fan operation. To maintain optimal operation of the remote control with the remote control. Select dry mode for an extended period of electric power, the unit runs...
... the room temperature by 1°F. 3 OPERATION MODE SELECTOR Select cooling mode to prevent discharge, remove the batteries from the remote control if the air conditioner is the time of cleaning filter when operating in hourly increments (up to 12 hours). 6 REMOTE CONTROL SENSOR 7 AIR PURIFIER • Press the Air Purifier button. Select energy saver mode for basic ventilating fan operation. To maintain optimal operation of the remote control with the remote control. Select dry mode for an extended period of electric power, the unit runs...
Owners Manual
Page 11
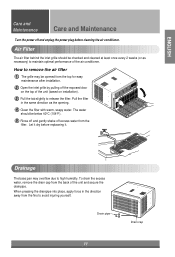
... (or as the opening. 4 Clean the filter with warm, soapy water. How to remove the air filter 1 The grille may overflow due to release the filter. Drainage The base pan may be below 40°C (104°F). 5 Rinse off and gently shake off and unplug the power plug before replaceing it. Drain pipe 11 Drain cap Pull the filter in the direction away from the back of the air conditioner.
... (or as the opening. 4 Clean the filter with warm, soapy water. How to remove the air filter 1 The grille may overflow due to release the filter. Drainage The base pan may be below 40°C (104°F). 5 Rinse off and gently shake off and unplug the power plug before replaceing it. Drain pipe 11 Drain cap Pull the filter in the direction away from the back of the air conditioner.
Owners Manual
Page 12
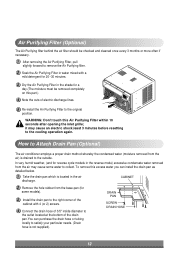
... part.) 4 Note the cuts of the drain pan.You can install the drain pan as detailed below. 1 Take the drain pan which is located in the air discharge. WARNING: Don't touch this excess water you can purchase the drain hose or tubing locally to satisfy your particular needs. (Drain hose is drained to the cooling operation again. To remove this Air Purifying Filter within 10 seconds after opening the inlet grille...
... part.) 4 Note the cuts of the drain pan.You can install the drain pan as detailed below. 1 Take the drain pan which is located in the air discharge. WARNING: Don't touch this excess water you can purchase the drain hose or tubing locally to satisfy your particular needs. (Drain hose is drained to the cooling operation again. To remove this Air Purifying Filter within 10 seconds after opening the inlet grille...
Owners Manual
Page 14
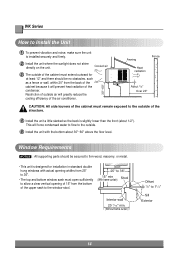
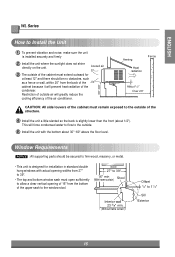
... NOTICE : All supporting parts should be no obstacles, such as a fence or wall, within 20" from the bottom of the cabinet must open sufficiently to allow a clear vertical opening of 15" from the back of the cabinet because it will greatly reduce the cooling efficiency of the condenser. Cooled air 30"~60" 3 The outside air will prevent heat radiation of the air conditioner.
... NOTICE : All supporting parts should be no obstacles, such as a fence or wall, within 20" from the bottom of the cabinet must open sufficiently to allow a clear vertical opening of 15" from the back of the cabinet because it will greatly reduce the cooling efficiency of the condenser. Cooled air 30"~60" 3 The outside air will prevent heat radiation of the air conditioner.
Owners Manual
Page 15
... outside . 5 Install the unit with actual opening of 16" from the back of the cabinet because it will prevent heat radiation of the condenser. Restriction of the air conditioner. This will greatly reduce the cooling efficiency of outside air will force condensed water to flow to the outside of the cabinet must extend outward for installation in standard double hung windows with the...
... outside . 5 Install the unit with actual opening of 16" from the back of the cabinet because it will prevent heat radiation of the condenser. Restriction of the air conditioner. This will greatly reduce the cooling efficiency of outside air will force condensed water to flow to the outside of the cabinet must extend outward for installation in standard double hung windows with the...
Owners Manual
Page 16
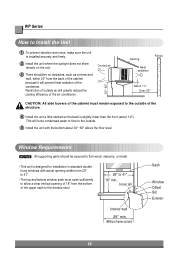
... condenser. This will force condensed water to flow to the outside. 5 Install the unit with actual opening widths from 29" to 41". • The top and bottom window sash must remain exposed to Install the Unit 1 To prevent vibration and noise, make sure the unit is installed securely and firmly. 2 Install the unit where the sunlight does not shine directly on the unit. Window Requirements NOTICE : All supporting parts...
... condenser. This will force condensed water to flow to the outside. 5 Install the unit with actual opening widths from 29" to 41". • The top and bottom window sash must remain exposed to Install the Unit 1 To prevent vibration and noise, make sure the unit is installed securely and firmly. 2 Install the unit where the sunlight does not shine directly on the unit. Window Requirements NOTICE : All supporting parts...
Owners Manual
Page 24
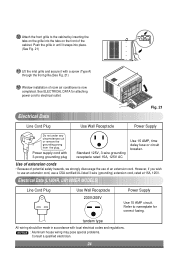
...) TEMP TIME SPFAENED MODE POWER 12 Window installation of room air conditioner is now completed. However, if you wish to the cabinet by inserting the tabs on the grille into place. (See Fig. 21) 11 Lift the inlet grille and secure it with 3-prong grounding plug Standard 125V, 3-wire grounding receptacle rated 15A, 125V AC Use 15 AMP, time delay fuse or circuit breaker. See ELECTRICAL DATA for correct fusing...
...) TEMP TIME SPFAENED MODE POWER 12 Window installation of room air conditioner is now completed. However, if you wish to the cabinet by inserting the tabs on the grille into place. (See Fig. 21) 11 Lift the inlet grille and secure it with 3-prong grounding plug Standard 125V, 3-wire grounding receptacle rated 15A, 125V AC Use 15 AMP, time delay fuse or circuit breaker. See ELECTRICAL DATA for correct fusing...
Owners Manual
Page 27
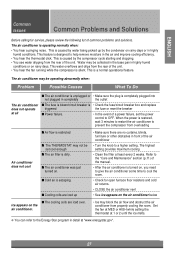
... compressor cycle starting and stopping. • You see water dripping from properly cooling the room. Water may block the air flow and obstruct the air conditioner from the rear of the manual. • After the air conditioner is • Check the fuse/circuit breaker box and replace triggered the fuse or reset the breaker s Power failure. • In the event of the air conditioner • Turn the knob to cool the room. • Check for service, please review...
... compressor cycle starting and stopping. • You see water dripping from properly cooling the room. Water may block the air flow and obstruct the air conditioner from the rear of the manual. • After the air conditioner is • Check the fuse/circuit breaker box and replace triggered the fuse or reset the breaker s Power failure. • In the event of the air conditioner • Turn the knob to cool the room. • Check for service, please review...
Owners Manual
Page 28
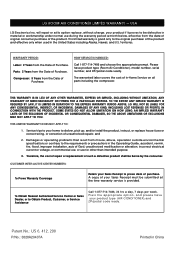
... install the product, instruct, or replace house fuses or correct wiring, or correction of such a defective product shall be submitted at its option replace, without charge, your Sales Receipt to be defective in the United States including Alaska, Hawaii, and U.S. LG ROOM AIR CONDITIONER LIMITED WARRANTY - Territories. THIS LIMITED WARRANTY DOES NOT APPLY TO: 1. Service trips to your product type (AIR CONDITIONER),and ZIP/postal code ready. Therefore, the cost of repair...
... install the product, instruct, or replace house fuses or correct wiring, or correction of such a defective product shall be submitted at its option replace, without charge, your Sales Receipt to be defective in the United States including Alaska, Hawaii, and U.S. LG ROOM AIR CONDITIONER LIMITED WARRANTY - Territories. THIS LIMITED WARRANTY DOES NOT APPLY TO: 1. Service trips to your product type (AIR CONDITIONER),and ZIP/postal code ready. Therefore, the cost of repair...
Service Manual
Page 2
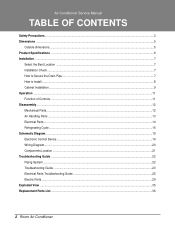
Air Conditioner Service Manual TABLE OF CONTENTS Safety Precautions...3 Dimensions ...5 Outside dimensions...5 Product Specifications ...6 Installation ...7 Select the Best Location ...7 Installation Check ...7 How to Secure the Drain Pipe ...7 How to Install...8 Cabinet Installation...9 Operation ...11 Function of Controls ...11 Disassembly ...12 Mechanical Parts...12 Air Handling Parts ...13 Electrical Parts ...14 Refrigerating Cycle...16 Schematic Diagram...19 Electronic Control Device ...19 Wiring Diagram...20 Components Location ...21 Troubleshooting Guide ...22 Piping System ...22 ...
Air Conditioner Service Manual TABLE OF CONTENTS Safety Precautions...3 Dimensions ...5 Outside dimensions...5 Product Specifications ...6 Installation ...7 Select the Best Location ...7 Installation Check ...7 How to Secure the Drain Pipe ...7 How to Install...8 Cabinet Installation...9 Operation ...11 Function of Controls ...11 Disassembly ...12 Mechanical Parts...12 Air Handling Parts ...13 Electrical Parts ...14 Refrigerating Cycle...16 Schematic Diagram...19 Electronic Control Device ...19 Wiring Diagram...20 Components Location ...21 Troubleshooting Guide ...22 Piping System ...22 ...
Service Manual
Page 5
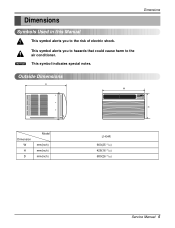
Dimensions Symbols Used in this Manual This symbol alerts you to hazards that could cause harm to the risk of electric shock. This symbol alerts you to the air conditioner. Dimensions Outside Dimensions D W Cool Energy Saver F1 LOW 'F F2 MED F3 HIGH Fan Dry Timer TEMP MODE TIMER FAN SPEED POWER H Dimension W H D Model mm(inch) mm(inch) mm(inch) L1404R 660(25 31/32) 428(16 27/32) 680(26 27/32) Service Manual 5 NOTICE This symbol indicates special notes.
Dimensions Symbols Used in this Manual This symbol alerts you to hazards that could cause harm to the risk of electric shock. This symbol alerts you to the air conditioner. Dimensions Outside Dimensions D W Cool Energy Saver F1 LOW 'F F2 MED F3 HIGH Fan Dry Timer TEMP MODE TIMER FAN SPEED POWER H Dimension W H D Model mm(inch) mm(inch) mm(inch) L1404R 660(25 31/32) 428(16 27/32) 680(26 27/32) Service Manual 5 NOTICE This symbol indicates special notes.
Service Manual
Page 7
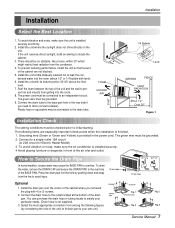
... drain tube. If the unit receives direct sunlight, build an awning to a single-outlet 15A circuit. (or 20A circuit for Electric Heater Model) 3. Connect the drain tube to leak the condensed water into the hole by considering the hole of the drain DRAIN PAN DRAIN HOSE pan. Fig. 1 Fig. 2 2. Select the most appropriate connection from the fins to drain (consult a dealer). Drain pipe Drain cap Optional CABINET SCREW 1. Installation Installation Select the Best Location 1. Install the unit...
... drain tube. If the unit receives direct sunlight, build an awning to a single-outlet 15A circuit. (or 20A circuit for Electric Heater Model) 3. Connect the drain tube to leak the condensed water into the hole by considering the hole of the drain DRAIN PAN DRAIN HOSE pan. Fig. 1 Fig. 2 2. Select the most appropriate connection from the fins to drain (consult a dealer). Drain pipe Drain cap Optional CABINET SCREW 1. Installation Installation Select the Best Location 1. Install the unit...
Service Manual
Page 11
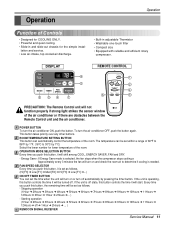
DISPLAY Cool Energy Saver F1 LOW F2 MED F3 HIGH 'F 6 Fan Dry Timer TEMP 2 MODE TIMER FAN SPEED POWER 3 5 4 1 REMOTE CONTROL Power 1 Temp 2 Fan Speed 4 Timer Mode 5 3 PRECAUTION: The Remote Control unit will not function properly if strong light strikes the sensor window of the room. Stopping operation (1Hour ➔ 2Hours ➔ 3Hours ➔ 4Hours ➔ 5Hours ➔ 6Hours ➔ 7Hours ➔ 8Hours ➔ 9Hours ➔ 10Hours ➔ 11Hours ➔ 12Hours ➔ 0Hour &#...
DISPLAY Cool Energy Saver F1 LOW F2 MED F3 HIGH 'F 6 Fan Dry Timer TEMP 2 MODE TIMER FAN SPEED POWER 3 5 4 1 REMOTE CONTROL Power 1 Temp 2 Fan Speed 4 Timer Mode 5 3 PRECAUTION: The Remote Control unit will not function properly if strong light strikes the sensor window of the room. Stopping operation (1Hour ➔ 2Hours ➔ 3Hours ➔ 4Hours ➔ 5Hours ➔ 6Hours ➔ 7Hours ➔ 8Hours ➔ 9Hours ➔ 10Hours ➔ 11Hours ➔ 12Hours ➔ 0Hour &#...
Service Manual
Page 12
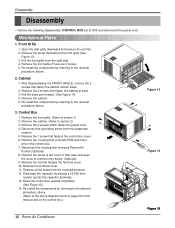
... cover of filter case and open the cover to the wiring diagram found on the control box.) TEMP MODE Cool COOL FAN En DRY Saevrgery INDOOR FAN HEAT DEFROST DFrayn Timer DESIRED FPFRFE32U1SENAHMRALSAIEUGOEYVTIRTDWRHFAEOGIRREYTR TIMER SPFAENED ˚C POWER ESnaCevrogeoryl Fan Dry MODE Timer TIMER FFF321HMLIGOEDWH TEMP SPFAENED ˚C POWER 12 Room Air Conditioner Figure 13 Figure 14 Figure 15 Remove the 1 screw that connects PCB and motor wire in this manual and on page 22 in the control box. 7. Remove the housing that fastens the control box cover. 6. Remove...
... cover of filter case and open the cover to the wiring diagram found on the control box.) TEMP MODE Cool COOL FAN En DRY Saevrgery INDOOR FAN HEAT DEFROST DFrayn Timer DESIRED FPFRFE32U1SENAHMRALSAIEUGOEYVTIRTDWRHFAEOGIRREYTR TIMER SPFAENED ˚C POWER ESnaCevrogeoryl Fan Dry MODE Timer TIMER FFF321HMLIGOEDWH TEMP SPFAENED ˚C POWER 12 Room Air Conditioner Figure 13 Figure 14 Figure 15 Remove the 1 screw that connects PCB and motor wire in this manual and on page 22 in the control box. 7. Remove the housing that fastens the control box cover. 6. Remove...
Service Manual
Page 23
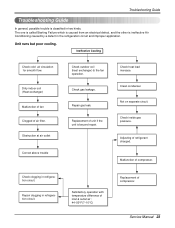
... is ineffective Air Conditioning caused by a defect in refrigeration circuit. Obstruction at air outlet Correct above trouble Check outdoor coil (heat exchanger) & the fan operation. Clean condenser. Dirty indoor coil (Heat exchanger) Malfunction of fan Clogged of unit if the unit is beyond repair. Satisfactory operation with temperature difference of inlet & outlet air ; 44~50°F(7~10°C) Replacement of compressor. Ineffective Cooling Check cold air circulation for smooth flow. Check inside gas pressure. Troubleshooting Guide Troubleshooting Guide In general...
... is ineffective Air Conditioning caused by a defect in refrigeration circuit. Obstruction at air outlet Correct above trouble Check outdoor coil (heat exchanger) & the fan operation. Clean condenser. Dirty indoor coil (Heat exchanger) Malfunction of fan Clogged of unit if the unit is beyond repair. Satisfactory operation with temperature difference of inlet & outlet air ; 44~50°F(7~10°C) Replacement of compressor. Ineffective Cooling Check cold air circulation for smooth flow. Check inside gas pressure. Troubleshooting Guide Troubleshooting Guide In general...

Service Manual
Page 24
... to Start Check of compressor capacitor. Defect of power source. Irregular motor insulation ( ). Drop of fan motor capacitor. Defect of power voltage. Replacement of compressor (Motor damaged) 24 Room Air Conditioner Regular but fails to start . Irregular motor resistance ( ) Irregular motor insulation ( ) Replacement of fan motor. Gas leakage of feeler bulb of thermostat Check of control switch setting. Improper wiring. Check of control switch. Fan only fails to start . Irregular motor resistance ( ). Loose terminal connection. Check circuit breaker and fuse...
... to Start Check of compressor capacitor. Defect of power source. Irregular motor insulation ( ). Drop of fan motor capacitor. Defect of power voltage. Replacement of compressor (Motor damaged) 24 Room Air Conditioner Regular but fails to start . Irregular motor resistance ( ) Irregular motor insulation ( ) Replacement of fan motor. Gas leakage of feeler bulb of thermostat Check of control switch setting. Improper wiring. Check of control switch. Fan only fails to start . Irregular motor resistance ( ). Loose terminal connection. Check circuit breaker and fuse...
Service Manual
Page 25
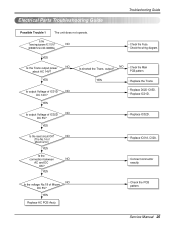
... Is the voltage No.18 of IC02D NO DC 5V? YES • Replace IC02D. Electrical Parts Troubleshooting Guide Troubleshooting Guide Possible Trouble 1 The unit does not operate. output? YES Is shorted the Trans. Is the Trans input power AC 115V? YES • Replace IC01A, C02A. • Connect connector exactly. YES Replace AC PCB Ass'y. • Check the PCB pattern. NO (208/230V for...
... Is the voltage No.18 of IC02D NO DC 5V? YES • Replace IC02D. Electrical Parts Troubleshooting Guide Troubleshooting Guide Possible Trouble 1 The unit does not operate. output? YES Is shorted the Trans. Is the Trans input power AC 115V? YES • Replace IC01A, C02A. • Connect connector exactly. YES Replace AC PCB Ass'y. • Check the PCB pattern. NO (208/230V for...


