
Owners Manual
Page 1
.... M NUEL 'UTILI ION CII = o,oE_UI Veuilez/re atentivement et en entier ce guide d'ullsation et [es mesures de securite ci-inc[uses avant de proceder & rinstalation et au fonctionnement de votre clmalseur. MODEL, MODELE, MODELO: HBLG1200H Manufactured by LG Emectronics AI C N ITIONE Ii® IN Please read the operating instructions and safety precautions carefu/y and thoroughly before installing and operating your room air conditioner.
.... M NUEL 'UTILI ION CII = o,oE_UI Veuilez/re atentivement et en entier ce guide d'ullsation et [es mesures de securite ci-inc[uses avant de proceder & rinstalation et au fonctionnement de votre clmalseur. MODEL, MODELE, MODELO: HBLG1200H Manufactured by LG Emectronics AI C N ITIONE Ii® IN Please read the operating instructions and safety precautions carefu/y and thoroughly before installing and operating your room air conditioner.
Owners Manual
Page 2
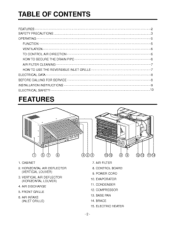
... GRILLE 6, AIR INTAKE (INLET GRILLE) 7, AIR FILTER 8, CONTROL BOARD 9, POWER CORD 10. EVAPORATOR 11. BRACE 15, ELECTRIC HEATER FEATURES 2 SAFE_¢ PRECAUTIONS 3 OPERATING ... 5 F UNCTI,ON ... 5 VENTILATION ... 6 TO CONTROL AIR DIRECTION 6 HOW TO SECURE THE DRAIN PiPE 6 AIR FILTER CLEANING ... 7 HOW TO USE THE REVERSIBLE INLET GRILLE 7 ELECTRICAL DATA ... 8 BEFORE CALLING FOR SERVICE 8 INSTALLATION INSTRUCTIONS ... 9 ELECTR ICAL SAFETY... 13 1, CABINET 2, HORIZONTAL AIR DEFLECTOR (VERTICAL LOUVER) 3, VERTICAL AIR DEFLECTOR (HORIZONTAL LOUVER) 4. COMPRESSOR...
... GRILLE 6, AIR INTAKE (INLET GRILLE) 7, AIR FILTER 8, CONTROL BOARD 9, POWER CORD 10. EVAPORATOR 11. BRACE 15, ELECTRIC HEATER FEATURES 2 SAFE_¢ PRECAUTIONS 3 OPERATING ... 5 F UNCTI,ON ... 5 VENTILATION ... 6 TO CONTROL AIR DIRECTION 6 HOW TO SECURE THE DRAIN PiPE 6 AIR FILTER CLEANING ... 7 HOW TO USE THE REVERSIBLE INLET GRILLE 7 ELECTRICAL DATA ... 8 BEFORE CALLING FOR SERVICE 8 INSTALLATION INSTRUCTIONS ... 9 ELECTR ICAL SAFETY... 13 1, CABINET 2, HORIZONTAL AIR DEFLECTOR (VERTICAL LOUVER) 3, VERTICAL AIR DEFLECTOR (HORIZONTAL LOUVER) 4. COMPRESSOR...
Owners Manual
Page 3
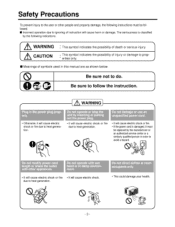
... of symbols used in this manual are as shown below, Be sure not to do. _ Be sure to follow the instruction. • Otherwise, it will cause electric shock or fire due to heat generation. . _twill cause electric shock or fire due to heat generation. •...; it will cause el_tric: shoals,. • This could damage your health. °3- To prevent injury to the user or other people and property damage, the, foliowing instructions must be r_laced by the manufacturer or an authorized service...
... of symbols used in this manual are as shown below, Be sure not to do. _ Be sure to follow the instruction. • Otherwise, it will cause electric shock or fire due to heat generation. . _twill cause electric shock or fire due to heat generation. •...; it will cause el_tric: shoals,. • This could damage your health. °3- To prevent injury to the user or other people and property damage, the, foliowing instructions must be r_laced by the manufacturer or an authorized service...

Owners Manual
Page 4
It may cause an iniury. • 'Water may cause deterioration of the cabinet tion, • Use caution when handling the case. of quaF ity, etc. • It may cause an ele_ric shock, • It may cause a fire or ...• Since the fan rotates at high speed during operation, it , • Useheavy#lovesto handlethecaseif necessary. • DONOT allowthe caseto slide -4- It may cause an electric shock. • An oxygen shortage may cause an injury. • This could injure the pets or plants. • Do not use this air conditioner to preserve precision devices...
It may cause an iniury. • 'Water may cause deterioration of the cabinet tion, • Use caution when handling the case. of quaF ity, etc. • It may cause an ele_ric shock, • It may cause a fire or ...• Since the fan rotates at high speed during operation, it , • Useheavy#lovesto handlethecaseif necessary. • DONOT allowthe caseto slide -4- It may cause an electric shock. • An oxygen shortage may cause an injury. • This could injure the pets or plants. • Do not use this air conditioner to preserve precision devices...
Owners Manual
Page 5
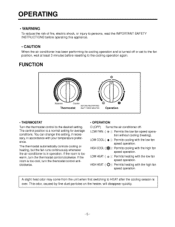
... Thermostat WAIT THREE MINUTES Operation • THERMOSTAT Turn the thermostat control to HEAT after the cooling season is in accordance with your temperature preference. You can change this appliance. • CAUTION When the air conditioner has been performing its cooling operation and is too cool, turn the thermostat control clockwise. LOW FAN ( e ): Permits the low fan speed operation without cooling (heating). If the room is a normal setting for average conditions. HIGH HEAT (-}_): Permits heating with the low fan speed operation...
... Thermostat WAIT THREE MINUTES Operation • THERMOSTAT Turn the thermostat control to HEAT after the cooling season is in accordance with your temperature preference. You can change this appliance. • CAUTION When the air conditioner has been performing its cooling operation and is too cool, turn the thermostat control clockwise. LOW FAN ( e ): Permits the low fan speed operation without cooling (heating). If the room is a normal setting for average conditions. HIGH HEAT (-}_): Permits heating with the low fan speed operation...
Owners Manual
Page 6
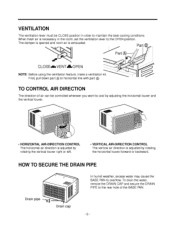
Part NOTE: Before using the ventilation feature, make a ventilation kit. To drain the water, remove the DRAIN CAP and secure the DRAIN PIPE to ovedlow. Whenfreshair is exhausted. VERTICAL AIR-DIRECTION CONTROL The vertical air direction is adiusted by rotating the horizontal louver forward or backward, HOW TO SECURE THE DRAIN PIPE In humid weather, ex_ss water may cause the BASE PAN to the rear hole of air can be controlled wherever...
Part NOTE: Before using the ventilation feature, make a ventilation kit. To drain the water, remove the DRAIN CAP and secure the DRAIN PIPE to ovedlow. Whenfreshair is exhausted. VERTICAL AIR-DIRECTION CONTROL The vertical air direction is adiusted by rotating the horizontal louver forward or backward, HOW TO SECURE THE DRAIN PIPE In humid weather, ex_ss water may cause the BASE PAN to the rear hole of air can be controlled wherever...
Owners Manual
Page 7
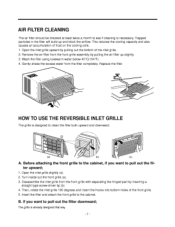
Remove the air filter from the front grille assembly by inserting a straight type screw-driver tip (b). 4. If you want to see if cleaning is already designed that way. The grille is necessary. This reduces the cooling capacity and also causes an accumulation of the inlet grille. 2. Replace the filter. Turn inside out the front grille (a). 3. Wash the filter using lukewarm water below 40°C(104°F). 4. Disassemble the inlet...
Remove the air filter from the front grille assembly by inserting a straight type screw-driver tip (b). 4. If you want to see if cleaning is already designed that way. The grille is necessary. This reduces the cooling capacity and also causes an accumulation of the inlet grille. 2. Replace the filter. Turn inside out the front grille (a). 3. Wash the filter using lukewarm water below 40°C(104°F). 4. Disassemble the inlet...
Owners Manual
Page 8
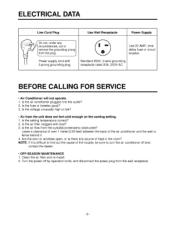
... cause of heat in the room? Clean the air filter and re-install. 2. BEFORE CALLING FOR SERVICE , Air Conditioner will not operate. 1. Is the air filter clogged with 3-prong grounding plug Standard 250V, 3-wire grounding receptacle rated 20A, 250V AC Use 20 AMP, time delay fuse or circuit breaker. Are the door or windows open, or is difficult to turn the air conditioner off by operation knob, and disconnect the power plug from the outside(condensers) obstructed? Turn the power off...
... cause of heat in the room? Clean the air filter and re-install. 2. BEFORE CALLING FOR SERVICE , Air Conditioner will not operate. 1. Is the air filter clogged with 3-prong grounding plug Standard 250V, 3-wire grounding receptacle rated 20A, 250V AC Use 20 AMP, time delay fuse or circuit breaker. Are the door or windows open, or is difficult to turn the air conditioner off by operation knob, and disconnect the power plug from the outside(condensers) obstructed? Turn the power off...
Owners Manual
Page 9
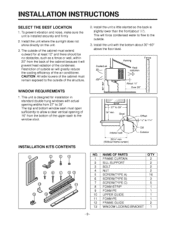
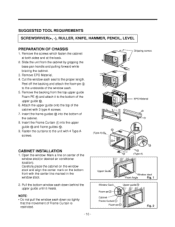
... the cooling efficiency of the air conditioner. Install the unit where the sunlight does not shine directly on the unit. 3. CAUTION: All side louvers of the cabinet must open sufficiently to allow a clear vertical opening of 16" from 27" to 39", The top and bottom window sash must remain exposed to the window stool_ INSTALLATION KITS CONTENTS _nterior wall I SELECT THE BEST LOCATION 1. This unit is installed...
... the cooling efficiency of the air conditioner. Install the unit where the sunlight does not shine directly on the unit. 3. CAUTION: All side louvers of the cabinet must open sufficiently to allow a clear vertical opening of 16" from 27" to 39", The top and bottom window sash must remain exposed to the window stool_ INSTALLATION KITS CONTENTS _nterior wall I SELECT THE BEST LOCATION 1. This unit is installed...
Owners Manual
Page 10
... desired air conditioner location). Mark a line on the bottom front with 4 Type A screws. (Type A}_. Peel off the backing and attach the foam-pc @ to the proper length. i Shipping screws EPS Matedal CABINET INSTALLATION 1. Open the window. Carefully place the, cabinet on the window stool and align the center mark on center of the cabinet with 3 type A screws. 7. insert the Frame Curtain...
... desired air conditioner location). Mark a line on the bottom front with 4 Type A screws. (Type A}_. Peel off the backing and attach the foam-pc @ to the proper length. i Shipping screws EPS Matedal CABINET INSTALLATION 1. Open the window. Carefully place the, cabinet on the window stool and align the center mark on center of the cabinet with 3 type A screws. 7. insert the Frame Curtain...

Owners Manual
Page 11
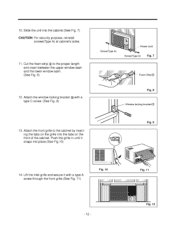
... you install the cabinet (frame guides @ are broken so easily). 5. The cabinet should be installed with a very slight tilt(about 1/£) downward toward the outside (See Fig. 5). Loosely assemble the sill support using the parts in each window sash track, and repeat step 2. 9. Attach the sill support to the cabinet track hole in relation to the selected position using screws Q(Type C). (See...
... you install the cabinet (frame guides @ are broken so easily). 5. The cabinet should be installed with a very slight tilt(about 1/£) downward toward the outside (See Fig. 5). Loosely assemble the sill support using the parts in each window sash track, and repeat step 2. 9. Attach the sill support to the cabinet track hole in relation to the selected position using screws Q(Type C). (See...
Owners Manual
Page 12
...@witha typeC screw.(SeeFig.9) Screw(Type A} .......Power cord z Screw(Type A) Fig. 7 Foam-S_rip Fig. 8 locking bracket@ 13. 10.Slidethe unitintothe cabinet.(SeeFig.7) CAUTION:Forsecuritypurpose,reinstall screws(TypeA) at cabinet'ssides. 11,Cutthe foamostnp® to the cabinet by inserting the tabs on the front of the cabinet. Lift the inlet grille and secure it snaps into...
...@witha typeC screw.(SeeFig.9) Screw(Type A} .......Power cord z Screw(Type A) Fig. 7 Foam-S_rip Fig. 8 locking bracket@ 13. 10.Slidethe unitintothe cabinet.(SeeFig.7) CAUTION:Forsecuritypurpose,reinstall screws(TypeA) at cabinet'ssides. 11,Cutthe foamostnp® to the cabinet by inserting the tabs on the front of the cabinet. Lift the inlet grille and secure it snaps into...
Owners Manual
Page 13
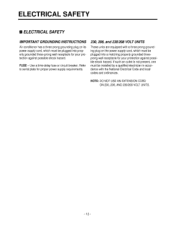
... plug on its power supply cord, which must be plugged into properly grounded three-prong wall receptacle for your protection against possible shock hazard. ELECTRICAL SAFETY • ELECTRICAL SAFETY IMPORTANT GROUNDING INSTRUCTIONS Air conditioner has a three-prong grounding plug on the power supply cord, which must be plugged into a matching properly grounded threeprong wall receptacle for your protection against possible shock hazard. FUSE - Use a time-delay fuse or circuit breaker...
... plug on its power supply cord, which must be plugged into properly grounded three-prong wall receptacle for your protection against possible shock hazard. ELECTRICAL SAFETY • ELECTRICAL SAFETY IMPORTANT GROUNDING INSTRUCTIONS Air conditioner has a three-prong grounding plug on the power supply cord, which must be plugged into a matching properly grounded threeprong wall receptacle for your protection against possible shock hazard. FUSE - Use a time-delay fuse or circuit breaker...
Owners Manual
Page 39
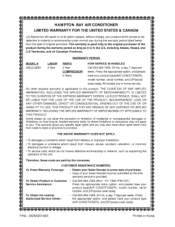
... the product during the warranty period listed below from delivery or improper installation. so these costs are in the U.S. Press the appropriate option, and please have your product type _' (AIR CONDITIONER), and ZIP/postal code ready. _=_ P/No.' 3828A20146S Printed in material or workmanship under normal use, during the warranty period as long as it is in -home service. WARRANTY PERIOD MODEL # HBLG1200H LABOR 2 Year PARTS 2 Year COMPRESSOR 5 Years HOW SERVICE IS...
... the product during the warranty period listed below from delivery or improper installation. so these costs are in the U.S. Press the appropriate option, and please have your product type _' (AIR CONDITIONER), and ZIP/postal code ready. _=_ P/No.' 3828A20146S Printed in material or workmanship under normal use, during the warranty period as long as it is in -home service. WARRANTY PERIOD MODEL # HBLG1200H LABOR 2 Year PARTS 2 Year COMPRESSOR 5 Years HOW SERVICE IS...


