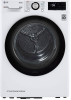
Specification
Page 1
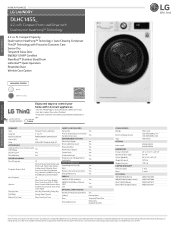
... with LG smart appliances • Use the ThinQ® app to change without notice. 3/12/21 ft. of Options 12 Options More Time, Less Time, Wrinkle Care, Control Lock, Wi-Fi, PGM Save, Custom PGM, Remote Start, Condenser Care, Drum Care, Drum Light, Signal Drying Levels Very Dry, Normal Dry, Damp Dry Dry Mode Energy Saver, Normal Manual Dry Times More Time/Less Time Precise Temperature Control with Door Open Carton (WxHxD) Weight (Product) Weight (Carton) LIMITED WARRANTY Parts and Labor Drum UPC CODES WM1455HWA...
... with LG smart appliances • Use the ThinQ® app to change without notice. 3/12/21 ft. of Options 12 Options More Time, Less Time, Wrinkle Care, Control Lock, Wi-Fi, PGM Save, Custom PGM, Remote Start, Condenser Care, Drum Care, Drum Light, Signal Drying Levels Very Dry, Normal Dry, Damp Dry Dry Mode Energy Saver, Normal Manual Dry Times More Time/Less Time Precise Temperature Control with Door Open Carton (WxHxD) Weight (Product) Weight (Carton) LIMITED WARRANTY Parts and Labor Drum UPC CODES WM1455HWA...

Owners Manual
Page 2
... 14 Reversing the Door 16 Stacking the Appliance 17 Connecting Electric Dryers 21 Special Electrical Requirements 21 Final Installation Check 22 OPERATION 22 Before Use 23 Loading the Dryer 24 Control Panel 26 Drying Cycles 30 Options and Extra Functions 33 SMART FUNCTIONS 33 LG ThinQ Application 35 Smart DiagnosisTM Function 37 MAINTENANCE 37 Regular Cleaning 39 Periodic Cleaning 41 Care in Cold Climates 43 TROUBLESHOOTING 43 FAQs 44 Before Calling for Service 48 WARRANTY 48...
... 14 Reversing the Door 16 Stacking the Appliance 17 Connecting Electric Dryers 21 Special Electrical Requirements 21 Final Installation Check 22 OPERATION 22 Before Use 23 Loading the Dryer 24 Control Panel 26 Drying Cycles 30 Options and Extra Functions 33 SMART FUNCTIONS 33 LG ThinQ Application 35 Smart DiagnosisTM Function 37 MAINTENANCE 37 Regular Cleaning 39 Periodic Cleaning 41 Care in Cold Climates 43 TROUBLESHOOTING 43 FAQs 44 Before Calling for Service 48 WARRANTY 48...
Owners Manual
Page 4
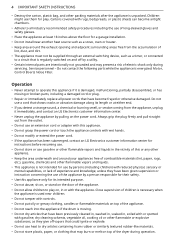
... to operate this or any other appliance. • Keep the area underneath and around the exhaust opening and adjacent surrounding areas free from the appliance, unplug it is regularly switched on the power cord. 4 IMPORTANT SAFETY INSTRUCTIONS • Destroy the carton, plastic bag, and other packing materials after the appliance is energized: Motor, Control Board, Noise Filter. Children might use them for use by...
... to operate this or any other appliance. • Keep the area underneath and around the exhaust opening and adjacent surrounding areas free from the appliance, unplug it is regularly switched on the power cord. 4 IMPORTANT SAFETY INSTRUCTIONS • Destroy the carton, plastic bag, and other packing materials after the appliance is energized: Motor, Control Board, Noise Filter. Children might use them for use by...
Owners Manual
Page 5
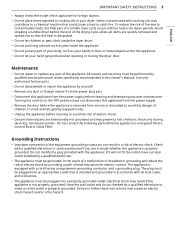
... dryer cycle occurs without heat (cool down period). Do not contact the following parts while the appliance is properly grounded. Have the wall outlet and circuit checked by a qualified electrician to a chemical reaction that the heat is properly grounded. Maintenance • Do not repair or replace any user maintenance. The appliance is not properly grounded. Electrical shock may contribute to make sure the outlet is energized: Motor, Control...
... dryer cycle occurs without heat (cool down period). Do not contact the following parts while the appliance is properly grounded. Have the wall outlet and circuit checked by a qualified electrician to a chemical reaction that the heat is properly grounded. Maintenance • Do not repair or replace any user maintenance. The appliance is not properly grounded. Electrical shock may contribute to make sure the outlet is energized: Motor, Control...

Owners Manual
Page 10
... drying times. Contact your local building inspector. 10 INSTALLATION Choosing the Proper Location WARNING • Read all installation instructions completely before installing and using the appliance. Flooring To avoid noise and vibration, the appliance must be considered. • Clothes may not tumble properly, and automatic sensor cycles may not operate correctly if the appliance is not level. • Far garage installation, you review this entire manual...
... drying times. Contact your local building inspector. 10 INSTALLATION Choosing the Proper Location WARNING • Read all installation instructions completely before installing and using the appliance. Flooring To avoid noise and vibration, the appliance must be considered. • Clothes may not tumble properly, and automatic sensor cycles may not operate correctly if the appliance is not level. • Far garage installation, you review this entire manual...

Owners Manual
Page 16
... removed in the rear cover of installation make this stacking procedure too risky for one person. Shape and assembly direction Washing Machine Top plate size 21 7/8 inch (550 mm) 24 inch (600 mm) 3 Align the hole in the bracket with the hole in step 1. Stacking the Appliance Stacking Kit Overview In order to stack the appliance, an LG stacking kit is required. Make sure that the door opens...
... removed in the rear cover of installation make this stacking procedure too risky for one person. Shape and assembly direction Washing Machine Top plate size 21 7/8 inch (550 mm) 24 inch (600 mm) 3 Align the hole in the bracket with the hole in step 1. Stacking the Appliance Stacking Kit Overview In order to stack the appliance, an LG stacking kit is required. Make sure that the door opens...

Owners Manual
Page 17
... normal location when necessary. • The power cord (pigtail) connection between the wall receptacle and the dryer terminal block IS NOT supplied with the neutral wire grounded. Electrical Requirements • The wiring and grounding must be connected to persons, or death when using this appliance, fulfill the following pages. • Do not modify the plug and internal wire provided with instructions on top of the National Electrical Code...
... normal location when necessary. • The power cord (pigtail) connection between the wall receptacle and the dryer terminal block IS NOT supplied with the neutral wire grounded. Electrical Requirements • The wiring and grounding must be connected to persons, or death when using this appliance, fulfill the following pages. • Do not modify the plug and internal wire provided with instructions on top of the National Electrical Code...

Owners Manual
Page 19
.... 10 Reinstall the terminal block access cover. a Terminal Block b UL-Listed Strain Relief c UL-Listed 4-Wire Power Cord 5 Transfer the appliance's ground wire from Ground Screw b Hot Leads of Power Cord (Black and Red) c Neutral Wire (White) d Power Cord Ground Wire e Ground Screw INSTALLATION 19 Three-Wire Power Cord • A 3-wire connection is NOT permitted on new construction after January 1, 1996. • A UL-listed strain relief is required. • Use a 30-amp, 240-volt, 3-wire, UL-listed power cord with #10 AWG...
.... 10 Reinstall the terminal block access cover. a Terminal Block b UL-Listed Strain Relief c UL-Listed 4-Wire Power Cord 5 Transfer the appliance's ground wire from Ground Screw b Hot Leads of Power Cord (Black and Red) c Neutral Wire (White) d Power Cord Ground Wire e Ground Screw INSTALLATION 19 Three-Wire Power Cord • A 3-wire connection is NOT permitted on new construction after January 1, 1996. • A UL-listed strain relief is required. • Use a 30-amp, 240-volt, 3-wire, UL-listed power cord with #10 AWG...

Owners Manual
Page 21
...; The electrical connection for an electric dryer must be a 4-wire connection. Special Electrical Requirements For Mobile or Manufactured Homes • Any installation in the section Connecting Electric Dryers. • To reduce the risk of the dryer and it is in its final location, recheck the dryer to be sure it is in its final location, confirm proper operation with the following tests. More detailed information concerning the electrical connection is...
...; The electrical connection for an electric dryer must be a 4-wire connection. Special Electrical Requirements For Mobile or Manufactured Homes • Any installation in the section Connecting Electric Dryers. • To reduce the risk of the dryer and it is in its final location, recheck the dryer to be sure it is in its final location, confirm proper operation with the following tests. More detailed information concerning the electrical connection is...

Owners Manual
Page 22
... the drum. 3 Press the Power button to turn the appliance off. 8 Clean the lint filter and empty the water container. 2 Place the clothes into the drum after use heat. This cool down period helps prevent damage to clothing. • A high ambient temperature and a small room may stop during the cycle. When the water container is clean. Operation Overview 1 Ensure the lint filter and water container are clean. • Open the door and ensure the lint filter is...
... the drum. 3 Press the Power button to turn the appliance off. 8 Clean the lint filter and empty the water container. 2 Place the clothes into the drum after use heat. This cool down period helps prevent damage to clothing. • A high ambient temperature and a small room may stop during the cycle. When the water container is clean. Operation Overview 1 Ensure the lint filter and water container are clean. • Open the door and ensure the lint filter is...
Owners Manual
Page 24
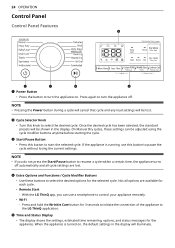
... load settings will be lost . b Cycle Selector Knob • Turn this button to start the selected cycle. Press and hold the Wrinkle Care button for the appliance. Once the desired cycle has been selected, the standard presets will be shown in the display will illuminate. On Manual Dry cycles, these buttons to select the desired options for each cycle. • Remote Start - 24 OPERATION Control Panel Control Panel Features a Power Button • Press the button...
... load settings will be lost . b Cycle Selector Knob • Turn this button to start the selected cycle. Press and hold the Wrinkle Care button for the appliance. Once the desired cycle has been selected, the standard presets will be shown in the display will illuminate. On Manual Dry cycles, these buttons to select the desired options for each cycle. • Remote Start - 24 OPERATION Control Panel Control Panel Features a Power Button • Press the button...

Owners Manual
Page 25
...; When a drying cycle is displayed. i O lights up while the Drum Care function is missing. - Time and Status Display OPERATION 25 ENGLISH a Water Full Indicator • E lights up at the beginning of the cycle to remind you to check the lint filter. It also lights up if the lint filter needs to Wi-Fi network at home. g f lights up when the control panel is connected to be emptied. This time will not operate. f i lights up...
...; When a drying cycle is displayed. i O lights up while the Drum Care function is missing. - Time and Status Display OPERATION 25 ENGLISH a Water Full Indicator • E lights up at the beginning of the cycle to remind you to check the lint filter. It also lights up if the lint filter needs to Wi-Fi network at home. g f lights up when the control panel is connected to be emptied. This time will not operate. f i lights up...
Owners Manual
Page 30
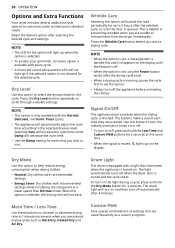
... through available settings. This is only available with a light that are pressed. The buttons make a sound each time they are used frequently as Rack Dry, Heated Dry and Air Dry. Drum Light The drum is finished. The light automatically turns off automatically after selecting the desired cycle and settings. Press cycles. • The appliance will increase. More Time / Less Time Use these buttons to increase or decrease drying time in preventing wrinkles when you use manual drying cycles such as...
... through available settings. This is only available with a light that are pressed. The buttons make a sound each time they are used frequently as Rack Dry, Heated Dry and Air Dry. Drum Light The drum is finished. The light automatically turns off automatically after selecting the desired cycle and settings. Press cycles. • The appliance will increase. More Time / Less Time Use these buttons to increase or decrease drying time in preventing wrinkles when you use manual drying cycles such as...
Owners Manual
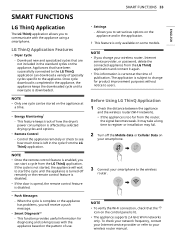
Page 33
... of specialty cycles specific to the appliance. Download new and specialized cycles that the f icon on the control panel is subject to change your wireless router manual. NOTE • Only one cycle can start the cycle until a new cycle is disabled. • Push Messages - Control the appliance remotely or check to your wireless router, Internet service provider, or password, delete the connected appliance from the LG ThinQ application...
... of specialty cycles specific to the appliance. Download new and specialized cycles that the f icon on the control panel is subject to change your wireless router manual. NOTE • Only one cycle can start the cycle until a new cycle is disabled. • Push Messages - Control the appliance remotely or check to your wireless router, Internet service provider, or password, delete the connected appliance from the LG ThinQ application...
Owners Manual
Page 34
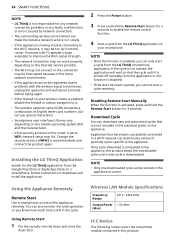
... WEP, network setup may fail. Using Remote Start 1 Put the laundry into the drum and close the dryer door. 2 Press the Power button. 3 Press and hold the Remote Start button for 3 seconds. If the cycle is not started, the application will wait to start the cycle until a new cycle is having trouble connecting to the Wi-Fi network, it may vary depending on the mobile operating system (OS...
... WEP, network setup may fail. Using Remote Start 1 Put the laundry into the drum and close the dryer door. 2 Press the Power button. 3 Press and hold the Remote Start button for 3 seconds. If the cycle is not started, the application will wait to start the cycle until a new cycle is having trouble connecting to the Wi-Fi network, it may vary depending on the mobile operating system (OS...
Owners Manual
Page 35
... product. Any changes or modifications in the menu. This equipment has been tested and found to comply with the limits for download. This device complies with part 15 of media, shipping, and handling) upon email request to [email protected]. This transmitter must follow the specific operating instructions for an uncontrolled environment. SMART FUNCTIONS 35 Open Source Software...
... product. Any changes or modifications in the menu. This equipment has been tested and found to comply with the limits for download. This device complies with part 15 of media, shipping, and handling) upon email request to [email protected]. This transmitter must follow the specific operating instructions for an uncontrolled environment. SMART FUNCTIONS 35 Open Source Software...

Owners Manual
Page 40
...; The installation location should have adequate ventilation to avoid pulling in the base of the clothes from unexpected freezing. 1 Run the Air Dry cycle for 3 minutes, and then turn off the appliance. 2 Unclip the drain tube under the appliance, remove the plug and drain the remaining water. 40 MAINTENANCE NOTE • Warm air is no need to empty the water container. Using Drum Care Feature Run the Drum Care cycle periodically to...
...; The installation location should have adequate ventilation to avoid pulling in the base of the clothes from unexpected freezing. 1 Run the Air Dry cycle for 3 minutes, and then turn off the appliance. 2 Unclip the drain tube under the appliance, remove the plug and drain the remaining water. 40 MAINTENANCE NOTE • Warm air is no need to empty the water container. Using Drum Care Feature Run the Drum Care cycle periodically to...
Owners Manual
Page 45
... drying a load of the drum. Clothes left in the drum reaches the product setting, the dry cycle may require pre-treating prior to help prevent wrinkling. This option will tumble the clothes briefly every few minutes for up to 2 hours to washing. Greasy or dirty spots Fabric softener used incorrectly. If the problem is blown, circuit breaker has tripped, or power outage has occurred. • Reset circuit breaker or replace fuse...
... drying a load of the drum. Clothes left in the drum reaches the product setting, the dry cycle may require pre-treating prior to help prevent wrinkling. This option will tumble the clothes briefly every few minutes for up to 2 hours to washing. Greasy or dirty spots Fabric softener used incorrectly. If the problem is blown, circuit breaker has tripped, or power outage has occurred. • Reset circuit breaker or replace fuse...

Owners Manual
Page 47
... cause odors. Do you run the Drum Care and Condenser Care cycles following the instructions in the MAINTENANCE section. Set the wireless router to 2.4 GHz and connect the appliance to the appliance or purchase and install a Wi-Fi repeater. The appliance is too far from the washer, follow the instructions in the washer or dryer after you smell an odor during use special characters.) The...
... cause odors. Do you run the Drum Care and Condenser Care cycles following the instructions in the MAINTENANCE section. Set the wireless router to 2.4 GHz and connect the appliance to the appliance or purchase and install a Wi-Fi repeater. The appliance is too far from the washer, follow the instructions in the washer or dryer after you smell an odor during use special characters.) The...

Owners Manual
Page 49
... is not properly installed in accordance with the Product's owner's manual. • Damage or failure of the Product caused by incorrect electrical current, voltage, or plumbing codes. • Damage or failure of the Product caused by use of parts, accessories, components, consumable cleaning products, any other products, or service that are not authorized by LG. • Replacement of light bulbs, filters, fuses, or any other...
... is not properly installed in accordance with the Product's owner's manual. • Damage or failure of the Product caused by incorrect electrical current, voltage, or plumbing codes. • Damage or failure of the Product caused by use of parts, accessories, components, consumable cleaning products, any other products, or service that are not authorized by LG. • Replacement of light bulbs, filters, fuses, or any other...


