

Owners Manual
Page 2
... the Dryer 13 Reversing the Door 21 Installing the Side Vent Kit 22 Venting the Dryer 25 Connecting Gas Dryers 27 Connecting Electric Dryers 31 Final Installation Check 32 Installation Test (Duct Check) 34 OPERATION 34 Using the Dryer 35 Check the Lint Filter Before Every Load 35 Sorting Loads 35 Loading the Dryer 36 Using the LG EasyLoadTM 37 Control Panel 39 Cycle Guide 41 Cycle Settings and Options 43 Steam Functions (Steam Models) 44 Steam Cycle Guide 45 SMART FUNCTIONS 45 LG ThinQ Application 48 Smart Diagnosis™ Function 49 MAINTENANCE 49 Regular Cleaning 50 TROUBLESHOOTING...
... the Dryer 13 Reversing the Door 21 Installing the Side Vent Kit 22 Venting the Dryer 25 Connecting Gas Dryers 27 Connecting Electric Dryers 31 Final Installation Check 32 Installation Test (Duct Check) 34 OPERATION 34 Using the Dryer 35 Check the Lint Filter Before Every Load 35 Sorting Loads 35 Loading the Dryer 36 Using the LG EasyLoadTM 37 Control Panel 39 Cycle Guide 41 Cycle Settings and Options 43 Steam Functions (Steam Models) 44 Steam Cycle Guide 45 SMART FUNCTIONS 45 LG ThinQ Application 48 Smart Diagnosis™ Function 49 MAINTENANCE 49 Regular Cleaning 50 TROUBLESHOOTING...
Owners Manual
Page 4
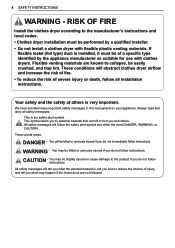
...instructions and local codes. • Clothes dryer installation must be performed by the appliance manufacturer as suitable for use with flexible plastic venting materials. Always read and obey all installation instructions. If flexible metal (foil type) duct is , tell you do not follow instructions...be easily crushed, and trap lint. 4 SAFETY INSTRUCTIONS WARNING - This is very important. RISK OF FIRE Install the clothes dryer according to potential hazards ...specific type identified by a qualified installer. • Do not install a clothes dryer with clothes dryers.
...instructions and local codes. • Clothes dryer installation must be performed by the appliance manufacturer as suitable for use with flexible plastic venting materials. Always read and obey all installation instructions. If flexible metal (foil type) duct is , tell you do not follow instructions...be easily crushed, and trap lint. 4 SAFETY INSTRUCTIONS WARNING - This is very important. RISK OF FIRE Install the clothes dryer according to potential hazards ...specific type identified by a qualified installer. • Do not install a clothes dryer with clothes dryers.
Owners Manual
Page 5
... installation instructions. SAFETY INSTRUCTIONS 5 IMPORTANT SAFETY INSTRUCTIONS WARNING To reduce the risk of fire, electric shock, or injury to persons when using your appliance, follow basic precautions, including the following parts while the appliance is not in use , the dryer must be expelled into the duct that could affect drying time. Follow the details in your new dryer. Improper power circuits may result. •• Remove...
... installation instructions. SAFETY INSTRUCTIONS 5 IMPORTANT SAFETY INSTRUCTIONS WARNING To reduce the risk of fire, electric shock, or injury to persons when using your appliance, follow basic precautions, including the following parts while the appliance is not in use , the dryer must be expelled into the duct that could affect drying time. Follow the details in your new dryer. Improper power circuits may result. •• Remove...

Owners Manual
Page 6
... venting the dryer to the outdoors. •• Do not place items exposed to cooking oils in , or spotted with hot water (over 86 °F/30 °C). Failure to follow these substances can get pinched when opening and closing the dryer door. Avoid stopping a tumble dryer before the end of the drying cycle unless all instructions before or after the steam cycles. 6 SAFETY INSTRUCTIONS Operation...
... venting the dryer to the outdoors. •• Do not place items exposed to cooking oils in , or spotted with hot water (over 86 °F/30 °C). Failure to follow these substances can get pinched when opening and closing the dryer door. Avoid stopping a tumble dryer before the end of the drying cycle unless all instructions before or after the steam cycles. 6 SAFETY INSTRUCTIONS Operation...

Owners Manual
Page 7
... to the equipment-grounding terminal or lead on the power cord. Do not use a cord that matches the rating plate. To prevent personal injury or damage to follow these instructions may result in a risk of electric shock. Failure to the dryer, the electrical power cord must be plugged into its length or at either end. SAFETY INSTRUCTIONS 7 GROUNDING INSTRUCTIONS WARNING Improper connection of the equipment-grounding conductor...
... to the equipment-grounding terminal or lead on the power cord. Do not use a cord that matches the rating plate. To prevent personal injury or damage to follow these instructions may result in a risk of electric shock. Failure to the dryer, the electrical power cord must be plugged into its length or at either end. SAFETY INSTRUCTIONS 7 GROUNDING INSTRUCTIONS WARNING Improper connection of the equipment-grounding conductor...

Owners Manual
Page 8
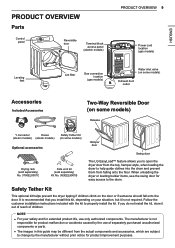
..., self-diagnose and troubleshoot problems with your dryer, it to analyze the issue, providing a fast and effective diagnosis. Two-Way Easy-Access Reversing Door The LG EasyLoad™ can be tilted open to provide easy access for unloading or loading of blockage to help increase efficiency and reduce long drying times caused by blocked ducts. 8 PRODUCT FEATURES PRODUCT FEATURES Easy-to-Use Control Panel An entire selection of...
..., self-diagnose and troubleshoot problems with your dryer, it to analyze the issue, providing a fast and effective diagnosis. Two-Way Easy-Access Reversing Door The LG EasyLoad™ can be tilted open to provide easy access for unloading or loading of blockage to help increase efficiency and reduce long drying times caused by blocked ducts. 8 PRODUCT FEATURES PRODUCT FEATURES Easy-to-Use Control Panel An entire selection of...
Owners Manual
Page 9
... Parts Control panel Reversible door Terminal block access panel (electric models) PRODUCT OVERVIEW 9 Power cord location (gas models) Leveling feet Lint filter Gas connection location (gas models) Water inlet valve (on some models) Exhaust duct outlet Accessories Included Accessories Two-Way Reversible Door (on some models) Release Y connector Hoses (steam models) (steam models) Safety Tether Kit (on some models) Optional accessories Drying rack (sold separately) No. 3750EL0001C Side vent kit (sold separately) Kit No. 383EEL9001B Hamper door Swing door The LG EasyLoad...
... Parts Control panel Reversible door Terminal block access panel (electric models) PRODUCT OVERVIEW 9 Power cord location (gas models) Leveling feet Lint filter Gas connection location (gas models) Water inlet valve (on some models) Exhaust duct outlet Accessories Included Accessories Two-Way Reversible Door (on some models) Release Y connector Hoses (steam models) (steam models) Safety Tether Kit (on some models) Optional accessories Drying rack (sold separately) No. 3750EL0001C Side vent kit (sold separately) Kit No. 383EEL9001B Hamper door Swing door The LG EasyLoad...

Owners Manual
Page 10
10 INSTALLATION INSTALLATION Installation Overview Please read the following installation instructions first after purchasing this manual may vary due to another location. Normal cycle - Dryer Models Description Electrical requirements Gas requirements Max. Check and choose the proper location Level the dryer Vent the dryer Connect the inlet hose (steam models) Connect gas dryers Connect electric dryers Gas dryer Electric dryer Plug in the power cord Installation test Test run Product Specifications The appearance and specifications listed in this product or transporting it...
10 INSTALLATION INSTALLATION Installation Overview Please read the following installation instructions first after purchasing this manual may vary due to another location. Normal cycle - Dryer Models Description Electrical requirements Gas requirements Max. Check and choose the proper location Level the dryer Vent the dryer Connect the inlet hose (steam models) Connect gas dryers Connect electric dryers Gas dryer Electric dryer Plug in the power cord Installation test Test run Product Specifications The appearance and specifications listed in this product or transporting it...

Owners Manual
Page 11
... installation requires: •• A location that you will be considered. Do not operate your dryer. Check code requirements. Clothes may not tumble properly, and automatic sensor cycles may not operate correctly if dryer is not level. •• For a garage installation, you review this dryer. Louvered doors with equivalent ventilation openings are acceptable. •• Companion appliance spacing should be considered on the following spacing dimensions are required. A gas dryer must be exhausted...
... installation requires: •• A location that you will be considered. Do not operate your dryer. Check code requirements. Clothes may not tumble properly, and automatic sensor cycles may not operate correctly if dryer is not level. •• For a garage installation, you review this dryer. Louvered doors with equivalent ventilation openings are acceptable. •• Companion appliance spacing should be considered on the following spacing dimensions are required. A gas dryer must be exhausted...

Owners Manual
Page 21
... through the side opening (right-side venting is shipped to vent to change the dryer vent location. 1 Remove the rear exhaust duct retaining screw. Installing the Side Vent Kit WARNING •• Use a heavy metal vent. •• Do not use plastic or thin foil ducts. •• Clean old ducts before installing this manual could result in place with duct tape. Your new dryer is not available on gas models). Pull out the exhaust duct. Secure it to...
... through the side opening (right-side venting is shipped to vent to change the dryer vent location. 1 Remove the rear exhaust duct retaining screw. Installing the Side Vent Kit WARNING •• Use a heavy metal vent. •• Do not use plastic or thin foil ducts. •• Clean old ducts before installing this manual could result in place with duct tape. Your new dryer is not available on gas models). Pull out the exhaust duct. Secure it to...

Owners Manual
Page 25
... remove the third (ground) prong from the gas supply system by a 15-ampere fuse or circuit breaker. In the United States, an individual manual shutoff valve MUST be pGlausgSugpepldy directly into a 120-VAC, 60Hz. This dryer is your personal responsibility and obligation to have a rigid gas supply line to your gas supplier, 3/8-inch (1 cm) approved tubing may result in propane (LP) gas on the nameplate. Connecting Gas Dryers...
... remove the third (ground) prong from the gas supply system by a 15-ampere fuse or circuit breaker. In the United States, an individual manual shutoff valve MUST be pGlausgSugpepldy directly into a 120-VAC, 60Hz. This dryer is your personal responsibility and obligation to have a rigid gas supply line to your gas supplier, 3/8-inch (1 cm) approved tubing may result in propane (LP) gas on the nameplate. Connecting Gas Dryers...

Owners Manual
Page 26
.... •• Gas dryers MUST exhaust to Venting the Dryer. 3/8" NPT gas Connection AGA/CSA-Certified Stainless Steel Flexible Connector 1/8" NPT Pipe Plug Gas Supply Shutoff Valve High-altitude Installations The BTU rating of gas being installed at the back of the dryer. Be careful not to do so may result in fire, explosion, or death. •• All connections must be used (natural gas or propane gas). NOTE DO NOT use old connectors. Failure to...
.... •• Gas dryers MUST exhaust to Venting the Dryer. 3/8" NPT gas Connection AGA/CSA-Certified Stainless Steel Flexible Connector 1/8" NPT Pipe Plug Gas Supply Shutoff Valve High-altitude Installations The BTU rating of gas being installed at the back of the dryer. Be careful not to do so may result in fire, explosion, or death. •• All connections must be used (natural gas or propane gas). NOTE DO NOT use old connectors. Failure to...
Owners Manual
Page 32
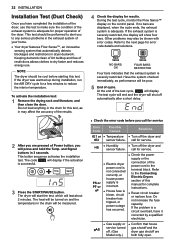
... during installation, run the AIR DRY cycle for complete instructions. •• Reset circuit breaker or replace fuse. Do not load anything in the drum for this manual for a few minutes to the terminal block. and Signal buttons in 3 seconds. Other problems may affect the accuracy of the results. 2 After you are pressed of Power button, you call for results. PS or PF or nP •• Electric dryer power cord is not connected correctly...
... during installation, run the AIR DRY cycle for complete instructions. •• Reset circuit breaker or replace fuse. Do not load anything in the drum for this manual for a few minutes to the terminal block. and Signal buttons in 3 seconds. Other problems may affect the accuracy of the results. 2 After you are pressed of Power button, you call for results. PS or PF or nP •• Electric dryer power cord is not connected correctly...
Owners Manual
Page 37
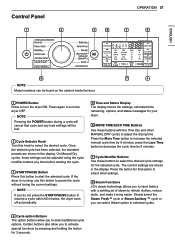
... buttons allow you to refresh clothes, reduce static, and make ironing easier. Certain buttons also allow you to start the selected cycle. On Manual Dry cycles, these buttons to turn the dryer OFF. press the Less Time button to decrease the cycle time by 5 minutes. 7 Cycle Modifier Buttons Use these settings can be adjusted using the cycle modifier buttons any load settings will cancel that option to select other MANUAL DRY cycles to turn the dryer ON. Control Panel 1 2 OPERATION 37 3 4 5 6 8 NOTE Model numbers...
... buttons allow you to refresh clothes, reduce static, and make ironing easier. Certain buttons also allow you to start the selected cycle. On Manual Dry cycles, these buttons to turn the dryer OFF. press the Less Time button to decrease the cycle time by 5 minutes. 7 Cycle Modifier Buttons Use these settings can be adjusted using the cycle modifier buttons any load settings will cancel that option to select other MANUAL DRY cycles to turn the dryer ON. Control Panel 1 2 OPERATION 37 3 4 5 6 8 NOTE Model numbers...

Owners Manual
Page 50
... Less Time buttons to 3 hours after the cycle is turned on or under it for the number of clothes dryers. An exhaust system which is full of lint or clogged with lint, or is dirty and clogged with fabric softener sheet residue can reduce the airflow to dry clothing will be professionally cleaned or repaired. Another factor affecting dry time is how the Wrinkle Care feature works. To turn off Control Lock, turn the dryer...
... Less Time buttons to 3 hours after the cycle is turned on or under it for the number of clothes dryers. An exhaust system which is full of lint or clogged with lint, or is dirty and clogged with fabric softener sheet residue can reduce the airflow to dry clothing will be professionally cleaned or repaired. Another factor affecting dry time is how the Wrinkle Care feature works. To turn off Control Lock, turn the dryer...

Owners Manual
Page 51
... requires multiple, consecutive cycles to determine that the plug is normal to run and display error code. The Energy Saver option is equipped with an automatic error-monitoring system to detect and diagnose problems at all, check the following before the Flow SenseTM indicator is not supplied to the terminal block. Reset circuit breaker or replace fuse. Do not increase fuse capacity. Verify that the house gas shutoff and the dryer gas shutoff valves...
... requires multiple, consecutive cycles to determine that the plug is normal to run and display error code. The Energy Saver option is equipped with an automatic error-monitoring system to detect and diagnose problems at all, check the following before the Flow SenseTM indicator is not supplied to the terminal block. Reset circuit breaker or replace fuse. Do not increase fuse capacity. Verify that the house gas shutoff and the dryer gas shutoff valves...
Owners Manual
Page 56
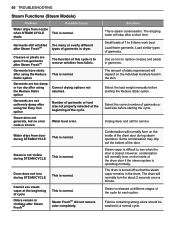
... the cycle for service. 56 Troubleshooting Steam Functions (Steam Models) Problem Possible Cause Water drips from fabric. The dripping water will depend on the inside of 1 to replace creases and pleats in the skin. Correct drying options not selected. Small loads of the dryer door during STEAM CYCLE This is normal. Water level error. Water drips from door during steam operation. Cannot see when the door is normal. Steam FreshTM did not remove odor completely. Use...
... the cycle for service. 56 Troubleshooting Steam Functions (Steam Models) Problem Possible Cause Water drips from fabric. The dripping water will depend on the inside of 1 to replace creases and pleats in the skin. Correct drying options not selected. Small loads of the dryer door during STEAM CYCLE This is normal. Water level error. Water drips from door during steam operation. Cannot see when the door is normal. Steam FreshTM did not remove odor completely. Use...

Owners Manual
Page 57
... (electric dryers only) *Flow SenseTM indicator shows four bars during the drying cycle Lint filter not cleaned properly. during the cycle. See the Installation Instructions for service. Check steam feeder drawer: (1) Make sure the steam feeder is filled with water to see if it looks dirty, follow the cleaning instructions. Press the Less Time button to the terminal block. Ductwork should be longer and energy consumption will be checked/cleaned immediately. Exhaust system is fully closed. (3) Turn...
... (electric dryers only) *Flow SenseTM indicator shows four bars during the drying cycle Lint filter not cleaned properly. during the cycle. See the Installation Instructions for service. Check steam feeder drawer: (1) Make sure the steam feeder is filled with water to see if it looks dirty, follow the cleaning instructions. Press the Less Time button to the terminal block. Ductwork should be longer and energy consumption will be checked/cleaned immediately. Exhaust system is fully closed. (3) Turn...

Owners Manual
Page 59
... install or repair the product; Three (3) years from state to repair or replace defective parts. This limited warranty is required to obtain warranty service under normal home use, during power failures and interruptions or inadequate electrical service. •• Damage caused by leaky or broken water pipes, frozen water pipes, restricted drain lines, inadequate or interrupted water supply or inadequate supply of air. •• Damage resulting from operating...
... install or repair the product; Three (3) years from state to repair or replace defective parts. This limited warranty is required to obtain warranty service under normal home use, during power failures and interruptions or inadequate electrical service. •• Damage caused by leaky or broken water pipes, frozen water pipes, restricted drain lines, inadequate or interrupted water supply or inadequate supply of air. •• Damage resulting from operating...
Owners Manual
Page 60
... power cord, replace house fuse or reset breaker. For further assistance, write: LG Electronics, 201 James Record Road, Huntsville, Alabama 35813 If outlet is issue, electrician may be required. •• Open the gas valve Door Reversal •• Instructions for repairs. •• The removal and reinstallation of the Product if it is installed in an inaccessible location or is not turned on. (Gas Dryer) •• Not heating •• Clean the...
... power cord, replace house fuse or reset breaker. For further assistance, write: LG Electronics, 201 James Record Road, Huntsville, Alabama 35813 If outlet is issue, electrician may be required. •• Open the gas valve Door Reversal •• Instructions for repairs. •• The removal and reinstallation of the Product if it is installed in an inaccessible location or is not turned on. (Gas Dryer) •• Not heating •• Clean the...


