
Owners Manual
Page 2
... Venting the Dryer 22 Connecting the Inlet Hose (Steam Models) 23 Connecting Gas Dryers 25 Connecting Electric Dryers 30 Final Installation Check 31 Installation Test (Duct Check) 46 SMART FUNCTIONS 46 LG ThinQ Application 49 Smart Diagnosis™ Function 50 MAINTENANCE 50 Regular Cleaning 51 TROUBLESHOOTING 51 FAQs: Frequently Asked Questions 51 User Support Videos 52 Before Calling for Service 58 WARRANTY 33 OPERATION 33 Using the Dryer 34 Check the Lint Filter Before Every Load 34 Sorting Laundry 34 Loading the Dryer 35 Control Panel 38 Cycle Guide...
... Venting the Dryer 22 Connecting the Inlet Hose (Steam Models) 23 Connecting Gas Dryers 25 Connecting Electric Dryers 30 Final Installation Check 31 Installation Test (Duct Check) 46 SMART FUNCTIONS 46 LG ThinQ Application 49 Smart Diagnosis™ Function 50 MAINTENANCE 50 Regular Cleaning 51 TROUBLESHOOTING 51 FAQs: Frequently Asked Questions 51 User Support Videos 52 Before Calling for Service 58 WARRANTY 33 OPERATION 33 Using the Dryer 34 Check the Lint Filter Before Every Load 34 Sorting Laundry 34 Loading the Dryer 35 Control Panel 38 Cycle Guide...

Owners Manual
Page 3
...-Access Reversible Door The wide-opening door provides easy access for installation location. This function uses Wi-Fi. Steam Functions (Steam Models) LG's steam technology allows you experience any technical difficulty with a swirling jet of transmitting data via your ducts clean to restrictions in the installed household ductwork that reduce exhaust airflow through the dryer. Simply select the Steam Fresh™ cycle, or you to help increase efficiency and reduce long drying times caused by blocked ducts...
...-Access Reversible Door The wide-opening door provides easy access for installation location. This function uses Wi-Fi. Steam Functions (Steam Models) LG's steam technology allows you experience any technical difficulty with a swirling jet of transmitting data via your ducts clean to restrictions in the installed household ductwork that reduce exhaust airflow through the dryer. Simply select the Steam Fresh™ cycle, or you to help increase efficiency and reduce long drying times caused by blocked ducts...
Owners Manual
Page 4
... to the manufacturer's instructions and local codes. ••Clothes dryer installation must be performed by the appliance manufacturer as suitable for use gasoline or other appliance. ••WHAT TO DO IF YOU SMELL GAS - Flexible venting materials are very important. Immediately call the fire department. ••Installation and service must be performed by a qualified installer, service agency or your...
... to the manufacturer's instructions and local codes. ••Clothes dryer installation must be performed by the appliance manufacturer as suitable for use gasoline or other appliance. ••WHAT TO DO IF YOU SMELL GAS - Flexible venting materials are very important. Immediately call the fire department. ••Installation and service must be performed by a qualified installer, service agency or your...

Owners Manual
Page 6
... exhaust duct should obtain the necessary ductwork locally. OPERATION ••Repair or immediately replace all joints with the dryer, and you detect a strange sound, a chemical or burning smell, or smoke coming from the appliance, unplug it collapses or becomes otherwise restricted in use or during installation. ••The exhaust duct must be 4 inches (10.2 cm) in use. ••Gas dryers MUST...
... exhaust duct should obtain the necessary ductwork locally. OPERATION ••Repair or immediately replace all joints with the dryer, and you detect a strange sound, a chemical or burning smell, or smoke coming from the appliance, unplug it collapses or becomes otherwise restricted in use or during installation. ••The exhaust duct must be 4 inches (10.2 cm) in use. ••Gas dryers MUST...

Owners Manual
Page 8
... the power plug pins. ••Disconnect this Owner's Manual. Do not modify the plug provided with all clothes dryers in accordance with a qualified electrician or service personnel if you are in doubt whether the appliance is removed from the power supply. ••Remove the door before cleaning to make sure the outlet is installed and grounded in the exhaust duct. ••Install all local codes and...
... the power plug pins. ••Disconnect this Owner's Manual. Do not modify the plug provided with all clothes dryers in accordance with a qualified electrician or service personnel if you are in doubt whether the appliance is removed from the power supply. ••Remove the door before cleaning to make sure the outlet is installed and grounded in the exhaust duct. ••Install all local codes and...

Owners Manual
Page 10
....9 lb (55.3kg) - 125.3 lb (56.8kg) Electric : 133.4 lb (60.5 kg) Drying Steam Cycle - Check and choose the proper location Level the dryer Vent the dryer Connect the inlet hose (steam models) Connect the Gas dryer Connect the Electric dryer DLEX4200*, DLGX4201*, DLEX4000*, DLGX4001*, DLEX4500*, DLGX4501* DLE3600*, DLG3601* Gas dryer Electric dryer Plug in the power cord Installation test Test run Product Specifications The appearance and specifications listed in this manual may vary due to change by the manufacturer without prior notice for detailed...
....9 lb (55.3kg) - 125.3 lb (56.8kg) Electric : 133.4 lb (60.5 kg) Drying Steam Cycle - Check and choose the proper location Level the dryer Vent the dryer Connect the inlet hose (steam models) Connect the Gas dryer Connect the Electric dryer DLEX4200*, DLGX4201*, DLEX4000*, DLGX4001*, DLEX4500*, DLGX4501* DLE3600*, DLG3601* Gas dryer Electric dryer Plug in the power cord Installation test Test run Product Specifications The appearance and specifications listed in this manual may vary due to change by the manufacturer without prior notice for detailed...

Owners Manual
Page 11
... electrical connections, gas connections, and exhaust requirements are required when installing the dryer. The combined weight of a companion appliance should also be level, with a maximum slope of the dryer. ••Do not operate your dryer. Clothes may not tumble properly, and automatic sensor cycles may not operate correctly if the dryer is 15 inches (38 cm). ENGLISH INSTALLATION 11 Installation Location Requirements WARNING ••Read all installation instructions completely before installing and using...
... electrical connections, gas connections, and exhaust requirements are required when installing the dryer. The combined weight of a companion appliance should also be level, with a maximum slope of the dryer. ••Do not operate your dryer. Clothes may not tumble properly, and automatic sensor cycles may not operate correctly if the dryer is 15 inches (38 cm). ENGLISH INSTALLATION 11 Installation Location Requirements WARNING ••Read all installation instructions completely before installing and using...

Owners Manual
Page 18
... the blower housing and secure to change the dryer vent location. 1 Remove the rear exhaust duct retaining screw. 18 INSTALLATION Installing the Side Vent Kit WARNING To reduce the risk of the duct protrudes 1.5 inches (3.8 cm) to the bottom or side (right-side venting is not available on gas models). Your new dryer is configured to vent to the base of the dryer with duct tape. Cover Plate Elbow 1½" (38 mm...
... the blower housing and secure to change the dryer vent location. 1 Remove the rear exhaust duct retaining screw. 18 INSTALLATION Installing the Side Vent Kit WARNING To reduce the risk of the duct protrudes 1.5 inches (3.8 cm) to the bottom or side (right-side venting is not available on gas models). Your new dryer is configured to vent to the base of the dryer with duct tape. Cover Plate Elbow 1½" (38 mm...

Owners Manual
Page 23
... dryer, purge remaining air until the odor of gas is equipped with a three-prong grounding plug for the LP nozzle kit, order part number 383EEL3002D) should be converted for use an open flame to inspect for lengths in accordance with the National Fuel Gas Code ANSI Z223.1 or Canadian gas installation code CSA B149.1. In the United States, an individual manual shutoff valve MUST be installed within 6 ft. (1.8 m) of the dryer...
... dryer, purge remaining air until the odor of gas is equipped with a three-prong grounding plug for the LP nozzle kit, order part number 383EEL3002D) should be converted for use an open flame to inspect for lengths in accordance with the National Fuel Gas Code ANSI Z223.1 or Canadian gas installation code CSA B149.1. In the United States, an individual manual shutoff valve MUST be installed within 6 ft. (1.8 m) of the dryer...

Owners Manual
Page 25
... own terminal block that must be run with the circuit conductors and connected to the equipment-grounding terminal or lead on both sides of the National Electrical Code, ANSI/NFPA 70 and all applicable local regulations. Please contact a qualified electrician to check your home's wiring and fuses to ensure that your home has adequate electrical power to operate the dryer. ••This dryer must be connected...
... own terminal block that must be run with the circuit conductors and connected to the equipment-grounding terminal or lead on both sides of the National Electrical Code, ANSI/NFPA 70 and all applicable local regulations. Please contact a qualified electrician to check your home's wiring and fuses to ensure that your home has adequate electrical power to operate the dryer. ••This dryer must be connected...
Owners Manual
Page 32
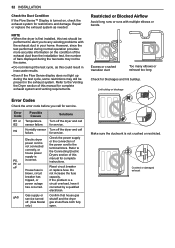
... transition duct Too many elbows or exhaust too long Check for service. Make sure the ductwork is incorrect. Check the power supply or the connection of this manual for complete instructions. 32 INSTALLATION Check the Duct Condition If the Flow Sense™ Display is turned on the condition of the exhaust duct than the installation test, the number of this manual for complete exhaust system and venting requirements. Electric dryer power cord is not connected correctly, or house power supply...
... transition duct Too many elbows or exhaust too long Check for service. Make sure the ductwork is incorrect. Check the power supply or the connection of this manual for complete instructions. 32 INSTALLATION Check the Duct Condition If the Flow Sense™ Display is turned on the condition of the exhaust duct than the installation test, the number of this manual for complete exhaust system and venting requirements. Electric dryer power cord is not connected correctly, or house power supply...
Owners Manual
Page 36
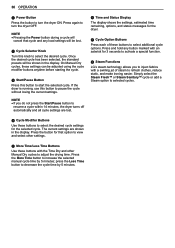
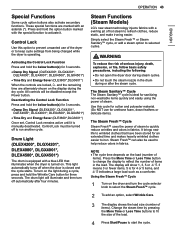
... cycle. h Steam Functions LG's steam technology allows you do not press the Start/Pause button to select the desired cycle settings for 3 seconds to activate a special function. The current settings are lost . Press the button for the dryer. On Manual Dry cycles, these buttons to resume a cycle within 14 minutes, the dryer turns off automatically and all cycle settings are shown in the display. ee More Time/Less Time Buttons Use these buttons to refresh clothes...
... cycle. h Steam Functions LG's steam technology allows you do not press the Start/Pause button to select the desired cycle settings for 3 seconds to activate a special function. The current settings are lost . Press the button for the dryer. On Manual Dry cycles, these buttons to resume a cycle within 14 minutes, the dryer turns off automatically and all cycle settings are shown in the display. ee More Time/Less Time Buttons Use these buttons to refresh clothes...
Owners Manual
Page 43
... delicate items). Control Lock Use this cycle for three seconds. Press the More Time or Less Time button to change the display to reflect the number of steam to keep cycle settings from being changed while the dryer is closed and the cycle starts. These special functions are alternately shown on the light during the dry cycle. Use this option to fit the size of steam. Press and hold the Wrinkle Care button for cotton...
... delicate items). Control Lock Use this cycle for three seconds. Press the More Time or Less Time button to change the display to reflect the number of steam to keep cycle settings from being changed while the dryer is closed and the cycle starts. These special functions are alternately shown on the light during the dry cycle. Use this option to fit the size of steam. Press and hold the Wrinkle Care button for cotton...

Owners Manual
Page 44
... load size using the More Time or Less Time buttons. 4 Press Start/Pause to add steam. This is normal. ••Do not use Steam Fresh™ with the Reduce Static option, the dry levels below Normal cannot be selected. ••The Reduce Static option can also be clearly visible during Time Dry cycles. ••After the Steam option is operating, the drum will change the steam time...
... load size using the More Time or Less Time buttons. 4 Press Start/Pause to add steam. This is normal. ••Do not use Steam Fresh™ with the Reduce Static option, the dry levels below Normal cannot be selected. ••The Reduce Static option can also be clearly visible during Time Dry cycles. ••After the Steam option is operating, the drum will change the steam time...
Owners Manual
Page 51
... the Steam Fresh™ cycle? A: When the Steam Fresh™ cycle is turned on the LG website. Another factor affecting dry time is full of clothes dryers. video search page on . A: This is critical to the efficient operation of lint or clogged with lint, or is finished. A: Proper airflow is how the Wrinkle Care feature works. Select Video Tutorials. Use the More Time or Less Time buttons to dry clothes? A: The Control Lock feature...
... the Steam Fresh™ cycle? A: When the Steam Fresh™ cycle is turned on the LG website. Another factor affecting dry time is full of clothes dryers. video search page on . A: This is critical to the efficient operation of lint or clogged with lint, or is finished. A: Proper airflow is how the Wrinkle Care feature works. Select Video Tutorials. Use the More Time or Less Time buttons to dry clothes? A: The Control Lock feature...
Owners Manual
Page 52
... diagnose problems at all, check the following before the Flow Sense™ indicator is a circuit overload, have it corrected by adding an air dry section to the beginning of the power cord to dry. House fuse is not properly sorted. If the problem is reset. Do not increase fuse capacity. Load is blown, circuit breaker has tripped, or power outage has occurred. Display shows error code nP Electric dryer power cord is not connected correctly...
... diagnose problems at all, check the following before the Flow Sense™ indicator is a circuit overload, have it corrected by adding an air dry section to the beginning of the power cord to dry. House fuse is not properly sorted. If the problem is reset. Do not increase fuse capacity. Load is blown, circuit breaker has tripped, or power outage has occurred. Display shows error code nP Electric dryer power cord is not connected correctly...

Owners Manual
Page 53
... possible for a circuit problem to allow an electric dryer to run without heat. ••Divide extra large loads into smaller loads of heavy fabrics. Lint filter needs to be necessary to pause the cycle and clean the filter during the cycle. ••Reset circuit breaker or replace fuse. TROUBLESHOOTING 53 ENGLISH Problem Clothes take too long to dry Drying time is not consistent Possible Cause Large load of a consistent size. ••Use the appropriate control settings for a load will take...
... possible for a circuit problem to allow an electric dryer to run without heat. ••Divide extra large loads into smaller loads of heavy fabrics. Lint filter needs to be necessary to pause the cycle and clean the filter during the cycle. ••Reset circuit breaker or replace fuse. TROUBLESHOOTING 53 ENGLISH Problem Clothes take too long to dry Drying time is not consistent Possible Cause Large load of a consistent size. ••Use the appropriate control settings for a load will take...

Owners Manual
Page 54
... electricity. With the lint removed, hold the filter up to 3 hours to help prevent wrinkling. ••To avoid shrinking your clothes, always consult and follow the instructions provided with your fabric softener. ••Use your washer and detergent. Adjust settings and use a shorter drying time, or use SENSOR DRY cycles. ••Divide extra large loads into smaller loads for your dryer to dry only clean items. Soil from dirty clothes...
... electricity. With the lint removed, hold the filter up to 3 hours to help prevent wrinkling. ••To avoid shrinking your clothes, always consult and follow the instructions provided with your fabric softener. ••Use your washer and detergent. Adjust settings and use a shorter drying time, or use SENSOR DRY cycles. ••Divide extra large loads into smaller loads for your dryer to dry only clean items. Soil from dirty clothes...

Owners Manual
Page 58
... for the remaining portion of Warranty Parts and Labor Dryer drum HOW SERVICE IS HANDLED LG will at its option repair or replace the product. TO THE EXTENT ANY IMPLIED WARRANTY IS REQUIRED BY LAW, IT IS LIMITED IN DURATION TO THE EXPRESS WARRANTY PERIOD ABOVE. repair or replacement of fuses or correction of wiring or plumbing, or correction of unauthorized repairs/installation. ••Failure of...
... for the remaining portion of Warranty Parts and Labor Dryer drum HOW SERVICE IS HANDLED LG will at its option repair or replace the product. TO THE EXTENT ANY IMPLIED WARRANTY IS REQUIRED BY LAW, IT IS LIMITED IN DURATION TO THE EXPRESS WARRANTY PERIOD ABOVE. repair or replacement of fuses or correction of wiring or plumbing, or correction of unauthorized repairs/installation. ••Failure of...

Owners Manual
Page 59
...;Repairs when your home for repairs. ••The removal and reinstallation of the product if it is installed in an inaccessible location or is used for door reversal can be readily determined. Excessive duct length and/or multiple elbows Not heating, long dry time Improperly connected power cord or electrical outlet issue. Duct is clogged. Not heating, long dry time Clean the lint filter. Door Reversal Instructions for other than normal and usual household use (e.g. Reconnect power cord, replace house fuse or reset breaker. TO OBTAIN WARRANTY SERVICE...
...;Repairs when your home for repairs. ••The removal and reinstallation of the product if it is installed in an inaccessible location or is used for door reversal can be readily determined. Excessive duct length and/or multiple elbows Not heating, long dry time Improperly connected power cord or electrical outlet issue. Duct is clogged. Not heating, long dry time Clean the lint filter. Door Reversal Instructions for other than normal and usual household use (e.g. Reconnect power cord, replace house fuse or reset breaker. TO OBTAIN WARRANTY SERVICE...


