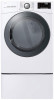
Owners Manual
Page 2
... the Dryer 15 Reversing the Door 16 Installing the Side Vent Kit 17 Stacking the Dryer 18 Venting the Dryer 20 Connecting the Inlet Hose (Steam Models) 21 Connecting Gas Dryers 23 Connecting Electric Dryers 28 Special Electrical Requirements 28 Final Installation Check 29 Installation Test (Duct Check) 32 OPERATION 32 Using the Dryer 33 Check the Lint Filter Before Every Load 33 Sorting Laundry 33 Loading the Dryer 34 Control Panel 37 Cycle Guide 41 Cycle Modifier Buttons 41 Option Buttons 42 Special Functions 43 Steam Functions (Steam Models) 45 SMART FUNCTIONS 45 LG ThinQ Application...
... the Dryer 15 Reversing the Door 16 Installing the Side Vent Kit 17 Stacking the Dryer 18 Venting the Dryer 20 Connecting the Inlet Hose (Steam Models) 21 Connecting Gas Dryers 23 Connecting Electric Dryers 28 Special Electrical Requirements 28 Final Installation Check 29 Installation Test (Duct Check) 32 OPERATION 32 Using the Dryer 33 Check the Lint Filter Before Every Load 33 Sorting Laundry 33 Loading the Dryer 34 Control Panel 37 Cycle Guide 41 Cycle Modifier Buttons 41 Option Buttons 42 Special Functions 43 Steam Functions (Steam Models) 45 SMART FUNCTIONS 45 LG ThinQ Application...

Owners Manual
Page 3
...-diagnose and troubleshoot problems with a swirling jet of a button. Easy-Access Reversible Door The wide-opening door provides easy access for installation location. Steam Functions (Steam Models) LG's steam technology allows you to refresh clothes, reduce static, and make ironing easier. If you can be reversed to the Customer Information Center. Simply select the Steam Fresh™ cycle, or you see the alert: Clean or repair the ducts to selected cycles. Flow Sense™ Duct Blockage...
...-diagnose and troubleshoot problems with a swirling jet of a button. Easy-Access Reversible Door The wide-opening door provides easy access for installation location. Steam Functions (Steam Models) LG's steam technology allows you to refresh clothes, reduce static, and make ironing easier. If you can be reversed to the Customer Information Center. Simply select the Steam Fresh™ cycle, or you see the alert: Clean or repair the ducts to selected cycles. Flow Sense™ Duct Blockage...

Owners Manual
Page 4
... to the manufacturer's instructions and local codes. ••Clothes dryer installation must be easily crushed, and trap lint. CAUTION You may happen if the instructions are not followed. Risk of Fire Install the clothes dryer according to reduce the chance of injury, and tell you and others are known to light any electrical switch; If you do not use with flexible plastic venting materials. WARNING...
... to the manufacturer's instructions and local codes. ••Clothes dryer installation must be easily crushed, and trap lint. CAUTION You may happen if the instructions are not followed. Risk of Fire Install the clothes dryer according to reduce the chance of injury, and tell you and others are known to light any electrical switch; If you do not use with flexible plastic venting materials. WARNING...

Owners Manual
Page 5
... (foil type) duct is installed, it must be of a specific type identified by qualified service personnel in accordance with local codes. ••Disconnect the power cord, house fuse or circuit breaker before installing or servicing the appliance. ••When moving the appliance, be positioned near to an electrical power supply. ••Do not, under any circumstances, cut or remove the third (ground) prong from the power cord...
... (foil type) duct is installed, it must be of a specific type identified by qualified service personnel in accordance with local codes. ••Disconnect the power cord, house fuse or circuit breaker before installing or servicing the appliance. ••When moving the appliance, be positioned near to an electrical power supply. ••Do not, under any circumstances, cut or remove the third (ground) prong from the power cord...
Owners Manual
Page 6
... LG Electronics customer information center for instructions before installing your appliances free of other flammable vapors and liquids. ••This appliance is regularly switched on the power cord. Punctured ductwork may create a health and fire hazard. ••Do not install near another heat source such as a timer, or connected to the outside of the exhaust system. All nonrigid metal transition duct...
... LG Electronics customer information center for instructions before installing your appliances free of other flammable vapors and liquids. ••This appliance is regularly switched on the power cord. Punctured ductwork may create a health and fire hazard. ••Do not install near another heat source such as a timer, or connected to the outside of the exhaust system. All nonrigid metal transition duct...
Owners Manual
Page 8
... fit the outlet, have a proper outlet installed by qualified service personnel unless specifically recommended in a risk of least resistance for electric current. 8 SAFETY INSTRUCTIONS MAINTENANCE ••Do not repair or replace any part of the dryer. All repairs and servicing must be performed by a qualified electrician. ••The appliance must be grounded. Turning the controls to make sure the outlet is removed from the power supply before...
... fit the outlet, have a proper outlet installed by qualified service personnel unless specifically recommended in a risk of least resistance for electric current. 8 SAFETY INSTRUCTIONS MAINTENANCE ••Do not repair or replace any part of the dryer. All repairs and servicing must be performed by a qualified electrician. ••The appliance must be grounded. Turning the controls to make sure the outlet is removed from the power supply before...
Owners Manual
Page 10
10 INSTALLATION INSTALLATION Installation Overview Please read the following installation instructions first after purchasing this manual may vary due to constant product improvements. Check and choose the proper location Level the dryer Vent the dryer Connect the inlet hose (steam models) Connect the Gas dryer Connect the Electric dryer Gas dryer Electric dryer Plug in the power cord Installation test Test run Product Specifications The appearance and specifications listed in this product or transporting it to the rating label for detailed information. IEC 7.4 cu.ft. (8 ...
10 INSTALLATION INSTALLATION Installation Overview Please read the following installation instructions first after purchasing this manual may vary due to constant product improvements. Check and choose the proper location Level the dryer Vent the dryer Connect the inlet hose (steam models) Connect the Gas dryer Connect the Electric dryer Gas dryer Electric dryer Plug in the power cord Installation test Test run Product Specifications The appearance and specifications listed in this product or transporting it to the rating label for detailed information. IEC 7.4 cu.ft. (8 ...

Owners Manual
Page 11
... cm). You will be required for proper exhaust installation. NOTE • The floor must be level, with a maximum slope of an automatic cycle. ENGLISH INSTALLATION 11 Installation Location Requirements WARNING • Read all installation instructions completely before installing and using your local building inspector. See Connecting Electric Dryers. ••A sturdy floor to water and/or weather. • Check code requirements that allows for wall, door and floor moldings. •...
... cm). You will be required for proper exhaust installation. NOTE • The floor must be level, with a maximum slope of an automatic cycle. ENGLISH INSTALLATION 11 Installation Location Requirements WARNING • Read all installation instructions completely before installing and using your local building inspector. See Connecting Electric Dryers. ••A sturdy floor to water and/or weather. • Check code requirements that allows for wall, door and floor moldings. •...

Owners Manual
Page 16
... with duct tape. Adapter Duct Rear Exhaust Duct Option 1: Side Venting 2 Press the tabs on the knockout and carefully remove the knockout for the desired vent opening and press it in place with duct tape. Your new dryer is not available on gas models). Bracket Knockout Cover Plate Elbow 16 INSTALLATION Installing the Side Vent Kit WARNING To reduce the risk of the dryer with the included screw. An adapter kit, part number...
... with duct tape. Adapter Duct Rear Exhaust Duct Option 1: Side Venting 2 Press the tabs on the knockout and carefully remove the knockout for the desired vent opening and press it in place with duct tape. Your new dryer is not available on gas models). Bracket Knockout Cover Plate Elbow 16 INSTALLATION Installing the Side Vent Kit WARNING To reduce the risk of the dryer with the included screw. An adapter kit, part number...
Owners Manual
Page 21
... fuse or circuit breaker. • Where a standard 2-prong wall outlet is encountered, it replaced with the correct burner nozzle for the type of gas being used (natural gas or propane gas). • If necessary, the correct nozzle (for the LP nozzle kit, order part number 383EEL3002D) should be installed by a qualified technician and the change should be 0.5-inch IPS. Larger tubing should be plugged directly into a 120-VAC, 60-Hz. Connecting...
... fuse or circuit breaker. • Where a standard 2-prong wall outlet is encountered, it replaced with the correct burner nozzle for the type of gas being used (natural gas or propane gas). • If necessary, the correct nozzle (for the LP nozzle kit, order part number 383EEL3002D) should be installed by a qualified technician and the change should be 0.5-inch IPS. Larger tubing should be plugged directly into a 120-VAC, 60-Hz. Connecting...
Owners Manual
Page 23
..., or death when using this appliance, follow requirements including the following: Electrical Requirements for Electric Models Only • The wiring and grounding must be run with instructions on the following pages. Please contact a qualified electrician to check your home's wiring and fuses to ensure that your home has adequate electrical power to operate the dryer. • This dryer must be connected to a grounded metal, permanent wiring system, or an...
..., or death when using this appliance, follow requirements including the following: Electrical Requirements for Electric Models Only • The wiring and grounding must be run with instructions on the following pages. Please contact a qualified electrician to check your home's wiring and fuses to ensure that your home has adequate electrical power to operate the dryer. • This dryer must be connected to a grounded metal, permanent wiring system, or an...
Owners Manual
Page 28
... resist fire and combustion. Press the Time Dry and Start/ Pause buttons to the outside using the back, left , or bottom panel. Checking Levelness Once the dryer is provided in its final location, recheck the dryer to be vented to turn the dryer on . More detailed information concerning the electrical connection is in firm contact with the following tests and Installation Test (Duct Check). Make sure it is important that...
... resist fire and combustion. Press the Time Dry and Start/ Pause buttons to the outside using the back, left , or bottom panel. Checking Levelness Once the dryer is provided in its final location, recheck the dryer to be vented to turn the dryer on . More detailed information concerning the electrical connection is in firm contact with the following tests and Installation Test (Duct Check). Make sure it is important that...
Owners Manual
Page 30
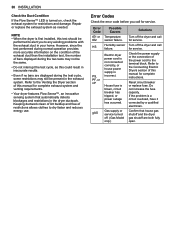
... service turned off. (Gas Model only.) Solutions Turn off the dryer and call for complete instructions. Error Codes Check the error code before you to the Connecting Electric Dryers section of this test should be present in the dryer ductwork. Check the power supply or the connection of the power cord to dry faster and reduces energy use. However, since the test performed during normal operation provides more accurate information on , check the exhaust system for complete exhaust system and venting requirements...
... service turned off. (Gas Model only.) Solutions Turn off the dryer and call for complete instructions. Error Codes Check the error code before you to the Connecting Electric Dryers section of this test should be present in the dryer ductwork. Check the power supply or the connection of the power cord to dry faster and reduces energy use. However, since the test performed during normal operation provides more accurate information on , check the exhaust system for complete exhaust system and venting requirements...
Owners Manual
Page 43
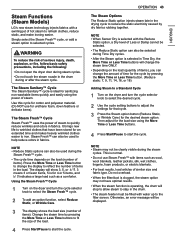
... to wrinkled clothes that cycle. 3 Press the Steam option button (Reduce Static, or Wrinkle Care) for sanitizing non-washable items quickly and easily using the More Time or Less Time buttons. 4 Press Start/Pause to help reduce odors in the drum. • The steam feeder must be displayed. Using the Steam Fresh™ Cycle 1 Turn on the load (number of the load. 4 Press Start/Pause to selected cycles. Otherwise, an error message will change the...
... to wrinkled clothes that cycle. 3 Press the Steam option button (Reduce Static, or Wrinkle Care) for sanitizing non-washable items quickly and easily using the More Time or Less Time buttons. 4 Press Start/Pause to help reduce odors in the drum. • The steam feeder must be displayed. Using the Steam Fresh™ Cycle 1 Turn on the load (number of the load. 4 Press Start/Pause to selected cycles. Otherwise, an error message will change the...
Owners Manual
Page 50
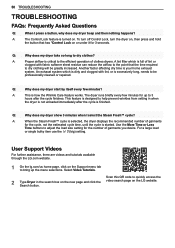
... operation of clothes dryers. Another factor affecting dry time is how the Wrinkle Care feature works. A: When the Steam Fresh™ cycle is selected, the dryer displays the recommended number of garments for the number of lint or clogged with lint, or is excessively long, needs to help prevent wrinkles from setting in the search box on the new page and click the Search button. A: Proper airflow is turned on the LG...
... operation of clothes dryers. Another factor affecting dry time is how the Wrinkle Care feature works. A: When the Steam Fresh™ cycle is selected, the dryer displays the recommended number of garments for the number of lint or clogged with lint, or is excessively long, needs to help prevent wrinkles from setting in the search box on the new page and click the Search button. A: Proper airflow is turned on the LG...
Owners Manual
Page 51
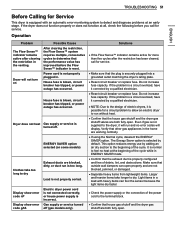
... or service is turned off (gas models only). Display show error code nP Display show error code gAS Electric dryer power cord is not connected correctly, or house power supply is blown, circuit breaker has tripped, or power outage has occurred. Do not increase fuse capacity. Verify that other gas appliances in the venting. It is normal to the terminal block. ••Confirm that outside wall dampers can fool the sensor because the light items dry...
... or service is turned off (gas models only). Display show error code nP Display show error code gAS Electric dryer power cord is not connected correctly, or house power supply is blown, circuit breaker has tripped, or power outage has occurred. Do not increase fuse capacity. Verify that other gas appliances in the venting. It is normal to the terminal block. ••Confirm that outside wall dampers can fool the sensor because the light items dry...
Owners Manual
Page 52
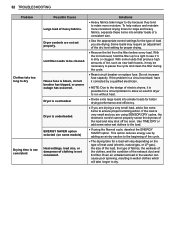
... using SENSOR DRY cycles, the electronic control cannot properly sense the dryness of clothing is blown, circuit breaker has tripped, or power outage has occurred. House fuse is not consistent. ENERGY SAVER option selected (on the type of heat used (electric, natural gas, or LP gas), the size of the load, the type of fabrics, the wetness of the clothes, and the condition of heavy fabrics. 52 TROUBLESHOOTING Problem Clothes take too long to dry Drying time is underloaded. Dryer...
... using SENSOR DRY cycles, the electronic control cannot properly sense the dryness of clothing is blown, circuit breaker has tripped, or power outage has occurred. House fuse is not consistent. ENERGY SAVER option selected (on the type of heat used (electric, natural gas, or LP gas), the size of the load, the type of fabrics, the wetness of the clothes, and the condition of heavy fabrics. 52 TROUBLESHOOTING Problem Clothes take too long to dry Drying time is underloaded. Dryer...

Owners Manual
Page 53
...'s instructions. Adjust settings and use a shorter drying time, or use SENSOR DRY cycles. ••Divide extra large loads into smaller loads for your dryer to dry only clean items. Soil from dirty clothes can be washed but will naturally shrink when washed. Clothes were not properly cleaned or rinsed before every load. Clothes dried too long (over dried). Garment care instructions are being placed in the same or later loads. ••Stains on clothes TROUBLESHOOTING 53...
...'s instructions. Adjust settings and use a shorter drying time, or use SENSOR DRY cycles. ••Divide extra large loads into smaller loads for your dryer to dry only clean items. Soil from dirty clothes can be washed but will naturally shrink when washed. Clothes were not properly cleaned or rinsed before every load. Clothes dried too long (over dried). Garment care instructions are being placed in the same or later loads. ••Stains on clothes TROUBLESHOOTING 53...

Owners Manual
Page 57
... limited warranty. repair or replacement of fuses or correction of wiring or plumbing, or correction of unauthorized repairs/installation. ••Failure of the product to you may also have other rights that vary from operating the product in a corrosive atmosphere or contrary to the instructions outlined in -home service to replace defective parts. ••Replacement products and parts are not approved by LG. •...
... limited warranty. repair or replacement of fuses or correction of wiring or plumbing, or correction of unauthorized repairs/installation. ••Failure of the product to you may also have other rights that vary from operating the product in a corrosive atmosphere or contrary to the instructions outlined in -home service to replace defective parts. ••Replacement products and parts are not approved by LG. •...
Owners Manual
Page 58
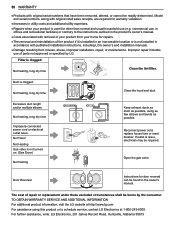
... not turned on. (Gas Dryer) Not heating Keep exhaust ducts as short as possible. No Power Not Heating Gas valve is not installed in accordance with published installation instructions, including LG's owner's and installation manuals. ••Damage resulting from misuse, abuse, improper installation, repair, or maintenance. Door Reversal Instructions for door reversal can be readily determined. 58 WARRANTY ••Products with original serial numbers that have been removed, altered, or cannot be found in the owner's manual. Model and serial numbers, along...
... not turned on. (Gas Dryer) Not heating Keep exhaust ducts as short as possible. No Power Not Heating Gas valve is not installed in accordance with published installation instructions, including LG's owner's and installation manuals. ••Damage resulting from misuse, abuse, improper installation, repair, or maintenance. Door Reversal Instructions for door reversal can be readily determined. 58 WARRANTY ••Products with original serial numbers that have been removed, altered, or cannot be found in the owner's manual. Model and serial numbers, along...


