Owners Manual
Page 2
... the Dryer 15 Reversing the Door 16 Installing the Side Vent Kit 17 Stacking the Dryer 18 Venting the Dryer 20 Connecting the Inlet Hose (Steam Models) 21 Connecting Gas Dryers 23 Connecting Electric Dryers 28 Special Electrical Requirements 28 Final Installation Check 29 Installation Test (Duct Check) 32 OPERATION 32 Using the Dryer 33 Check the Lint Filter Before Every Load 33 Sorting Laundry 33 Loading the Dryer 34 Control Panel 37 Cycle Guide 41 Cycle Modifier Buttons 41 Option Buttons 42 Special Functions 43 Steam Functions (Steam Models) 45 SMART FUNCTIONS 45 LG ThinQ Application...
... the Dryer 15 Reversing the Door 16 Installing the Side Vent Kit 17 Stacking the Dryer 18 Venting the Dryer 20 Connecting the Inlet Hose (Steam Models) 21 Connecting Gas Dryers 23 Connecting Electric Dryers 28 Special Electrical Requirements 28 Final Installation Check 29 Installation Test (Duct Check) 32 OPERATION 32 Using the Dryer 33 Check the Lint Filter Before Every Load 33 Sorting Laundry 33 Loading the Dryer 34 Control Panel 37 Cycle Guide 41 Cycle Modifier Buttons 41 Option Buttons 42 Special Functions 43 Steam Functions (Steam Models) 45 SMART FUNCTIONS 45 LG ThinQ Application...

Owners Manual
Page 3
... selected cycles. The door hinge can add a Steam option to set options, self-diagnose and troubleshoot problems with the touch of hot steam to adjust for loading and unloading. Steam Functions (Steam Models) LG's steam technology allows you see the alert: Clean or repair the ducts to restrictions in the installed household ductwork that reduce exhaust airflow through the dryer. Simply select the Steam Fresh™ cycle, or you to remove the restrictions. Flow...
... selected cycles. The door hinge can add a Steam option to set options, self-diagnose and troubleshoot problems with the touch of hot steam to adjust for loading and unloading. Steam Functions (Steam Models) LG's steam technology allows you see the alert: Clean or repair the ducts to restrictions in the installed household ductwork that reduce exhaust airflow through the dryer. Simply select the Steam Fresh™ cycle, or you to remove the restrictions. Flow...

Owners Manual
Page 4
.... Risk of Fire Install the clothes dryer according to the manufacturer's instructions and local codes. ••Clothes dryer installation must be performed by a qualified installer, service agency or your gas supplier, call your appliance. These conditions will tell you and others are known to light any electrical switch; Follow the gas supplier's instructions. - Do not try to collapse, be easily crushed, and trap lint. Clear the room...
.... Risk of Fire Install the clothes dryer according to the manufacturer's instructions and local codes. ••Clothes dryer installation must be performed by a qualified installer, service agency or your gas supplier, call your appliance. These conditions will tell you and others are known to light any electrical switch; Follow the gas supplier's instructions. - Do not try to collapse, be easily crushed, and trap lint. Clear the room...

Owners Manual
Page 5
... install a clothes dryer with flexible plastic venting materials. ENGLISH SAFETY INSTRUCTIONS 5 IMPORTANT SAFETY INSTRUCTIONS WARNING To reduce the risk of explosion, fire, death, electric shock, scalding or injury to persons when using this product, follow basic precautions, including the following: INSTALLATION ••Before use, the appliance must be properly installed as described in this manual. ••Connect to a properly rated, protected, and sized power circuit...
... install a clothes dryer with flexible plastic venting materials. ENGLISH SAFETY INSTRUCTIONS 5 IMPORTANT SAFETY INSTRUCTIONS WARNING To reduce the risk of explosion, fire, death, electric shock, scalding or injury to persons when using this product, follow basic precautions, including the following: INSTALLATION ••Before use, the appliance must be properly installed as described in this manual. ••Connect to a properly rated, protected, and sized power circuit...
Owners Manual
Page 6
... been given supervision or instruction concerning the use sheet metal screws or other appliance. ••Keep the area underneath and around the exhaust opening and adjacent surrounding areas free from the outlet. ••Do not use an extension cord or adapter with this appliance. ••Do not grasp the power cord or touch the appliance controls with wet hands...
... been given supervision or instruction concerning the use sheet metal screws or other appliance. ••Keep the area underneath and around the exhaust opening and adjacent surrounding areas free from the outlet. ••Do not use an extension cord or adapter with this appliance. ••Do not grasp the power cord or touch the appliance controls with wet hands...
Owners Manual
Page 8
... performed by qualified service personnel unless specifically recommended in the exhaust duct. ••Install all local codes and ordinances. ••This dryer must be plugged into a properly grounded outlet. The appliance is properly grounded. Check with the appliance; Electrical shock may create an electric shock hazard and/or a fire hazard. SAVE THESE INSTRUCTIONS 8 SAFETY INSTRUCTIONS MAINTENANCE ••Do not repair or replace any dust...
... performed by qualified service personnel unless specifically recommended in the exhaust duct. ••Install all local codes and ordinances. ••This dryer must be plugged into a properly grounded outlet. The appliance is properly grounded. Check with the appliance; Electrical shock may create an electric shock hazard and/or a fire hazard. SAVE THESE INSTRUCTIONS 8 SAFETY INSTRUCTIONS MAINTENANCE ••Do not repair or replace any dust...
Owners Manual
Page 10
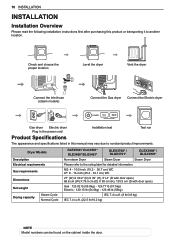
... proper location Level the dryer Vent the dryer Connect the inlet hose (steam models) Connect the Gas dryer Connect the Electric dryer Gas dryer Electric dryer Plug in the power cord Installation test Test run Product Specifications The appearance and specifications listed in this product or transporting it to another location. NG: 4 - 10.5-inch (10.2 - 26.7 cm) WC LP: 8 - 13-inch (20.4 - 33.1 cm) WC 27" (W) X 30.2" (D) X 39" (H), 51.4" (D with door open) 68.6 cm (W) X 76.5 cm (D) X 99 cm (H), 130.5 cm (D with door open) Gas...
... proper location Level the dryer Vent the dryer Connect the inlet hose (steam models) Connect the Gas dryer Connect the Electric dryer Gas dryer Electric dryer Plug in the power cord Installation test Test run Product Specifications The appearance and specifications listed in this product or transporting it to another location. NG: 4 - 10.5-inch (10.2 - 26.7 cm) WC LP: 8 - 13-inch (20.4 - 33.1 cm) WC 27" (W) X 30.2" (D) X 39" (H), 51.4" (D with door open) 68.6 cm (W) X 76.5 cm (D) X 99 cm (H), 130.5 cm (D with door open) Gas...

Owners Manual
Page 11
... result in longer drying times. • The dryer must be considered. Clothes may not tumble properly, and automatic sensor cycles may not operate correctly if the dryer is not level. • For garage installation, you review this entire manual before installing and operating your local building inspector. Contact your dryer! ENGLISH INSTALLATION 11 Installation Location Requirements WARNING • Read all installation instructions completely before installing and using your dryer at temperatures below 45 °...
... result in longer drying times. • The dryer must be considered. Clothes may not tumble properly, and automatic sensor cycles may not operate correctly if the dryer is not level. • For garage installation, you review this entire manual before installing and operating your local building inspector. Contact your dryer! ENGLISH INSTALLATION 11 Installation Location Requirements WARNING • Read all installation instructions completely before installing and using your dryer at temperatures below 45 °...

Owners Manual
Page 16
... to vent to change the dryer vent location. 1 Remove the rear exhaust duct retaining screw. It can also vent to the bottom or side (right-side venting is not available on gas models). An adapter kit, part number 383EEL9001B, may be purchased from the dryer. Be sure that the male end of the elbow faces down through the hole in the bottom of the dryer. 16 INSTALLATION Installing the Side Vent Kit WARNING...
... to vent to change the dryer vent location. 1 Remove the rear exhaust duct retaining screw. It can also vent to the bottom or side (right-side venting is not available on gas models). An adapter kit, part number 383EEL9001B, may be purchased from the dryer. Be sure that the male end of the elbow faces down through the hole in the bottom of the dryer. 16 INSTALLATION Installing the Side Vent Kit WARNING...
Owners Manual
Page 21
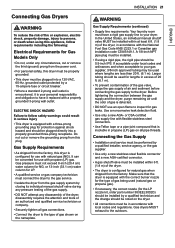
... use an open flame to inspect for natural gas when shipped from the factory, this dryer is equipped with a three-prong grounding plug for use with propane (LP) gas. Connecting the Gas Supply • Installation and service must be performed by a 15-ampere fuse or circuit breaker. • Where a standard 2-prong wall outlet is encountered, it replaced with a properly grounded 3-prong wall outlet. or CSA-certified gas supply line with flexible stainless steel connectors. • Use...
... use an open flame to inspect for natural gas when shipped from the factory, this dryer is equipped with a three-prong grounding plug for use with propane (LP) gas. Connecting the Gas Supply • Installation and service must be performed by a 15-ampere fuse or circuit breaker. • Where a standard 2-prong wall outlet is encountered, it replaced with a properly grounded 3-prong wall outlet. or CSA-certified gas supply line with flexible stainless steel connectors. • Use...
Owners Manual
Page 23
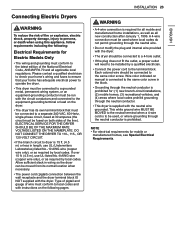
... adequate electrical power to operate the dryer. • This dryer must be connected to a grounded metal, permanent wiring system, or an equipment-grounding conductor must be run with the neutral wire grounded. Wire color indicated on manual is connected to the same color screw in length, use UL-listed No.-8 AWG wire (copper wire only), or as required by local codes. Please contact a qualified electrician to check your home's wiring and fuses...
... adequate electrical power to operate the dryer. • This dryer must be connected to a grounded metal, permanent wiring system, or an equipment-grounding conductor must be run with the neutral wire grounded. Wire color indicated on manual is connected to the same color screw in length, use UL-listed No.-8 AWG wire (copper wire only), or as required by local codes. Please contact a qualified electrician to check your home's wiring and fuses...
Owners Manual
Page 28
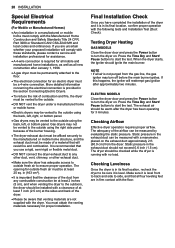
... no load. It is required for proper installation. If this happens, the igniter will resist fire and combustion. The dryer should be a 4-wire connection. Gas dryers may be vented to the outside fresh air to be warm after approximately two minutes. Testing Dryer Heating GAS MODELS Close the dryer door and press the Power button to turn the dryer on . Static pressure in (163 cm²). ••It is running with...
... no load. It is required for proper installation. If this happens, the igniter will resist fire and combustion. The dryer should be a 4-wire connection. Gas dryers may be vented to the outside fresh air to be warm after approximately two minutes. Testing Dryer Heating GAS MODELS Close the dryer door and press the Power button to turn the dryer on . Static pressure in (163 cm²). ••It is running with...
Owners Manual
Page 30
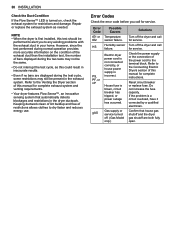
... normal operation provides more accurate information on , check the exhaust system for service. Turn off the dryer and call for service. Error Codes Check the error code before you to the Connecting Electric Dryers section of the power cord to dry faster and reduces energy use. Electric dryer power cord is not connected correctly, or house power supply is a circuit overload, have it corrected by a qualified electrician. Check the power supply or the connection of this manual for complete exhaust system and venting requirements...
... normal operation provides more accurate information on , check the exhaust system for service. Turn off the dryer and call for service. Error Codes Check the error code before you to the Connecting Electric Dryers section of the power cord to dry faster and reduces energy use. Electric dryer power cord is not connected correctly, or house power supply is a circuit overload, have it corrected by a qualified electrician. Check the power supply or the connection of this manual for complete exhaust system and venting requirements...
Owners Manual
Page 43
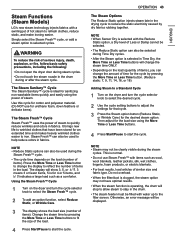
... Time Dry cycles. • After the Steam option is operating, the drum will stop to allow steam to stay in Time Dry, the More Time or Less Time buttons will change the steam time ONLY. • Depending on the load (number of steam. It brings new life to wrinkled clothes that cycle. 3 Press the Steam option button (Reduce Static, or Wrinkle Care) for sanitizing non-washable items quickly and easily using the More Time or Less Time buttons. 4 Press Start...
... Time Dry cycles. • After the Steam option is operating, the drum will stop to allow steam to stay in Time Dry, the More Time or Less Time buttons will change the steam time ONLY. • Depending on the load (number of steam. It brings new life to wrinkled clothes that cycle. 3 Press the Steam option button (Reduce Static, or Wrinkle Care) for sanitizing non-washable items quickly and easily using the More Time or Less Time buttons. 4 Press Start...
Owners Manual
Page 50
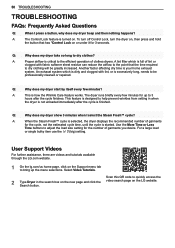
... exhaust system. A: The Control Lock feature is started. Q: Why does my dryer show 3 minutes when I press a button, why does my dryer beep and then nothing happens? For a large load or single bulky item use the (big) setting. Another factor affecting dry time is critical to the efficient operation of lint or clogged with fabric softener sheet residue can reduce the airflow to dry clothes? A: When the Steam Fresh™ cycle...
... exhaust system. A: The Control Lock feature is started. Q: Why does my dryer show 3 minutes when I press a button, why does my dryer beep and then nothing happens? For a large load or single bulky item use the (big) setting. Another factor affecting dry time is critical to the efficient operation of lint or clogged with fabric softener sheet residue can reduce the airflow to dry clothes? A: When the Steam Fresh™ cycle...
Owners Manual
Page 51
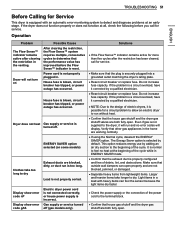
... show error code gAS Electric dryer power cord is not connected correctly, or house power supply is not properly plugged in. If the problem is a circuit overload, have it corrected by default. TROUBLESHOOTING 51 ENGLISH Before Calling for Service This dryer is equipped with heavy items can open . Power cord is incorrect. House fuse is securely plugged into a grounded outlet matching the dryer's rating plate. ••Reset circuit breaker or replace fuse. Solutions ••If the Flow...
... show error code gAS Electric dryer power cord is not connected correctly, or house power supply is not properly plugged in. If the problem is a circuit overload, have it corrected by default. TROUBLESHOOTING 51 ENGLISH Before Calling for Service This dryer is equipped with heavy items can open . Power cord is incorrect. House fuse is securely plugged into a grounded outlet matching the dryer's rating plate. ••Reset circuit breaker or replace fuse. Solutions ••If the Flow...
Owners Manual
Page 52
... the cycle and clean the filter during the cycle. ••Reset circuit breaker or replace fuse. With some models) Heat settings, load size, or dampness of load you are drying. Dryer is very small and you are using the Normal cycle, deselect the ENERGY SAVER option. To help reduce and maintain more moisture. Solutions ••Heavy fabrics take too long to dry Drying time is possible for a circuit problem to allow an electric dryer to run without heat...
... the cycle and clean the filter during the cycle. ••Reset circuit breaker or replace fuse. With some models) Heat settings, load size, or dampness of load you are drying. Dryer is very small and you are using the Normal cycle, deselect the ENERGY SAVER option. To help reduce and maintain more moisture. Solutions ••Heavy fabrics take too long to dry Drying time is possible for a circuit problem to allow an electric dryer to run without heat...

Owners Manual
Page 53
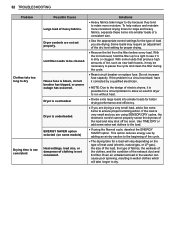
... care instructions. Adjust settings and use a shorter drying time, or use SENSOR DRY cycles. ••Divide extra large loads into smaller loads for drying. ••Check pockets thoroughly before every load. Clothes left in the same or later loads. ••Stains on clothes TROUBLESHOOTING 53 Possible Cause Fabric softener used incorrectly. Dryer is dirty or clogged. Use a low or no heat setting. ••Remove the lint from clothes that were not removed during the cycle...
... care instructions. Adjust settings and use a shorter drying time, or use SENSOR DRY cycles. ••Divide extra large loads into smaller loads for drying. ••Check pockets thoroughly before every load. Clothes left in the same or later loads. ••Stains on clothes TROUBLESHOOTING 53 Possible Cause Fabric softener used incorrectly. Dryer is dirty or clogged. Use a low or no heat setting. ••Remove the lint from clothes that were not removed during the cycle...

Owners Manual
Page 57
... warranty service under normal home use of Warranty Parts and Labor Dryer drum HOW SERVICE IS HANDLED LG will provide parts and labor to state. Warranty Period One (1) year from date of original retail purchase Ten (10) years from date of original retail purchase Scope of accessories, components, or consumable cleaning products that vary from natural gas or LP gas. repair or replacement of fuses or correction of wiring...
... warranty service under normal home use of Warranty Parts and Labor Dryer drum HOW SERVICE IS HANDLED LG will provide parts and labor to state. Warranty Period One (1) year from date of original retail purchase Ten (10) years from date of original retail purchase Scope of accessories, components, or consumable cleaning products that vary from natural gas or LP gas. repair or replacement of fuses or correction of wiring...
Owners Manual
Page 58
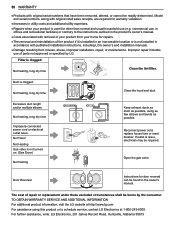
Excessive duct length and/or multiple elbows Not heating, long dry time Improperly connected power cord or electrical outlet issue. No Power Not Heating Gas valve is clogged. Reconnect power cord, replace house fuse or reset breaker. For further assistance, write: LG Electronics, 201 James Record Road, Huntsville, Alabama 35813 58 WARRANTY ••Products with original serial numbers that have been removed, altered, or cannot be borne by LG. Filter is not turned on. (Gas Dryer) Not heating Keep exhaust ducts as short as...
Excessive duct length and/or multiple elbows Not heating, long dry time Improperly connected power cord or electrical outlet issue. No Power Not Heating Gas valve is clogged. Reconnect power cord, replace house fuse or reset breaker. For further assistance, write: LG Electronics, 201 James Record Road, Huntsville, Alabama 35813 58 WARRANTY ••Products with original serial numbers that have been removed, altered, or cannot be borne by LG. Filter is not turned on. (Gas Dryer) Not heating Keep exhaust ducts as short as...


