
Owners Manual
Page 2
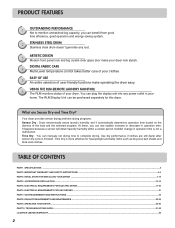
... such as king-size bed sheets and thick work clothes. Use dry performance if clothes are Sensor Dry and Time Dry? GAS REQUIREMENTS AND INSTRUCTIONS ...22 PART8. OPERATING YOUR DRYER ...25-30 PART10. ARTISTIC DESIGN 3 Modern front panel look stylish. DIGITAL FABRIC CARE 4 Multi-Level temperature control takes better care of your dryer. Your dryer provides sensor drying and time drying programs. Sensor Dry : Dryer electronically sense laundry humidity and it automatically determines operation time based on the dryness of user-friendly functions...
... such as king-size bed sheets and thick work clothes. Use dry performance if clothes are Sensor Dry and Time Dry? GAS REQUIREMENTS AND INSTRUCTIONS ...22 PART8. OPERATING YOUR DRYER ...25-30 PART10. ARTISTIC DESIGN 3 Modern front panel look stylish. DIGITAL FABRIC CARE 4 Multi-Level temperature control takes better care of your dryer. Your dryer provides sensor drying and time drying programs. Sensor Dry : Dryer electronically sense laundry humidity and it automatically determines operation time based on the dryness of user-friendly functions...
Owners Manual
Page 4
WARNING! You will repair or replace any parts defective in this manual must be followed. Proof of Purchase. ! Use the space below to record the model number and serial number of fire or explosion, electric shock or to other than private family use, all warranty coverage is effective for your Dryer is installed and operated per this manual, LG will need the complete Model and Serial Number when requesting Warranty Service. Model No. Warranty Restriction: If...
WARNING! You will repair or replace any parts defective in this manual must be followed. Proof of Purchase. ! Use the space below to record the model number and serial number of fire or explosion, electric shock or to other than private family use, all warranty coverage is effective for your Dryer is installed and operated per this manual, LG will need the complete Model and Serial Number when requesting Warranty Service. Model No. Warranty Restriction: If...
Owners Manual
Page 5
...) Clean lint screen before using your dryer. Check with a qualified electrician or service person if you are in doubt as they give off vapors that could cause a load to catch fire. 14) Do not use heat to the weather. 7) Do not tamper with controls. 8) Do not repair or replace any part of the appliance or attempt any risk of electric shock. WARNING! SAVE THESE INSTRUCTIONS GROUNDING INSTRUCTIONS...
...) Clean lint screen before using your dryer. Check with a qualified electrician or service person if you are in doubt as they give off vapors that could cause a load to catch fire. 14) Do not use heat to the weather. 7) Do not tamper with controls. 8) Do not repair or replace any part of the appliance or attempt any risk of electric shock. WARNING! SAVE THESE INSTRUCTIONS GROUNDING INSTRUCTIONS...

Owners Manual
Page 6
... in this manual and instructions provided by your gas supplier. • Do not store or use any kind of oil on them, including cooking oil. • Articles containing foam, rubber, rubber-like materials, plastic or similar materials should be minimized further by properly venting the dryer to light a match or cigarette, or turn on any gas or electrical appliance. •...
... in this manual and instructions provided by your gas supplier. • Do not store or use any kind of oil on them, including cooking oil. • Articles containing foam, rubber, rubber-like materials, plastic or similar materials should be minimized further by properly venting the dryer to light a match or cigarette, or turn on any gas or electrical appliance. •...
Owners Manual
Page 9
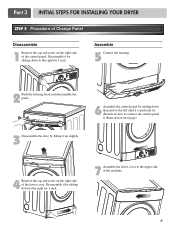
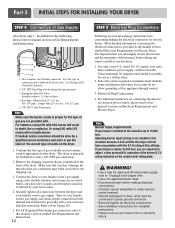
... connect the control panel is illustrated on next page) 3 Disassemble the deco by lifting it up slightly. 4 Remove the cap and screw on the right side of the control panel. Disassemble it by sliding down to the upper side of the machine. 9 Part 3 INITIAL STEPS FOR INSTALLING YOUR DRYER STEP 3 Procedure of Change Panel Disassemble 1 Remove the cap and screw on the right side of the lower cover. Disassemble...
... connect the control panel is illustrated on next page) 3 Disassemble the deco by lifting it up slightly. 4 Remove the cap and screw on the right side of the control panel. Disassemble it by sliding down to the upper side of the machine. 9 Part 3 INITIAL STEPS FOR INSTALLING YOUR DRYER STEP 3 Procedure of Change Panel Disassemble 1 Remove the cap and screw on the right side of the lower cover. Disassemble...
Owners Manual
Page 12
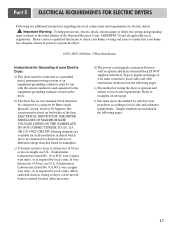
... model/serial rating plate. ! listed No. 10 (copper wire only) three conductor power supply cord kit rated 240 Volts (minimum) 30 Amperes and labeled as noted below, only use a new stainless steel flexible connector if allowed by your house is proper for the type of this manual, before making the electrical connection for checking inlet gas pressure) 3. Turn on Gas Requirements and Instructions. 1 2 5 3 4 1. WARNING! • Use a new UL approved 30 amp power supply cord...
... model/serial rating plate. ! listed No. 10 (copper wire only) three conductor power supply cord kit rated 240 Volts (minimum) 30 Amperes and labeled as noted below, only use a new stainless steel flexible connector if allowed by your house is proper for the type of this manual, before making the electrical connection for checking inlet gas pressure) 3. Turn on Gas Requirements and Instructions. 1 2 5 3 4 1. WARNING! • Use a new UL approved 30 amp power supply cord...

Owners Manual
Page 13
... air is running with damp cloth to the dryer drum/drying compartment and, after approximately two minutes. Confirming Heat Source in the exhaust duct can be warm after reviewing the following parts on your dryer after the dryer has been operating for three minutes. Static pressure in this manual for proper installation of the Dryer. Effective dryer operation requires appropriate dryer airflow. Static pressure in Electric Dryers Close the door to remove from the gas line, the gas...
... air is running with damp cloth to the dryer drum/drying compartment and, after approximately two minutes. Confirming Heat Source in the exhaust duct can be warm after reviewing the following parts on your dryer after the dryer has been operating for three minutes. Static pressure in this manual for proper installation of the Dryer. Effective dryer operation requires appropriate dryer airflow. Static pressure in Electric Dryers Close the door to remove from the gas line, the gas...

Owners Manual
Page 14
... the duct. ! The opening for outside using the back, left , right, or bottom panel. 5) Gas dryers may not be vented to the outside using the back, left , or bottom panel. More detailed information concerning the electrical connection is provided at the manual section entitled Electrical Requirements for proper installation. ! WARNING! Gas dryer may be a 4-wire connection. The following instructions apply to any installation of the dryer in a manufactured or mobile home: 1) The gas dryer must...
... the duct. ! The opening for outside using the back, left , right, or bottom panel. 5) Gas dryers may not be vented to the outside using the back, left , or bottom panel. More detailed information concerning the electrical connection is provided at the manual section entitled Electrical Requirements for proper installation. ! WARNING! Gas dryer may be a 4-wire connection. The following instructions apply to any installation of the dryer in a manufactured or mobile home: 1) The gas dryer must...
Owners Manual
Page 17
... run with dryer. Heating elements are included in the following pages. wire (copper wire only), or as required by local codes. wire (copper wire only), or as required by local codes. Refer to local code and ordinance requirements. Please contact a qualified electrician to check your home's wiring and fuses to ensure that your dryer according to examples on the following pages. 17 d) The power cord (pigtail) connection between wall receptacle and dryer terminal block...
... run with dryer. Heating elements are included in the following pages. wire (copper wire only), or as required by local codes. wire (copper wire only), or as required by local codes. Refer to local code and ordinance requirements. Please contact a qualified electrician to check your home's wiring and fuses to ensure that your dryer according to examples on the following pages. 17 d) The power cord (pigtail) connection between wall receptacle and dryer terminal block...
Owners Manual
Page 20
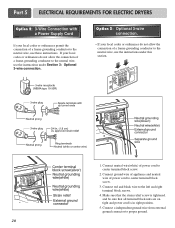
... wire from external ground connector to the left and right terminal block screws. 4. and be sure that the strain relief screw is in right position. 5. If your local codes or ordinances do not allow the connection of a frame-grounding conductor to the neutral wire, use the instructions under this section. 1. Connect red and black wire to proper ground. 20 Part 5 ELECTRICAL REQUIREMENTS FOR ELECTRIC DRYERS Option 2: 3-Wire Connection with a Power Supply Cord...
... wire from external ground connector to the left and right terminal block screws. 4. and be sure that the strain relief screw is in right position. 5. If your local codes or ordinances do not allow the connection of a frame-grounding conductor to the neutral wire, use the instructions under this section. 1. Connect red and black wire to proper ground. 20 Part 5 ELECTRICAL REQUIREMENTS FOR ELECTRIC DRYERS Option 2: 3-Wire Connection with a Power Supply Cord...

Owners Manual
Page 21
... electrical connections and requirements for Your Dryer: a) Please note that the wiring diagram is provided inside the dryer control hood. Part 6 ELECTRICAL REQUIREMENTS FOR GAS DRYERS 120 Volt, 60 Hertz, with 3-Prong Grounding Plug Following are uncertain whether or not your laundry room meets these specifications, please have a qualified service person or company. If it does not fit the outlet in your laundry room, a proper outlet will need to be plugged directed...
... electrical connections and requirements for Your Dryer: a) Please note that the wiring diagram is provided inside the dryer control hood. Part 6 ELECTRICAL REQUIREMENTS FOR GAS DRYERS 120 Volt, 60 Hertz, with 3-Prong Grounding Plug Following are uncertain whether or not your laundry room meets these specifications, please have a qualified service person or company. If it does not fit the outlet in your laundry room, a proper outlet will need to be plugged directed...
Owners Manual
Page 22
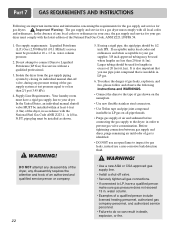
... result in your area, the gas supply and service for gas dryers. ! A 1/8 in LP gas. 6. pipe plug must comply with all local codes and ordinances. DO NOT attempt any disassembly of the National Fuel Gas Code, ANSI Z223.1/NFPA 54. 1. WARNING! • Use a new AGA or CSA approved gas supply line. • Install a shut-off valve, during any pressure testing of the gas supply system at 10 + 1.5 in...
... result in your area, the gas supply and service for gas dryers. ! A 1/8 in LP gas. 6. pipe plug must comply with all local codes and ordinances. DO NOT attempt any disassembly of the National Fuel Gas Code, ANSI Z223.1/NFPA 54. 1. WARNING! • Use a new AGA or CSA approved gas supply line. • Install a shut-off valve, during any pressure testing of the gas supply system at 10 + 1.5 in...
Owners Manual
Page 23
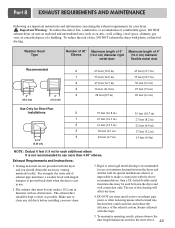
.... Part 8 EXHAUST REQUIREMENTS AND MAINTENANCE Following are not provided with plastic or thin foil ducting. It is impossible to prevent back-draft when the dryer is recommended for use more than 4 90° elbows. Venting materials are important instructions and information concerning the exhaust requirements for each additional elbow. Make sure to use as transition ducting between the dryer and wall connection only. Exhaust Requirements and Instructions: 1. Secure...
.... Part 8 EXHAUST REQUIREMENTS AND MAINTENANCE Following are not provided with plastic or thin foil ducting. It is impossible to prevent back-draft when the dryer is recommended for use more than 4 90° elbows. Venting materials are important instructions and information concerning the exhaust requirements for each additional elbow. Make sure to use as transition ducting between the dryer and wall connection only. Exhaust Requirements and Instructions: 1. Secure...
Owners Manual
Page 24
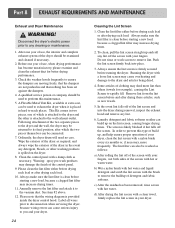
... Kit comes in two pieces, one of the control panel. 9. Ordinarily, the dryer drum will need no care. Please clean the lint filter either before drying each load or after drying each load. 10. Label all wires prior to disconnection when servicing the dryer, because wiring errors can cause serious injury to you and your dryer. Clean the lint filter either before drying each load or after drying each load. Remove lint from the lint screen before starting a new load, because a clogged lint filter may increase drying times...
... Kit comes in two pieces, one of the control panel. 9. Ordinarily, the dryer drum will need no care. Please clean the lint filter either before drying each load or after drying each load. 10. Label all wires prior to disconnection when servicing the dryer, because wiring errors can cause serious injury to you and your dryer. Clean the lint filter either before drying each load or after drying each load. Remove lint from the lint screen before starting a new load, because a clogged lint filter may increase drying times...
Owners Manual
Page 27
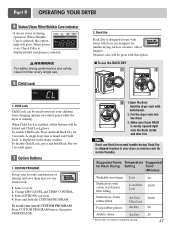
... onetouch recall. 1. Part 9 OPERATING YOUR DRYER 5 Status/Clean Filter/Wrinkle Care Indicator • It shows status of settings and save them here for use Rack for 3 seconds again. 7 Option Buttons 1. When power is on control panel while the dryer is displayed on the status window. Rack Dry Rack Dry is evenly spaced right onto the drum inside and door rim. Set up your stored CUSTOM PROGRAM Press CUSTOM PROGRAM button, then press START/PAUSE. 3 1.Open the door. When Child Lock...
... onetouch recall. 1. Part 9 OPERATING YOUR DRYER 5 Status/Clean Filter/Wrinkle Care Indicator • It shows status of settings and save them here for use Rack for 3 seconds again. 7 Option Buttons 1. When power is on control panel while the dryer is displayed on the status window. Rack Dry Rack Dry is evenly spaced right onto the drum inside and door rim. Set up your stored CUSTOM PROGRAM Press CUSTOM PROGRAM button, then press START/PAUSE. 3 1.Open the door. When Child Lock...
Owners Manual
Page 28
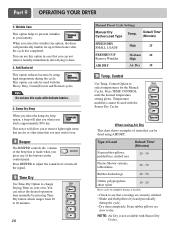
... Reset cycle to complete drying, if needed. • Check to dry. This notice will alert you select the wrinkle free option, the dryer will periodically tumble for the Manual Cycles. CONTROL until the desired temperature setting glows. Temperature modifiers cannot be used with the Sensor Dry Cycles. You can only be dried using AIR DRY. Cycles Load Type Default Time* (Minutes) SPEED DRY SMALL LOADS FRESHEN UP Remove Wrinkles AIR DRY High 25 Medium 20 High Air Dry 30 10 Temp. Press TEMP. Type of the beep...
... Reset cycle to complete drying, if needed. • Check to dry. This notice will alert you select the wrinkle free option, the dryer will periodically tumble for the Manual Cycles. CONTROL until the desired temperature setting glows. Temperature modifiers cannot be used with the Sensor Dry Cycles. You can only be dried using AIR DRY. Cycles Load Type Default Time* (Minutes) SPEED DRY SMALL LOADS FRESHEN UP Remove Wrinkles AIR DRY High 25 Medium 20 High Air Dry 30 10 Temp. Press TEMP. Type of the beep...
Owners Manual
Page 30
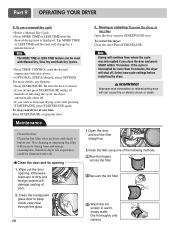
... foreign objects will change by 1 minute interval. Improper wire connection or related wiring error will shut off . • If you do not press START/PAUSE within 10 minutes. I Clean the door and its opening . Part 9 OPERATING YOUR DRYER 4. To restart the dryer Close the door. Maintenance Clean lint filter Clean the lint filter after each use and check it before restarting the dryer. ! Note The MORE TIME or LESS TIME feature can cause fire or electric shock or...
... foreign objects will change by 1 minute interval. Improper wire connection or related wiring error will shut off . • If you do not press START/PAUSE within 10 minutes. I Clean the door and its opening . Part 9 OPERATING YOUR DRYER 4. To restart the dryer Close the door. Maintenance Clean lint filter Clean the lint filter after each use and check it before restarting the dryer. ! Note The MORE TIME or LESS TIME feature can cause fire or electric shock or...
Owners Manual
Page 31
... / circuit breaker box and replace the fuse or reset the circuit breaker. (IMPORTANT: electric dryers generally use your clothes entirely clean? Make sure to use two fuses or breakers.) • Is the gas supply or service blocked or off? In this case, thermistor should be replaced and call a service center. Part 10 TROUBLESHOOTING GUIDE Troubleshooting Tips Save time and money! tE2 It is displayed when thermistor is blown or the circuit breaker tripped, the dryer might tumble but not heat. Problem: My Dryer Displayed Error...
... / circuit breaker box and replace the fuse or reset the circuit breaker. (IMPORTANT: electric dryers generally use your clothes entirely clean? Make sure to use two fuses or breakers.) • Is the gas supply or service blocked or off? In this case, thermistor should be replaced and call a service center. Part 10 TROUBLESHOOTING GUIDE Troubleshooting Tips Save time and money! tE2 It is displayed when thermistor is blown or the circuit breaker tripped, the dryer might tumble but not heat. Problem: My Dryer Displayed Error...
Owners Manual
Page 32
... over dry the load of dried clothes. It is important that the lint filter is clean. Try using consistent heat settings and consistent load sizes? Part 10 TROUBLESHOOTING GUIDE 5.Problem:There is Lint on my Clothes Question What to Do • Is your settings and use fabric softener? Divide your load of the exhaust ducts and lint filer. 32 Please refer to the manual section on the heat setting, the type of heat used (electric, natural or LP gas), the size of the load, the type...
... over dry the load of dried clothes. It is important that the lint filter is clean. Try using consistent heat settings and consistent load sizes? Part 10 TROUBLESHOOTING GUIDE 5.Problem:There is Lint on my Clothes Question What to Do • Is your settings and use fabric softener? Divide your load of the exhaust ducts and lint filer. 32 Please refer to the manual section on the heat setting, the type of heat used (electric, natural or LP gas), the size of the load, the type...
Owners Manual
Page 33
... review of the appropriate sections of this manual that nothing has been set ? To avoid shrinkage, please carefully follow the care and use two fuses or breakers.) • Did you drying large loads of laundry? Check your home's or laundry room's fuse box/circuit breaker box and replace the fuse or reset the circuit breaker. (IMPORTANT: electric dryers generally use instructions for your garment, because some fabrics will shrink when dried in , and that the exhaust venting...
... review of the appropriate sections of this manual that nothing has been set ? To avoid shrinkage, please carefully follow the care and use two fuses or breakers.) • Did you drying large loads of laundry? Check your home's or laundry room's fuse box/circuit breaker box and replace the fuse or reset the circuit breaker. (IMPORTANT: electric dryers generally use instructions for your garment, because some fabrics will shrink when dried in , and that the exhaust venting...


