

Owners Manual
Page 1
1-800-243-0000 24 HOURS A DAY, 7 DAYS A WEEK FOR LG CUSTOMER SERVICE _ ¢ '/,, 4_" """n Ir_;_9_ ,_: _',_"r _ _, ,_Y_'_!,i,rsi,_[ ,'_;"i r,±j, ElectricandGasDryer DLE7177WNl/DLG7188WiVi DLE7177NiVI/DLG7188NM DLE7177RIVI/DLG7188RM Thank you for future reference. Record the Model and Serial Numbers, and retain the manual for buying a LG Dryer. Please read your manual carefully, as it provides instructions on safe Installation, Use and Maintenance. For more information, visit our website at http:iius.lge.com P/No.: 3828EL3010A
1-800-243-0000 24 HOURS A DAY, 7 DAYS A WEEK FOR LG CUSTOMER SERVICE _ ¢ '/,, 4_" """n Ir_;_9_ ,_: _',_"r _ _, ,_Y_'_!,i,rsi,_[ ,'_;"i r,±j, ElectricandGasDryer DLE7177WNl/DLG7188WiVi DLE7177NiVI/DLG7188NM DLE7177RIVI/DLG7188RM Thank you for future reference. Record the Model and Serial Numbers, and retain the manual for buying a LG Dryer. Please read your manual carefully, as it provides instructions on safe Installation, Use and Maintenance. For more information, visit our website at http:iius.lge.com P/No.: 3828EL3010A
Owners Manual
Page 2
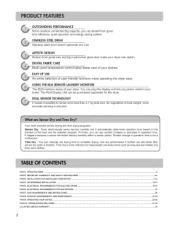
...times, you can plug the display unit into any rust. IMPORTANT WARRANTY AND SAFETY INSTRUCTIONS ...PART3. TROUBLESHOOTING GUIDE ...LG DRYER LIMITED WARRANTY ...2 3 4-6 7-12 13-14 15-18 lg 20 21-22 23-30 31-33 34 ARTISTICDESIGN Modern front panel look stylish. You can see sudden increase or ...decrease in operation time. Your dryer provides sensor drying and time drying programs. Sensor Dry : Dryer electronically sense laundry humidity and it possible...
...times, you can plug the display unit into any rust. IMPORTANT WARRANTY AND SAFETY INSTRUCTIONS ...PART3. TROUBLESHOOTING GUIDE ...LG DRYER LIMITED WARRANTY ...2 3 4-6 7-12 13-14 15-18 lg 20 21-22 23-30 31-33 34 ARTISTICDESIGN Modern front panel look stylish. You can see sudden increase or ...decrease in operation time. Your dryer provides sensor drying and time drying programs. Sensor Dry : Dryer electronically sense laundry humidity and it possible...

Owners Manual
Page 3
[] Type : Electric and Gas Dryer [] Rating [] Size [] Capacity [] Weight : Please refer to the rating label regarding detailed information. : 27 x 29.9 x 38.7(inch) :IEC 7.3cu.ft. (22.5 Ib) : 126 Ibs (57.2 ... without manqfaturer_ notice. See page 14 .[br how to use . 3 See page 13.[br how to use . esign qf pedestal_ are subject to use. ACCESSORIES 2 Dryer rack (1 each) Stacking kit (1 each ) Purchased Separately Remote Laundry Monitor Purchased Separately See page 26 .[br how to change by manufacturer. Pedestal (1 each ) Purchased Separately...
[] Type : Electric and Gas Dryer [] Rating [] Size [] Capacity [] Weight : Please refer to the rating label regarding detailed information. : 27 x 29.9 x 38.7(inch) :IEC 7.3cu.ft. (22.5 Ib) : 126 Ibs (57.2 ... without manqfaturer_ notice. See page 14 .[br how to use . 3 See page 13.[br how to use . esign qf pedestal_ are subject to use. ACCESSORIES 2 Dryer rack (1 each) Stacking kit (1 each ) Purchased Separately Remote Laundry Monitor Purchased Separately See page 26 .[br how to change by manufacturer. Pedestal (1 each ) Purchased Separately...
Owners Manual
Page 4
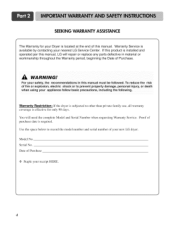
...to prevent property damage, personal injury, or death when using your new LG dryer. SEEKING WARRANTY ASSISTANCE The Warranty for only 90 days. Serial No. For your Dryer is installed and operated per this manual, LG will need the complete Model and Serial Number when requesting Warranty Service. ... located at the end of Purchase -_I_ Staple your nearest LG Service Center. Proof of Purchase. Warranty Service is required. Model No. Date of this manual must be followed. Warranty Restriction: If the dryer is subjected to other than private family use, all warranty ...
...to prevent property damage, personal injury, or death when using your new LG dryer. SEEKING WARRANTY ASSISTANCE The Warranty for only 90 days. Serial No. For your Dryer is installed and operated per this manual, LG will need the complete Model and Serial Number when requesting Warranty Service. ... located at the end of Purchase -_I_ Staple your nearest LG Service Center. Proof of Purchase. Warranty Service is required. Model No. Date of this manual must be followed. Warranty Restriction: If the dryer is subjected to other than private family use, all warranty ...
Owners Manual
Page 5
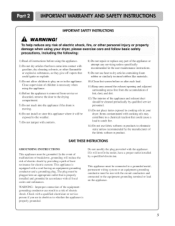
... to eliminate static unless recommended by a qualified electrician. Close supervision of the fabric sofiner or product. This appliance is properly installed and grounded in your dryer. SAVE THESE INSTRUCTIONS GROUNDING INSTRUCTIONS This appliance nmst be grounded. IMPORTANT SAFETY INSTRUCTIONS 1) Read all local codes and ordinances.
... to eliminate static unless recommended by a qualified electrician. Close supervision of the fabric sofiner or product. This appliance is properly installed and grounded in your dryer. SAVE THESE INSTRUCTIONS GROUNDING INSTRUCTIONS This appliance nmst be grounded. IMPORTANT SAFETY INSTRUCTIONS 1) Read all local codes and ordinances.
Owners Manual
Page 6
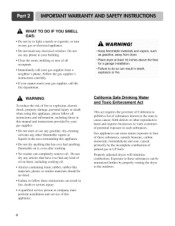
... materials should be minimized further by your gas supplier. • Do not store or use any phone in your gas supplier from dryer. • Place dryer at least 18 inches above the floor for a garage installation. • Failure to such substances. Gas appliances can result in this...anything that has ever had any kind of oil on it, even after washing. • No washer can completely remove oil. Properly adjusted dryers will minimize combustion. Follow the gas supplier's instructions carefully. ° If you cannot reach your gas supplier, call your building. • ...
... materials should be minimized further by your gas supplier. • Do not store or use any phone in your gas supplier from dryer. • Place dryer at least 18 inches above the floor for a garage installation. • Failure to such substances. Gas appliances can result in this...anything that has ever had any kind of oil on it, even after washing. • No washer can completely remove oil. Properly adjusted dryers will minimize combustion. Follow the gas supplier's instructions carefully. ° If you cannot reach your gas supplier, call your building. • ...
Owners Manual
Page 7
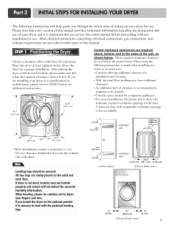
...through the initial steps of the unit as shown below. Choose a location with a solid floor for additional instructions. If you install the dryer on the solid and even fleer. it is also acceptable. 3Bt (7.6 cm) 48 t_2. (310 cm 2) ventilation hole * Most installations... require a minimum 5 1/2 in. (14 cm) clearance behind the dryer for use of this manual provides important information regarding the preparation and use . More detailed instructions concerning electrical connections, gas connections, and exhaust...
...through the initial steps of the unit as shown below. Choose a location with a solid floor for additional instructions. If you install the dryer on the solid and even fleer. it is also acceptable. 3Bt (7.6 cm) 48 t_2. (310 cm 2) ventilation hole * Most installations... require a minimum 5 1/2 in. (14 cm) clearance behind the dryer for use of this manual provides important information regarding the preparation and use . More detailed instructions concerning electrical connections, gas connections, and exhaust...
Owners Manual
Page 8
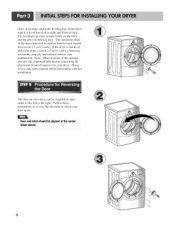
... for your door opens: Door and latch should be installed to open either to reverse the direction in position, adjust the leveling legs of the dryer until it is not level, and if the slope exceeds 2.5 cm (1 inch), a load may not tumble properly and internal sensors may malfunction. The ...leveling legs must remain firmly on your dryer can be aligned at the center 8 Follow these instructions to the left or the right. If the dryer is level from left to right and front to back should not rock. Note: Other sections...
... for your door opens: Door and latch should be installed to open either to reverse the direction in position, adjust the leveling legs of the dryer until it is not level, and if the slope exceeds 2.5 cm (1 inch), a load may not tumble properly and internal sensors may malfunction. The ...leveling legs must remain firmly on your dryer can be aligned at the center 8 Follow these instructions to the left or the right. If the dryer is level from left to right and front to back should not rock. Note: Other sections...
Owners Manual
Page 9
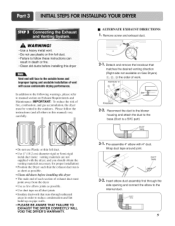
... duct to the blower housing and attach the duct to the base.(Duct is as short as possible. • Clean old ducts beJbre installing this dryer • The male end of each section of exhaust duct must be vented to the internal duct. 9 Please follow these instructions can result in... the following warnings, please refer to reduce condensation and lint build-up on pipe walls. • PLEASE BE AWARE THAT FAILURE TO EXHAUST THE DRYER CORRECTLY WILL VOID THE DRYER'S WARRANTY. • ALTERNATE EXHAUST DIRECTIONS ]. iMPORTANT: To reduce the risk of fire, combustion, and gas accumulation, the...
... duct to the blower housing and attach the duct to the base.(Duct is as short as possible. • Clean old ducts beJbre installing this dryer • The male end of each section of exhaust duct must be vented to the internal duct. 9 Please follow these instructions can result in... the following warnings, please refer to reduce condensation and lint build-up on pipe walls. • PLEASE BE AWARE THAT FAILURE TO EXHAUST THE DRYER CORRECTLY WILL VOID THE DRYER'S WARRANTY. • ALTERNATE EXHAUST DIRECTIONS ]. iMPORTANT: To reduce the risk of fire, combustion, and gas accumulation, the...
Owners Manual
Page 10
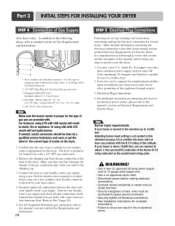
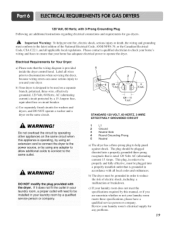
... gauge solid copper w_re. • Use a UL approved strain relief. • Disconnect power before making the electrical connection li)r electric dryers. Confirm that you don't damage the threads of the burner B.T.U rating indicated on Gas Requirements and Instructions. 1. Gas Connection Make sure ...the burner nozzle is important that you are provided with a non-corrosive leak detection fluid. The dryer is required li)r manufactured (mobile) home installations and where local codes do so can result in death, fire or explosion, Or using...
... gauge solid copper w_re. • Use a UL approved strain relief. • Disconnect power before making the electrical connection li)r electric dryers. Confirm that you don't damage the threads of the burner B.T.U rating indicated on Gas Requirements and Instructions. 1. Gas Connection Make sure ...the burner nozzle is important that you are provided with a non-corrosive leak detection fluid. The dryer is required li)r manufactured (mobile) home installations and where local codes do so can result in death, fire or explosion, Or using...
Owners Manual
Page 11
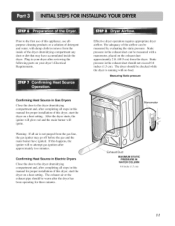
..., use allpurpose cleaning products or a solution of detergent and water, with damp cloth to remove from the inside of the dryer drum!drying compartment any dust or dirt that may go off before the gas and the main burner have accumulated inside the... duct can be checked while the dryer is not purged from the dryer. Effective dryer operation requires appropriate dryer airflow. The dryer should be measured with a manometer, placed on a heat setting. Measuring Static pressure Confirming Heat Source in Gas Dryers Close the door to the dryer drum/drying compartment and, after completing...
..., use allpurpose cleaning products or a solution of detergent and water, with damp cloth to remove from the inside of the dryer drum!drying compartment any dust or dirt that may go off before the gas and the main burner have accumulated inside the... duct can be checked while the dryer is not purged from the dryer. Effective dryer operation requires appropriate dryer airflow. The dryer should be measured with a manometer, placed on a heat setting. Measuring Static pressure Confirming Heat Source in Gas Dryers Close the door to the dryer drum/drying compartment and, after completing...

Owners Manual
Page 12
...screws or fasteners that the clearance of the duct from any other duct, vent, chimney, or other exhaust duct. 8) Make sure the dryer has adequate access to outside fresh air to ensure proper operation. WARNING! You should obtain the venting materials necessary for outside fresh air must ... using the back, left , or bottom panel. The following instructions are applicable to installations of combustion and fire, the dryer must be vented to the outside. 4) Electric dryers may be vented to the manufactured or mobile home structure, and the exhaust duct must be made of the...
...screws or fasteners that the clearance of the duct from any other duct, vent, chimney, or other exhaust duct. 8) Make sure the dryer has adequate access to outside fresh air to ensure proper operation. WARNING! You should obtain the venting materials necessary for outside fresh air must ... using the back, left , or bottom panel. The following instructions are applicable to installations of combustion and fire, the dryer must be vented to the outside. 4) Electric dryers may be vented to the manufactured or mobile home structure, and the exhaust duct must be made of the...
Owners Manual
Page 13
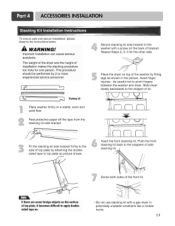
...on , • Do not use stacking kit with a screw on top of top plate, it becomes difficult to pinch fingers between the washer and dryer. Push the front stacking kit back to the stoppers of installation makes the stacking procedure too risky for the other side. Peel protective paper off... Secure stacking kit side bracket to the stopper of the front kit. Place the dryer on the back of top plate by fitting legs as picture shows. Slide dryer slowly backwards to the washer with a gas dryer in the picture. Fit the stacking kit side bracket firmly to top plate as ...
...on , • Do not use stacking kit with a screw on top of top plate, it becomes difficult to pinch fingers between the washer and dryer. Push the front stacking kit back to the stoppers of installation makes the stacking procedure too risky for the other side. Peel protective paper off... Secure stacking kit side bracket to the stopper of the front kit. Place the dryer on the back of top plate by fitting legs as picture shows. Slide dryer slowly backwards to the washer with a gas dryer in the picture. Fit the stacking kit side bracket firmly to top plate as ...
Owners Manual
Page 14
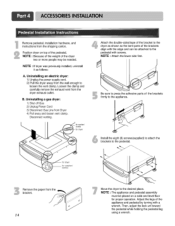
... Power Cord 3) Disconnect Gas Line from the dryer exhaust outlet. Loosen the clamp and carefully remove the exhaust vent from Dryer 4) Pull away and loosen vent clamp. Uninstalling an electric dryer: 1) Unplug the power supply cord, 2) Pull the dryer away from the wall enough to the pedestal...pedestal by turning with screws. I Be sure to the pedestal with a wrench. I ,,/ Move the dryer to the dryer as follows: A. NOTE : Attach the lower side first. for dryer for proper operation. combo Attach the double-sided tape of the bracket to the desired place. Install ...
... Power Cord 3) Disconnect Gas Line from the dryer exhaust outlet. Loosen the clamp and carefully remove the exhaust vent from Dryer 4) Pull away and loosen vent clamp. Uninstalling an electric dryer: 1) Unplug the power supply cord, 2) Pull the dryer away from the wall enough to the pedestal...pedestal by turning with screws. I Be sure to the pedestal with a wrench. I ,,/ Move the dryer to the dryer as follows: A. NOTE : Attach the lower side first. for dryer for proper operation. combo Attach the double-sided tape of the bracket to the desired place. Install ...
Owners Manual
Page 15
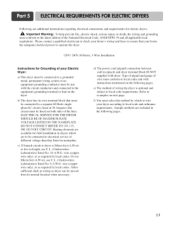
... electrical service of the National Electrical Code, ANSI/NFPA 70 and all applicable local regulations. Allow sufficient slack in dryers which to wire your Electric Dryer: a) This dryer must be connected to a grounded metal, permanent wiring system or an equipment-grounding conductor must be fused on the...electric shock, serious injury or death, the wiring and grounding must conform to local code and ordinance requirements. ELECTRICAL SERVICE FOR THE DRYER SHOULD BE OF MAXIMUM RATE VOLTAGE LISTED ON THE NAMEPLATE. Refer to local code requirements. e) The method of wire must conform to...
... electrical service of the National Electrical Code, ANSI/NFPA 70 and all applicable local regulations. Allow sufficient slack in dryers which to wire your Electric Dryer: a) This dryer must be connected to a grounded metal, permanent wiring system or an equipment-grounding conductor must be fused on the...electric shock, serious injury or death, the wiring and grounding must conform to local code and ordinance requirements. ELECTRICAL SERVICE FOR THE DRYER SHOULD BE OF MAXIMUM RATE VOLTAGE LISTED ON THE NAMEPLATE. Refer to local code requirements. e) The method of wire must conform to...

Owners Manual
Page 16
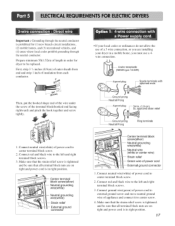
...and connect it to the left and right terminal block screws. 3. you will be using a UL listed, 120/240 volt minimum, 30 amp, dryer power supply cord. Connect ground wire(green) of power cord to external ground screw and move neutral ground wire of 3 wires a hook shape. &#... cutting 1_/2inch (3.8cm) from end. Colored wire should be replaced. you will be sure that the strain relief screw is prohibited for dryer to be connected to center terminal block screw. 2. Wire color indicated on manual is applied resulting in right position. Connect neutral wire(white)...
...and connect it to the left and right terminal block screws. 3. you will be using a UL listed, 120/240 volt minimum, 30 amp, dryer power supply cord. Connect ground wire(green) of power cord to external ground screw and move neutral ground wire of 3 wires a hook shape. &#... cutting 1_/2inch (3.8cm) from end. Colored wire should be replaced. you will be sure that the strain relief screw is prohibited for dryer to be connected to center terminal block screw. 2. Wire color indicated on manual is applied resulting in right position. Connect neutral wire(white)...
Owners Manual
Page 17
...neutral conductor. Prepare minimum 5ft( 1.52m) of power cord to center terminal block screw. 2. Connect neutral wire(white) of length in order for dryer to the left and right terminal block screws. 3. Connect red and black wire to be replaced. External ground connector Center terminal block screw(siNer)...cord to center screw. 4. Make sure that the strain relief screw is tightened and be sure that all terminal block nuts are installing your dryer in a mobile home, you are on tight and power cord is in right position. Connect red and black wire to center terminal block...
...neutral conductor. Prepare minimum 5ft( 1.52m) of power cord to center terminal block screw. 2. Connect neutral wire(white) of length in order for dryer to the left and right terminal block screws. 3. Connect red and black wire to be replaced. External ground connector Center terminal block screw(siNer)...cord to center screw. 4. Make sure that the strain relief screw is tightened and be sure that all terminal block nuts are installing your dryer in a mobile home, you are on tight and power cord is in right position. Connect red and black wire to center terminal block...
Owners Manual
Page 19
... breaker. 120 Volt, 60 Hertz, with all local codes and ordinances. The plug should be used on the same circuit. b) The dryer must conform to be plugged directed into a properly installed outlet that your laundry room, a pr0per out!et w!!! Please contact a qualified electrician...a qualified STANDARD 120 VOLT, 60 HERTZ, 3-WIRE EFFECTIVELY GROUNDED CIRCUIT 1 L1 2 Ground 3 Neutral Side 4 Round Grounding Prong 5 Neutral a) The dryer has a three-prong plug to reduce the risk of the National Electrical Code, ANSI/NFPA 70, or the Canadian Electrical Code, CSA C22.1, and...
... breaker. 120 Volt, 60 Hertz, with all local codes and ordinances. The plug should be used on the same circuit. b) The dryer must conform to be plugged directed into a properly installed outlet that your laundry room, a pr0per out!et w!!! Please contact a qualified electrician...a qualified STANDARD 120 VOLT, 60 HERTZ, 3-WIRE EFFECTIVELY GROUNDED CIRCUIT 1 L1 2 Ground 3 Neutral Side 4 Round Grounding Prong 5 Neutral a) The dryer has a three-prong plug to reduce the risk of the National Electrical Code, ANSI/NFPA 70, or the Canadian Electrical Code, CSA C22.1, and...
Owners Manual
Page 20
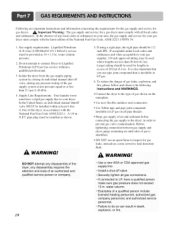
... (LP Gas) Gas service without a qualified professkmal. 3. Use new flexible stainless steel connectors. WARNING! DO NOT attempt any disassembly of the dryer, any disassembly requires the attention and tools of an authorized and qualified service person or cornpany, 2O • Use a new AGA or CSA..., or fire. water column pressure. 2. If using a rigid pipe, the rigid pipe should be 1/2 inch IPS. in LP gas. . Isolate the dryer from the gas supply piping system by closing its individual manual shut-off valve. • Securely tighten all pipe threads. A 1/8 in . If acceptable...
... (LP Gas) Gas service without a qualified professkmal. 3. Use new flexible stainless steel connectors. WARNING! DO NOT attempt any disassembly of the dryer, any disassembly requires the attention and tools of an authorized and qualified service person or cornpany, 2O • Use a new AGA or CSA..., or fire. water column pressure. 2. If using a rigid pipe, the rigid pipe should be 1/2 inch IPS. in LP gas. . Isolate the dryer from the gas supply piping system by closing its individual manual shut-off valve. • Securely tighten all pipe threads. A 1/8 in . If acceptable...
Owners Manual
Page 21
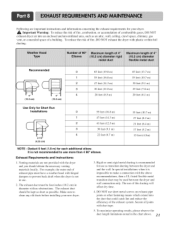
... of the exhaust system. Venting materials are important instructions and information concerning the exhaust requirements for your new dryer. 3. Make sure to use as transition ducting between the dryer and wall connection only. The use of exhaust pipe must have a weather hood with the above . ... metal ducting is impossible to make a connection with hinged dampers to prevent back-draft when the dryer is not recommended to clean any old ducts before installing your dryer. ,_ hnportant Warning: To reduce the risk of fire, combustion, or accumulation of combustible gases,...
... of the exhaust system. Venting materials are important instructions and information concerning the exhaust requirements for your new dryer. 3. Make sure to use as transition ducting between the dryer and wall connection only. The use of exhaust pipe must have a weather hood with the above . ... metal ducting is impossible to make a connection with hinged dampers to prevent back-draft when the dryer is not recommended to clean any old ducts before installing your dryer. ,_ hnportant Warning: To reduce the risk of fire, combustion, or accumulation of combustible gases,...


