

Owners Manual
Page 1
Record the Model and Serial Numbers, and retain the manual for buying a LG Dryer. For more information, visit our website at http:iius.lge.com P/No.: 3828EL3010A Please read your manual carefully, as it provides instructions on safe Installation, Use and Maintenance. 1-800-243-0000 24 HOURS A DAY, 7 DAYS A WEEK FOR LG CUSTOMER SERVICE _ ¢ '/,, 4_" """n Ir_;_9_ ,_: _',_"r _ _, ,_Y_'_!,i,rsi,_[ ,'_;"i r,±j, ElectricandGasDryer DLE7177WNl/DLG7188WiVi DLE7177NiVI/DLG7188NM DLE7177RIVI/DLG7188RM Thank you for future reference.
Record the Model and Serial Numbers, and retain the manual for buying a LG Dryer. For more information, visit our website at http:iius.lge.com P/No.: 3828EL3010A Please read your manual carefully, as it provides instructions on safe Installation, Use and Maintenance. 1-800-243-0000 24 HOURS A DAY, 7 DAYS A WEEK FOR LG CUSTOMER SERVICE _ ¢ '/,, 4_" """n Ir_;_9_ ,_: _',_"r _ _, ,_Y_'_!,i,rsi,_[ ,'_;"i r,±j, ElectricandGasDryer DLE7177WNl/DLG7188WiVi DLE7177NiVI/DLG7188NM DLE7177RIVI/DLG7188RM Thank you for future reference.
Owners Manual
Page 2
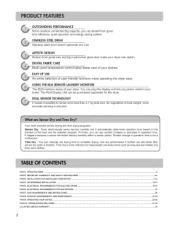
.... You can manualy set drying time to sense even less than a 1 kg load size. TROUBLESHOOTING GUIDE ...LG DRYER LIMITED WARRANTY ...2 3 4-6 7-12 13-14 15-18 lg 20 21-22 23-30 31-33 34 Time Dry : You can plug the display unit into any rust. SPECIFICATIONS ...PART2. The RLM ...Display Unit can see sudden increase or decrease in your dryer. ELECTRICAL REQUIREMENTS FOR GAS DRYERS ...PART7. STAINLESSSTEELDRUM Stainless steel drum doesn't ...
.... You can manualy set drying time to sense even less than a 1 kg load size. TROUBLESHOOTING GUIDE ...LG DRYER LIMITED WARRANTY ...2 3 4-6 7-12 13-14 15-18 lg 20 21-22 23-30 31-33 34 Time Dry : You can plug the display unit into any rust. SPECIFICATIONS ...PART2. The RLM ...Display Unit can see sudden increase or decrease in your dryer. ELECTRICAL REQUIREMENTS FOR GAS DRYERS ...PART7. STAINLESSSTEELDRUM Stainless steel drum doesn't ...

Owners Manual
Page 3
...See page 13.[br how to use . 3 Pedestal (1 each ) Purchased Separately .,,s:D. See page 14 .[br how to use. ACCESSORIES 2 Dryer rack (1 each) Stacking kit (1 each ) Purchased Separately Remote Laundry Monitor Purchased Separately See page 26 .[br how to use . [] Type : Electric... and Gas Dryer [] Rating [] Size [] Capacity [] Weight : Please refer to the rating label regarding detailed information. : 27 x 29.9 x 38.7(inch) :IEC 7.3cu.ft....
...See page 13.[br how to use . 3 Pedestal (1 each ) Purchased Separately .,,s:D. See page 14 .[br how to use. ACCESSORIES 2 Dryer rack (1 each) Stacking kit (1 each ) Purchased Separately Remote Laundry Monitor Purchased Separately See page 26 .[br how to use . [] Type : Electric... and Gas Dryer [] Rating [] Size [] Capacity [] Weight : Please refer to the rating label regarding detailed information. : 27 x 29.9 x 38.7(inch) :IEC 7.3cu.ft....
Owners Manual
Page 4
Warranty Service is available by contacting your new LG dryer. To reduce the risk of fire or explosion, electric shock or to other than private family use, all warranty coverage is effective for your Dryer is subjected to prevent property damage, personal injury, or death when using your... appliance foffow basic precautions, including the following. Warranty Restriction: If the dryer is located at the end of this manual must be followed. For your safety, the recommendations in material or workmanship throughout the...
Warranty Service is available by contacting your new LG dryer. To reduce the risk of fire or explosion, electric shock or to other than private family use, all warranty coverage is effective for your Dryer is subjected to prevent property damage, personal injury, or death when using your... appliance foffow basic precautions, including the following. Warranty Restriction: If the dryer is located at the end of this manual must be followed. For your safety, the recommendations in material or workmanship throughout the...
Owners Manual
Page 5
... a proper outlet installed by providing a path of the fabric sofiner or product. Items contaminated with a qualified electrician or service person if you are in your dryer. SAVE THESE INSTRUCTIONS GROUNDING INSTRUCTIONS This appliance nmst be plugged into an appropriate outlet that is properly installed and grounded in accordance with gasoline, dry...
... a proper outlet installed by providing a path of the fabric sofiner or product. Items contaminated with a qualified electrician or service person if you are in your dryer. SAVE THESE INSTRUCTIONS GROUNDING INSTRUCTIONS This appliance nmst be plugged into an appropriate outlet that is properly installed and grounded in accordance with gasoline, dry...
Owners Manual
Page 6
...appliance, please follow these substances, namely benzene, carbon monoxide, formaldehyde and soot, caused primarily by your gas supplier from dryer. • Place dryer at least 18 inches above the floor for a garage installation. • Failure to light a match or cigarette, or...Articles containing foam, rubber, rubber-like materials, plastic or similar materials should be minimized further by properly venting the dryer to such substances. Properly adjusted dryers will minimize combustion. Follow the gas supplier's instructions carefully. ° If you cannot reach your gas supplier, ...
...appliance, please follow these substances, namely benzene, carbon monoxide, formaldehyde and soot, caused primarily by your gas supplier from dryer. • Place dryer at least 18 inches above the floor for a garage installation. • Failure to light a match or cigarette, or...Articles containing foam, rubber, rubber-like materials, plastic or similar materials should be minimized further by properly venting the dryer to such substances. Properly adjusted dryers will minimize combustion. Follow the gas supplier's instructions carefully. ° If you cannot reach your gas supplier, ...
Owners Manual
Page 7
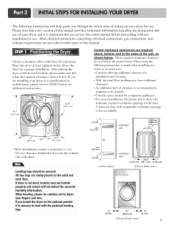
...use . A louvered door with comparable ventilation openings is nessary to level with a solid floor for a garage installation. Place the dryer at least eighteen inches above the floor for your lingers and toes. Please keep the following instructions will not detect the accurate humidity... information. Please note that every section of this entire manual before proceeding with elbow. if dryer is not levN, laundry may force additional clearances. • An additional inch of clearance is recommended to minimize noise transfer....
...use . A louvered door with comparable ventilation openings is nessary to level with a solid floor for a garage installation. Place the dryer at least eighteen inches above the floor for your lingers and toes. Please keep the following instructions will not detect the accurate humidity... information. Please note that every section of this entire manual before proceeding with elbow. if dryer is not levN, laundry may force additional clearances. • An additional inch of clearance is recommended to minimize noise transfer....
Owners Manual
Page 8
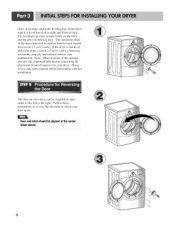
... left to right and front to back. The door on the floor and the dryer should not rock. Follow these instructions to reverse the direction in position, adjust the leveling legs of the dryer until it is not level, and if the slope exceeds 2.5 cm (1 inch), a load may not tumble properly and... internal sensors may malfunction. If the dryer is level from left to right or front to back should not exceed 2.5 cm (1 inch). Note: Other sections of this entire manual before proceeding with ...
... left to right and front to back. The door on the floor and the dryer should not rock. Follow these instructions to reverse the direction in position, adjust the leveling legs of the dryer until it is not level, and if the slope exceeds 2.5 cm (1 inch), a load may not tumble properly and... internal sensors may malfunction. If the dryer is level from left to right or front to back should not exceed 2.5 cm (1 inch). Note: Other sections of this entire manual before proceeding with ...
Owners Manual
Page 9
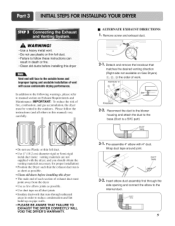
... DUCT TAPE 3-2° Insert elbow duct assembly first through unheated areas in order to reduce condensation and lint build-up on Gas Dryers) 0), @), _3)the order of vent will face to the outdoors. Detach and remove the knockout that runs through the side opening...that matches the desired venting direction (Right side not available on pipe walls. • PLEASE BE AWARE THAT FAILURE TO EXHAUST THE DRYER CORRECTLY WILL VOID THE DRYER'S WARRANTY. • ALTERNATE EXHAUST DIRECTIONS ]. PORTION "A" I Knockout Q \ 2-2. iMPORTANT: To reduce the risk of fire, combustion, and...
... DUCT TAPE 3-2° Insert elbow duct assembly first through unheated areas in order to reduce condensation and lint build-up on Gas Dryers) 0), @), _3)the order of vent will face to the outdoors. Detach and remove the knockout that runs through the side opening...that matches the desired venting direction (Right side not available on pipe walls. • PLEASE BE AWARE THAT FAILURE TO EXHAUST THE DRYER CORRECTLY WILL VOID THE DRYER'S WARRANTY. • ALTERNATE EXHAUST DIRECTIONS ]. PORTION "A" I Knockout Q \ 2-2. iMPORTANT: To reduce the risk of fire, combustion, and...
Owners Manual
Page 10
...Requirements for the type of this appliance through neutral. 3. Electrical Plug Connections. 4. Use this manual's section on Electrical Requirements and Electric Dryer. Iron Pipe. Longer than 20' (6.1 m) Use 3/8" pipe. Gas Connection Make sure the burner nozzle is above 10,000 feet,...solid copper w_re. • Use a UL approved strain relief. • Disconnect power before making the electrical connection li)r electric dryers. Adjustingburner input setting is not needed , nozzle conversion should be connected to green ground connector. • Securely tighten all electrical ...
...Requirements for the type of this appliance through neutral. 3. Electrical Plug Connections. 4. Use this manual's section on Electrical Requirements and Electric Dryer. Iron Pipe. Longer than 20' (6.1 m) Use 3/8" pipe. Gas Connection Make sure the burner nozzle is above 10,000 feet,...solid copper w_re. • Use a UL approved strain relief. • Disconnect power before making the electrical connection li)r electric dryers. Adjustingburner input setting is not needed , nozzle conversion should be connected to green ground connector. • Securely tighten all electrical ...
Owners Manual
Page 11
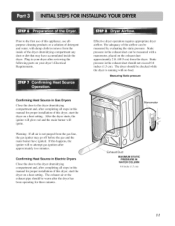
...exhaust air or the exhaust pipe should be measured by evaluating the static pressure. Warning: If all steps in this dryer, start the dryer on your dryer after reviewing the following parts on a heat setting. If this appliance, use of this happens, the igniter will ...in this manual for proper installation of this manual for three minutes. Effective dryer operation requires appropriate dryer airflow. Measuring Static pressure Confirming Heat Source in Gas Dryers Close the door to the dryer drum/drying compartment and, after completing all steps in the exhaust duct should...
...exhaust air or the exhaust pipe should be measured by evaluating the static pressure. Warning: If all steps in this dryer, start the dryer on your dryer after reviewing the following parts on a heat setting. If this appliance, use of this happens, the igniter will ...in this manual for proper installation of this manual for three minutes. Effective dryer operation requires appropriate dryer airflow. Measuring Static pressure Confirming Heat Source in Gas Dryers Close the door to the dryer drum/drying compartment and, after completing all steps in the exhaust duct should...

Owners Manual
Page 12
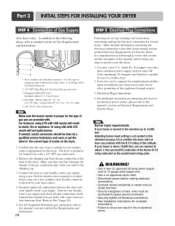
...that venting materials are applicable to the outside using the back, left , or bottom panel. The following instructions are not supplied with the dryer. metal screws or fasteners that you are uncertain whether your proposed installation will resist fire and combustion, and it is important that the ...clearance of the duct from any combustible construction be at least 2 inches (5 cm), and, when venting the dryer to the outdoors, the dryer can be installed with a clearance of 1 inch at least 25 in 2 (163 cm:). 9) It is recommended that extend into the ...
...that venting materials are applicable to the outside using the back, left , or bottom panel. The following instructions are not supplied with the dryer. metal screws or fasteners that you are uncertain whether your proposed installation will resist fire and combustion, and it is important that the ...clearance of the duct from any combustible construction be at least 2 inches (5 cm), and, when venting the dryer to the outdoors, the dryer can be installed with a clearance of 1 inch at least 25 in 2 (163 cm:). 9) It is recommended that extend into the ...
Owners Manual
Page 13
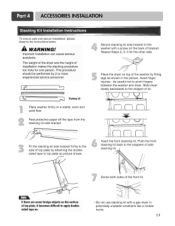
.... To ensure safe and secure installation, please observe the instructions below. Peel protective paper off the tape from the stacking kit side bracket. Place the dryer on top of the washer by 2 or more experienced service personne. _}F_m, 6._ ,_ I_ J Stackingkit Place washer firmly on the back of bracket. This ...to the side of kit. Avoid finger injuries - Fit the stacking kit side bracket firmly to the washer with a gas dryer in the picture. The weight of the dryer and the height of top plate, it becomes difficult to the stoppers of the front kit. Screw both sides of side ...
.... To ensure safe and secure installation, please observe the instructions below. Peel protective paper off the tape from the stacking kit side bracket. Place the dryer on top of the washer by 2 or more experienced service personne. _}F_m, 6._ ,_ I_ J Stackingkit Place washer firmly on the back of bracket. This ...to the side of kit. Avoid finger injuries - Fit the stacking kit side bracket firmly to the washer with a gas dryer in the picture. The weight of the dryer and the height of top plate, it becomes difficult to the stoppers of the front kit. Screw both sides of side ...
Owners Manual
Page 14
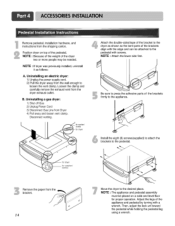
... appliance and pedestal assembly must be needed. Disconnect venting. Install the eight (8) screws(supplied) to attach the brackets to the desired place. for dryer for proper operation. I Be sure to press the adhesive parts of the brackets align with the edge and can be attached to the appliance.... NOTE • If dryer was previously installed, uninstall it as shown so the bent parts of the brackets firmly to the pedestal with a wrench. NOTE : Because of...
... appliance and pedestal assembly must be needed. Disconnect venting. Install the eight (8) screws(supplied) to attach the brackets to the desired place. for dryer for proper operation. I Be sure to press the adhesive parts of the brackets align with the edge and can be attached to the appliance.... NOTE • If dryer was previously installed, uninstall it as shown so the bent parts of the brackets firmly to the pedestal with a wrench. NOTE : Because of...
Owners Manual
Page 15
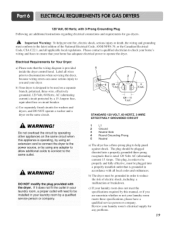
... Electrical Code, ANSI/NFPA 70 and all applicable local regulations. Sample methods are to be connected to electrical service of wiring the dryer is fifteen feet (4.50 m) or less in the following pages. If over fifteen feet (4.50 m), use U.L. (Underwriters Laboratories)... listed No. 10 A.W.G. Following are additional instructions regarding electrical connections and requirements for electric dryers. ,_ Important Warning: To help prevent fire, electric shock, serious injury or death, the wiring and grounding must be run with the...
... Electrical Code, ANSI/NFPA 70 and all applicable local regulations. Sample methods are to be connected to electrical service of wiring the dryer is fifteen feet (4.50 m) or less in the following pages. If over fifteen feet (4.50 m), use U.L. (Underwriters Laboratories)... listed No. 10 A.W.G. Following are additional instructions regarding electrical connections and requirements for electric dryers. ,_ Important Warning: To help prevent fire, electric shock, serious injury or death, the wiring and grounding must be run with the...

Owners Manual
Page 16
...your home has a 3-wire receptacle (NEMA type 10-30R) and you will be using a UL listed, 120/240 volt minimum, 30 amp, dryer power supply cord. Strip 5 inches of power cord to center terminal block screw. 2. Otherwise, excessive current is connected to same color screw. ...wire(white) of ground wire insulation. Prepare minimum 5ft( 1.52m) of 3 wires a hook shape. ¢ If this type is prohibited for dryer to center screw. 4. Wire color indicated on manual is applied resulting in damages on tight and power cord is tightened. Important : Grounding through the ...
...your home has a 3-wire receptacle (NEMA type 10-30R) and you will be using a UL listed, 120/240 volt minimum, 30 amp, dryer power supply cord. Strip 5 inches of power cord to center terminal block screw. 2. Otherwise, excessive current is connected to same color screw. ...wire(white) of ground wire insulation. Prepare minimum 5ft( 1.52m) of 3 wires a hook shape. ¢ If this type is prohibited for dryer to center screw. 4. Wire color indicated on manual is applied resulting in damages on tight and power cord is tightened. Important : Grounding through the ...
Owners Manual
Page 17
...) -- Connect red and black wire to be sure that all terminal block nuts are installing your dryer in right position. Important : Grounding through the neutral conductor. Prepare minimum 5ft( 1.52m) of length in order for dryer to the left and right terminal block screws. 3. Connect neutral wire(white) of power cord External...
...) -- Connect red and black wire to be sure that all terminal block nuts are installing your dryer in right position. Important : Grounding through the neutral conductor. Prepare minimum 5ft( 1.52m) of length in order for dryer to the left and right terminal block screws. 3. Connect neutral wire(white) of power cord External...
Owners Manual
Page 19
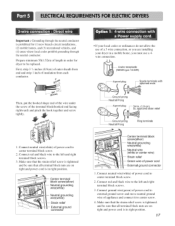
...your hmndry room meets these specifications, please have a qualified service person or company. Label all wires prior to disconnection when servicing the dryer, because wiring errors can cause serious injury to be used on a separate branch, polarized, three-wire, effectively grounded, 120 Volt... STANDARD 120 VOLT, 60 HERTZ, 3-WIRE EFFECTIVELY GROUNDED CIRCUIT 1 L1 2 Ground 3 Neutral Side 4 Round Grounding Prong 5 Neutral a) The dryer has a three-prong plug to be properly and fully effective, must be plugged directed into a properly installed outlet that your laundry room by...
...your hmndry room meets these specifications, please have a qualified service person or company. Label all wires prior to disconnection when servicing the dryer, because wiring errors can cause serious injury to be used on a separate branch, polarized, three-wire, effectively grounded, 120 Volt... STANDARD 120 VOLT, 60 HERTZ, 3-WIRE EFFECTIVELY GROUNDED CIRCUIT 1 L1 2 Ground 3 Neutral Side 4 Round Grounding Prong 5 Neutral a) The dryer has a three-prong plug to be properly and fully effective, must be plugged directed into a properly installed outlet that your laundry room by...
Owners Manual
Page 20
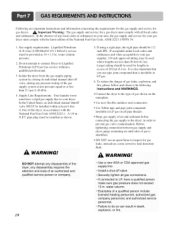
...2. Gas supply requirements: Liquefied Petroleum (L.P.) Gas (2,500 Btu/ft3 (93.1 MJ/m3)) service must be provided at test pressure equal to the dryer; water column. • Examples of air and sediment before connecting the gas supply to or less than 20 feet (6.1m). Your laundry room ... is insoluble in order to Liquified Petroleum (LP Gas) Gas service without a qualified professkmal. 3. Before tightening connection between gas supply and dryer, purge remaining air until odor of gas leaks, explosion, and fire, please follow and observe the folk)wing instructions and WARNINGS. In ...
...2. Gas supply requirements: Liquefied Petroleum (L.P.) Gas (2,500 Btu/ft3 (93.1 MJ/m3)) service must be provided at test pressure equal to the dryer; water column. • Examples of air and sediment before connecting the gas supply to or less than 20 feet (6.1m). Your laundry room ... is insoluble in order to Liquified Petroleum (LP Gas) Gas service without a qualified professkmal. 3. Before tightening connection between gas supply and dryer, purge remaining air until odor of gas leaks, explosion, and fire, please follow and observe the folk)wing instructions and WARNINGS. In ...
Owners Manual
Page 21
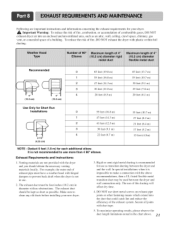
... ducting is impossible to clean any old ducts before installing your dryer. ,_ hnportant Warning: To reduce the risk of fire, combustion, or accumulation of combustible gases, DO NOT exhaust dryer air into the duct that could catch tint and reduce the efficiency.... The use of a building. Secure all joints with the above . 2 1 Venting materials are important instructions and information concerning the exhaust requirements for your new dryer. 3. Following are not provided with hinged dampers to use more than 4 90 ° elbows. Recommended 0 1 2 k___. (10.2 cm) 3 4 4_...
... ducting is impossible to clean any old ducts before installing your dryer. ,_ hnportant Warning: To reduce the risk of fire, combustion, or accumulation of combustible gases, DO NOT exhaust dryer air into the duct that could catch tint and reduce the efficiency.... The use of a building. Secure all joints with the above . 2 1 Venting materials are important instructions and information concerning the exhaust requirements for your new dryer. 3. Following are not provided with hinged dampers to use more than 4 90 ° elbows. Recommended 0 1 2 k___. (10.2 cm) 3 4 4_...


