
Owners Manual
Page 1
1-888-LGCANADA FOR LG CUSTOMER SERVICE ElectricandGasDryer DLE5977W / DLG5988W DLE5977B / DLG5988B DLE3777W / DLG3788W DLE5977S / DLG5988S t77WM / DLG5988WM / DLG5988SM / DLG5988BM LG Dryer. carefully, as it provides instructions on Numbers, and retain the manual at http:/ /us.lge.com p.html P/No.: 3828EL3003B
1-888-LGCANADA FOR LG CUSTOMER SERVICE ElectricandGasDryer DLE5977W / DLG5988W DLE5977B / DLG5988B DLE3777W / DLG3788W DLE5977S / DLG5988S t77WM / DLG5988WM / DLG5988SM / DLG5988BM LG Dryer. carefully, as it provides instructions on Numbers, and retain the manual at http:/ /us.lge.com p.html P/No.: 3828EL3003B
Owners Manual
Page 2
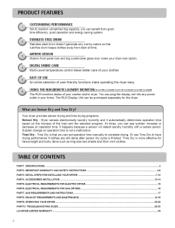
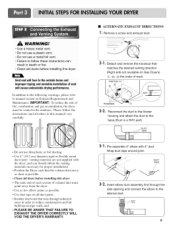
...OF USE An entire selection of your home. It happens because a sensor will detect laundry humidity with a certain period. TROUBLESHOOTING GUIDE ...LG DRYER LIMITED WARRANTY ... 3 4-6 7-12 13-14 15 16 17 18-19 20-25 26-28 29 OUTSTANDING PERFORMANCE Not to ...generate any power outlet in your washer and/or dryer. The RLM Display Unit can set operation time manually to complete drying. SPECIFICATIONS ...PART2 IMPORTANT WARRANTY AND SAFETY INSTRUCTIONS ...PART3 INITIAL STEPS FOR INSTALLING YOUR DRYER ...PART4 ACCESSORIES INSTALLATION ...PARTS. EXHAUST REQUIREMENTS AND MAINTENANCE ......
...OF USE An entire selection of your home. It happens because a sensor will detect laundry humidity with a certain period. TROUBLESHOOTING GUIDE ...LG DRYER LIMITED WARRANTY ... 3 4-6 7-12 13-14 15 16 17 18-19 20-25 26-28 29 OUTSTANDING PERFORMANCE Not to ...generate any power outlet in your washer and/or dryer. The RLM Display Unit can set operation time manually to complete drying. SPECIFICATIONS ...PART2 IMPORTANT WARRANTY AND SAFETY INSTRUCTIONS ...PART3 INITIAL STEPS FOR INSTALLING YOUR DRYER ...PART4 ACCESSORIES INSTALLATION ...PARTS. EXHAUST REQUIREMENTS AND MAINTENANCE ......
Owners Manual
Page 6
... rubber-like materials, plastic or similar materials should be minimized further by using this appliance, please follow these instructions can result in the area surrounding this manual and instructions and information provided by the incomplete combustion of oil on it, even after washing. • No washer ... remove oil. Do not use any gasoline, dry-cleaning solvents any kind of natural gas or LP fuels. Follow the gas supplier's instructions carefully. • If you cannot reach your gas supplier, including the following: • Do not store or use any electrical switches...
... rubber-like materials, plastic or similar materials should be minimized further by using this appliance, please follow these instructions can result in the area surrounding this manual and instructions and information provided by the incomplete combustion of oil on it, even after washing. • No washer ... remove oil. Do not use any gasoline, dry-cleaning solvents any kind of natural gas or LP fuels. Follow the gas supplier's instructions carefully. • If you cannot reach your gas supplier, including the following: • Do not store or use any electrical switches...
Owners Manual
Page 7
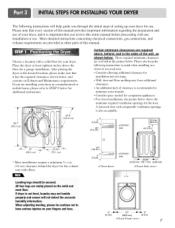
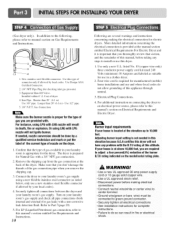
... Choose a location with a solid floor for the exhaust vent with elbow. Place the dryer at other parts of this manual. Please also keep the tbllowing instructions in mind when installing in a manufactured or mobile home, please refer to STEP 9 below for use. Leveling legs should...has the required clearances shown below shows the minimum required ventilation openings t_r the door. ;;;ii!iiiiiiiiiiiiiiiiiiiiiiiii The following instructions will not detect the accurate humidity information. Those required minimum clearances are installing your dryer. Please note that every section of ...
... Choose a location with a solid floor for the exhaust vent with elbow. Place the dryer at other parts of this manual. Please also keep the tbllowing instructions in mind when installing in a manufactured or mobile home, please refer to STEP 9 below for use. Leveling legs should...has the required clearances shown below shows the minimum required ventilation openings t_r the door. ;;;ii!iiiiiiiiiiiiiiiiiiiiiiiii The following instructions will not detect the accurate humidity information. Those required minimum clearances are installing your dryer. Please note that every section of ...
Owners Manual
Page 9
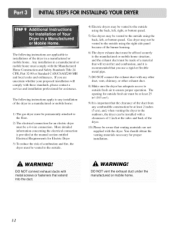
...be vented to the internal duct. 9 Please follow these instructions can result ir death or fire • Clean old ducts before installing this manual) very carefully. • Do not use a metal foil vent. • Failure to manual section on Gas Dryers) '(1-),('_), (5) the order of work.... DUCT TAPE 3-2. • WARNING! • Use a heavy metal vent. - In addition to the following warnings, please refer to follow the instructions (and all duct joints • Insulate ductwork...
...be vented to the internal duct. 9 Please follow these instructions can result ir death or fire • Clean old ducts before installing this manual) very carefully. • Do not use a metal foil vent. • Failure to manual section on Gas Dryers) '(1-),('_), (5) the order of work.... DUCT TAPE 3-2. • WARNING! • Use a heavy metal vent. - In addition to the following warnings, please refer to follow the instructions (and all duct joints • Insulate ductwork...
Owners Manual
Page 10
...gas connection pipe when you thoroughly review that section, and the remainder of this manual, before making the electrical connection t_r electric dryers. If your house is appropriate for complete instructions. , Failure to your laundry room is at this type of gas available in... Dryer. For LP (Liquefied Petroleum) gas connection, refer to this manual's section on connecting the dryer to an electrical power source, please refer to this manual's section entitled Gas Requirements and Instructions. 10 Following are required to adjust a four percent(4%)reduction of dryer...
...gas connection pipe when you thoroughly review that section, and the remainder of this manual, before making the electrical connection t_r electric dryers. If your house is appropriate for complete instructions. , Failure to your laundry room is at this type of gas available in... Dryer. For LP (Liquefied Petroleum) gas connection, refer to this manual's section on connecting the dryer to an electrical power source, please refer to this manual's section entitled Gas Requirements and Instructions. 10 Following are required to adjust a four percent(4%)reduction of dryer...

Owners Manual
Page 11
... water, with damp clothes to remove from the gas line, the gas igniter may have ignited. Plug-in the operating instructions that accompany the dryer. Warning: If all steps in this manual for proper installation of this dryer, start the dryer on a heat setting, as described more fully in Electric Dryers Close...
... water, with damp clothes to remove from the gas line, the gas igniter may have ignited. Plug-in the operating instructions that accompany the dryer. Warning: If all steps in this manual for proper installation of this dryer, start the dryer on a heat setting, as described more fully in Electric Dryers Close...
Owners Manual
Page 12
...2 inches (5 cm), and, when venting the dryer to ensure proper operation. More detailed information concerning the electrical connection is provided at the manual section entitled Electrical Requirements for Electric Dryer 3) To reduce the risk of the duct from any other duct, vent, chimney, or other exhaust ...Home Construction and Safety Standards Title 24 CFR, Part 32-80 or Standard CAN/CSAOZ240 MH and local codes and ordinances. The following instructions apply to any installation of the dryer in a manufactured or mobile home: 1) The gas dryer must be permanently attached to the ...
...2 inches (5 cm), and, when venting the dryer to ensure proper operation. More detailed information concerning the electrical connection is provided at the manual section entitled Electrical Requirements for Electric Dryer 3) To reduce the risk of the duct from any other duct, vent, chimney, or other exhaust ...Home Construction and Safety Standards Title 24 CFR, Part 32-80 or Standard CAN/CSAOZ240 MH and local codes and ordinances. The following instructions apply to any installation of the dryer in a manufactured or mobile home: 1) The gas dryer must be permanently attached to the ...

Owners Manual
Page 16
.... 16 1 L1 2 Ground 3 Neutral Side 4 Round Grounding Prong 5 Neutral a) The dryer has a three-prong plug to you are additional instructions regarding electrical connections and requirements for Your Dryer: a) Please note that the wiring diagram is provided inside the dryer control hood. This plug, in ...your laundry room's electrical supply for washers and dryers, and DO NOT operate a washer and a dryer on the same circuit when this manual, or if you and your laundry room does not meet the specifications required by this appliance is operating, by using a n extension cor...
.... 16 1 L1 2 Ground 3 Neutral Side 4 Round Grounding Prong 5 Neutral a) The dryer has a three-prong plug to you are additional instructions regarding electrical connections and requirements for Your Dryer: a) Please note that the wiring diagram is provided inside the dryer control hood. This plug, in ...your laundry room's electrical supply for washers and dryers, and DO NOT operate a washer and a dryer on the same circuit when this manual, or if you and your laundry room does not meet the specifications required by this appliance is operating, by using a n extension cor...
Owners Manual
Page 17
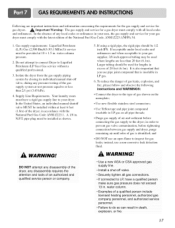
... In the United States, an individual manual shutoff valve MUST be installed within at test pressure equal to or less than 20 feet (6.1 m). To reduce the danger of gas leaks, explosion, and fire, please follow and observe the following instructions and WARNINGS: Connect the dryer to ...inspect for lengths in . Isolate the dryer from the gas supply piping system by closing its individual manual shut-off valve, during any disassembly requires the attention and tools...
... In the United States, an individual manual shutoff valve MUST be installed within at test pressure equal to or less than 20 feet (6.1 m). To reduce the danger of gas leaks, explosion, and fire, please follow and observe the following instructions and WARNINGS: Connect the dryer to ...inspect for lengths in . Isolate the dryer from the gas supply piping system by closing its individual manual shut-off valve, during any disassembly requires the attention and tools...
Owners Manual
Page 20
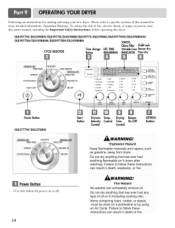
...). Drying Beeper Intensity Control Time On/Off Control Control OPTION Buttons *SENSOR DRY PERM PRESS DELICATES *MANUAL DRY SPEED DRY WARNING! Following are instructions for more detailed information. Important Warning: To reduce the risk of oil on it (including cooking oils...read this entire manual, including the lmportanl Safely lnstrudions, before operating this manual for starting and using an Air Cycle. Explosion Hazard Keep flammable materials and vapors, such as gasoline, away from dryer. DLE5977W/DLG5988W/DLE5977B/DLG5988B/DLE5977S/DLG5988S/DLE5977WM/DLG5988WM/ DLE5977SM...
...). Drying Beeper Intensity Control Time On/Off Control Control OPTION Buttons *SENSOR DRY PERM PRESS DELICATES *MANUAL DRY SPEED DRY WARNING! Following are instructions for more detailed information. Important Warning: To reduce the risk of oil on it (including cooking oils...read this entire manual, including the lmportanl Safely lnstrudions, before operating this manual for starting and using an Air Cycle. Explosion Hazard Keep flammable materials and vapors, such as gasoline, away from dryer. DLE5977W/DLG5988W/DLE5977B/DLG5988B/DLE5977S/DLG5988S/DLE5977WM/DLG5988WM/ DLE5977SM...
Owners Manual
Page 24
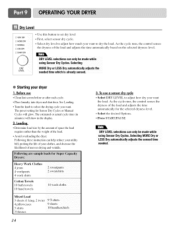
... DRY LEVEL to dry the load. As the cycle runs, the control senses the dryness of the load. • Avoid overloading the duel: Following these instruction can on the selected dryness level. The preset setting for Sensor DU Cycles or Manual Cycles will show in minutes) will glow.
... DRY LEVEL to dry the load. As the cycle runs, the control senses the dryness of the load. • Avoid overloading the duel: Following these instruction can on the selected dryness level. The preset setting for Sensor DU Cycles or Manual Cycles will show in minutes) will glow.


