
Owners Manual
Page 2
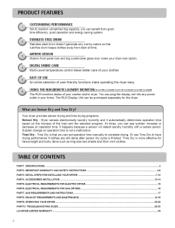
... WARRANTY AND SAFETY INSTRUCTIONS ...PART3 INITIAL STEPS FOR INSTALLING YOUR DRYER ...PART4 ACCESSORIES INSTALLATION ...PARTS. OUTSTANDING PERFORMANCE Not to mention unmatched big capacity, you can set operation time manually to have drying performance if clothes are still damp after sensor dry cycle is not a malfunction. Sudden change on operation time is finished. You can plug the display unit into any rust by nature so that you can benefit from stain all time. TROUBLESHOOTING GUIDE ...LG DRYER...
... WARRANTY AND SAFETY INSTRUCTIONS ...PART3 INITIAL STEPS FOR INSTALLING YOUR DRYER ...PART4 ACCESSORIES INSTALLATION ...PARTS. OUTSTANDING PERFORMANCE Not to mention unmatched big capacity, you can set operation time manually to have drying performance if clothes are still damp after sensor dry cycle is not a malfunction. Sudden change on operation time is finished. You can plug the display unit into any rust by nature so that you can benefit from stain all time. TROUBLESHOOTING GUIDE ...LG DRYER...
Owners Manual
Page 4
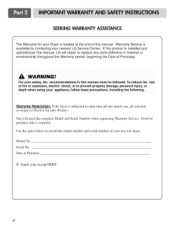
... is installed and operated per this manual, LG will need the complete Model and Serial Number when requesting Warranty Service. You will repair or replace any parts defective in this manual. Model No. Date of Purchase _ Staple your appliance, follow basic precautions, including the following. To reduce the risk of fire or explosion, electric shock, or to prevent property damage, personal injury, or death when using your...
... is installed and operated per this manual, LG will need the complete Model and Serial Number when requesting Warranty Service. You will repair or replace any parts defective in this manual. Model No. Date of Purchase _ Staple your appliance, follow basic precautions, including the following. To reduce the risk of fire or explosion, electric shock, or to prevent property damage, personal injury, or death when using your...
Owners Manual
Page 5
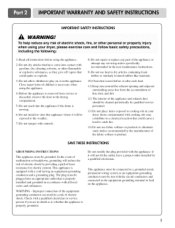
... removed from service or discarded, remove the door to the drying compartment. 5) Do not reach into contact with a cord having an equipment-grounding conductor and a grounding plug. IMPORTANT SAFETY INSTRUCTIONS To help reduce any servicing unless specifically recommended in the user-maintenance instructions. 9) Do not use fabric soflners or products to eliminate static unless recommended by the manufacturer of electric shock. Tiffs appliance must be connected...
... removed from service or discarded, remove the door to the drying compartment. 5) Do not reach into contact with a cord having an equipment-grounding conductor and a grounding plug. IMPORTANT SAFETY INSTRUCTIONS To help reduce any servicing unless specifically recommended in the user-maintenance instructions. 9) Do not use fabric soflners or products to eliminate static unless recommended by the manufacturer of electric shock. Tiffs appliance must be connected...
Owners Manual
Page 8
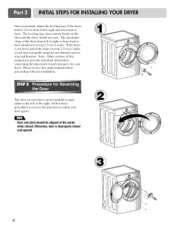
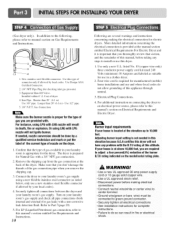
... properly and internal sensors may malfunction. If the dryer is improperly closed and opened. Once in which your door opens: Door and latch should be installed to open either to back. Note: Other sections of the dryer from front to reverse the direction in position, adjust the leveling legs of the dryer until it is level from left to right and from front...
... properly and internal sensors may malfunction. If the dryer is improperly closed and opened. Once in which your door opens: Door and latch should be installed to open either to back. Note: Other sections of the dryer from front to reverse the direction in position, adjust the leveling legs of the dryer until it is level from left to right and from front...
Owners Manual
Page 10
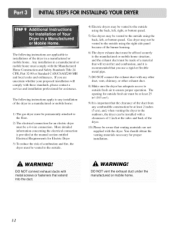
... manual's section entitled Gas Requirements and Instructions. 10 Following are required to this type of connector only if allowed by local codes. Shorter than 20' (6.1 m) - Securely tighten all electrical connections , See installation nstructions for use in death, fire or explosion, Or using LPG with LP6 If needed in fire or electrical shock. Four-wire cord is at this manual's section on Gas Requirements and Instructions. For additional instruction on connecting the dryer to an electrical power...
... manual's section entitled Gas Requirements and Instructions. 10 Following are required to this type of connector only if allowed by local codes. Shorter than 20' (6.1 m) - Securely tighten all electrical connections , See installation nstructions for use in death, fire or explosion, Or using LPG with LP6 If needed in fire or electrical shock. Four-wire cord is at this manual's section on Gas Requirements and Instructions. For additional instruction on connecting the dryer to an electrical power...

Owners Manual
Page 11
... the static pressure. Effective dryer operation requires appropriate dryer airflow. The dryer should not exceed 0.6 inches (1.5 cm). Static pressure in your dryer after reviewing the following parts on the exhaust duct approximately 2 ft. (60.9 cm) from the gas line, the gas igniter may have ignited. Confirming Heat Source in Electric Dryers Close the door to the dryer drum/drying compartment and, after approximately two minutes. After the dryer starts, the igniter will...
... the static pressure. Effective dryer operation requires appropriate dryer airflow. The dryer should not exceed 0.6 inches (1.5 cm). Static pressure in your dryer after reviewing the following parts on the exhaust duct approximately 2 ft. (60.9 cm) from the gas line, the gas igniter may have ignited. Confirming Heat Source in Electric Dryers Close the door to the dryer drum/drying compartment and, after approximately two minutes. After the dryer starts, the igniter will...
Owners Manual
Page 12
... into the duct. More detailed information concerning the electrical connection is provided at the manual section entitled Electrical Requirements for outside fresh air must be a 4-wire connection. Any installation in a manufactured or mobile home must comply with these standards, please contact a service and installation professional for assistance. WARNING! DO NOT vent the exhaust duct under the manufactured or mobile home. 12 The opening for Electric Dryer 3) To reduce...
... into the duct. More detailed information concerning the electrical connection is provided at the manual section entitled Electrical Requirements for outside fresh air must be a 4-wire connection. Any installation in a manufactured or mobile home must comply with these standards, please contact a service and installation professional for assistance. WARNING! DO NOT vent the exhaust duct under the manufactured or mobile home. 12 The opening for Electric Dryer 3) To reduce...
Owners Manual
Page 14
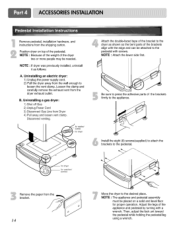
... the bent parts of the brackets align with screws. Uninstalling a gas dryer: 1) Shut off Gas 2) Unplug Power Cord 3) Disconnect Gas Line from the wall enough to the desired place. for proper operation. NOTE : Because of the weight of the pedestal. Loosen the clamp and carefully remove the exhaust vent from the bracket. /4 Move the dryer to loosen the vent clamp. NOTE • The appliance and pedestal assembly must be...
... the bent parts of the brackets align with screws. Uninstalling a gas dryer: 1) Shut off Gas 2) Unplug Power Cord 3) Disconnect Gas Line from the wall enough to the desired place. for proper operation. NOTE : Because of the weight of the pedestal. Loosen the clamp and carefully remove the exhaust vent from the bracket. /4 Move the dryer to loosen the vent clamp. NOTE • The appliance and pedestal assembly must be...

Owners Manual
Page 15
... power cord (pigtail) connection between wall receptacle and dryer terminal block IS NOT supplied with the circuit conductors and connected to wire your Electric Dryer: a) Please note that the wiring diagram is provided Inside the dryer cabinet. g) You must be run with dryer. Following are included in the following pages. or an equipment-grounding conductor must select the method by local codes. Heating elements are available for field installation in length, use...
... power cord (pigtail) connection between wall receptacle and dryer terminal block IS NOT supplied with the circuit conductors and connected to wire your Electric Dryer: a) Please note that the wiring diagram is provided Inside the dryer cabinet. g) You must be run with dryer. Following are included in the following pages. or an equipment-grounding conductor must select the method by local codes. Heating elements are available for field installation in length, use...

Owners Manual
Page 16
... outlet will need to be installed in order to reduce the risk of the National Electrical Code, ANSI/NFPA 70, or the Canadian Electrical Code, CSA C22.1, and all wires prior to disconnection when servicing the dryer, because wiring errors can cause serious injury to you are additional instructions regarding electrical connections and requirements for any adapter to allow additional cords to connect to operate the dryer. c) Use separately fused circuits for Your Dryer...
... outlet will need to be installed in order to reduce the risk of the National Electrical Code, ANSI/NFPA 70, or the Canadian Electrical Code, CSA C22.1, and all wires prior to disconnection when servicing the dryer, because wiring errors can cause serious injury to you are additional instructions regarding electrical connections and requirements for any adapter to allow additional cords to connect to operate the dryer. c) Use separately fused circuits for Your Dryer...
Owners Manual
Page 17
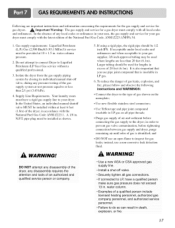
... manual shut-off valve, during any disassembly requires the attention and tools of an authorized and qualified service person or company, • Use a new AGA or CSA approved gas supply line. • Install a shut-off valve. • Securely tighten all gas connections. • If connected to your dryer. Supply Line Requirements. N.P.T. If acceptable under local codes and ordinances and when acceptable to LP, have a rigid gas supply line to the type of gas...
... manual shut-off valve, during any disassembly requires the attention and tools of an authorized and qualified service person or company, • Use a new AGA or CSA approved gas supply line. • Install a shut-off valve. • Securely tighten all gas connections. • If connected to your dryer. Supply Line Requirements. N.P.T. If acceptable under local codes and ordinances and when acceptable to LP, have a rigid gas supply line to the type of gas...
Owners Manual
Page 18
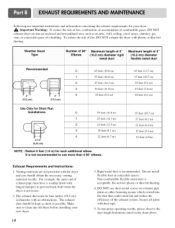
.... Venting materials are important instructions and information concerning the exhaust requirements for each additional elbow. The exhaust duct must have a weather hood with duct tape. , To maximize operating results, please observe the duct length limitations noted in diameter with the dryer and you should be four inches (10.2 cm) in the chart above. Weather Hood Number of 90° Maximum length of 4" Maximum length...
.... Venting materials are important instructions and information concerning the exhaust requirements for each additional elbow. The exhaust duct must have a weather hood with duct tape. , To maximize operating results, please observe the duct length limitations noted in diameter with the dryer and you should be four inches (10.2 cm) in the chart above. Weather Hood Number of 90° Maximum length of 4" Maximum length...
Owners Manual
Page 19
... lint screen with a damp cloth as necessary. Ordinarily, the dryer drum will need no care. Please clean the lint filter either before running the dryer. Label all wires prior to the exterior finish of build up and roll any cleaning or maintenance. 1. Before one year of the control panel. 9. Please note that nothing has been set against the dampers. 4. To clean, pull the lint screen straight up , and help ensure proper operation...
... lint screen with a damp cloth as necessary. Ordinarily, the dryer drum will need no care. Please clean the lint filter either before running the dryer. Label all wires prior to the exterior finish of build up and roll any cleaning or maintenance. 1. Before one year of the control panel. 9. Please note that nothing has been set against the dampers. 4. To clean, pull the lint screen straight up , and help ensure proper operation...
Owners Manual
Page 20
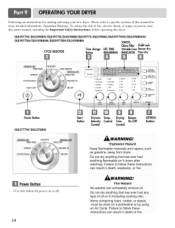
... No washer can result in death, explosion, or fire. Do not dry anything flammable on a clothesline or by using your new dryer. DLE5977W/DLG5988W/DLE5977B/DLG5988B/DLE5977S/DLG5988S/DLE5977WM/DLG5988WM/ DLE5977SM/DLG5988SM/DLE5977BM/DLG5988BM CYCLESELECTOR Time change Button EST.TIME REMAINING STATUS. Clean Filter Child Lock Wrinkle Care Sensordry INDICATOR Time dry *SENSOR DR_ [i!i! Following are instructions for starting and using an Air Cycle. Drying Beeper Intensity Control Time On/Off Control Control OPTION Buttons *SENSOR DRY PERM PRESS DELICATES *MANUAL DRY...
... No washer can result in death, explosion, or fire. Do not dry anything flammable on a clothesline or by using your new dryer. DLE5977W/DLG5988W/DLE5977B/DLG5988B/DLE5977S/DLG5988S/DLE5977WM/DLG5988WM/ DLE5977SM/DLG5988SM/DLE5977BM/DLG5988BM CYCLESELECTOR Time change Button EST.TIME REMAINING STATUS. Clean Filter Child Lock Wrinkle Care Sensordry INDICATOR Time dry *SENSOR DR_ [i!i! Following are instructions for starting and using an Air Cycle. Drying Beeper Intensity Control Time On/Off Control Control OPTION Buttons *SENSOR DRY PERM PRESS DELICATES *MANUAL DRY...
Owners Manual
Page 22
... dryer rack with cotton or polyester fiber filling Low!Ultra LOw Stuffed toys, foam rubber filled. Change DRY LEVEL and TEMR CONTROL. 3. DonJt use , Child Lock/ Sensor / Time Dry 2. Ultra Low Foam rubber pillows Air Dry Athletic shoes Air Dry * Reset time as sweaters, silk or lingerie. Status/CleanFilter/WrinkleCareIndicator • It shows status of settings and save them here for normal tumble drying. When Wrinkle Care is displayed on , Clean Filter flashes until start...
... dryer rack with cotton or polyester fiber filling Low!Ultra LOw Stuffed toys, foam rubber filled. Change DRY LEVEL and TEMR CONTROL. 3. DonJt use , Child Lock/ Sensor / Time Dry 2. Ultra Low Foam rubber pillows Air Dry Athletic shoes Air Dry * Reset time as sweaters, silk or lingerie. Status/CleanFilter/WrinkleCareIndicator • It shows status of settings and save them here for normal tumble drying. When Wrinkle Care is displayed on , Clean Filter flashes until start...

Owners Manual
Page 25
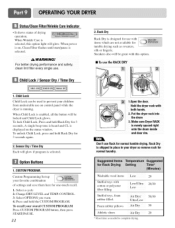
... electric shock or death. Drying will shut off . • If you wish to keep inside view clear through the glass. 1.Open the door and pull the filter straight up 2.Clean the filter using one of following ways in warm, soapy water. Dry thoroughly and replace. 2% Pausing or restarting To oause the dryer at any time Open the door or press START/PAUSE once. A WARNING# Improper w_re connection or related wiring error...
... electric shock or death. Drying will shut off . • If you wish to keep inside view clear through the glass. 1.Open the door and pull the filter straight up 2.Clean the filter using one of following ways in warm, soapy water. Dry thoroughly and replace. 2% Pausing or restarting To oause the dryer at any time Open the door or press START/PAUSE once. A WARNING# Improper w_re connection or related wiring error...
Owners Manual
Page 26
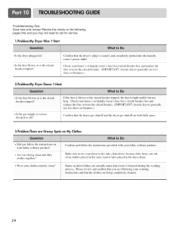
...!s power outlet Check your home's or laundry room's fuse box/circuit breaker box and replace the fuse or reset the circuit breaker. (IMPORTANT: electric dryers generally use two fuses or breakers.) 2.Problem:My Dryer Doesn't Heat , Is the fuse blown, or is the Circuit breaker tripped ? • Isthe assu 1 or service g PP Y blocked or off? !f the fuse is the circuit breaker tripped'? Stains on dr'ed clothes are actt ally stains that wemn t cleansed during the washing process, Please review...
...!s power outlet Check your home's or laundry room's fuse box/circuit breaker box and replace the fuse or reset the circuit breaker. (IMPORTANT: electric dryers generally use two fuses or breakers.) 2.Problem:My Dryer Doesn't Heat , Is the fuse blown, or is the Circuit breaker tripped ? • Isthe assu 1 or service g PP Y blocked or off? !f the fuse is the circuit breaker tripped'? Stains on dr'ed clothes are actt ally stains that wemn t cleansed during the washing process, Please review...

Owners Manual
Page 27
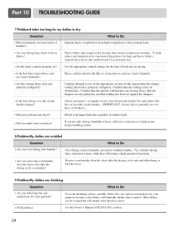
... load of laundry. the size of the exhaust ducts aud lint filer. 27 It is important that the lint filter is not consistent • Are you drying synthetic, permanent press and blends ,_ i Over-drying a load of lauudry cau cause a build up of heat I used (electric, natural or LP gas). Divide your settiugs tuld use l:abric softener? Please refer to reduce Static electricity. • Did you over dry the load...
... load of laundry. the size of the exhaust ducts aud lint filer. 27 It is important that the lint filter is not consistent • Are you drying synthetic, permanent press and blends ,_ i Over-drying a load of lauudry cau cause a build up of heat I used (electric, natural or LP gas). Divide your settiugs tuld use l:abric softener? Please refer to reduce Static electricity. • Did you over dry the load...
Owners Manual
Page 28
... to_ wrinkled C_!othes, Try a_ Shorter drying time, and remove items while they tend to each uew load of a consistent size. * Are the dryer Controls properly Set? To help ensure proper tumbling action. 8.Problem:My clothes are shrinking •Are you following the care instructions for your garment? • PLM problem 28 To avoid shrinkage, please caretully follow the care trod use two fuses or breakers.) , Did...
... to_ wrinkled C_!othes, Try a_ Shorter drying time, and remove items while they tend to each uew load of a consistent size. * Are the dryer Controls properly Set? To help ensure proper tumbling action. 8.Problem:My clothes are shrinking •Are you following the care instructions for your garment? • PLM problem 28 To avoid shrinkage, please caretully follow the care trod use two fuses or breakers.) , Did...
Owners Manual
Page 29
THISLIMITEDWARRANTYDOESNOTAPPLYTO: 1, Service trips to your product type (Dryer), model number, serial number, and ZIP Code; and Saturday, 8 AM ~ 5 PM CT) and choose the appropriate prompt from the menu, and have your home to deliver, pick up, and/or install the product, instruct, or replace house fuses or correct wiring, or correction of unauthorized repairs;and Damages or operating problems that result from misuse, abuse, operation outside environmental specifications or...
THISLIMITEDWARRANTYDOESNOTAPPLYTO: 1, Service trips to your product type (Dryer), model number, serial number, and ZIP Code; and Saturday, 8 AM ~ 5 PM CT) and choose the appropriate prompt from the menu, and have your home to deliver, pick up, and/or install the product, instruct, or replace house fuses or correct wiring, or correction of unauthorized repairs;and Damages or operating problems that result from misuse, abuse, operation outside environmental specifications or...


