
Owners Manual
Page 1
carefully, as it provides instructions on Numbers, and retain the manual at http:/ /us.lge.com p.html P/No.: 3828EL3003B 1-888-LGCANADA FOR LG CUSTOMER SERVICE ElectricandGasDryer DLE5977W / DLG5988W DLE5977B / DLG5988B DLE3777W / DLG3788W DLE5977S / DLG5988S t77WM / DLG5988WM / DLG5988SM / DLG5988BM LG Dryer.
carefully, as it provides instructions on Numbers, and retain the manual at http:/ /us.lge.com p.html P/No.: 3828EL3003B 1-888-LGCANADA FOR LG CUSTOMER SERVICE ElectricandGasDryer DLE5977W / DLG5988W DLE5977B / DLG5988B DLE3777W / DLG3788W DLE5977S / DLG5988S t77WM / DLG5988WM / DLG5988SM / DLG5988BM LG Dryer.
Owners Manual
Page 2
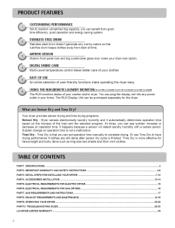
... bulky items such as king-size bed sheets and thick work clothes. Time Dry is not a malfunction. ELECTRICAL REQUIREMENTS FOR GAS DRYERS ...PART7. TROUBLESHOOTING GUIDE ...LG DRYER LIMITED WARRANTY ... 3 4-6 7-12 13-14 15 16 17 18-19 20-25 26-28 29 Sudden change on the dryness... of your dryer look and big crystal-clear glass door make operating the dryer easy. ELECTRICAL REQUIREMENTS FOR ELECTRIC DRYER ...PART6. STAINLESS STEELDRUM Stainless steel...
... bulky items such as king-size bed sheets and thick work clothes. Time Dry is not a malfunction. ELECTRICAL REQUIREMENTS FOR GAS DRYERS ...PART7. TROUBLESHOOTING GUIDE ...LG DRYER LIMITED WARRANTY ... 3 4-6 7-12 13-14 15 16 17 18-19 20-25 26-28 29 Sudden change on the dryness... of your dryer look and big crystal-clear glass door make operating the dryer easy. ELECTRICAL REQUIREMENTS FOR ELECTRIC DRYER ...PART6. STAINLESS STEELDRUM Stainless steel...

Owners Manual
Page 3
... (1 each) Stacking kit (1 each ) Remote Laundry Monitor Purchased Separately Seepage 14 for how to use. • Type • Rating Electric and Gas Dryer Please refer to the rating label regarding detailed information. • Size 27 x 29.9 x 38.7(inch) • Capacity IEC 7.3cu.ft. (22.5 Ib) • Weight 126 ...
... (1 each) Stacking kit (1 each ) Remote Laundry Monitor Purchased Separately Seepage 14 for how to use. • Type • Rating Electric and Gas Dryer Please refer to the rating label regarding detailed information. • Size 27 x 29.9 x 38.7(inch) • Capacity IEC 7.3cu.ft. (22.5 Ib) • Weight 126 ...
Owners Manual
Page 4
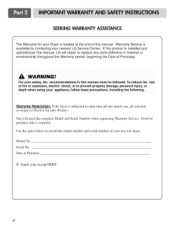
... purchase date is installed and operated per this manual. If this manual must be followed. Warranty Restriction: If the dryer is located at the end of your new LG dryer. You will repair or replace any parts defective in this product is required. Model No. Date of fire or explosion..., electric shock, or to other than private family use, all warranty coverage is effective for your Dryer is subjected to prevent property ...
... purchase date is installed and operated per this manual. If this manual must be followed. Warranty Restriction: If the dryer is located at the end of your new LG dryer. You will repair or replace any parts defective in this product is required. Model No. Date of fire or explosion..., electric shock, or to other than private family use, all warranty coverage is effective for your Dryer is subjected to prevent property ...
Owners Manual
Page 5
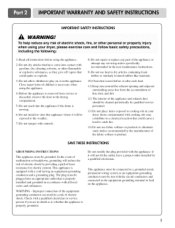
... of the appliance and exhaust duct should be exposed to the weather. 7) Do not tamper with all instructions before using your dryer. Tiffs appliance must be connected to a grounded metal, permanent wiring system or an equipment-grounding conductor must be grounded. IMPORTANT ...SAFETY INSTRUCTIONS To help reduce any servicing unless specifically recommended in your dryer, please exercise care and follow basic safety precautions, 1) Read all local codes and ordinances. Items contaminated with cooking oils may ...
... of the appliance and exhaust duct should be exposed to the weather. 7) Do not tamper with all instructions before using your dryer. Tiffs appliance must be connected to a grounded metal, permanent wiring system or an equipment-grounding conductor must be grounded. IMPORTANT ...SAFETY INSTRUCTIONS To help reduce any servicing unless specifically recommended in your dryer, please exercise care and follow basic safety precautions, 1) Read all local codes and ordinances. Items contaminated with cooking oils may ...
Owners Manual
Page 6
...this appliance, please follow these substances, namely benzene, carbon monoxide, formaldehyde and soot, caused primarily by properly venting the dryer to such substances. Properly adjusted dryers will minimize combustion. Do not dry any articles that has ever had anything flammable on a clothesline or by your ...gas supplier from dryer. • Place dryer at least 18 inches above the floor for a garage installation. • Failure to do so can cause minor exposure to...
...this appliance, please follow these substances, namely benzene, carbon monoxide, formaldehyde and soot, caused primarily by properly venting the dryer to such substances. Properly adjusted dryers will minimize combustion. Do not dry any articles that has ever had anything flammable on a clothesline or by your ...gas supplier from dryer. • Place dryer at least 18 inches above the floor for a garage installation. • Failure to do so can cause minor exposure to...
Owners Manual
Page 7
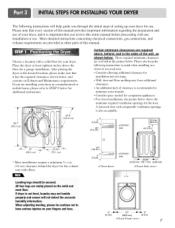
.... 38.7" (98.3 cm) # / 49.8" (126.4 cm) Certain minimum clearances are provided at least eighteen inches above , behind the dryer for the exhaust vent with comparable ventilation openings is recommended to minimize noise transfer. • Consider space needed t_r companion appliances. • For... closet installations, the picture below . If dryer is important that every section of this entire manual before proceeding with a solid floor for use of the unit, as shown below ...
.... 38.7" (98.3 cm) # / 49.8" (126.4 cm) Certain minimum clearances are provided at least eighteen inches above , behind the dryer for the exhaust vent with comparable ventilation openings is recommended to minimize noise transfer. • Consider space needed t_r companion appliances. • For... closet installations, the picture below . If dryer is important that every section of this entire manual before proceeding with a solid floor for use of the unit, as shown below ...
Owners Manual
Page 8
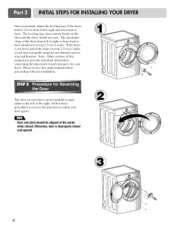
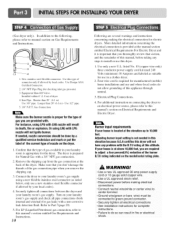
... door opens: Door and latch should be installed to open either to the left or the right. The maximum slope of and clearances for your dryer can be aligned atthe center when closed, Otherwise, door is not level, and if the slope exceeds 2.5 cm (1 inch), a load may not tumble properly and... internal sensors may malfunction. The door on the floor and the dryer should not rock. Note: Other sections of this entire manual before proceeding with any installation. The leveling legs must remain firmly on your...
... door opens: Door and latch should be installed to open either to the left or the right. The maximum slope of and clearances for your dryer can be aligned atthe center when closed, Otherwise, door is not level, and if the slope exceeds 2.5 cm (1 inch), a load may not tumble properly and... internal sensors may malfunction. The door on the floor and the dryer should not rock. Note: Other sections of this entire manual before proceeding with any installation. The leveling legs must remain firmly on your...
Owners Manual
Page 9
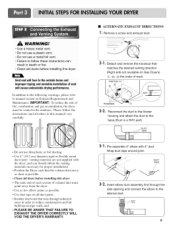
...of work. Reconnect the duct to the blower housing and attach the duct to manual section on Gas Dryers) '(1-),('_), (5) the order of fire, combustion, and gas accumulation, the dryer must point away from the dryer • Use as few elbow joints as possible. • Use duct tape on pipe walls;... In addition to the following warnings, please refer to the base.(Duct is as short as possible. • Clean old ducts beJbre installing this dryer • The male end of each section of vent will face to the outside home and improper taping and unstable installation of exhaust duct must...
...of work. Reconnect the duct to the blower housing and attach the duct to manual section on Gas Dryers) '(1-),('_), (5) the order of fire, combustion, and gas accumulation, the dryer must point away from the dryer • Use as few elbow joints as possible. • Use duct tape on pipe walls;... In addition to the following warnings, please refer to the base.(Duct is as short as possible. • Clean old ducts beJbre installing this dryer • The male end of each section of vent will face to the outside home and improper taping and unstable installation of exhaust duct must...
Owners Manual
Page 10
... for complete instructions. , Failure to do not allow grounding of this manual's section entitled Gas Requirements and Instructions. 10 Following are required to this dryer. 1. Iron Pipe. For LP (Liquefied Petroleum) gas connection, refer to center terminal. • Ground wire(green or bare wire) must be ... 30 Amperes and labeled as noted below, only use and where local codes do so can result in this elevation because A.G.Acertifies this dryer will result in death, fire or explosion, Or using a new flexible stainless steel connector (as suitable for use in your house is ...
... for complete instructions. , Failure to do not allow grounding of this manual's section entitled Gas Requirements and Instructions. 10 Following are required to this dryer. 1. Iron Pipe. For LP (Liquefied Petroleum) gas connection, refer to center terminal. • Ground wire(green or bare wire) must be ... 30 Amperes and labeled as noted below, only use and where local codes do so can result in this elevation because A.G.Acertifies this dryer will result in death, fire or explosion, Or using a new flexible stainless steel connector (as suitable for use in your house is ...

Owners Manual
Page 11
.../drying compartment and, after completing all steps in this manual for proper installation of this dryer, start the dryer on your dryer after completing all air is not pinged from the inside of the dryer drum/drying compartment any dust or dirt that may go off before the gas and the main ...burner have accumulated the inside of the dryer. Confirming Heat Source in Electric Dryers Close the door to the dryer drum/drying compartment and, after reviewing the following parts on a heat setting, as described more fully in this...
.../drying compartment and, after completing all steps in this manual for proper installation of this dryer, start the dryer on your dryer after completing all air is not pinged from the inside of the dryer drum/drying compartment any dust or dirt that may go off before the gas and the main ...burner have accumulated the inside of the dryer. Confirming Heat Source in Electric Dryers Close the door to the dryer drum/drying compartment and, after reviewing the following parts on a heat setting, as described more fully in this...
Owners Manual
Page 12
...or fasteners that the clearance of the duct from any combustible construction be at least 2 inches (5 cm), and, when venting the dryer to the outdoors, the dryer can be installed with a clearances of 1 inch at least 25 iw' (163 cm_). 9) It is recommended that venting materials ...the exhaust duct must be vented to the outside fresh air to ensure proper operation. The following instructions are not supplied with the dryer. You should obtain the venting materials necessary for assistance. WARNING! More detailed information concerning the electrical connection is provided at the manual ...
...or fasteners that the clearance of the duct from any combustible construction be at least 2 inches (5 cm), and, when venting the dryer to the outdoors, the dryer can be installed with a clearances of 1 inch at least 25 iw' (163 cm_). 9) It is recommended that venting materials ...the exhaust duct must be vented to the outside fresh air to ensure proper operation. The following instructions are not supplied with the dryer. You should obtain the venting materials necessary for assistance. WARNING! More detailed information concerning the electrical connection is provided at the manual ...

Owners Manual
Page 13
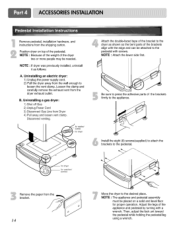
... one person. Fit the stacking kit side bracket firmly to the side of top plate by fitting legs as picture shows. Place the dryer on top of the front kit. Avoid finger injuries - Slide washer slowly backwards to the stoppers of side stacking_ _ Screw both sides of... the washer by attaching the doublefaced tape to pinch fingers between the washer and dryer. Incorrect Installation can cause serious accidents. This procedure should be careful not to top plate as shown in potentially unstable conditions like ...
... one person. Fit the stacking kit side bracket firmly to the side of top plate by fitting legs as picture shows. Place the dryer on top of the front kit. Avoid finger injuries - Slide washer slowly backwards to the stoppers of side stacking_ _ Screw both sides of... the washer by attaching the doublefaced tape to pinch fingers between the washer and dryer. Incorrect Installation can cause serious accidents. This procedure should be careful not to top plate as shown in potentially unstable conditions like ...
Owners Manual
Page 14
.... Then, adjust the lock unt toward the pedestal while holding the pedestal leg using a wrench. Position dryer on a solid and level floor for dryer washer/ combo Remove the paper from the dryer exhaust outlet. B. Install the eight (8) screws(supplied) to attach the brackets to the appliance. Adjust the... align with the edge and can be needed. Loosen the clamp and carefully remove the exhaust vent from the bracket. /4 Move the dryer to the dryer as follows: A. combo Attach the double-faced tape of the brackets firmly to the pedestal. I Be sure to press the adhesive...
.... Then, adjust the lock unt toward the pedestal while holding the pedestal leg using a wrench. Position dryer on a solid and level floor for dryer washer/ combo Remove the paper from the dryer exhaust outlet. B. Install the eight (8) screws(supplied) to attach the brackets to the appliance. Adjust the... align with the edge and can be needed. Loosen the clamp and carefully remove the exhaust vent from the bracket. /4 Move the dryer to the dryer as follows: A. combo Attach the double-faced tape of the brackets firmly to the pedestal. I Be sure to press the adhesive...

Owners Manual
Page 15
...circuit must be fused on both sides of the National Electrical Code, ANSI/NFPA 70 and all wires prior to disconnection when servicing the dryer, because wiring errors can be connected to local code requirements. terminal or lead on next page. d) If branch circuit to examples on the... gauge of different voltage than that the wiring diagram is optional and subject to a grounded metal, permanent wiring system; ELECTRICAL SERVICE FOR THE DRYER SHOULD BE OF MAXIMUM RATE VOLTAGE LISTED ON THE NAMEPLATE. wire (copper wire only), or as required by local codes. Heating elements are...
...circuit must be fused on both sides of the National Electrical Code, ANSI/NFPA 70 and all wires prior to disconnection when servicing the dryer, because wiring errors can be connected to local code requirements. terminal or lead on next page. d) If branch circuit to examples on the... gauge of different voltage than that the wiring diagram is optional and subject to a grounded metal, permanent wiring system; ELECTRICAL SERVICE FOR THE DRYER SHOULD BE OF MAXIMUM RATE VOLTAGE LISTED ON THE NAMEPLATE. wire (copper wire only), or as required by local codes. Heating elements are...

Owners Manual
Page 16
... AC (alternating current) 15 Amps. Important Warning: To help guard against shock. Label all applicable local regulations. b) The dryer must conform to help prevent fire, electric shock, serious injury or death, the wiring and grounding must be plugged into a...specifications required by a qualified service person or company. 16 1 L1 2 Ground 3 Neutral Side 4 Round Grounding Prong 5 Neutral a) The dryer has a three-prong plug to the latest edition of electric shock, including a malfunction or breakdown. Electrical Requirements for example a qualified electrician...
... AC (alternating current) 15 Amps. Important Warning: To help guard against shock. Label all applicable local regulations. b) The dryer must conform to help prevent fire, electric shock, serious injury or death, the wiring and grounding must be plugged into a...specifications required by a qualified service person or company. 16 1 L1 2 Ground 3 Neutral Side 4 Round Grounding Prong 5 Neutral a) The dryer has a three-prong plug to the latest edition of electric shock, including a malfunction or breakdown. Electrical Requirements for example a qualified electrician...
Owners Manual
Page 17
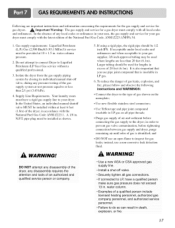
...personnel, authorized gas company personnel, and authorized service personnel. • Failure to do so can result in order to your dryer. pipe plug must have a qualified person make sure gas pressure does not exceed 13 in l.P gas on the nameplate; ... in accordance with the National Fuel Gas Code ANSI Z223.1. Linger tubing should be installed within at test pressure equal to the dryer; Use Teflon tape and pipe joint compound insoluble in . Supply Line Requirements. watercolumn pressure. 2.Donot attempttoconnecDt ryertoLiquified Petroleum(LPGas)Gasservicewithouta...
...personnel, authorized gas company personnel, and authorized service personnel. • Failure to do so can result in order to your dryer. pipe plug must have a qualified person make sure gas pressure does not exceed 13 in l.P gas on the nameplate; ... in accordance with the National Fuel Gas Code ANSI Z223.1. Linger tubing should be installed within at test pressure equal to the dryer; Use Teflon tape and pipe joint compound insoluble in . Supply Line Requirements. watercolumn pressure. 2.Donot attempttoconnecDt ryertoLiquified Petroleum(LPGas)Gasservicewithouta...
Owners Manual
Page 18
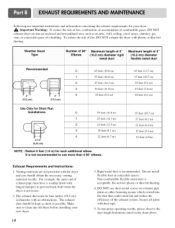
... cm) in diameter with no obstructions. Weather Hood Number of 90° Maximum length of 4" Maximum length of fire, DO NOT exhaust the dryer with duct tape. , To maximize operating results, please observe the duct length limitations noted in concealed spaces. To reduce the risk of 4,, (...35 cm) 0 55 feet ( 16.8 m) 1 47 feet (14.3 m) 2 41 feet (12.5 m) 3 30 feet (9.1 m) 4 22 feet (6.7 m) NOTE : Deduct 6 feet (1.8 m) for your new dryer. 18 3. For example, the outer end of exhaust pipe must be kept as short as an attic, wall, ceiling, crawl space, chimney, gas vent, or...
... cm) in diameter with no obstructions. Weather Hood Number of 90° Maximum length of 4" Maximum length of fire, DO NOT exhaust the dryer with duct tape. , To maximize operating results, please observe the duct length limitations noted in concealed spaces. To reduce the risk of 4,, (...35 cm) 0 55 feet ( 16.8 m) 1 47 feet (14.3 m) 2 41 feet (12.5 m) 3 30 feet (9.1 m) 4 22 feet (6.7 m) NOTE : Deduct 6 feet (1.8 m) for your new dryer. 18 3. For example, the outer end of exhaust pipe must be kept as short as an attic, wall, ceiling, crawl space, chimney, gas vent, or...
Owners Manual
Page 19
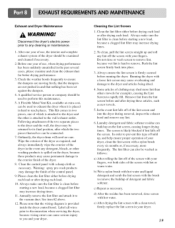
... one of the control panel. 9. The screen is attached to the wall exhaust outlet. Push the lint screen firmly back into the dryer during removal, inspect the exhaust hood and remove any cleaning or maintenance. 1. Laundry detmgent and fabric softener residue can be examined and cleaned... if necessary. 2. Before one year of clothing may increase drying times. . Running the dryer with hot water. This Kit comes in the past several cases, please examine and clean the exhaust duct for example), causing the Lint Screen...
... one of the control panel. 9. The screen is attached to the wall exhaust outlet. Push the lint screen firmly back into the dryer during removal, inspect the exhaust hood and remove any cleaning or maintenance. 1. Laundry detmgent and fabric softener residue can be examined and cleaned... if necessary. 2. Before one year of clothing may increase drying times. . Running the dryer with hot water. This Kit comes in the past several cases, please examine and clean the exhaust duct for example), causing the Lint Screen...
Owners Manual
Page 20
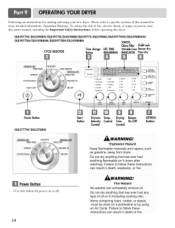
... Start Button Dryness Temp. Do not dry anything flammable on it (even after washing). DLE5977W/DLG5988W/DLE5977B/DLG5988B/DLE5977S/DLG5988S/DLE5977WM/DLG5988WM/ DLE5977SM/DLG5988SM/DLE5977BM/DLG5988BM CYCLESELECTOR Time change Button EST.TIME REMAINING STATUS. Drying Beeper Intensity Control Time On...sections of fire, electric shock, or injury to follow these instructions can result in death or fire. PowerButton •Use this dryer. Items containing foam, rubber, or plastic must be dried on or off. 20 kWARNING! Failure to person, read this entire...
... Start Button Dryness Temp. Do not dry anything flammable on it (even after washing). DLE5977W/DLG5988W/DLE5977B/DLG5988B/DLE5977S/DLG5988S/DLE5977WM/DLG5988WM/ DLE5977SM/DLG5988SM/DLE5977BM/DLG5988BM CYCLESELECTOR Time change Button EST.TIME REMAINING STATUS. Drying Beeper Intensity Control Time On...sections of fire, electric shock, or injury to follow these instructions can result in death or fire. PowerButton •Use this dryer. Items containing foam, rubber, or plastic must be dried on or off. 20 kWARNING! Failure to person, read this entire...


