Specification (English)
Page 2
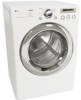
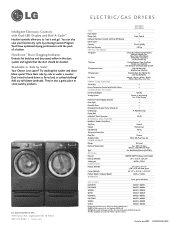
...or under a counter. Try stacking the washer and dryer. Add our tall drawer pedestals. LG ELECTRONICS INC. 1000 Sylvan Ave., Englewood Cliffs, NJ 07632 800.243.0000 LGusa.com ELECTRIC/GAS DRYERS DLE5955 DLG5966 TYPE Front Loader Design Look Front Control ...Intelligent Electronic Controls with Dual LED Display Dial-A-Cycle™ Capacity 7.3 cu.ft. (DOE) Dry Linen Capacity >10.1kg DRYING PROGRAMS 9 Programs Sensor Dry: Normal, Cotton/Towels, Delicates, Wrinkle Care, Heavy Duty, Ultra Delicate Manual...
...or under a counter. Try stacking the washer and dryer. Add our tall drawer pedestals. LG ELECTRONICS INC. 1000 Sylvan Ave., Englewood Cliffs, NJ 07632 800.243.0000 LGusa.com ELECTRIC/GAS DRYERS DLE5955 DLG5966 TYPE Front Loader Design Look Front Control ...Intelligent Electronic Controls with Dual LED Display Dial-A-Cycle™ Capacity 7.3 cu.ft. (DOE) Dry Linen Capacity >10.1kg DRYING PROGRAMS 9 Programs Sensor Dry: Normal, Cotton/Towels, Delicates, Wrinkle Care, Heavy Duty, Ultra Delicate Manual...

User Guide
Page 2
... high efficiency. Your new LG Dryer combines the most advanced drying sensor technology with many years of reliable service. INTRODUCTION IMPORTANT SAFETY INSTRUCTIONS Basic Safety Precautions 3 What to the LG family. By following the operating and care instructions in this manual, your purchase and welcome to Do if You Smell Gas 4 Grounding Instructions 5 Safety Instructions...
... high efficiency. Your new LG Dryer combines the most advanced drying sensor technology with many years of reliable service. INTRODUCTION IMPORTANT SAFETY INSTRUCTIONS Basic Safety Precautions 3 What to the LG family. By following the operating and care instructions in this manual, your purchase and welcome to Do if You Smell Gas 4 Grounding Instructions 5 Safety Instructions...

User Guide
Page 3
...and either the word DANGER or WARNING. Close supervision of children is necessary when the dryer is moving. • Do not repair or replace any other flammable or explosive substances as described in this manual and on or in an area where it will be exposed to the weather. •...; Always check the inside of fire, electric shock, or injury to persons when using the dryer. • Before use heat to dry articles containing ...
...and either the word DANGER or WARNING. Close supervision of children is necessary when the dryer is moving. • Do not repair or replace any other flammable or explosive substances as described in this manual and on or in an area where it will be exposed to the weather. •...; Always check the inside of fire, electric shock, or injury to persons when using the dryer. • Before use heat to dry articles containing ...
User Guide
Page 4
...;ed installer, service agency, or the gas supplier. If you cannot reach your gas supplier, call your building. 3. WHAT TO DO IF YOU SMELL GAS: 1. Clear the room, building, or area of this manual must be minimized further by properly venting the dryer to four of these substances can cause... minor exposure to the outdoors. 4 Gas appliances can be performed by the incomplete combustion of...
...;ed installer, service agency, or the gas supplier. If you cannot reach your gas supplier, call your building. 3. WHAT TO DO IF YOU SMELL GAS: 1. Clear the room, building, or area of this manual must be minimized further by properly venting the dryer to four of these substances can cause... minor exposure to the outdoors. 4 Gas appliances can be performed by the incomplete combustion of...

User Guide
Page 5
...electric shock, or to prevent property damage, personal injury, or loss of fire, electric shock, or injury to persons when using this manual must be grounded. wWARNING - Do not modify the plug provided with the circuit conductors and connected to the equipmentgrounding terminal or lead on...must be run with the appliance. In the event of electric shock, do not install the dryer in . Packaging material can result if the dryer is properly installed and grounded in this manual. This appliance must be equipped with all shipping materials properly. above the floor for...
...electric shock, or to prevent property damage, personal injury, or loss of fire, electric shock, or injury to persons when using this manual must be grounded. wWARNING - Do not modify the plug provided with the circuit conductors and connected to the equipmentgrounding terminal or lead on...must be run with the appliance. In the event of electric shock, do not install the dryer in . Packaging material can result if the dryer is properly installed and grounded in this manual. This appliance must be equipped with all shipping materials properly. above the floor for...
User Guide
Page 6
...not in use. SAFETY INSTRUCTIONS FOR INSTALLATION Exhaust/Ducting: • Gas dryers MUST be exhausted to make a connection with no obstructions. If the dryer is not provided with duct tape. The exhaust duct should be followed...extend into the laundry area. IMPORTANT SAFETY INSTRUCTIONS READ ALL INSTRUCTIONS BEFORE USE wWARNING For your new dryer. The use sheet metal screws or other combustible ductwork can create a health and fire ... death. • DO NOT use of this manual must be exhausted to follow these instructions can result in fire or death. 6
...not in use. SAFETY INSTRUCTIONS FOR INSTALLATION Exhaust/Ducting: • Gas dryers MUST be exhausted to make a connection with no obstructions. If the dryer is not provided with duct tape. The exhaust duct should be followed...extend into the laundry area. IMPORTANT SAFETY INSTRUCTIONS READ ALL INSTRUCTIONS BEFORE USE wWARNING For your new dryer. The use sheet metal screws or other combustible ductwork can create a health and fire ... death. • DO NOT use of this manual must be exhausted to follow these instructions can result in fire or death. 6
User Guide
Page 7
...or a fire hazard. • The dryer should always be properly grounded. Failure to make sure the outlet is not properly grounded. These power cord can be careful not to the installation instructions in this manual for specific electrical requirements for your model....personal injury, or loss of fire, electric shock, or injury to the dryer from the outlet. IMPORTANT SAFETY INSTRUCTIONS READ ALL INSTRUCTIONS BEFORE USE wWARNING For your safety, the information in this manual must be plugged into a properly grounded outlet. SAFETY INSTRUCTIONS FOR CONNECTING ELECTRICITY...
...or a fire hazard. • The dryer should always be properly grounded. Failure to make sure the outlet is not properly grounded. These power cord can be careful not to the installation instructions in this manual for specific electrical requirements for your model....personal injury, or loss of fire, electric shock, or injury to the dryer from the outlet. IMPORTANT SAFETY INSTRUCTIONS READ ALL INSTRUCTIONS BEFORE USE wWARNING For your safety, the information in this manual must be plugged into a properly grounded outlet. SAFETY INSTRUCTIONS FOR CONNECTING ELECTRICITY...
User Guide
Page 9
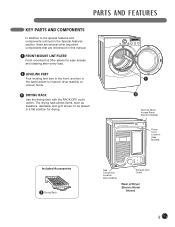
...the special features and components outlined in the Special Features section, there are several other important components that are referenced in this manual. 1 FRONT-MOUNT LINT FILTER Front-mounted lint filter allows for easy access and cleaning after every load. 2 LEVELING FEET...in a flat position for drying. 1 2 Terminal Block Access Panel (Electric Models) Power Cord Location (Gas Models) Included Accessories 3 Drying Rack Gas Connection Location (Gas Models) Exhaust Duct Outlet Rear of Dryer (Electric Model Shown) 9 PARTS AND FEATURES KEY PARTS AND COMPONENTS In addition to improve...
...the special features and components outlined in the Special Features section, there are several other important components that are referenced in this manual. 1 FRONT-MOUNT LINT FILTER Front-mounted lint filter allows for easy access and cleaning after every load. 2 LEVELING FEET...in a flat position for drying. 1 2 Terminal Block Access Panel (Electric Models) Power Cord Location (Gas Models) Included Accessories 3 Drying Rack Gas Connection Location (Gas Models) Exhaust Duct Outlet Rear of Dryer (Electric Model Shown) 9 PARTS AND FEATURES KEY PARTS AND COMPONENTS In addition to improve...
User Guide
Page 10
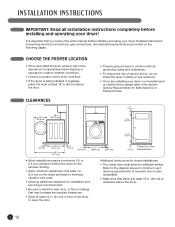
...back to minimize vibration and noise. • Allowing additional clearance for installation and servicing is being installed in a garage, place the dryer at least 18 in . (46 cm) of clearance above for the exhaust ducting. • Allow minimum clearances of at least 1...) in damp or wet locations. • If you review this entire manual before installing and operating your dryer. Detailed instructions concerning electrical connections, gas connections, and exhaust requirements are installing your dryer in a manufactured or mobile home, please refer to the section Special Requirements...
...back to minimize vibration and noise. • Allowing additional clearance for installation and servicing is being installed in a garage, place the dryer at least 18 in . (46 cm) of clearance above for the exhaust ducting. • Allow minimum clearances of at least 1...) in damp or wet locations. • If you review this entire manual before installing and operating your dryer. Detailed instructions concerning electrical connections, gas connections, and exhaust requirements are installing your dryer in a manufactured or mobile home, please refer to the section Special Requirements...
User Guide
Page 11
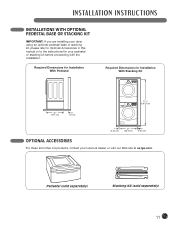
...INSTRUCTIONS INSTALLATIONS WITH OPTIONAL PEDESTAL BASE OR STACKING KIT IMPORTANT: If you are installing your dryer using an optional pedestal base or stacking kit, please refer to Optional Accessories in this manual or to the instructions for Installation With Stacking Kit 30" (76.1 cm) 4"...ACCESSORIES For these and other LG products, contact your pedestal or stacking kit before proceeding with the installation. Pedestal (sold separately) Stacking Kit (sold separately) 11 Required Dimensions for Installation With Pedestal Required Dimensions for your local LG dealer, or visit our ...
...INSTRUCTIONS INSTALLATIONS WITH OPTIONAL PEDESTAL BASE OR STACKING KIT IMPORTANT: If you are installing your dryer using an optional pedestal base or stacking kit, please refer to Optional Accessories in this manual or to the instructions for Installation With Stacking Kit 30" (76.1 cm) 4"...ACCESSORIES For these and other LG products, contact your pedestal or stacking kit before proceeding with the installation. Pedestal (sold separately) Stacking Kit (sold separately) 11 Required Dimensions for Installation With Pedestal Required Dimensions for your local LG dealer, or visit our ...

User Guide
Page 16
..., 60-Hz. Failure to do so can be converted for use with the National Fuel Gas Code ANSI Z223.1. grounded outlet protected by closing its individual manual shutoff valve during any disassembly of the dryer; It can result in fire, explosion, or death. • Use Tefl..., or death. • To prevent contamination of the gas valve, purge the gas supply of this warning can result in fire, explosion, or death. • This dryer must have it replaced with natural gas. In the United States, an individual manual shutoff valve MUST be installed within at least 6 ft....
..., 60-Hz. Failure to do so can be converted for use with the National Fuel Gas Code ANSI Z223.1. grounded outlet protected by closing its individual manual shutoff valve during any disassembly of the dryer; It can result in fire, explosion, or death. • Use Tefl..., or death. • To prevent contamination of the gas valve, purge the gas supply of this warning can result in fire, explosion, or death. • This dryer must have it replaced with natural gas. In the United States, an individual manual shutoff valve MUST be installed within at least 6 ft....

User Guide
Page 22
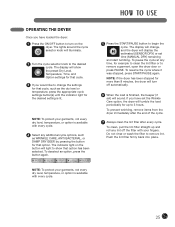
...BUTTONS Use these settings can be lost. 2 CYCLE SELECTOR KNOB Turn this dryer. 7 5 7 6 1 2 3 1 POWER ON/OFF BUTTON Press to select additional cycle options. Certain buttons also allow you to increase the selected manual cycle time by a minute. Press the MORE TIME button to activate special... functions by pressing and holding the button for your new dryer. Once the desired cycle has been selected, the standard presets...
...BUTTONS Use these settings can be lost. 2 CYCLE SELECTOR KNOB Turn this dryer. 7 5 7 6 1 2 3 1 POWER ON/OFF BUTTON Press to select additional cycle options. Certain buttons also allow you to increase the selected manual cycle time by a minute. Press the MORE TIME button to activate special... functions by pressing and holding the button for your new dryer. Once the desired cycle has been selected, the standard presets...
User Guide
Page 23
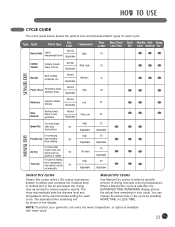
Damp in the cycle by pressing MORE TIME or LESS TIME. Medium 41 Adjustable Perm. The dryer automatically sets the dryness level and temperature at the recommended setting for each cycle. Less Time Dry Care Bacterial Dry 54 Cotton/ Towels Denims, towels, ... Adjustable High Adjustable No Heat High Adjustable 25 Adjustable 20 Adjustable 30 Adjustable 40 Adjustable Sensor Dry Cycles Manual Dry Cycles Sensor Dry cycles utilize LG's unique dual sensor system to detect and compare the moisture level in clothes and in your garments, not every dry level, temperature, or option is ...
Damp in the cycle by pressing MORE TIME or LESS TIME. Medium 41 Adjustable Perm. The dryer automatically sets the dryness level and temperature at the recommended setting for each cycle. Less Time Dry Care Bacterial Dry 54 Cotton/ Towels Denims, towels, ... Adjustable High Adjustable No Heat High Adjustable 25 Adjustable 20 Adjustable 30 Adjustable 40 Adjustable Sensor Dry Cycles Manual Dry Cycles Sensor Dry cycles utilize LG's unique dual sensor system to detect and compare the moisture level in clothes and in your garments, not every dry level, temperature, or option is ...
User Guide
Page 25
... temperature, press the appropriate cycle settings button(s) until the indicator light for example to clean the lint filter or to change , and the dryer will display the estimated (SENSOR DRY) or set ) will show that option. NOTE: To protect your garments, not every dry level, temperature..., or option is finished, the beeper (if set time (MANUAL DRY) remaining and start tumbling. To clean, pull the lint filter straight up to remove lint. Push the lint filter firmly back into place....
... temperature, press the appropriate cycle settings button(s) until the indicator light for example to clean the lint filter or to change , and the dryer will display the estimated (SENSOR DRY) or set ) will show that option. NOTE: To protect your garments, not every dry level, temperature..., or option is finished, the beeper (if set time (MANUAL DRY) remaining and start tumbling. To clean, pull the lint filter straight up to remove lint. Push the lint filter firmly back into place....
User Guide
Page 26
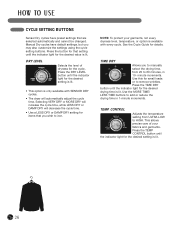
... cycle setting buttons. Press the TIME DRY button until the indicator light for the desired drying time is lit. 26 TIME DRY Allows you to manually select the drying time, from ULTRA LOW to HIGH. Use this for the desired setting is lit. Use the MORE TIME/ LESS TIME buttons ... TEMP CONTROL button until the indicator light for the desired setting is lit. • This option is available with SENSOR DRY cycles. • The dryer will decrease the cycle time. • Use a LESS DRY or DAMP DRY setting for items that setting until the indicator light for the desired value...
... cycle setting buttons. Press the TIME DRY button until the indicator light for the desired drying time is lit. 26 TIME DRY Allows you to manually select the drying time, from ULTRA LOW to HIGH. Use this for the desired setting is lit. Use the MORE TIME/ LESS TIME buttons ... TEMP CONTROL button until the indicator light for the desired setting is lit. • This option is available with SENSOR DRY cycles. • The dryer will decrease the cycle time. • Use a LESS DRY or DAMP DRY setting for items that setting until the indicator light for the desired value...
User Guide
Page 37
... involved in the product's owner's manual. • Damage resulting from province...from the Date of sale as it is provided. LG ELECTRONICS SHALL NOT BE LIABLE FOR THE LOSS OF ...model and serial numbers and your postal code ready. LG ELECTRONICS, INC. THE DURATION OF ANY IMPLIED WARRANTIES, ..., or acts of God. • Repairs when your LG product is void if the factory applied serial number has ... correction of purchase, LG Electronics will, at its option, repair or replace the product at : www.LG.ca and select .... Please call 1-888-LG-CANADA (888-542-2623) and select the appropriate ...
... involved in the product's owner's manual. • Damage resulting from province...from the Date of sale as it is provided. LG ELECTRONICS SHALL NOT BE LIABLE FOR THE LOSS OF ...model and serial numbers and your postal code ready. LG ELECTRONICS, INC. THE DURATION OF ANY IMPLIED WARRANTIES, ..., or acts of God. • Repairs when your LG product is void if the factory applied serial number has ... correction of purchase, LG Electronics will, at its option, repair or replace the product at : www.LG.ca and select .... Please call 1-888-LG-CANADA (888-542-2623) and select the appropriate ...


