
Owner's Manual
Page 4
...Your dryer's model and serial numbers are defective in material or workmanship. ! Part 1 IMPORTANT WARRANTY AND SAFETY INSTRUCTIONS SEEKING WARRANTY ASSISTANCE Warranty Service. Warranty service is available by contacting your new LG dryer. Use the space below to record the model number and serial number of... its mechanical or electrical parts if they are located on the Model and Serial Number Plate located on...
...Your dryer's model and serial numbers are defective in material or workmanship. ! Part 1 IMPORTANT WARRANTY AND SAFETY INSTRUCTIONS SEEKING WARRANTY ASSISTANCE Warranty Service. Warranty service is available by contacting your new LG dryer. Use the space below to record the model number and serial number of... its mechanical or electrical parts if they are located on the Model and Serial Number Plate located on...
Owner's Manual
Page 5
... the appliance and exhaust duct should be grounded. to a chemical reaction that is properly grounded. Items contaminated with controls. 8) Do not repair or replace any part of the appliance or attempt any risk of electric shock, fire, or other flammable or explosive substances, as to play on or in accordance with... service person if you are in your dryer, please exercise care and follow basic safety precautions, including the following: 1) Read all local codes and ordinances. Part 1 IMPORTANT WARRANTY AND SAFETY INSTRUCTIONS IMPORTANT SAFETY INSTRUCTIONS !
... the appliance and exhaust duct should be grounded. to a chemical reaction that is properly grounded. Items contaminated with controls. 8) Do not repair or replace any part of the appliance or attempt any risk of electric shock, fire, or other flammable or explosive substances, as to play on or in accordance with... service person if you are in your dryer, please exercise care and follow basic safety precautions, including the following: 1) Read all local codes and ordinances. Part 1 IMPORTANT WARRANTY AND SAFETY INSTRUCTIONS IMPORTANT SAFETY INSTRUCTIONS !
Owner's Manual
Page 6
...; Immediately call the fire department. ! WHAT TO DO IF YOU SMELL GAS: • Do not try to publish a list of natural gas or LP fuels. Part 1 IMPORTANT WARRANTY AND SAFETY INSTRUCTIONS !
...; Immediately call the fire department. ! WHAT TO DO IF YOU SMELL GAS: • Do not try to publish a list of natural gas or LP fuels. Part 1 IMPORTANT WARRANTY AND SAFETY INSTRUCTIONS !
Owner's Manual
Page 7
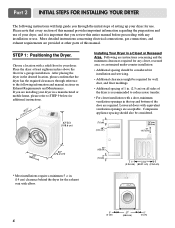
...dryer for use of the door are required. Louvered doors with a solid floor for a garage installation. Place the dryer at other parts of this entire manual before proceeding with a door, minimum ventilation openings in the top and bottom of your dryer in a manufactured...the following instructions will help guide you are acceptable. After placing the dryer in . (2.5 cm) on Exhaust Requirements and Maintenance. Part 2 INITIAL STEPS FOR INSTALLING YOUR DRYER The following information and manual sections on all sides of this manual provides important information regarding...
...dryer for use of the door are required. Louvered doors with a solid floor for a garage installation. Place the dryer at other parts of this entire manual before proceeding with a door, minimum ventilation openings in the top and bottom of your dryer in a manufactured...the following instructions will help guide you are acceptable. After placing the dryer in . (2.5 cm) on Exhaust Requirements and Maintenance. Part 2 INITIAL STEPS FOR INSTALLING YOUR DRYER The following information and manual sections on all sides of this manual provides important information regarding...

Owner's Manual
Page 8
... legs must remain firmly on your dryer. The maximum slope of the dryer from left to right and from front to back should not rock. Part 2 INITIAL STEPS FOR INSTALLING YOUR DRYER Once in which your door opens: 1 2 3 7
... legs must remain firmly on your dryer. The maximum slope of the dryer from left to right and from front to back should not rock. Part 2 INITIAL STEPS FOR INSTALLING YOUR DRYER Once in which your door opens: 1 2 3 7
Owner's Manual
Page 9
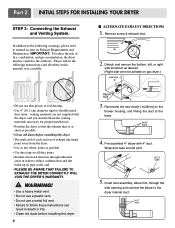
... CORRECTLY WILL VOID THE DRYER'S WARRANTY. ! Reconnect the new duct[11 in death or fire. • Clean old ducts before installing this manual) very carefully. Part 2 INITIAL STEPS FOR INSTALLING YOUR DRYER STEP 3: Connecting the Exhaust and Venting System. WARNING! • Use a heavy metal vent. • Do not use a plastic vent...
... CORRECTLY WILL VOID THE DRYER'S WARRANTY. ! Reconnect the new duct[11 in death or fire. • Clean old ducts before installing this manual) very carefully. Part 2 INITIAL STEPS FOR INSTALLING YOUR DRYER STEP 3: Connecting the Exhaust and Venting System. WARNING! • Use a heavy metal vent. • Do not use a plastic vent...
Owner's Manual
Page 10
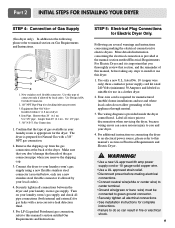
... where local codes do so can cause serious injury to disconnection when servicing the dryer, because wiring errors can result in fire or electrical shock. 9 Part 2 INITIAL STEPS FOR INSTALLING YOUR DRYER STEP 4: Connection of the dryer. Installed within 6' (1.8 m) of this manual, before making the electrical connection for manufactured (mobile) home...
... where local codes do so can cause serious injury to disconnection when servicing the dryer, because wiring errors can result in fire or electrical shock. 9 Part 2 INITIAL STEPS FOR INSTALLING YOUR DRYER STEP 4: Connection of the dryer. Installed within 6' (1.8 m) of this manual, before making the electrical connection for manufactured (mobile) home...
Owner's Manual
Page 11
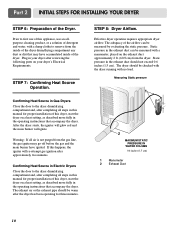
... the exhaust duct approximately 2 ft. (60.9 cm) from the dryer. Measuring Static pressure 1 2 MAXIMUM STATIC PRESSURE IN WATER COLUMN 0.6 inches (1.5 cm) 1 Manometer 2 Exhaust Duct 10 Part 2 INITIAL STEPS FOR INSTALLING YOUR DRYER STEP 6: Preparation of this happens, the igniter will ignite. Warning: If all steps in this dryer, start the dryer... may have ignited. After the dryer starts, the igniter will glow red and the main burner will re-attempt gas ignition after reviewing the following parts on your dryer after approximately two minutes.
... the exhaust duct approximately 2 ft. (60.9 cm) from the dryer. Measuring Static pressure 1 2 MAXIMUM STATIC PRESSURE IN WATER COLUMN 0.6 inches (1.5 cm) 1 Manometer 2 Exhaust Duct 10 Part 2 INITIAL STEPS FOR INSTALLING YOUR DRYER STEP 6: Preparation of this happens, the igniter will ignite. Warning: If all steps in this dryer, start the dryer... may have ignited. After the dryer starts, the igniter will glow red and the main burner will re-attempt gas ignition after reviewing the following parts on your dryer after approximately two minutes.
Owner's Manual
Page 12
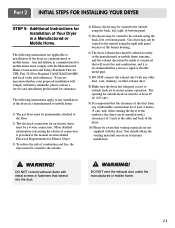
... back, left , or bottom panel. The following instructions are not supplied with the Manufactured Home Construction and Safety Standards Title 24 CFR, Part 32-80 or Standard CAN/CSA0Z240 MH and local codes and ordinances. The following instructions apply to any installation of the dryer in a...Please be aware that extend into the duct. ! DO NOT vent the exhaust duct under the manufactured or mobile home. 11 WARNING! WARNING! Part 2 INITIAL STEPS FOR INSTALLING YOUR DRYER STEP 9: Additional Instructions for Electric Dryer 3) To reduce the risk of combustion and fire, the dryer must...
... back, left , or bottom panel. The following instructions are not supplied with the Manufactured Home Construction and Safety Standards Title 24 CFR, Part 32-80 or Standard CAN/CSA0Z240 MH and local codes and ordinances. The following instructions apply to any installation of the dryer in a...Please be aware that extend into the duct. ! DO NOT vent the exhaust duct under the manufactured or mobile home. 11 WARNING! WARNING! Part 2 INITIAL STEPS FOR INSTALLING YOUR DRYER STEP 9: Additional Instructions for Electric Dryer 3) To reduce the risk of combustion and fire, the dryer must...
Owner's Manual
Page 13
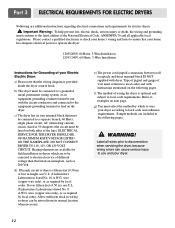
... circuit must be moved from its own terminal block that listed on the following pages. ! g) You must be connected to a grounded metal, permanent wiring system; Part 3 ELECTRICAL REQUIREMENTS FOR ELECTRIC DRYERS Following are additional instructions regarding electrical connections and requirements for Grounding of wiring the dryer is optional and subject to...
... circuit must be moved from its own terminal block that listed on the following pages. ! g) You must be connected to a grounded metal, permanent wiring system; Part 3 ELECTRICAL REQUIREMENTS FOR ELECTRIC DRYERS Following are additional instructions regarding electrical connections and requirements for Grounding of wiring the dryer is optional and subject to...

Owner's Manual
Page 14
Part 3 ELECTRICAL REQUIREMENTS FOR ELECTRIC DRYERS Review the following options to determine the appropriate electrical connection for your home: 3-wire receptacle (NEMA type10-30R) 4-wire receptacle (...
Part 3 ELECTRICAL REQUIREMENTS FOR ELECTRIC DRYERS Review the following options to determine the appropriate electrical connection for your home: 3-wire receptacle (NEMA type10-30R) 4-wire receptacle (...
Owner's Manual
Page 15
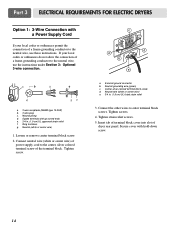
... receptacle (NEMA type 10-30R) b. 3-wire plug c. Neutral prong d. Insert tab of terminal block cover into slot of the terminal block. Ring terminals g. Tighten screw. Part 3 ELECTRICAL REQUIREMENTS FOR ELECTRIC DRYERS Option 1: 3-Wire Connection with a Power Supply Cord lf your local codes or ordinances do not allow the connection of a frame...
... receptacle (NEMA type 10-30R) b. 3-wire plug c. Neutral prong d. Insert tab of terminal block cover into slot of the terminal block. Ring terminals g. Tighten screw. Part 3 ELECTRICAL REQUIREMENTS FOR ELECTRIC DRYERS Option 1: 3-Wire Connection with a Power Supply Cord lf your local codes or ordinances do not allow the connection of a frame...
Owner's Manual
Page 16
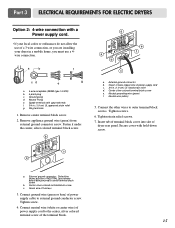
... or bare copper wire of power supply cord c. 3/4 in a mobile home, you must use of the terminal block. 15 Green wire of dryer rear panel. Part 3 ELECTRICAL REQUIREMENTS FOR ELECTRIC DRYERS Option 2: 4-wire connection with a Power supply cord. • lf your dryer in . (1.9 cm) UL-listed strain relief d. Spade terminals with...
... or bare copper wire of power supply cord c. 3/4 in a mobile home, you must use of the terminal block. 15 Green wire of dryer rear panel. Part 3 ELECTRICAL REQUIREMENTS FOR ELECTRIC DRYERS Option 2: 4-wire connection with a Power supply cord. • lf your dryer in . (1.9 cm) UL-listed strain relief d. Spade terminals with...
Owner's Manual
Page 17
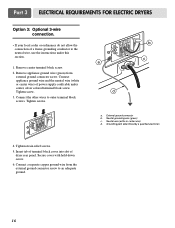
Remove center terminal block screw. 2. Tighten screw. 3. a. Tighten strain relief screws. 5. Part 3 ELECTRICAL REQUIREMENTS FOR ELECTRIC DRYERS Option 3: Optional 3-wire connection. • If your local codes or ordinances do not allow the connection of a frame-grounding conductor ...
Remove center terminal block screw. 2. Tighten screw. 3. a. Tighten strain relief screws. 5. Part 3 ELECTRICAL REQUIREMENTS FOR ELECTRIC DRYERS Option 3: Optional 3-wire connection. • If your local codes or ordinances do not allow the connection of a frame-grounding conductor ...
Owner's Manual
Page 18
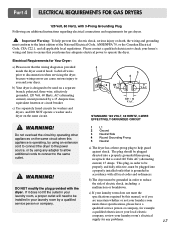
... wiring and grounding must be plugged directed into a properly installed outlet that is provided inside the dryer control hood. Electrical Requirements for gas dryers. ! WARNING! Part 4 ELECTRICAL REQUIREMENTS FOR GAS DRYERS 120 Volt, 60 Hertz, with 3-Prong Grounding Plug Following are uncertain whether or not your laundry room meets these specifications...
... wiring and grounding must be plugged directed into a properly installed outlet that is provided inside the dryer control hood. Electrical Requirements for gas dryers. ! WARNING! Part 4 ELECTRICAL REQUIREMENTS FOR GAS DRYERS 120 Volt, 60 Hertz, with 3-Prong Grounding Plug Following are uncertain whether or not your laundry room meets these specifications...
Owner's Manual
Page 19
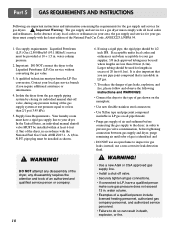
.... 18 6. A qualified technician must have a qualified person make sure gas pressure does not exceed 13 in accordance with the National Fuel Gas Coide ANSI Z223.1. Part 5 GAS REQUIREMENTS AND INSTRUCTIONS Following are less than 2/1 psi (3.45 kPa). 5.
.... 18 6. A qualified technician must have a qualified person make sure gas pressure does not exceed 13 in accordance with the National Fuel Gas Coide ANSI Z223.1. Part 5 GAS REQUIREMENTS AND INSTRUCTIONS Following are less than 2/1 psi (3.45 kPa). 5.
Owner's Manual
Page 20
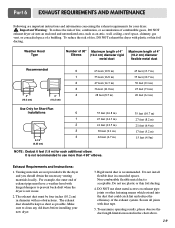
... the exhaust requirements for each additional elbow. To maximize operating results, please observe the duct length limitations noted in use plastic or thin foil ducting. 4. Part 6 EXHAUST REQUIREMENTS AND MAINTENANCE Following are not provided with the dryer and you should be four inches (10.2 cm) in concealed spaces. Make sure to...
... the exhaust requirements for each additional elbow. To maximize operating results, please observe the duct length limitations noted in use plastic or thin foil ducting. 4. Part 6 EXHAUST REQUIREMENTS AND MAINTENANCE Following are not provided with the dryer and you should be four inches (10.2 cm) in concealed spaces. Make sure to...
Owner's Manual
Page 21
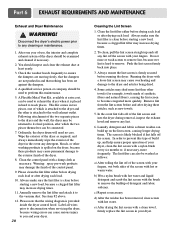
Part 6 EXHAUST REQUIREMENTS AND MAINTENANCE Exhaust and Dryer Maintenance ! After one of the two separate pieces to the dryer and the wall, the dryer may be ...
Part 6 EXHAUST REQUIREMENTS AND MAINTENANCE Exhaust and Dryer Maintenance ! After one of the two separate pieces to the dryer and the wall, the dryer may be ...
Owner's Manual
Page 22
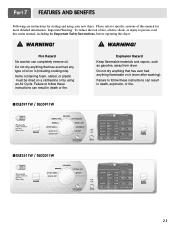
... anything flammable on it (even after washing). Important Warning: To reduce the risk of this dryer. ! Failure to follow these instructions can completely remove oil. Part 7 FEATURES AND BENEFITS Following are instructions for more detailed information. Please refer to specific sections of fire, electric shock, or injury to follow these instructions...
... anything flammable on it (even after washing). Important Warning: To reduce the risk of this dryer. ! Failure to follow these instructions can completely remove oil. Part 7 FEATURES AND BENEFITS Following are instructions for more detailed information. Please refer to specific sections of fire, electric shock, or injury to follow these instructions...
Owner's Manual
Page 23
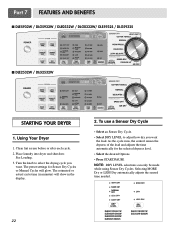
... Cycles. DLE5911W/G5911W DLE2511W/G2511W DLE5932W/G5932W DLE2532W/G2532W DLE0332W/G0332W DLE5932S/G5932S 22 The estimated or actual cycle time (in the display. 2. Part 7 FEATURES AND BENEFITS I DLE5932W / DLG5932W / DLE0332W / DLG0332W/ DLE5932S / DLG5932S I DLE2532W / DLG2532W STARTING YOUR DRYER 1. Using Your Dryer 1. Clean lint screen before or after each cycle. 2. As the cycle...
... Cycles. DLE5911W/G5911W DLE2511W/G2511W DLE5932W/G5932W DLE2532W/G2532W DLE0332W/G0332W DLE5932S/G5932S 22 The estimated or actual cycle time (in the display. 2. Part 7 FEATURES AND BENEFITS I DLE5932W / DLG5932W / DLE0332W / DLG0332W/ DLE5932S / DLG5932S I DLE2532W / DLG2532W STARTING YOUR DRYER 1. Using Your Dryer 1. Clean lint screen before or after each cycle. 2. As the cycle...


