
Owner's Manual
Page 3
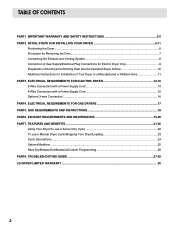
... ...21-26 Using Your Dryer/To use a Sensor Dry Cycle 22 To use a Manual Dryer Cycle/Stopping Your Dryer/Loading 23 Cycle Descriptions...24 Options/Modifiers ...25 Rack Dry... a Power Supply Cord 15 Optional 3-wire Connection ...16 PART4. TROUBLESHOOTING GUIDE ...27-29 LG DRYER LIMITED WARRANTY ...30 2 GAS REQUIREMENTS AND INSTRUCTIONS 18 PART6. EXHAUST REQUIREMENTS AND MAINTENANCE ...19-20 PART7. ELECTRICAL REQUIREMENTS FOR GAS DRYERS 17 PART5. INITIAL STEPS FOR INSTALLING YOUR DRYER 6-11 Positioning the Dryer ...6 Procedure for Reversing the Door...7 Connecting the ...
... ...21-26 Using Your Dryer/To use a Sensor Dry Cycle 22 To use a Manual Dryer Cycle/Stopping Your Dryer/Loading 23 Cycle Descriptions...24 Options/Modifiers ...25 Rack Dry... a Power Supply Cord 15 Optional 3-wire Connection ...16 PART4. TROUBLESHOOTING GUIDE ...27-29 LG DRYER LIMITED WARRANTY ...30 2 GAS REQUIREMENTS AND INSTRUCTIONS 18 PART6. EXHAUST REQUIREMENTS AND MAINTENANCE ...19-20 PART7. ELECTRICAL REQUIREMENTS FOR GAS DRYERS 17 PART5. INITIAL STEPS FOR INSTALLING YOUR DRYER 6-11 Positioning the Dryer ...6 Procedure for Reversing the Door...7 Connecting the ...
Owner's Manual
Page 4
... property damage, personal injury, or death when using your nearest LG Service Center and, for warranty period from the date of purchase, if this dryer is installed and operated according to the instructions in this manual, LG will need the complete model and serial numbers when requesting information.... AND SAFETY INSTRUCTIONS SEEKING WARRANTY ASSISTANCE Warranty Service. For your dryer is needed to record the model number and serial number of this manual must be followed. The warranty for only 90 days. Use the space below to obtain warranty service. We recommend that you staple...
... property damage, personal injury, or death when using your nearest LG Service Center and, for warranty period from the date of purchase, if this dryer is installed and operated according to the instructions in this manual, LG will need the complete model and serial numbers when requesting information.... AND SAFETY INSTRUCTIONS SEEKING WARRANTY ASSISTANCE Warranty Service. For your dryer is needed to record the model number and serial number of this manual must be followed. The warranty for only 90 days. Use the space below to obtain warranty service. We recommend that you staple...
Owner's Manual
Page 6
... supplier's instructions carefully. • If you cannot reach your gas supplier from dryer. • Place dryer at least 18 inches above the floor for a garage installation. • Failure to light a match, or cigarette, or turn on a clothesline or by using this appliance, please follow these substances can completely remove oil. Do... try to do so can result in your building. • Clear the room, building or area of all instructions and information, including those in this manual and instructions and information provided by properly venting the dryer to such substances.
... supplier's instructions carefully. • If you cannot reach your gas supplier from dryer. • Place dryer at least 18 inches above the floor for a garage installation. • Failure to light a match, or cigarette, or turn on a clothesline or by using this appliance, please follow these substances can completely remove oil. Do... try to do so can result in your building. • Clear the room, building or area of all instructions and information, including those in this manual and instructions and information provided by properly venting the dryer to such substances.
Owner's Manual
Page 7
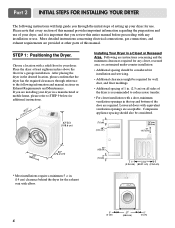
...) (2.54 cm) 0" (0 cm) 27" (68.6 cm) 0" (0 cm) 6 Place the dryer at other parts of this entire manual before proceeding with equivalent ventilation openings are installing your dryer in a manufactured or mobile home, please refer to STEP 9 below for additional instructions. (12580.2.57"cm) 42"3/4 (108.6 cm.... STEP 1: Positioning the Dryer. If you are acceptable. Following are required. Part 2 INITIAL STEPS FOR INSTALLING YOUR DRYER The following information and manual sections on all sides of the dryer is important that the dryer has the required clearances through reference to ...
...) (2.54 cm) 0" (0 cm) 27" (68.6 cm) 0" (0 cm) 6 Place the dryer at other parts of this entire manual before proceeding with equivalent ventilation openings are installing your dryer in a manufactured or mobile home, please refer to STEP 9 below for additional instructions. (12580.2.57"cm) 42"3/4 (108.6 cm.... STEP 1: Positioning the Dryer. If you are acceptable. Following are required. Part 2 INITIAL STEPS FOR INSTALLING YOUR DRYER The following information and manual sections on all sides of the dryer is important that the dryer has the required clearances through reference to ...

Owner's Manual
Page 8
... it is not level, and if the slope exceeds 2.5 cm (1 inch), a load may not tumble properly and internal sensors may be installed to open either to the left to right and from front to back should not rock. STEP 2: Procedure for your dryer. If the ...level from left or the right. Part 2 INITIAL STEPS FOR INSTALLING YOUR DRYER Once in which your door opens: 1 2 3 7 Please review this manual also provide important information concerning the placement of this entire manual before proceeding with any installation. Note: Other sections of and clearances for Reversing the Door ...
... it is not level, and if the slope exceeds 2.5 cm (1 inch), a load may not tumble properly and internal sensors may be installed to open either to the left to right and from front to back should not rock. STEP 2: Procedure for your dryer. If the ...level from left or the right. Part 2 INITIAL STEPS FOR INSTALLING YOUR DRYER Once in which your door opens: 1 2 3 7 Please review this manual also provide important information concerning the placement of this entire manual before proceeding with any installation. Note: Other sections of and clearances for Reversing the Door ...
Owner's Manual
Page 9
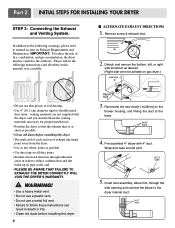
... to the following instructions (and all duct joints • Insulate ductwork that the exhaust duct is as short as possible • Clean old ducts before installing this manual) very carefully. Remove screw & exhaust duct. 2. and • PLEASE BE AWARE THAT FAILURE TO EXHAUST THE DRYER CORRECTLY WILL VOID THE DRYER'S WARRANTY. ! Reconnect...
... to the following instructions (and all duct joints • Insulate ductwork that the exhaust duct is as short as possible • Clean old ducts before installing this manual) very carefully. Remove screw & exhaust duct. 2. and • PLEASE BE AWARE THAT FAILURE TO EXHAUST THE DRYER CORRECTLY WILL VOID THE DRYER'S WARRANTY. ! Reconnect...
Owner's Manual
Page 10
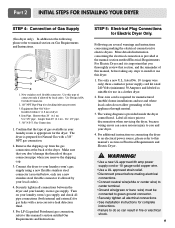
...8226; Use a UL approved strain relief. • Disconnect power before taking any steps to this appliance through neutral. 3. Use this manual's section entitled Gas Requirements and Instructions. Installed within 6' (1.8 m) of Gas Supply (Gas dryer only). Shorter than 20' (6.1 m) - Gas Connection 1. Securely tighten all ... ground connector. • Securely tighten all wires prior to you remove the shipping cap. 3. Part 2 INITIAL STEPS FOR INSTALLING YOUR DRYER STEP 4: Connection of dryer 4. Confirm that the type of the gas connection pipe when you and your laundry room...
...8226; Use a UL approved strain relief. • Disconnect power before taking any steps to this appliance through neutral. 3. Use this manual's section entitled Gas Requirements and Instructions. Installed within 6' (1.8 m) of Gas Supply (Gas dryer only). Shorter than 20' (6.1 m) - Gas Connection 1. Securely tighten all ... ground connector. • Securely tighten all wires prior to you remove the shipping cap. 3. Part 2 INITIAL STEPS FOR INSTALLING YOUR DRYER STEP 4: Connection of dryer 4. Confirm that the type of the gas connection pipe when you and your laundry room...
Owner's Manual
Page 11
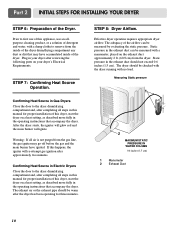
...Confirming Heat Source in Electric Dryers Close the door to the dryer drum/drying compartment and, after completing all steps in this manual for proper installation of this dryer, start the dryer on your dryer after approximately two minutes. STEP 8: Dryer Airflow. The dryer should ... an allpurpose cleaning product, or a solution of the Dryer. Static pressure in your dryer's Electrical Requirements. Part 2 INITIAL STEPS FOR INSTALLING YOUR DRYER STEP 6: Preparation of detergent and water, with no load. Warning: If all steps in the exhaust duct should be measured...
...Confirming Heat Source in Electric Dryers Close the door to the dryer drum/drying compartment and, after completing all steps in this manual for proper installation of this dryer, start the dryer on your dryer after approximately two minutes. STEP 8: Dryer Airflow. The dryer should ... an allpurpose cleaning product, or a solution of the Dryer. Static pressure in your dryer's Electrical Requirements. Part 2 INITIAL STEPS FOR INSTALLING YOUR DRYER STEP 6: Preparation of detergent and water, with no load. Warning: If all steps in the exhaust duct should be measured...
Owner's Manual
Page 12
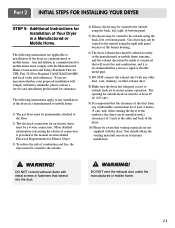
...be at least 25 in2 (163 cm2). 9) It is important that you are not supplied with these standards, please contact a service and installation professional for Electric Dryer 3) To reduce the risk of a material that will comply with the dryer. More detailed information concerning the electrical connection... is recommended that the clearance of 1 inch at the manual section entitled Electrical Requirements for assistance. DO NOT vent the exhaust duct under the manufactured or mobile home. 11
...be at least 25 in2 (163 cm2). 9) It is important that you are not supplied with these standards, please contact a service and installation professional for Electric Dryer 3) To reduce the risk of a material that will comply with the dryer. More detailed information concerning the electrical connection... is recommended that the clearance of 1 inch at the manual section entitled Electrical Requirements for assistance. DO NOT vent the exhaust duct under the manufactured or mobile home. 11
Owner's Manual
Page 18
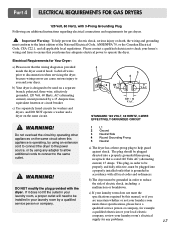
Electrical Requirements for any adapter to allow additional cords to connect to the power source, or by this manual, or if you and your home has adequate electrical power to ensure that is rated 120 Volts AC (alternating current) 15 Amps. STANDARD 120...fused circuits for gas dryers. ! The plug should be used on the same circuit. ! Please contact a qualified electrician to be plugged directed into a properly installed outlet that your dryer. DO NOT modify the plug provided with 3-Prong Grounding Plug Following are uncertain whether or not your laundry room meets these...
Electrical Requirements for any adapter to allow additional cords to connect to the power source, or by this manual, or if you and your home has adequate electrical power to ensure that is rated 120 Volts AC (alternating current) 15 Amps. STANDARD 120...fused circuits for gas dryers. ! The plug should be used on the same circuit. ! Please contact a qualified electrician to be plugged directed into a properly installed outlet that your dryer. DO NOT modify the plug provided with 3-Prong Grounding Plug Following are uncertain whether or not your laundry room meets these...
Owner's Manual
Page 19
...your area, the gas supply and service for gas dryers. ! Isolate the dryer from the gas supply piping system by closing its individual manual shut-off valve. • Securely tighten all local codes and ordinances. Your laundry room must comply with the latest edition of the gas...is also important that you require additional assistance or information. 4. WARNING! • Use a new AGA or CSA approved gas supply line. • Install a shut-off valve, during any local codes or ordinances in accordance with all gas connections. • If connected to prevent gas valve contamination, ...
...your area, the gas supply and service for gas dryers. ! Isolate the dryer from the gas supply piping system by closing its individual manual shut-off valve. • Securely tighten all local codes and ordinances. Your laundry room must comply with the latest edition of the gas...is also important that you require additional assistance or information. 4. WARNING! • Use a new AGA or CSA approved gas supply line. • Install a shut-off valve, during any local codes or ordinances in accordance with all gas connections. • If connected to prevent gas valve contamination, ...


