
Owner's Manual
Page 2
1-800-243-0000 24 HOURS A DAY, 7 DAYS A WEEK FOR LG CUSTOMER SERVICE Electric and Gas Dryer / / / / / / P/No.: 3828EL4001A
1-800-243-0000 24 HOURS A DAY, 7 DAYS A WEEK FOR LG CUSTOMER SERVICE Electric and Gas Dryer / / / / / / P/No.: 3828EL4001A
Owner's Manual
Page 3
... AND INSTRUCTIONS 18 PART6. TROUBLESHOOTING GUIDE ...27-29 LG DRYER LIMITED WARRANTY ...30 2 FEATURES AND BENEFITS ...21-26 Using Your Dryer/To use a Sensor Dry Cycle 22 To use a Manual Dryer Cycle/Stopping Your Dryer/Loading 23 Cycle Descriptions...24 Options/Modifiers ...25 Rack... PART4. TABLE OF CONTENTS PART1. IMPORTANT WARRANTY AND SAFETY INSTRUCTIONS 3-5 PART2. INITIAL STEPS FOR INSTALLING YOUR DRYER 6-11 Positioning the Dryer ...6 Procedure for Reversing the Door...7 Connecting the Exhaust and Venting System 8 Connection of Gas Supply/Electrical Plug Connections for...
... AND INSTRUCTIONS 18 PART6. TROUBLESHOOTING GUIDE ...27-29 LG DRYER LIMITED WARRANTY ...30 2 FEATURES AND BENEFITS ...21-26 Using Your Dryer/To use a Sensor Dry Cycle 22 To use a Manual Dryer Cycle/Stopping Your Dryer/Loading 23 Cycle Descriptions...24 Options/Modifiers ...25 Rack... PART4. TABLE OF CONTENTS PART1. IMPORTANT WARRANTY AND SAFETY INSTRUCTIONS 3-5 PART2. INITIAL STEPS FOR INSTALLING YOUR DRYER 6-11 Positioning the Dryer ...6 Procedure for Reversing the Door...7 Connecting the Exhaust and Venting System 8 Connection of Gas Supply/Electrical Plug Connections for...
Owner's Manual
Page 4
... purchase date is needed to prevent property damage, personal injury, or death when using your nearest LG Service Center and, for warranty period from the date of this dryer is installed and operated according to other than private family use, all warranty coverage is printed the.... Warranty service is subjected to the instructions in this manual, LG will need the complete model and serial numbers when requesting information. Model No. For your new LG dryer. You will repair or replace any of the dryer behind the door. Serial No. Part 1 IMPORTANT WARRANTY AND SAFETY...
... purchase date is needed to prevent property damage, personal injury, or death when using your nearest LG Service Center and, for warranty period from the date of this dryer is installed and operated according to other than private family use, all warranty coverage is printed the.... Warranty service is subjected to the instructions in this manual, LG will need the complete model and serial numbers when requesting information. Model No. For your new LG dryer. You will repair or replace any of the dryer behind the door. Serial No. Part 1 IMPORTANT WARRANTY AND SAFETY...
Owner's Manual
Page 5
... WARRANTY AND SAFETY INSTRUCTIONS IMPORTANT SAFETY INSTRUCTIONS ! Items contaminated with gasoline, dry-cleaning solvents, or other personal or property injury when using your dryer. This appliance is moving. 6) Do not install or store this appliance where it will not fit the outlet, have come into contact with... plugged into the appliance if the drum is equipped with a qualified electrician or service person if you are in your dryer, please exercise care and follow basic safety precautions, including the following: 1) Read all local codes and ordinances. WARNING!
... WARRANTY AND SAFETY INSTRUCTIONS IMPORTANT SAFETY INSTRUCTIONS ! Items contaminated with gasoline, dry-cleaning solvents, or other personal or property injury when using your dryer. This appliance is moving. 6) Do not install or store this appliance where it will not fit the outlet, have come into contact with... plugged into the appliance if the drum is equipped with a qualified electrician or service person if you are in your dryer, please exercise care and follow basic safety precautions, including the following: 1) Read all local codes and ordinances. WARNING!
Owner's Manual
Page 6
... to these substrances, namely benzene, carbon monoxide, formaldehyde and soot, caused primarily by your gas supplier, call your gas supplier from dryer. • Place dryer at least 18 inches above the floor for a garage installation. • Failure to do so can cause minor exposure to the ...cooking oil. • Articles containing foam, rubber, rubber like materials, plastic, or similar materials should be minimized further by properly venting the dryer to four of these substances can be dried on it, even after washing. • No washer can result in this appliance. ! Part...
... to these substrances, namely benzene, carbon monoxide, formaldehyde and soot, caused primarily by your gas supplier, call your gas supplier from dryer. • Place dryer at least 18 inches above the floor for a garage installation. • Failure to do so can cause minor exposure to the ...cooking oil. • Articles containing foam, rubber, rubber like materials, plastic, or similar materials should be minimized further by properly venting the dryer to four of these substances can be dried on it, even after washing. • No washer can result in this appliance. ! Part...
Owner's Manual
Page 7
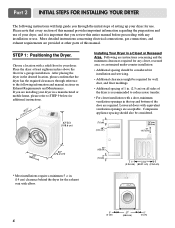
... floor for use. More detailed instructions concerning electrical connections, gas connections, and exhaust requirements are acceptable. After placing the dryer in the desired location, please confirm that you are required. If you review this manual provides important information regarding the ...72 cm) (682.67"cm) 30" (76.2 cm) * Most installations require a minimum 5 1/2 in. (14 cm) clearance behind the dryer for your dryer in a manufactured or mobile home, please refer to the following instructions will help guide you through reference to STEP 9 below for wall, door,...
... floor for use. More detailed instructions concerning electrical connections, gas connections, and exhaust requirements are acceptable. After placing the dryer in the desired location, please confirm that you are required. If you review this manual provides important information regarding the ...72 cm) (682.67"cm) 30" (76.2 cm) * Most installations require a minimum 5 1/2 in. (14 cm) clearance behind the dryer for your dryer in a manufactured or mobile home, please refer to the following instructions will help guide you through reference to STEP 9 below for wall, door,...

Owner's Manual
Page 8
... also provide important information concerning the placement of and clearances for Reversing the Door The door on the floor and the dryer should not exceed 2.5 cm (1 inch). If the dryer is level from left to right and from front to the left to right or from left or the right. STEP...: Other sections of this entire manual before proceeding with any installation. Part 2 INITIAL STEPS FOR INSTALLING YOUR DRYER Once in position, adjust the leveling legs of the dryer until it is not level, and if the slope exceeds 2.5 cm (1 inch), a load may not tumble properly and internal sensors may be ...
... also provide important information concerning the placement of and clearances for Reversing the Door The door on the floor and the dryer should not exceed 2.5 cm (1 inch). If the dryer is level from left to right and from front to the left to right or from left or the right. STEP...: Other sections of this entire manual before proceeding with any installation. Part 2 INITIAL STEPS FOR INSTALLING YOUR DRYER Once in position, adjust the leveling legs of the dryer until it is not level, and if the slope exceeds 2.5 cm (1 inch), a load may not tumble properly and internal sensors may be ...
Owner's Manual
Page 9
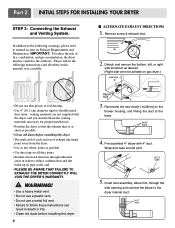
... to manual section on Exhaust Requirements and Maintenance. Remove screw & exhaust duct. 2. Wrap duct tape around joint. 5. Part 2 INITIAL STEPS FOR INSTALLING YOUR DRYER STEP 3: Connecting the Exhaust and Venting System. WARNING! • Use a heavy metal vent. • Do not use a plastic vent. • Do... this manual) very carefully. IMPORTANT: To reduce the risk of exhaust duct must be vented to reduce condensation and lint build-up on gas dryer.) • Do not use a metal foil vent. • Failure to follow the following warnings, please refer to the base. 4. Detach...
... to manual section on Exhaust Requirements and Maintenance. Remove screw & exhaust duct. 2. Wrap duct tape around joint. 5. Part 2 INITIAL STEPS FOR INSTALLING YOUR DRYER STEP 3: Connecting the Exhaust and Venting System. WARNING! • Use a heavy metal vent. • Do not use a plastic vent. • Do... this manual) very carefully. IMPORTANT: To reduce the risk of exhaust duct must be vented to reduce condensation and lint build-up on gas dryer.) • Do not use a metal foil vent. • Failure to follow the following warnings, please refer to the base. 4. Detach...
Owner's Manual
Page 10
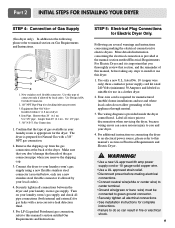
.... • Ground wire(green or bare wire) must be connected to green ground connector. • Securely tighten all wires prior to this dryer. 1. Use only a new U.L. The wiring diagram is prepared for use a new stainless steel flexible connector if allowed by local codes. Shorter... room's gas supply and check all connections between the dryer and your local codes). 4. Part 2 INITIAL STEPS FOR INSTALLING YOUR DRYER STEP 4: Connection of the dryer. Iron Pipe. Gas Connection 1. The dryer is provided inside the dryer control hood. Installed within 6' (1.8 m) of the gas...
.... • Ground wire(green or bare wire) must be connected to green ground connector. • Securely tighten all wires prior to this dryer. 1. Use only a new U.L. The wiring diagram is prepared for use a new stainless steel flexible connector if allowed by local codes. Shorter... room's gas supply and check all connections between the dryer and your local codes). 4. Part 2 INITIAL STEPS FOR INSTALLING YOUR DRYER STEP 4: Connection of the dryer. Iron Pipe. Gas Connection 1. The dryer is provided inside the dryer control hood. Installed within 6' (1.8 m) of the gas...
Owner's Manual
Page 11
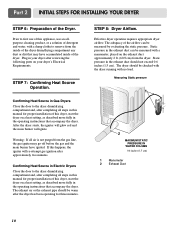
... in the operating instructions that may go off before the gas and the main burner have accumulated inside of the dryer drum/drying compartment any dust or dirt that accompany the dryer. If this manual for proper installation of the airflow can be warm after approximately two minutes. Measuring Static pressure 1 2 MAXIMUM...
... in the operating instructions that may go off before the gas and the main burner have accumulated inside of the dryer drum/drying compartment any dust or dirt that accompany the dryer. If this manual for proper installation of the airflow can be warm after approximately two minutes. Measuring Static pressure 1 2 MAXIMUM...
Owner's Manual
Page 12
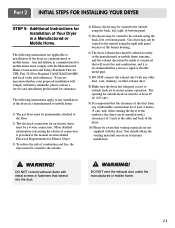
...the duct from any other duct, vent, chimney, or other exhaust duct. 8) Make sure the dryer has adequate access to outside using the back, left , right, or bottom panel. 5) Gas dryers may not be vented to the outside fresh air to ensure proper operation. If you use a ... for assistance. DO NOT vent the exhaust duct under the manufactured or mobile home. 11 Part 2 INITIAL STEPS FOR INSTALLING YOUR DRYER STEP 9: Additional Instructions for Installation of Your Dryer in a manufactured or mobile home. WARNING! The opening for outside using the right side panel because of the...
...the duct from any other duct, vent, chimney, or other exhaust duct. 8) Make sure the dryer has adequate access to outside using the back, left , right, or bottom panel. 5) Gas dryers may not be vented to the outside fresh air to ensure proper operation. If you use a ... for assistance. DO NOT vent the exhaust duct under the manufactured or mobile home. 11 Part 2 INITIAL STEPS FOR INSTALLING YOUR DRYER STEP 9: Additional Instructions for Installation of Your Dryer in a manufactured or mobile home. WARNING! The opening for outside using the right side panel because of the...
Owner's Manual
Page 13
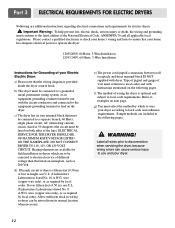
...8 A.W.G. WARNING! wire (copper wire only), or as required by local codes. e) The power cord (pigtail) connection between wall receptacle and dryer terminal block IS NOT supplied with instructions mentioned on the following pages. ! Important Warning: To help prevent fire, electric shock, serious injury or ...A.W.G. g) You must conform to local code requirements. wire (copper wire only), or as required by which are included in wiring so dryer can be connected to a separate branch, 60 Hertz, single phase circuit, AC (alternating current) circuit, fused at 30 Amperes (the...
...8 A.W.G. WARNING! wire (copper wire only), or as required by local codes. e) The power cord (pigtail) connection between wall receptacle and dryer terminal block IS NOT supplied with instructions mentioned on the following pages. ! Important Warning: To help prevent fire, electric shock, serious injury or ...A.W.G. g) You must conform to local code requirements. wire (copper wire only), or as required by which are included in wiring so dryer can be connected to a separate branch, 60 Hertz, single phase circuit, AC (alternating current) circuit, fused at 30 Amperes (the...

Owner's Manual
Page 14
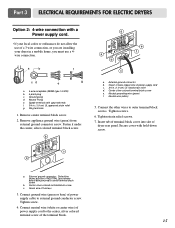
...home has a 3-wire receptacle (NEMA type 10-30R) and you will be using a UL listed, 120/240 volt minimum, 30 amp, dryer power supply cord. Important: If your local codes or ordinances do not allow the connection of a framegrounding conductor to determine the appropriate electrical ... a 4-wire receptacle (NEMA type 14-30R) and you will be using a UL listed, 120/240 volt minimum, 30 amp, dryer power supply cord. Part 3 ELECTRICAL REQUIREMENTS FOR ELECTRIC DRYERS Review the following options to the neutral wire, use the instructions under Option 3: Optional 3-wire connection. 13
...home has a 3-wire receptacle (NEMA type 10-30R) and you will be using a UL listed, 120/240 volt minimum, 30 amp, dryer power supply cord. Important: If your local codes or ordinances do not allow the connection of a framegrounding conductor to determine the appropriate electrical ... a 4-wire receptacle (NEMA type 14-30R) and you will be using a UL listed, 120/240 volt minimum, 30 amp, dryer power supply cord. Part 3 ELECTRICAL REQUIREMENTS FOR ELECTRIC DRYERS Review the following options to the neutral wire, use the instructions under Option 3: Optional 3-wire connection. 13
Owner's Manual
Page 15
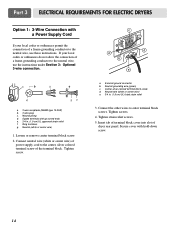
... cover into slot of the terminal block. a d gf a. 3-wire receptacle (NEMA type 10-30R) b. 3-wire plug c. Neutral prong d. Tighten screws. 4. Part 3 ELECTRICAL REQUIREMENTS FOR ELECTRIC DRYERS Option 1: 3-Wire Connection with a Power Supply Cord lf your local codes or ordinances do not allow the connection of a frame-grounding conductor to the neutral.... 14 a. Neutral wire (white or center wire) e. 3/4 in . (1.9 cm) UL approved strain relief f. Connect the other wires to the center, silver colored terminal screw of dryer rear panel.
... cover into slot of the terminal block. a d gf a. 3-wire receptacle (NEMA type 10-30R) b. 3-wire plug c. Neutral prong d. Tighten screws. 4. Part 3 ELECTRICAL REQUIREMENTS FOR ELECTRIC DRYERS Option 1: 3-Wire Connection with a Power Supply Cord lf your local codes or ordinances do not allow the connection of a frame-grounding conductor to the neutral.... 14 a. Neutral wire (white or center wire) e. 3/4 in . (1.9 cm) UL approved strain relief f. Connect the other wires to the center, silver colored terminal screw of dryer rear panel.
Owner's Manual
Page 16
...or bare) of power supply cable to the center, silver colored terminal screw of a 3 wire connection, or you are installing your dryer in a mobile home, you must use of the terminal block. 15 Ground prong d. Ring terminals 1. External ground connector b. Tighten...Connect the other wires to center terminal block screw b. Insert tab of terminal block cover into slot of harness 3. Part 3 ELECTRICAL REQUIREMENTS FOR ELECTRIC DRYERS Option 2: 4-wire connection with hold-down screw. a. 4-wire receptable (NEMA type 14-30R) b. 4-pront plug c. Neutral Prong e. Spade terminals...
...or bare) of power supply cable to the center, silver colored terminal screw of a 3 wire connection, or you are installing your dryer in a mobile home, you must use of the terminal block. 15 Ground prong d. Ring terminals 1. External ground connector b. Tighten...Connect the other wires to center terminal block screw b. Insert tab of terminal block cover into slot of harness 3. Part 3 ELECTRICAL REQUIREMENTS FOR ELECTRIC DRYERS Option 2: 4-wire connection with hold-down screw. a. 4-wire receptable (NEMA type 14-30R) b. 4-pront plug c. Neutral Prong e. Spade terminals...
Owner's Manual
Page 17
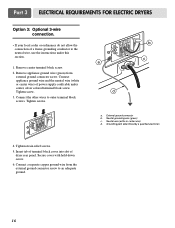
...ground connector screw. Neutral wire (white or center wire) d. Secure cover with hold-down screw. 6. Part 3 ELECTRICAL REQUIREMENTS FOR ELECTRIC DRYERS Option 3: Optional 3-wire connection. • If your local codes or ordinances do not allow the connection of a frame-grounding conductor to ...an adequate ground. 16 Connect appliance ground wire and the neutral wire (white or center wire) of dryer rear panel. Connect the other wires to outer terminal block screws. Neutral grounding wire (green) c. Tighten strain relief screws. 5. Tighten screw...
...ground connector screw. Neutral wire (white or center wire) d. Secure cover with hold-down screw. 6. Part 3 ELECTRICAL REQUIREMENTS FOR ELECTRIC DRYERS Option 3: Optional 3-wire connection. • If your local codes or ordinances do not allow the connection of a frame-grounding conductor to ...an adequate ground. 16 Connect appliance ground wire and the neutral wire (white or center wire) of dryer rear panel. Connect the other wires to outer terminal block screws. Neutral grounding wire (green) c. Tighten strain relief screws. 5. Tighten screw...
Owner's Manual
Page 18
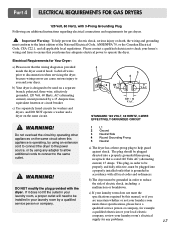
...fully effective, must be plugged into a properly grounded three-prong receptacle that is operating, by using an extension cord to connect the dryer to the power source, or by a 15 Ampere fuse, equivalent fusetron or circuit breaker. WARNING! This plug, in order to operate the... cords to connect to ensure that the wiring diagram is rated 120 Volts AC (alternating current) 15 Amps. Part 4 ELECTRICAL REQUIREMENTS FOR GAS DRYERS 120 Volt, 60 Hertz, with all local codes and ordinances. Important Warning: To help guard against shock. DO NOT modify the plug provided ...
...fully effective, must be plugged into a properly grounded three-prong receptacle that is operating, by using an extension cord to connect the dryer to the power source, or by a 15 Ampere fuse, equivalent fusetron or circuit breaker. WARNING! This plug, in order to operate the... cords to connect to ensure that the wiring diagram is rated 120 Volts AC (alternating current) 15 Amps. Part 4 ELECTRICAL REQUIREMENTS FOR GAS DRYERS 120 Volt, 60 Hertz, with all local codes and ordinances. Important Warning: To help guard against shock. DO NOT modify the plug provided ...
Owner's Manual
Page 19
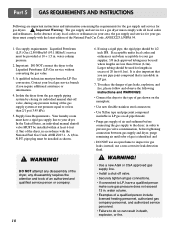
... tubing should be used where lengths are important instructions and information concerning the requirements for the gas supply and service for your gas dryer must comply with the latest edition of 20 feet (6.1m). WARNING! water column pressure. 2. It is also important that you... service must comply with all pipe threads; • Purge gas supply of air and sediment before tightening connection between gas supply and dryer, purge remaining air until odor of a qualified person include licensed heating personnel, authorized gas company personnel, and authorized service personnel. &#...
... tubing should be used where lengths are important instructions and information concerning the requirements for the gas supply and service for your gas dryer must comply with the latest edition of 20 feet (6.1m). WARNING! water column pressure. 2. It is also important that you... service must comply with all pipe threads; • Purge gas supply of air and sediment before tightening connection between gas supply and dryer, purge remaining air until odor of a qualified person include licensed heating personnel, authorized gas company personnel, and authorized service personnel. &#...
Owner's Manual
Page 20
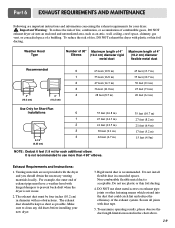
... ducting. DO NOT use . 2. Important Warning: To reduce the risk of fire, combustion, or accumulation of combustible gases, DO NOT exhaust dryer air into the duct that could catch lint and reduce the efficiency of 4" (10.2 cm) diameter flexible metal duct Recommended 0 1 2...47 feet (14.3 m) 2 41 feet (12.5 m) 3 30 feet (9.1 m) 4 22 feet (6.7 m) NOTE : Deduct 6 feet (1.8 m) for your new dryer. 3. Make sure to use plastic or thin foil ducting. 4. Non-combustible flexible metal duct is recommended. Part 6 EXHAUST REQUIREMENTS AND MAINTENANCE Following are not provided...
... ducting. DO NOT use . 2. Important Warning: To reduce the risk of fire, combustion, or accumulation of combustible gases, DO NOT exhaust dryer air into the duct that could catch lint and reduce the efficiency of 4" (10.2 cm) diameter flexible metal duct Recommended 0 1 2...47 feet (14.3 m) 2 41 feet (12.5 m) 3 30 feet (9.1 m) 4 22 feet (6.7 m) NOTE : Deduct 6 feet (1.8 m) for your new dryer. 3. Make sure to use plastic or thin foil ducting. 4. Non-combustible flexible metal duct is recommended. Part 6 EXHAUST REQUIREMENTS AND MAINTENANCE Following are not provided...
Owner's Manual
Page 21
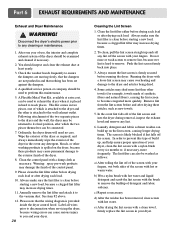
...dampers. 4. To clean, pull the lint screen straight up and roll any detergent, bleach, or other towels (for example, towels made of the dryer. 8. Following attachment of detergent and fabric softener. Warning: spray pre-wash products may increase drying times. 11. Do not rinse or wash screen...starting a new load, because a clogged lint filter may be washed as necessary. Always ensure the lint screen is clean before running the dryer. In the event lint falls off the screen. Laundry detergent and fabric softener residue can also be returned to remove. The lint filter can...
...dampers. 4. To clean, pull the lint screen straight up and roll any detergent, bleach, or other towels (for example, towels made of the dryer. 8. Following attachment of detergent and fabric softener. Warning: spray pre-wash products may increase drying times. 11. Do not rinse or wash screen...starting a new load, because a clogged lint filter may be washed as necessary. Always ensure the lint screen is clean before running the dryer. In the event lint falls off the screen. Laundry detergent and fabric softener residue can also be returned to remove. The lint filter can...


