
Owner's Manual
Page 3
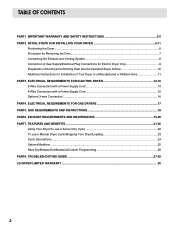
IMPORTANT WARRANTY AND SAFETY INSTRUCTIONS 3-5 PART2. ELECTRICAL REQUIREMENTS FOR GAS DRYERS 17 PART5. TROUBLESHOOTING GUIDE ...27-29 LG DRYER LIMITED WARRANTY ...30 2 PART3. ELECTRICAL REQUIREMENTS FOR ELECTRIC DRYER 12-16 3-Wire Connection with a Power Supply Cord 14 4-Wire Connection with a Power Supply ...Cord 15 Optional 3-wire Connection ...16 PART4. FEATURES AND BENEFITS ...21-26 Using Your Dryer/To use a Sensor Dry Cycle 22 To use a Manual Dryer Cycle/Stopping Your Dryer/Loading 23 Cycle Descriptions...24 Options/Modifiers ...25 Rack...
IMPORTANT WARRANTY AND SAFETY INSTRUCTIONS 3-5 PART2. ELECTRICAL REQUIREMENTS FOR GAS DRYERS 17 PART5. TROUBLESHOOTING GUIDE ...27-29 LG DRYER LIMITED WARRANTY ...30 2 PART3. ELECTRICAL REQUIREMENTS FOR ELECTRIC DRYER 12-16 3-Wire Connection with a Power Supply Cord 14 4-Wire Connection with a Power Supply ...Cord 15 Optional 3-wire Connection ...16 PART4. FEATURES AND BENEFITS ...21-26 Using Your Dryer/To use a Sensor Dry Cycle 22 To use a Manual Dryer Cycle/Stopping Your Dryer/Loading 23 Cycle Descriptions...24 Options/Modifiers ...25 Rack...
Owner's Manual
Page 5
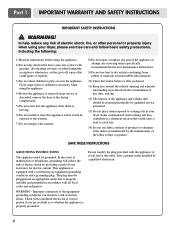
... after each load. 11) Keep area around the exhaust opening and adjacent surrounding areas free from service or discarded, remove the door to the drying compartment. 5) Do not reach into contact with controls. 8) Do not repair or replace any part of the appliance or attempt any risk of...the drum is moving. 6) Do not install or store this appliance where it will be exposed to the weather. 7) Do not tamper with gasoline, dry-cleaning solvents, or other personal or property injury when using the appliance. 4) Before the appliance is necessary when using your dryer. WARNING! WARNING - ...
... after each load. 11) Keep area around the exhaust opening and adjacent surrounding areas free from service or discarded, remove the door to the drying compartment. 5) Do not reach into contact with controls. 8) Do not repair or replace any part of the appliance or attempt any risk of...the drum is moving. 6) Do not install or store this appliance where it will be exposed to the weather. 7) Do not tamper with gasoline, dry-cleaning solvents, or other personal or property injury when using the appliance. 4) Before the appliance is necessary when using your dryer. WARNING! WARNING - ...
Owner's Manual
Page 6
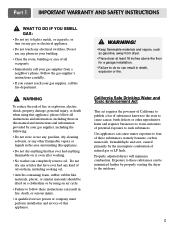
... injury, or death when using an air cycle. • Failure to follow all occupants. • Immediately call the fire department. ! Do not dry any articles that have ever had any kind of oil on them, including cooking oil. • Articles containing foam, rubber, rubber like materials, plastic...the area surrounding this appliance. ! Exposure to these substances can cause minor exposure to warn customers of this appliance. • Do not dry anything that has ever had anything flammable on any gas or electrical appliance. • Do not touch any electrical switches. WHAT TO DO ...
... injury, or death when using an air cycle. • Failure to follow all occupants. • Immediately call the fire department. ! Do not dry any articles that have ever had any kind of oil on them, including cooking oil. • Articles containing foam, rubber, rubber like materials, plastic...the area surrounding this appliance. ! Exposure to these substances can cause minor exposure to warn customers of this appliance. • Do not dry anything that has ever had anything flammable on any gas or electrical appliance. • Do not touch any electrical switches. WHAT TO DO ...
Owner's Manual
Page 11
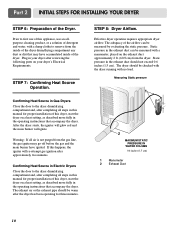
...PRESSURE IN WATER COLUMN 0.6 inches (1.5 cm) 1 Manometer 2 Exhaust Duct 10 Confirming Heat Source in Gas Dryers Close the door to the dryer drum/drying compartment and, after the dryer has been operating for proper installation of this dryer, start the dryer on the exhaust duct approximately 2 ft. (60.9...: If all steps in this appliance, use an allpurpose cleaning product, or a solution of the Dryer. The adequacy of the dryer drum/drying compartment any dust or dirt that accompany the dryer. Prior to remove from the dryer. Part 2 INITIAL STEPS FOR INSTALLING YOUR DRYER STEP ...
...PRESSURE IN WATER COLUMN 0.6 inches (1.5 cm) 1 Manometer 2 Exhaust Duct 10 Confirming Heat Source in Gas Dryers Close the door to the dryer drum/drying compartment and, after the dryer has been operating for proper installation of this dryer, start the dryer on the exhaust duct approximately 2 ft. (60.9...: If all steps in this appliance, use an allpurpose cleaning product, or a solution of the Dryer. The adequacy of the dryer drum/drying compartment any dust or dirt that accompany the dryer. Prior to remove from the dryer. Part 2 INITIAL STEPS FOR INSTALLING YOUR DRYER STEP ...
Owner's Manual
Page 21
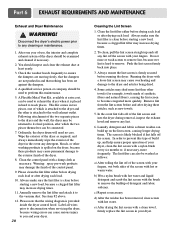
... exterior of the dryer as new towels. 5. Annually remove the lint filter and attach it is spilled on the lint screen, causing longer drying times. Running the dryer with your dryer. 20 Cleaning the Lint Screen 1. c) Repeat as necessary. WARNING! Please clean the lint filter .... 9. Part 6 EXHAUST REQUIREMENTS AND MAINTENANCE Exhaust and Dryer Maintenance ! Disconnect the dryer's electric power prior to the dryer and articles being dried. 4. Ordinarily, the dryer drum will need no care. Clean the lint filter either before running the dryer. Always make sure the lint ...
... exterior of the dryer as new towels. 5. Annually remove the lint filter and attach it is spilled on the lint screen, causing longer drying times. Running the dryer with your dryer. 20 Cleaning the Lint Screen 1. c) Repeat as necessary. WARNING! Please clean the lint filter .... 9. Part 6 EXHAUST REQUIREMENTS AND MAINTENANCE Exhaust and Dryer Maintenance ! Disconnect the dryer's electric power prior to the dryer and articles being dried. 4. Ordinarily, the dryer drum will need no care. Clean the lint filter either before running the dryer. Always make sure the lint ...
Owner's Manual
Page 22
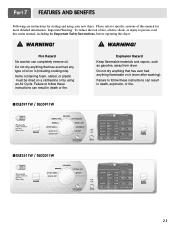
...it (even after washing). Explosion Hazard Keep flammable materials and vapors, such as gasoline, away from dryer. WARNING! Do not dry anything flammable on it (including cooking oils). Important Warning: To reduce the risk of fire, electric shock, or injury to...Air Cycle. Part 7 FEATURES AND BENEFITS Following are instructions for more detailed information. I DLE5911W / DLG5911W I DLE2511W / DLG2511W 21 Do not dry anything that has ever had anything that has ever had any type of this dryer. ! Please refer to follow these instructions can result in ...
...it (even after washing). Explosion Hazard Keep flammable materials and vapors, such as gasoline, away from dryer. WARNING! Do not dry anything flammable on it (including cooking oils). Important Warning: To reduce the risk of fire, electric shock, or injury to...Air Cycle. Part 7 FEATURES AND BENEFITS Following are instructions for more detailed information. I DLE5911W / DLG5911W I DLE2511W / DLG2511W 21 Do not dry anything that has ever had anything that has ever had any type of this dryer. ! Please refer to follow these instructions can result in ...
Owner's Manual
Page 23
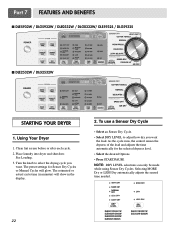
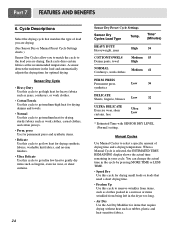
... settings for the selected dryness level. • Select the desired Options. • Press START/PAUSE NOTE: DRY LEVEL selections can only be made while using Sensor Dry Cycles. As the cycle runs, the control senses the dryness of the load and adjusts the time automatically for.../G0332W DLE5932S/G5932S 22 Place laundry into dryer and shut door. Using Your Dryer 1. Part 7 FEATURES AND BENEFITS I DLE5932W / DLG5932W / DLE0332W / DLG0332W/ DLE5932S / DLG5932S I DLE2532W / DLG2532W STARTING YOUR DRYER 1. The estimated or actual cycle time (in minutes) will glow. Selecting MORE...
... settings for the selected dryness level. • Select the desired Options. • Press START/PAUSE NOTE: DRY LEVEL selections can only be made while using Sensor Dry Cycles. As the cycle runs, the control senses the dryness of the load and adjusts the time automatically for.../G0332W DLE5932S/G5932S 22 Place laundry into dryer and shut door. Using Your Dryer 1. Part 7 FEATURES AND BENEFITS I DLE5932W / DLG5932W / DLE0332W / DLG0332W/ DLE5932S / DLG5932S I DLE2532W / DLG2532W STARTING YOUR DRYER 1. The estimated or actual cycle time (in minutes) will glow. Selecting MORE...
Owner's Manual
Page 24
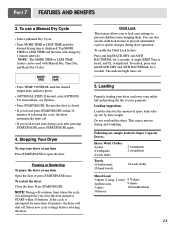
...Child Lock This feature allows you wish to prevent unintended cycle or option changes during dryer operation. To unlock, press and hold RACK DRY and ANTI BACTERIAL for Super Capacity Dryers: Heavy Work Clothes 4 jeans 4 workpants 4 work shirts 2 sweatpants 2 sweatshirts Towels 10 ...3 sheets (1 king, 2 twin) 4 pillowcases 3 shirts 3 blouses 9 T-shirts 9 shorts 10 handkerchiefs 23 You can also use a Manual Dry Cycle • Select a Manual Dry Cycle. • Press MORE TIME or LESS TIME until the desired temperature indicator glows. • (OPTIONAL STEP) If desired, select OPTIONS. ...
...Child Lock This feature allows you wish to prevent unintended cycle or option changes during dryer operation. To unlock, press and hold RACK DRY and ANTI BACTERIAL for Super Capacity Dryers: Heavy Work Clothes 4 jeans 4 workpants 4 work shirts 2 sweatpants 2 sweatshirts Towels 10 ...3 sheets (1 king, 2 twin) 4 pillowcases 3 shirts 3 blouses 9 T-shirts 9 shorts 10 handkerchiefs 23 You can also use a Manual Dry Cycle • Select a Manual Dry Cycle. • Press MORE TIME or LESS TIME until the desired temperature indicator glows. • (OPTIONAL STEP) If desired, select OPTIONS. ...
Owner's Manual
Page 25
...high heat for heavy fabrics such as jeans, corduroys, or work clothes. • Cotton/Towels Use this cycle to get medium-high heat for drying sturdy fabrics such as work clothes PERM. When a Manual Cycle is selected, the ESTIMATED TIME REMAINING display shows the actual time remaining in the... AND BENEFITS 6. You can change the actual time in the cycle by pressing MORE TIME or LESS TIME. • Speed Dry Use this cycle for items that need a short drying time. • Freshen Up Use this cycle to remove wrinkles from items, such as clothes packed in a suitcase or items...
...high heat for heavy fabrics such as jeans, corduroys, or work clothes. • Cotton/Towels Use this cycle to get medium-high heat for drying sturdy fabrics such as work clothes PERM. When a Manual Cycle is selected, the ESTIMATED TIME REMAINING display shows the actual time remaining in the... AND BENEFITS 6. You can change the actual time in the cycle by pressing MORE TIME or LESS TIME. • Speed Dry Use this cycle for items that need a short drying time. • Freshen Up Use this cycle to remove wrinkles from items, such as clothes packed in a suitcase or items...
Owner's Manual
Page 26
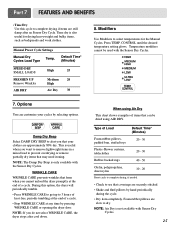
...; Stop WRINKLE CARE at any time by pressing WRINKLE CARE or opening the dryer door. Foam rubber pillows are approximately 80% dry. Part 7 FEATURES AND BENEFITS • Time Dry Use this option, the dryer will periodically tumble. • Press WRINKLE CARE to get up to 3 hours of heat-free... 30 Plastic-Shower curtains, tableclothes 20 - 30 Rubber-backed rugs 40 - 50 Olefin, polypropylene, sheer nylon 10 - 20 Reset cycle to complete drying, if needed. • Check to see that coverings are securely stitched. • Shake and fluff pillows by hand periodically during the cycle. •...
...; Stop WRINKLE CARE at any time by pressing WRINKLE CARE or opening the dryer door. Foam rubber pillows are approximately 80% dry. Part 7 FEATURES AND BENEFITS • Time Dry Use this option, the dryer will periodically tumble. • Press WRINKLE CARE to get up to 3 hours of heat-free... 30 Plastic-Shower curtains, tableclothes 20 - 30 Rubber-backed rugs 40 - 50 Olefin, polypropylene, sheer nylon 10 - 20 Reset cycle to complete drying, if needed. • Check to see that coverings are securely stitched. • Shake and fluff pillows by hand periodically during the cycle. •...
Owner's Manual
Page 27
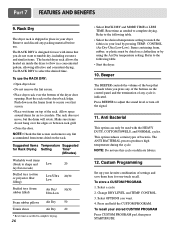
...NORMAL cycles. Suggested Items Temperature Suggested for use . Beeper The BEEPER controls the volume of the beep that you want to tumble dry, including sweaters and similar items. The heated dryer rack allows the heated air inside the dryer to flow in your favorite combination ... wool items (block to shape and lay flat on the frame front to match the fabrics in a concentrated pattern, allowing effective and consistent drying. Refer to the following table. • Select the desired temperature setting to secure over the edges or between rack grill. • Close...
...NORMAL cycles. Suggested Items Temperature Suggested for use . Beeper The BEEPER controls the volume of the beep that you want to tumble dry, including sweaters and similar items. The heated dryer rack allows the heated air inside the dryer to flow in your favorite combination ... wool items (block to shape and lay flat on the frame front to match the fabrics in a concentrated pattern, allowing effective and consistent drying. Refer to the following table. • Select the desired temperature setting to secure over the edges or between rack grill. • Close...

Owner's Manual
Page 28
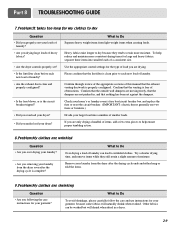
...placed in ? • Is the fuse blown, or is the circuit breaker tripped? Stains on your fabric softener product? • Are you drying clean and dirty clothes together? Confirm that weren't cleansed during the washing process. Part 8 TROUBLESHOOTING GUIDE Troubleshooting Tips Save time and money! Make... sure to use your dryer to Do Confirm and follow the instructions on dried clothes are Greasy Spots on My Clothes Question • Did you may not need to call for service. 1.Problem:My Dryer Won ...
...placed in ? • Is the fuse blown, or is the circuit breaker tripped? Stains on your fabric softener product? • Are you drying clean and dirty clothes together? Confirm that weren't cleansed during the washing process. Part 8 TROUBLESHOOTING GUIDE Troubleshooting Tips Save time and money! Make... sure to use your dryer to Do Confirm and follow the instructions on dried clothes are Greasy Spots on My Clothes Question • Did you may not need to call for service. 1.Problem:My Dryer Won ...
Owner's Manual
Page 29
.... Divide your lint filter full? These materials can cause static to build up of laundry? • Are you use a shorter drying time. Try using a fabric softener. 6.Problem:The drying time is not consistent Question • Are you properly sort your dryer? • Did you place any paper, tissue, or...of clothing are empty before each new load of laundry. • Did you using a fabric softener to reduce static electricity. • Did you over dry the load of static electricity. Confirm that might forget to take a piece of paper or a tissue out of the pocket of a pair of pants,...
.... Divide your lint filter full? These materials can cause static to build up of laundry? • Are you use a shorter drying time. Try using a fabric softener. 6.Problem:The drying time is not consistent Question • Are you properly sort your dryer? • Did you place any paper, tissue, or...of clothing are empty before each new load of laundry. • Did you using a fabric softener to reduce static electricity. • Did you over dry the load of static electricity. Confirm that might forget to take a piece of paper or a tissue out of the pocket of a pair of pants,...
Owner's Manual
Page 30
... dryer? • Did you are not pushed in a dryer. 29 Confirm that the outside wall dampers are moving freely, that the dampers are only drying a handful of items, add a few extra pieces to each new load of this manual that the lint filter is complete? Check your home's or...under load your larger load into smaller loads of smaller loads. Use the appropriate control settings for your laundry from the dryer soon after the drying cycle ends and either hang or fold the items. 9.Problem:My clothes are shrinking Question • Are you following the care instructions for ...
... dryer? • Did you are not pushed in a dryer. 29 Confirm that the outside wall dampers are moving freely, that the dampers are only drying a handful of items, add a few extra pieces to each new load of this manual that the lint filter is complete? Check your home's or...under load your larger load into smaller loads of smaller loads. Use the appropriate control settings for your laundry from the dryer soon after the drying cycle ends and either hang or fold the items. 9.Problem:My clothes are shrinking Question • Are you following the care instructions for ...
Service Manual
Page 5
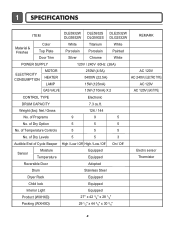
Weight (lbs): Net / Gross 126 / 144 No. 1 SPECIFICATIONS ITEM DLE5932W DLE5932S DLE2532W DLG5932W DLG5932S DLG2532W REMARK Material & Finishes Color Top Plate Door Trim White Porcelain Silver Titanium Porcelain Chrome White Painted White POWER SUPPLY 120V... 240V ( ELECTRIC TYPE) AC 120V GAS VALVE 13W (110mA) X 2 AC 120V ( GAS TYPE) CONTROL TYPE Electronic DRUM CAPACITY 7.3 cu.ft. of Dry Levels 5 5 3 Audible End of Dry Option 5 5 5 No. of Cycle Beeper High / Low / Off High / Low / Off On / Off Sensor Moisture Temperature Equipped Equipped Electro sensor...
Weight (lbs): Net / Gross 126 / 144 No. 1 SPECIFICATIONS ITEM DLE5932W DLE5932S DLE2532W DLG5932W DLG5932S DLG2532W REMARK Material & Finishes Color Top Plate Door Trim White Porcelain Silver Titanium Porcelain Chrome White Painted White POWER SUPPLY 120V... 240V ( ELECTRIC TYPE) AC 120V GAS VALVE 13W (110mA) X 2 AC 120V ( GAS TYPE) CONTROL TYPE Electronic DRUM CAPACITY 7.3 cu.ft. of Dry Levels 5 5 3 Audible End of Dry Option 5 5 5 No. of Cycle Beeper High / Low / Off High / Low / Off On / Off Sensor Moisture Temperature Equipped Equipped Electro sensor...

Service Manual
Page 10
... Saturation 66±5°C (5min) 47±5°C Normal Medium (Normal) 41min Saturation 62±5°C (5min) 47±5°C Sense Dry * Perm. 3Hr Permanent Low (Normal) 36min Saturation 55±5°C (5min) 47±5°C Press Delicate Low (Normal) 32min Saturation 55...Time: 6min On Time: 10sec Temperature Control for each cycle * Sense dry : "Dry Level" is set by users. ** Manual dry : "Temperature control" is set by users. 9 Default settings can be adjusted by users. Dry Display erature Level time Electro- 4 COLUMBUS DRYER CYCLE PROCESS Cycle Default ...
... Saturation 66±5°C (5min) 47±5°C Normal Medium (Normal) 41min Saturation 62±5°C (5min) 47±5°C Sense Dry * Perm. 3Hr Permanent Low (Normal) 36min Saturation 55±5°C (5min) 47±5°C Press Delicate Low (Normal) 32min Saturation 55...Time: 6min On Time: 10sec Temperature Control for each cycle * Sense dry : "Dry Level" is set by users. ** Manual dry : "Temperature control" is set by users. 9 Default settings can be adjusted by users. Dry Display erature Level time Electro- 4 COLUMBUS DRYER CYCLE PROCESS Cycle Default ...

Service Manual
Page 21
... Pin (BLUE wire) and Pin (ORANGE wire) to Electro load: 1. Take 6pin Connector from Washing Machine Damp Dry 10% ~ Dried clothes 205 ~ 240 Over 4.0V Completely-dried clothes 20 NO YES • Check Electro Load and • Harness Connector. • Check Harness- Is the... measurement within the range of Table 2 during Diagnostic Test? 2. Normal Condition Table 2. Short with Dry Level. linking connector. Is the measurement within the range of Table 2 NO when measuring the voltage in Electric load, is resistance below 1Ω...
... Pin (BLUE wire) and Pin (ORANGE wire) to Electro load: 1. Take 6pin Connector from Washing Machine Damp Dry 10% ~ Dried clothes 205 ~ 240 Over 4.0V Completely-dried clothes 20 NO YES • Check Electro Load and • Harness Connector. • Check Harness- Is the... measurement within the range of Table 2 during Diagnostic Test? 2. Normal Condition Table 2. Short with Dry Level. linking connector. Is the measurement within the range of Table 2 NO when measuring the voltage in Electric load, is resistance below 1Ω...
Service Manual
Page 23
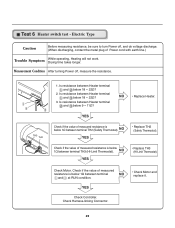
... resistance is below 1Ω between terminal TH3 (HI-Limit Thermostat). Check if the value of measured resistance is below 1Ω between terminal TH2 (Safety Thermostat). Drying time takes longer. NO YES • Replace TH2 (Safety Thermostat). YES Check Controller. NO YES • Replace TH3 (HI-Limit Thermostat). Check Harness-linking Connector...
... resistance is below 1Ω between terminal TH3 (HI-Limit Thermostat). Check if the value of measured resistance is below 1Ω between terminal TH2 (Safety Thermostat). Drying time takes longer. NO YES • Replace TH2 (Safety Thermostat). YES Check Controller. NO YES • Replace TH3 (HI-Limit Thermostat). Check Harness-linking Connector...
Service Manual
Page 24
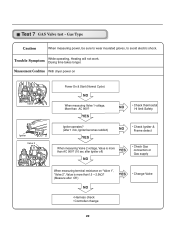
... 90V? YES NO • Check thermostat Hi limit Safety Igniter operates? (after Off ) YES • Change Valve NO • Harness check • Controller change 23 Drying time takes longer. Gas Type Caution When measuring power, be sure to wear insulated gloves, to avoid electric shock. Trouble Symptom While operating, Heating will...
... 90V? YES NO • Check thermostat Hi limit Safety Igniter operates? (after Off ) YES • Change Valve NO • Harness check • Controller change 23 Drying time takes longer. Gas Type Caution When measuring power, be sure to wear insulated gloves, to avoid electric shock. Trouble Symptom While operating, Heating will...
Service Manual
Page 26
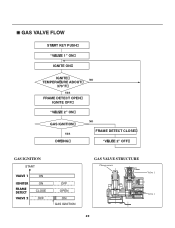
GAS VALVE FLOW START KEY PUSH "VALVE 1" ON IGNITE ON IGNITE TEMPERATURE ABOUT 370"F YES FRAME DETECT OPEN IGNITE OFF "VALVE 2" ON GAS IGNITION YES DRYING NO NO FRAME DETECT CLOSE "VALVE 2" OFF GAS IGNITION START VALVE 1 IGNITER FRAME DETECT VALVE 2 ON ON CLOSE OFF OFF OPEN ON GAS IGNITION GAS VALVE STRUCTURE 25
GAS VALVE FLOW START KEY PUSH "VALVE 1" ON IGNITE ON IGNITE TEMPERATURE ABOUT 370"F YES FRAME DETECT OPEN IGNITE OFF "VALVE 2" ON GAS IGNITION YES DRYING NO NO FRAME DETECT CLOSE "VALVE 2" OFF GAS IGNITION START VALVE 1 IGNITER FRAME DETECT VALVE 2 ON ON CLOSE OFF OFF OPEN ON GAS IGNITION GAS VALVE STRUCTURE 25


