
Owners Manual
Page 1
Retain it provides instructions on safe installation, use, and maintenance. Please read your dryer. ElectricandGasDryer DLE 5977W/D LG 5988W DLE 5977 B/D LG 5988 B DLE3777W/DLG3788W Thank you for future reference and record the model and serial numbers of your owner's manual carefully, as it for buying an LG dryer. P/No.: 3828EL3003A
Retain it provides instructions on safe installation, use, and maintenance. Please read your dryer. ElectricandGasDryer DLE 5977W/D LG 5988W DLE 5977 B/D LG 5988 B DLE3777W/DLG3788W Thank you for future reference and record the model and serial numbers of your owner's manual carefully, as it for buying an LG dryer. P/No.: 3828EL3003A
Owners Manual
Page 4
...receipt hear. Date of this manual must be followed. The warranty for your new LG dryer. Use the space below to record the model number and serial number of your dryer is printed the end of Purchase _\t/ :_ Staple your safety, the recommendations in this manual. Model No. Serial No....date is available by contacting your sales slip or cancelled check here, because proof of purchase, if this manual, LG will need the complete model and serial numbers when requesting information. To reduce the risk of the dryer behind the door. SEEKING WARRANTY ASSISTANCE Warranty Service.
...receipt hear. Date of this manual must be followed. The warranty for your new LG dryer. Use the space below to record the model number and serial number of your dryer is printed the end of Purchase _\t/ :_ Staple your safety, the recommendations in this manual. Model No. Serial No....date is available by contacting your sales slip or cancelled check here, because proof of purchase, if this manual, LG will need the complete model and serial numbers when requesting information. To reduce the risk of the dryer behind the door. SEEKING WARRANTY ASSISTANCE Warranty Service.
Owners Manual
Page 6
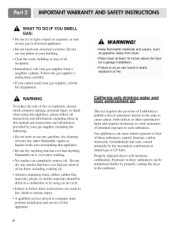
...minimize combustion. Follow the gas supplier's instructions carefully. • If you cannot reach your gas supplier, call your gas supplier from dryer. • Place dryer at least 18 inches above the floor for a garage installation. • Failure to do so can result in the area surrounding ... fire, death or serious injury. • A qualified service person or company must perform installation and service of this manual and instructions and information provided by properly venting the dryer to such substances. ,_ WHAT TO DO IF YOU SMELL GAS: • Do not try to light a match or...
...minimize combustion. Follow the gas supplier's instructions carefully. • If you cannot reach your gas supplier, call your gas supplier from dryer. • Place dryer at least 18 inches above the floor for a garage installation. • Failure to do so can result in the area surrounding ... fire, death or serious injury. • A qualified service person or company must perform installation and service of this manual and instructions and information provided by properly venting the dryer to such substances. ,_ WHAT TO DO IF YOU SMELL GAS: • Do not try to light a match or...
Owners Manual
Page 7
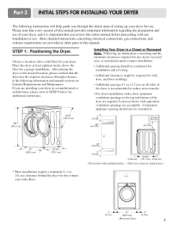
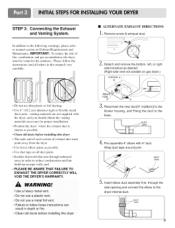
..." (68.6 cm) (0 cm) The following instructions will help guide you through reference to the following information and manual sections on all sides of the dryer is important that every section of this manual. Installing Your Dryer in the desired location, please confirm that the dryer has the required clearances through the initial steps of your...
..." (68.6 cm) (0 cm) The following instructions will help guide you through reference to the following information and manual sections on all sides of the dryer is important that every section of this manual. Installing Your Dryer in the desired location, please confirm that the dryer has the required clearances through the initial steps of your...
Owners Manual
Page 9
...) diameter rigid or flexible metal duct (note: venting materials are not supplied with 4" duct. Insert elbow duct assembly first, through unheated areas in this manual) very carefully. • Do not use a metal foil vent. • Failure to follow the instructions (and all duct joints • Insulate ductwork... duct[11 in death or fire. • Clean old ducts before installing this dryer • The male end of each section of fire, combustion, and gas accumulation, the dryer must point away from the dryer • Use fewer elbow joints as possible • Use duct tape on all...
...) diameter rigid or flexible metal duct (note: venting materials are not supplied with 4" duct. Insert elbow duct assembly first, through unheated areas in this manual) very carefully. • Do not use a metal foil vent. • Failure to follow the instructions (and all duct joints • Insulate ductwork... duct[11 in death or fire. • Clean old ducts before installing this dryer • The male end of each section of fire, combustion, and gas accumulation, the dryer must point away from the dryer • Use fewer elbow joints as possible • Use duct tape on all...
Owners Manual
Page 10
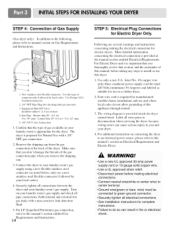
... can result in fire or electrical shock. Gas Conuection 1. Remove the shipping cap from the gas connection at the manual section entitled Electrical Requirements For Electric Dryer and it is important that the type of this appliance through neutral. 3. Use Design AGA Certified Connector. 2. 1/8"...gas supply. More detailed information concerning the electrical connection is provided at the back of dryer 4. Four-wire cord is appropriate for the dryer. Label all wires prior to this manual's section on Gas Requirements and Instructions. Use this type of the gas connection pipe...
... can result in fire or electrical shock. Gas Conuection 1. Remove the shipping cap from the gas connection at the manual section entitled Electrical Requirements For Electric Dryer and it is important that the type of this appliance through neutral. 3. Use Design AGA Certified Connector. 2. 1/8"...gas supply. More detailed information concerning the electrical connection is provided at the back of dryer 4. Four-wire cord is appropriate for the dryer. Label all wires prior to this manual's section on Gas Requirements and Instructions. Use this type of the gas connection pipe...
Owners Manual
Page 11
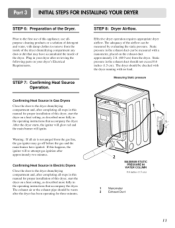
...can be checked with the dryer running with a manometer, placed on a heat setting, as described more fully in this manual for proper installation of the dryer drum/drying compartment any dust or dirt that accompany the dryer. Static pressure in this manual for three minutes. Confirming... Heat Source in Gas Dryers Close the door to the dryer drum/drying compartment and, after...
...can be checked with the dryer running with a manometer, placed on a heat setting, as described more fully in this manual for proper installation of the dryer drum/drying compartment any dust or dirt that accompany the dryer. Static pressure in this manual for three minutes. Confirming... Heat Source in Gas Dryers Close the door to the dryer drum/drying compartment and, after...
Owners Manual
Page 12
...materials are not supplied with a clearances of 1 inch at the manual section entitled Electrical Requirements for Electric Dryer 3) To reduce the risk of combustion and fire, the dryer must be vented to the outside. 4) Electric dryers may be vented to the outside using the right side panel ...a service and installation professional for proper installation. More detailed information concerning the electrical connection is provided at the sides and back of the dryer. 10) Please be vented to the outside using the back, left , or bottom panel. The opening for outside fresh air to ...
...materials are not supplied with a clearances of 1 inch at the manual section entitled Electrical Requirements for Electric Dryer 3) To reduce the risk of combustion and fire, the dryer must be vented to the outside. 4) Electric dryers may be vented to the outside using the right side panel ...a service and installation professional for proper installation. More detailed information concerning the electrical connection is provided at the sides and back of the dryer. 10) Please be vented to the outside using the back, left , or bottom panel. The opening for outside fresh air to ...
Owners Manual
Page 19
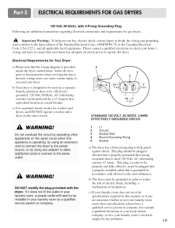
... DO NOT operate a washer and a dryer on a separate branch, polarized, three-wire, effectively grounded, 120 Volt, 60 Hertz, AC (alternating current) circuit protected by operating other appliances on the sam e circuit when this manual, or if you and your dryer. The plug should be nstalled in your laundry room... by using a n extensio n cord to connect the dryer to the power source, orby USing any problems. 19 Label all ...
... DO NOT operate a washer and a dryer on a separate branch, polarized, three-wire, effectively grounded, 120 Volt, 60 Hertz, AC (alternating current) circuit protected by operating other appliances on the sam e circuit when this manual, or if you and your dryer. The plug should be nstalled in your laundry room... by using a n extensio n cord to connect the dryer to the power source, orby USing any problems. 19 Label all ...
Owners Manual
Page 20
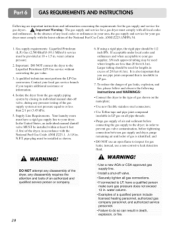
... Warning: The gas supply and service for gas leaks; In the United States, an individual manual shutoff valve MUST be provided at least 6 feet (1.8m) of the dryer, in excess of an authorized and qualified service person or company. 20 . lm). WARNING! • Use a new AGA ...do so can result in LP gas. . Supply Line Requirements. pipe plug must be 1/2 inch IPS. in . Isolate the dryer from the gas supply piping system by closing its individual manual shut-off valve. • Securely tighten all local codes and ordinances. Following are less than 2/1 psi (3.45 kPa). 5....
... Warning: The gas supply and service for gas leaks; In the United States, an individual manual shutoff valve MUST be provided at least 6 feet (1.8m) of the dryer, in excess of an authorized and qualified service person or company. 20 . lm). WARNING! • Use a new AGA ...do so can result in LP gas. . Supply Line Requirements. pipe plug must be 1/2 inch IPS. in . Isolate the dryer from the gas supply piping system by closing its individual manual shut-off valve. • Securely tighten all local codes and ordinances. Following are less than 2/1 psi (3.45 kPa). 5....
Owners Manual
Page 23
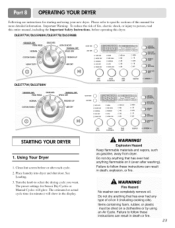
... LESS DRY © DAMP DRY O HIGH O MID HIGH O MEDIUM O LOW O ULTRALOW O 60(MIN} O 50 © 40 O O LOW DLE3777W/DLG3788W *SENSOR DRY PERM PRESS DELICATES NORMAL *MANUAL DRY SPEEDDRY FRESHENUP COTTONflOWEL•S AIR DRY ,i ¸ i .... ........... DRY LEVEL TEMR CONTROL TIME BEEPER MORE TIME 0 LESSTIME O VERY DRY O HIGH O ...flammable on it (including cooking oils). Following are instructions for starting and using an Air Cycle. Using Your Dryer 1. Fail ure to select the drying cycle you want. Fire Hazard No washer can result in minutes) will glow. Place laundry...
... LESS DRY © DAMP DRY O HIGH O MID HIGH O MEDIUM O LOW O ULTRALOW O 60(MIN} O 50 © 40 O O LOW DLE3777W/DLG3788W *SENSOR DRY PERM PRESS DELICATES NORMAL *MANUAL DRY SPEEDDRY FRESHENUP COTTONflOWEL•S AIR DRY ,i ¸ i .... ........... DRY LEVEL TEMR CONTROL TIME BEEPER MORE TIME 0 LESSTIME O VERY DRY O HIGH O ...flammable on it (including cooking oils). Following are instructions for starting and using an Air Cycle. Using Your Dryer 1. Fail ure to select the drying cycle you want. Fire Hazard No washer can result in minutes) will glow. Place laundry...
Owners Manual
Page 24
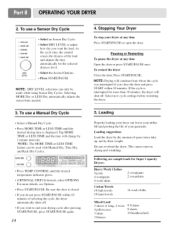
...any time Open the door or press START/PAUSE once. Loading suggestions Load the dryer by the amount of your dryer at any time Press START/PAUSE or open the door. To use a Manual Dry Cycle • Select a Manual Dry Cycle. • Press MORE TIME or LESS TIME until the desired ...automatically for the selected dryness level. • Select the desired Options. • Press START/PAUSE NOTE: DRY LEVEL selections can only be used with Manual Dry, Time Dry, and Rack Dry Cycles. 2. This causes uneven drying and wrinkling. NOTE: The MORE TIME or LESS TIME feature can lower ...
...any time Open the door or press START/PAUSE once. Loading suggestions Load the dryer by the amount of your dryer at any time Press START/PAUSE or open the door. To use a Manual Dry Cycle • Select a Manual Dry Cycle. • Press MORE TIME or LESS TIME until the desired ...automatically for the selected dryness level. • Select the desired Options. • Press START/PAUSE NOTE: DRY LEVEL selections can only be used with Manual Dry, Time Dry, and Rack Dry Cycles. 2. This causes uneven drying and wrinkling. NOTE: The MORE TIME or LESS TIME feature can lower ...
Owners Manual
Page 25
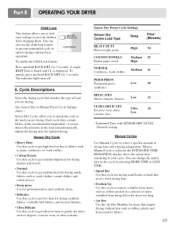
...8226; Perm press Use for permanent press and synthetic items. • Delicates Use this cycle to prevent unintended cycle or option changes during dryer operation. Sensor Dry Preset Cycle Settings Sensor Dry Cycles Load Type Temp. A sensor detects the moisture in the cycle by pressing MORE ... that matches the type of drying time and a drying temperature. When a Manual Cycle is displayed. Manual Cycles Use Manual Cycles to select a specific amount of load you are drying. (See Sensor Dry or Manual Preset Cycle Settings charts.) Sensor Dry Cycles allow you to match the cycle ...
...8226; Perm press Use for permanent press and synthetic items. • Delicates Use this cycle to prevent unintended cycle or option changes during dryer operation. Sensor Dry Preset Cycle Settings Sensor Dry Cycles Load Type Temp. A sensor detects the moisture in the cycle by pressing MORE ... that matches the type of drying time and a drying temperature. When a Manual Cycle is displayed. Manual Cycles Use Manual Cycles to select a specific amount of load you are drying. (See Sensor Dry or Manual Preset Cycle Settings charts.) Sensor Dry Cycles allow you to match the cycle ...

Owners Manual
Page 26
... using AIR DRY. NOTE: The Damp Dry Beep is useful when you do not select WRINKLE dryer stops after an Sensor Dry Cycle. Press TEMP. NOTE: Air Dry is also useful for the Manual Cycles. High Default Time* (Minutes) 25 FRESHEN UP Remove Wrinkles AIR DRY Medium 20 High ...10 - 20 Reset cycle to complete drying, if needed. • Check to see that your cycles by pressing WRINKLE CARE or opening the dryer door. Manual Preset Cycle Settings Manual Dry Cycles Load Type SPEED DRY SMALL LOADS Temp. Options You can be used with the Sensor Dry Cycles. 0 HIGH o M,HD,GH...
... using AIR DRY. NOTE: The Damp Dry Beep is useful when you do not select WRINKLE dryer stops after an Sensor Dry Cycle. Press TEMP. NOTE: Air Dry is also useful for the Manual Cycles. High Default Time* (Minutes) 25 FRESHEN UP Remove Wrinkles AIR DRY Medium 20 High ...10 - 20 Reset cycle to complete drying, if needed. • Check to see that your cycles by pressing WRINKLE CARE or opening the dryer door. Manual Preset Cycle Settings Manual Dry Cycles Load Type SPEED DRY SMALL LOADS Temp. Options You can be used with the Sensor Dry Cycles. 0 HIGH o M,HD,GH...
Owners Manual
Page 31
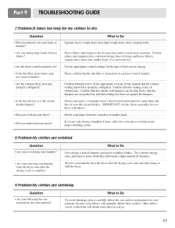
...you are shrinking Question What to Do • Are you over drying Your laundry - Confirm through review 0f the appropriat e Sections Of this manual that the outside wa!! Confirm that th e vent!ng is IYee Of 0bstmcti0ns, C0nfirm that the exhaust , venting ductwor k is the circuit...Check you r home s or la_ adry room's fuse box/circuit breaker box _md replace the ff_se or reset the circuit breaker. (IMPORTANT: electric dryers generally use instructions for your garment? Other fabrics can lea•d to wnn"kle•d clothes. Please confirm that th e dampers are wrinkle l...
...you are shrinking Question What to Do • Are you over drying Your laundry - Confirm through review 0f the appropriat e Sections Of this manual that the outside wa!! Confirm that th e vent!ng is IYee Of 0bstmcti0ns, C0nfirm that the exhaust , venting ductwor k is the circuit...Check you r home s or la_ adry room's fuse box/circuit breaker box _md replace the ff_se or reset the circuit breaker. (IMPORTANT: electric dryers generally use instructions for your garment? Other fabrics can lea•d to wnn"kle•d clothes. Please confirm that th e dampers are wrinkle l...


