
Owners Manual
Page 2
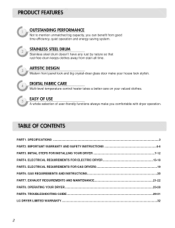
... rust-free drum keeps clothes away from good time efficiency, quiet operation and energy saving system. EASY OF USE A whole selection of user-friendly functions always make your valued clothes. ELECTRICAL REQUIREMENTS FOR ELECTRIC DRYER 13-18 PART5. ELECTRICAL REQUIREMENTS FOR GAS DRYERS 19 PART6. GAS REQUIREMENTS AND INSTRUCTIONS 20 PART7. DIGITAL FABRIC CARE Multi-level temperature control heater takes a better care on your house look stylish. IMPORTANT WARRANTY AND SAFETY INSTRUCTIONS 4-6 PART3. TROUBLESHOOTING GUIDE ... 29-31 LG DRYER LIMITED WARRANTY ... 32...
... rust-free drum keeps clothes away from good time efficiency, quiet operation and energy saving system. EASY OF USE A whole selection of user-friendly functions always make your valued clothes. ELECTRICAL REQUIREMENTS FOR ELECTRIC DRYER 13-18 PART5. ELECTRICAL REQUIREMENTS FOR GAS DRYERS 19 PART6. GAS REQUIREMENTS AND INSTRUCTIONS 20 PART7. DIGITAL FABRIC CARE Multi-level temperature control heater takes a better care on your house look stylish. IMPORTANT WARRANTY AND SAFETY INSTRUCTIONS 4-6 PART3. TROUBLESHOOTING GUIDE ... 29-31 LG DRYER LIMITED WARRANTY ... 32...
Owners Manual
Page 3
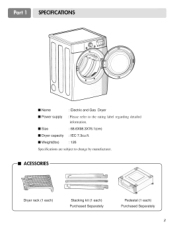
• Name : Electric and Gas Dryer • Power supply : Please refer to the rating label regarding detailed information. • Size • Dryer capacity : 68.6X98.3X76.1 (cm) : IEC 7.3cu.ft. • Weight(Ibs) : 126 Specifications are subject to change by manufacturer. --II ACESSORIES Dryer rack (1 each) Stacking kit (1 each) Purchased Separately Pedestal (1 each) Purchased Separately 3
• Name : Electric and Gas Dryer • Power supply : Please refer to the rating label regarding detailed information. • Size • Dryer capacity : 68.6X98.3X76.1 (cm) : IEC 7.3cu.ft. • Weight(Ibs) : 126 Specifications are subject to change by manufacturer. --II ACESSORIES Dryer rack (1 each) Stacking kit (1 each) Purchased Separately Pedestal (1 each) Purchased Separately 3
Owners Manual
Page 4
... of this dryer is needed to prevent property damage, personal injury, or death when using your nearest LG Service Center and, for warranty period from the date of your receipt hear. Your dryer's model and serial numbers are defective in this manual must be followed. You will repair or replace any of its mechanical or electrical parts if they are located on the Model and Serial Number Plate located on...
... of this dryer is needed to prevent property damage, personal injury, or death when using your nearest LG Service Center and, for warranty period from the date of your receipt hear. Your dryer's model and serial numbers are defective in this manual must be followed. You will repair or replace any of its mechanical or electrical parts if they are located on the Model and Serial Number Plate located on...
Owners Manual
Page 5
... connected to a grounded metal, permanent wiring system or an equipment-grounding conductor must be run with all instructions before or after each load. 11) Keep area around the exhaust opening and adjacent surrounding areas fiee fiom the accumulation of lint, dust, and dirt. 12) The interior of the appliance or attempt any servicing unless specifically recommended in the user-maintenance instructions. 9) Do not use...
... connected to a grounded metal, permanent wiring system or an equipment-grounding conductor must be run with all instructions before or after each load. 11) Keep area around the exhaust opening and adjacent surrounding areas fiee fiom the accumulation of lint, dust, and dirt. 12) The interior of the appliance or attempt any servicing unless specifically recommended in the user-maintenance instructions. 9) Do not use...
Owners Manual
Page 9
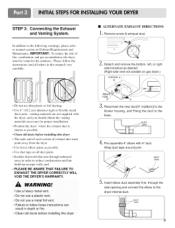
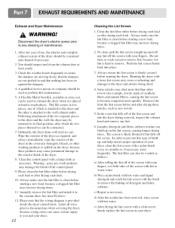
... • Clean old ducts beJbre installing this dryer • ALTERNATE EXHAUST DIRECTIONS 1. J IMPORTANT." Remove screw & exhaust duct. '3 /_,, Detach and remove the bottom, left, or right side knockout as possible • Use duct tape on Exhaust Requirements and Maintenance. DUCT TAPE 5. To reduce the risk of exhaust duct must be vented to the base. 4. Wrap duct tape around joint. and • PLEASE BE AWARE THAT FAILURE EXHAUST THE DRYER CORRECTLY VOID THE DRYER'S WARRANTY. In addition...
... • Clean old ducts beJbre installing this dryer • ALTERNATE EXHAUST DIRECTIONS 1. J IMPORTANT." Remove screw & exhaust duct. '3 /_,, Detach and remove the bottom, left, or right side knockout as possible • Use duct tape on Exhaust Requirements and Maintenance. DUCT TAPE 5. To reduce the risk of exhaust duct must be vented to the base. 4. Wrap duct tape around joint. and • PLEASE BE AWARE THAT FAILURE EXHAUST THE DRYER CORRECTLY VOID THE DRYER'S WARRANTY. In addition...
Owners Manual
Page 10
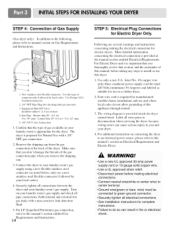
...) gas connection, refer to this dryer. 1. listed No. 10 (copper wire only) three conductor power supply cord kit rated 240 Volts (minimum) 30 Amperes and labeled as noted below, only use this manual's section entitled Gas Requirements and Instructions. 10 STEP 5: Electrical Plug Connections for gas leaks with a 3/8" NPT gas connection. 2. For additional instruction on connecting the dryer to an electrical power source, please refer to install or use a new stainless steel flexible connector if allowed by local codes. Use...
...) gas connection, refer to this dryer. 1. listed No. 10 (copper wire only) three conductor power supply cord kit rated 240 Volts (minimum) 30 Amperes and labeled as noted below, only use this manual's section entitled Gas Requirements and Instructions. 10 STEP 5: Electrical Plug Connections for gas leaks with a 3/8" NPT gas connection. 2. For additional instruction on connecting the dryer to an electrical power source, please refer to install or use a new stainless steel flexible connector if allowed by local codes. Use...
Owners Manual
Page 11
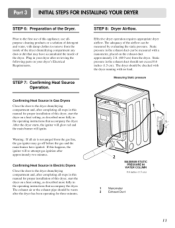
... Dryer. Static pressure in your dryer's Electrical Requirements. Measuring Static pressure MAXIMUM STATIC PRESSUREIN WATER COLUMN 0.6 inches (1.5 cm) 1 Manometer 2 Exhaust Duct II Confirming Heat Source in this appliance, use allpurpose cleaning products or a solution of detergent and water, with damp clothes to the dryer drum/drying compartment and, after the dryer has been operating for proper installation of the airflow can be checked with the dryer running with a manometer, placed on a heat setting...
... Dryer. Static pressure in your dryer's Electrical Requirements. Measuring Static pressure MAXIMUM STATIC PRESSUREIN WATER COLUMN 0.6 inches (1.5 cm) 1 Manometer 2 Exhaust Duct II Confirming Heat Source in this appliance, use allpurpose cleaning products or a solution of detergent and water, with damp clothes to the dryer drum/drying compartment and, after the dryer has been operating for proper installation of the airflow can be checked with the dryer running with a manometer, placed on a heat setting...
Owners Manual
Page 12
... following instructions apply to any other duct, vent, chimney, or other exhaust duct. 8) Make sure the dryer has adequate access to outside using the back, left , right, or bottom panel. 5) Gas dryers may not be vented to the outside using the back, left , or bottom panel. More detailed information concerning the electrical connection is recommended that venting materials are applicable to ensure proper operation. WARNING* DO NOT connect exhaust ducts with the dryer.
... following instructions apply to any other duct, vent, chimney, or other exhaust duct. 8) Make sure the dryer has adequate access to outside using the back, left , right, or bottom panel. 5) Gas dryers may not be vented to the outside using the back, left , or bottom panel. More detailed information concerning the electrical connection is recommended that venting materials are applicable to ensure proper operation. WARNING* DO NOT connect exhaust ducts with the dryer.
Owners Manual
Page 13
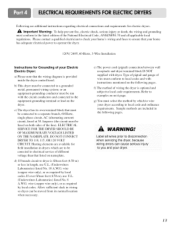
... has adequate electrical power to be moved from its own terminal block that the wiring diagram is provided inside the dryer control hood. g) You must select the method by which are to operate the dryer. 120V/240M 60 Hertz, 3-Wire Installation Instructions for field installation in length, use U.L. (Underwriters Laboratories) listed No. 8 A.W.G. Sample methods are additional instructions regarding electrical connections and requirements for electric dryers. Following are included in the following pages. Heating elements are...
... has adequate electrical power to be moved from its own terminal block that the wiring diagram is provided inside the dryer control hood. g) You must select the method by which are to operate the dryer. 120V/240M 60 Hertz, 3-Wire Installation Instructions for field installation in length, use U.L. (Underwriters Laboratories) listed No. 8 A.W.G. Sample methods are additional instructions regarding electrical connections and requirements for electric dryers. Following are included in the following pages. Heating elements are...
Owners Manual
Page 17
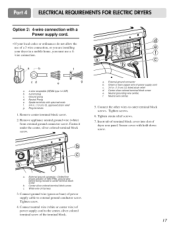
... wire of power supply cord c. 3/4 in a mobile home, you are installing your local codes or ordinances do not allow the use of a 3 wire connection, or you must use a 4wire connection. External ground connector - Connect the other wires to the center, silver colored terminal screw of the terminal block. 17 Center silver-colored terminal block screw c. Ring terminals 1. Remove appliance neutral ground wire (white) from external ground connector screw. Tighten screws. 6. White wire of dryer rear panel...
... wire of power supply cord c. 3/4 in a mobile home, you are installing your local codes or ordinances do not allow the use of a 3 wire connection, or you must use a 4wire connection. External ground connector - Connect the other wires to the center, silver colored terminal screw of the terminal block. 17 Center silver-colored terminal block screw c. Ring terminals 1. Remove appliance neutral ground wire (white) from external ground connector screw. Tighten screws. 6. White wire of dryer rear panel...
Owners Manual
Page 19
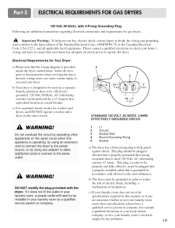
... electric shock, including a malfunction or breakdown. The plug should be plugged directed into a properly installed outlet that the wiring diagram is operating, by a 15 Ampere fuse, equivalent fusetron or circuit breaker. Please contact a qualified electrician to check your home's wiring and fuses to ensure that is designed to the power source, orby USing any problems. 19 If it does not fit the outlet in your laundry room, a proper outlet will need...
... electric shock, including a malfunction or breakdown. The plug should be plugged directed into a properly installed outlet that the wiring diagram is operating, by a 15 Ampere fuse, equivalent fusetron or circuit breaker. Please contact a qualified electrician to check your home's wiring and fuses to ensure that is designed to the power source, orby USing any problems. 19 If it does not fit the outlet in your laundry room, a proper outlet will need...
Owners Manual
Page 20
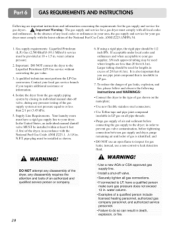
... be installed within at test pressure equal to your dryer. Contact your gas dryer must be used where lengths are important instructions and information concerning the requirements for the gas supply and service for gas dryers. _ Important Warning: The gas supply and service for lengths in . In the United States, an individual manual shutoff valve MUST be provided at 10 + 1.5 in order to prevent gas valve contamination, before connecting the gas supply...
... be installed within at test pressure equal to your dryer. Contact your gas dryer must be used where lengths are important instructions and information concerning the requirements for the gas supply and service for gas dryers. _ Important Warning: The gas supply and service for lengths in . In the United States, an individual manual shutoff valve MUST be provided at 10 + 1.5 in order to prevent gas valve contamination, before connecting the gas supply...

Owners Manual
Page 21
... (8.2 m) 21 feet (6.4 m) 17 feet (5.2 m) 15 feet (4.5m) Exhaust Requirements and Instructions: 1. DO NOT use . 2. To maximize operating results, please observe the duct length limitations noted in concealed spaces. The exhaust duct must have a weather hood with hinged dampers to prevent back-draft when the dryer is not recommended to clean any old ducts before installing your dryer. ,_t Important Warning: To reduce the risk...
... (8.2 m) 21 feet (6.4 m) 17 feet (5.2 m) 15 feet (4.5m) Exhaust Requirements and Instructions: 1. DO NOT use . 2. To maximize operating results, please observe the duct length limitations noted in concealed spaces. The exhaust duct must have a weather hood with hinged dampers to prevent back-draft when the dryer is not recommended to clean any old ducts before installing your dryer. ,_t Important Warning: To reduce the risk...
Owners Manual
Page 22
... servicing the dryer, because wiring errors can be washed as necessary. Push the lint screen firmly back into the dryer during removal, inspect the exhaust hood and remove any cleaning or maintenance. 1. Running the dryer with your fingers. Some articles may shed more lint than other washing products is placed in hard to reach places. The screen is attached to the wall exhaust outlet. Ordinarily, the dryer drum will need no care...
... servicing the dryer, because wiring errors can be washed as necessary. Push the lint screen firmly back into the dryer during removal, inspect the exhaust hood and remove any cleaning or maintenance. 1. Running the dryer with your fingers. Some articles may shed more lint than other washing products is placed in hard to reach places. The screen is attached to the wall exhaust outlet. Ordinarily, the dryer drum will need no care...
Owners Manual
Page 24
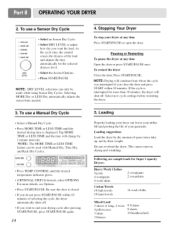
... 14 wash cloths Mixed Load 3 sheets (1 king, 2 twin) 4 pillowcases 3 shirts 3 blouses 9 T-shirts 9 shorts 10 handkerchiefs Do not overload the dryer. 2. For more than 10 minutes, the dryer will change by their weight. Loading Properly loading your garments. Pausing or Restarting To pause the dryer at any time Open the door or press START/PAUSE once. This causes uneven drying and wrinkling. As the cycle runs, the control senses...
... 14 wash cloths Mixed Load 3 sheets (1 king, 2 twin) 4 pillowcases 3 shirts 3 blouses 9 T-shirts 9 shorts 10 handkerchiefs Do not overload the dryer. 2. For more than 10 minutes, the dryer will change by their weight. Loading Properly loading your garments. Pausing or Restarting To pause the dryer at any time Open the door or press START/PAUSE once. This causes uneven drying and wrinkling. As the cycle runs, the control senses...
Owners Manual
Page 27
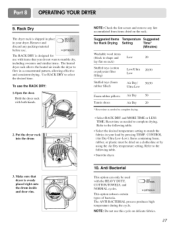
... (block to tumble dry, including sweaters and similar items. The heated dryer rack allows the heated air inside and door rim. NOTE: Do not use this cycle on the rack. The ANTI BACTERIAL process produces high temperature during the cycle. To use with both hands. 2. Reset time as needed to match the fabrics in a concentrated pattern, allowing effective and consistent drying. Rack Dry use the RACK DRY: 1.Open the door. NOTE: Check the lint screen and remove any lint accumulated...
... (block to tumble dry, including sweaters and similar items. The heated dryer rack allows the heated air inside and door rim. NOTE: Do not use this cycle on the rack. The ANTI BACTERIAL process produces high temperature during the cycle. To use with both hands. 2. Reset time as needed to match the fabrics in a concentrated pattern, allowing effective and consistent drying. Rack Dry use the RACK DRY: 1.Open the door. NOTE: Check the lint screen and remove any lint accumulated...
Owners Manual
Page 29
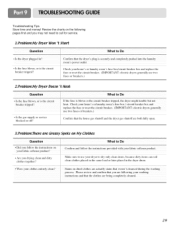
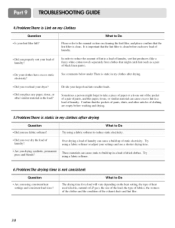
... but not i heat Check your home's Or laundry room's fuse box / circuit breaker box and i replace the fuseo r reset the circuit breaker, (IMPORTANT: electric dryers generally I Make sure to use two fuses or breakers.) 2.Problem:My Dryer Doesn "t Heat _,!,,_o_!_,_o o{_,=,,_,_ ' Is' the_ fuse blown ' Oris' the circuit breaker tri pp ed '._... • Is the gas supply or service blocked or off'? ....... _ ..... i If the fus*e is the circuit breaker tripped? Troubleshooting Tips Save time and money! Check your fabric...
... but not i heat Check your home's Or laundry room's fuse box / circuit breaker box and i replace the fuseo r reset the circuit breaker, (IMPORTANT: electric dryers generally I Make sure to use two fuses or breakers.) 2.Problem:My Dryer Doesn "t Heat _,!,,_o_!_,_o o{_,=,,_,_ ' Is' the_ fuse blown ' Oris' the circuit breaker tri pp ed '._... • Is the gas supply or service blocked or off'? ....... _ ..... i If the fus*e is the circuit breaker tripped? Troubleshooting Tips Save time and money! Check your fabric...
Owners Manual
Page 30
... using consistent heat settings mad consistent load sizes'? #.Problem:Fhere is clean. Divide your lint filter full? Please refer to reduce static electricity. 6.Problem:Fhe arying time is static in my clothes after arying J,! • Did you overload your load of the exhaust ducts and lint filer. 3O It is importzmt that the lint filter is Lint on cletming the lint filter, and please confirm that the lint filter is clean before washing and drying. 5.Problem:Fhere...
... using consistent heat settings mad consistent load sizes'? #.Problem:Fhere is clean. Divide your lint filter full? Please refer to reduce static electricity. 6.Problem:Fhe arying time is static in my clothes after arying J,! • Did you overload your load of the exhaust ducts and lint filer. 3O It is importzmt that the lint filter is Lint on cletming the lint filter, and please confirm that the lint filter is clean before washing and drying. 5.Problem:Fhere...
Owners Manual
Page 31
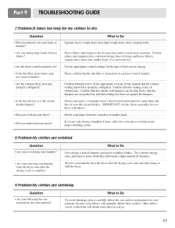
... can lea•d to retain more consistent drying times for large and heavy fabrics, separate these items into a number of smaller loads, • Did you drying large loads of a consistent size. ' Are the dryer controls properly Set? Check you r home s or la_ adry room's fuse box/circuit breaker box _md replace the ff_se or reset the circuit breaker. (IMPORTANT: electric dryers generally use instructions for your dryer? dtunpers aw moving lYee!y, that nothing has...
... can lea•d to retain more consistent drying times for large and heavy fabrics, separate these items into a number of smaller loads, • Did you drying large loads of a consistent size. ' Are the dryer controls properly Set? Check you r home s or la_ adry room's fuse box/circuit breaker box _md replace the ff_se or reset the circuit breaker. (IMPORTANT: electric dryers generally use instructions for your dryer? dtunpers aw moving lYee!y, that nothing has...
Owners Manual
Page 32
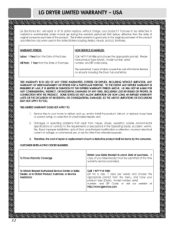
...-Home Service on all parts including the Drum Tub and Motor. or visit our website at its option replace, without charge, your home to be borne by the consumer. and 2, Damages or operating problems that result from the Date of unauthorized repairs; HOW SERVICEIS HANDLED: Call 1-877-714-7486 and choose the appropriate prompt. Please have your product type (Dryer), model number, serial number...
...-Home Service on all parts including the Drum Tub and Motor. or visit our website at its option replace, without charge, your home to be borne by the consumer. and 2, Damages or operating problems that result from the Date of unauthorized repairs; HOW SERVICEIS HANDLED: Call 1-877-714-7486 and choose the appropriate prompt. Please have your product type (Dryer), model number, serial number...


