
Owners Manual
Page 1
Please read your dryer. Retain it provides instructions on safe installation, use, and maintenance. P/No.: 3828EL3003A ElectricandGasDryer DLE 5977W/D LG 5988W DLE 5977 B/D LG 5988 B DLE3777W/DLG3788W Thank you for future reference and record the model and serial numbers of your owner's manual carefully, as it for buying an LG dryer.
Please read your dryer. Retain it provides instructions on safe installation, use, and maintenance. P/No.: 3828EL3003A ElectricandGasDryer DLE 5977W/D LG 5988W DLE 5977 B/D LG 5988 B DLE3777W/DLG3788W Thank you for future reference and record the model and serial numbers of your owner's manual carefully, as it for buying an LG dryer.
Owners Manual
Page 2
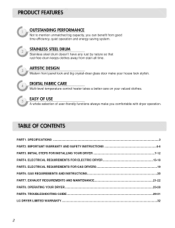
.... PART1. IMPORTANT WARRANTY AND SAFETY INSTRUCTIONS 4-6 PART3. TROUBLESHOOTING GUIDE ... 29-31 LG DRYER LIMITED WARRANTY ... 32 2 SPECIFICATIONS ... 3 PART2. EXHAUST REQUIREMENTS AND MAINTENANCE 21-22 PART8. ELECTRICAL REQUIREMENTS FOR ELECTRIC DRYER 13-18 PART5. OPERATING YOUR DRYER ... 23-28 PART9. ELECTRICAL REQUIREMENTS FOR GAS DRYERS 19 PART6. GAS REQUIREMENTS AND INSTRUCTIONS 20 PART7. INITIAL STEPS FOR...
.... PART1. IMPORTANT WARRANTY AND SAFETY INSTRUCTIONS 4-6 PART3. TROUBLESHOOTING GUIDE ... 29-31 LG DRYER LIMITED WARRANTY ... 32 2 SPECIFICATIONS ... 3 PART2. EXHAUST REQUIREMENTS AND MAINTENANCE 21-22 PART8. ELECTRICAL REQUIREMENTS FOR ELECTRIC DRYER 13-18 PART5. OPERATING YOUR DRYER ... 23-28 PART9. ELECTRICAL REQUIREMENTS FOR GAS DRYERS 19 PART6. GAS REQUIREMENTS AND INSTRUCTIONS 20 PART7. INITIAL STEPS FOR...
Owners Manual
Page 3
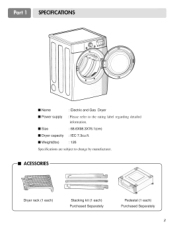
• Name : Electric and Gas Dryer • Power supply : Please refer to the rating label regarding detailed information. • Size • Dryer capacity : 68.6X98.3X76.1 (cm) : IEC 7.3cu.ft. • Weight(Ibs) : 126 Specifications are subject to change by manufacturer. --II ACESSORIES Dryer rack (1 each) Stacking kit (1 each) Purchased Separately Pedestal (1 each) Purchased Separately 3
• Name : Electric and Gas Dryer • Power supply : Please refer to the rating label regarding detailed information. • Size • Dryer capacity : 68.6X98.3X76.1 (cm) : IEC 7.3cu.ft. • Weight(Ibs) : 126 Specifications are subject to change by manufacturer. --II ACESSORIES Dryer rack (1 each) Stacking kit (1 each) Purchased Separately Pedestal (1 each) Purchased Separately 3
Owners Manual
Page 4
... obtain warranty service. Model No. WARNINGS For your nearest LG Service Center and, for warranty period from the date of purchase, if this dryer is installed and operated according to the instructions in this manual, LG will need the complete model and serial numbers when requesting ...days. SEEKING WARRANTY ASSISTANCE Warranty Service. Serial No. Warranty Restriction: If the dryer is effective for your dryer is needed to prevent property damage, personal injury, or death when using your new LG dryer. Use the space below to other than private family use, all warranty ...
... obtain warranty service. Model No. WARNINGS For your nearest LG Service Center and, for warranty period from the date of purchase, if this dryer is installed and operated according to the instructions in this manual, LG will need the complete model and serial numbers when requesting ...days. SEEKING WARRANTY ASSISTANCE Warranty Service. Serial No. Warranty Restriction: If the dryer is effective for your dryer is needed to prevent property damage, personal injury, or death when using your new LG dryer. Use the space below to other than private family use, all warranty ...
Owners Manual
Page 5
... or breakdown, grounding will be plugged into contact with the circuit conductors and connected to the equipment-grounding terminal or lead on or in your dryer. In the event of electric shock. hnproper connection of the equipmentgrounding conductor can result in the user-maintenance instructions. 9) Do not use fabric soflners or...
... or breakdown, grounding will be plugged into contact with the circuit conductors and connected to the equipment-grounding terminal or lead on or in your dryer. In the event of electric shock. hnproper connection of the equipmentgrounding conductor can result in the user-maintenance instructions. 9) Do not use fabric soflners or...
Owners Manual
Page 6
... service person or company must perform installation and service of this manual and instructions and information provided by your gas supplier from dryer. • Place dryer at least 18 inches above the floor for a garage installation. • Failure to light a match or cigarette, or turn.... 6 WARNING! • Keep flare mable materials and vapors, such as gasoline, away from a neighbor's phone. Properly adjusted dryers will minimize combustion. Do not use any gasoline, dry-cleaning solvents any other reproductive harm and requires businesses to warn customers of potential...
... service person or company must perform installation and service of this manual and instructions and information provided by your gas supplier from dryer. • Place dryer at least 18 inches above the floor for a garage installation. • Failure to light a match or cigarette, or turn.... 6 WARNING! • Keep flare mable materials and vapors, such as gasoline, away from a neighbor's phone. Properly adjusted dryers will minimize combustion. Do not use any gasoline, dry-cleaning solvents any other reproductive harm and requires businesses to warn customers of potential...
Owners Manual
Page 7
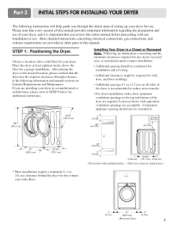
... the desired location, please confirm that you are instructions concerning and the minimum clearances required for any installation or use of your dryer. Installing Your Dryer in . (2.5 cm) on Exhaust Requirements and Maintenance. For closet installation with elbow. =E::::::::3= 0 '__ (0 cm) 27" _'q_0"... (68.6 cm) (0 cm) The following information and manual sections on all sides of the dryer is important that the dryer has the required clearances through reference to the following instructions will help guide you through the initial steps of setting up ...
... the desired location, please confirm that you are instructions concerning and the minimum clearances required for any installation or use of your dryer. Installing Your Dryer in . (2.5 cm) on Exhaust Requirements and Maintenance. For closet installation with elbow. =E::::::::3= 0 '__ (0 cm) 27" _'q_0"... (68.6 cm) (0 cm) The following information and manual sections on all sides of the dryer is important that the dryer has the required clearances through reference to the following instructions will help guide you through the initial steps of setting up ...
Owners Manual
Page 8
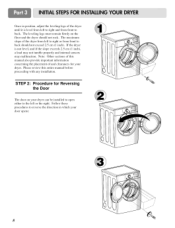
...).If thedryer is levelfromlefttorightandfromfrontto back.Thelevelinglegsmustremainfirmly onthe floor andthedryershouldnotrock. STEP 2: Procedure for Reversing the Door The door on your dryer can be installed to open either to reverse the direction in which your dryer.Pleasereviewthisentiremanuabl efore proceedinwg ithanyinstallation. Oncein positiona, djusthelevelinglegsof thedryer until it is not level,andif theslopeexceed2s.5cm(1 inch), a loadmaynottumbleproperlyandinternalsensors...
...).If thedryer is levelfromlefttorightandfromfrontto back.Thelevelinglegsmustremainfirmly onthe floor andthedryershouldnotrock. STEP 2: Procedure for Reversing the Door The door on your dryer can be installed to open either to reverse the direction in which your dryer.Pleasereviewthisentiremanuabl efore proceedinwg ithanyinstallation. Oncein positiona, djusthelevelinglegsof thedryer until it is not level,andif theslopeexceed2s.5cm(1 inch), a loadmaynottumbleproperlyandinternalsensors...
Owners Manual
Page 9
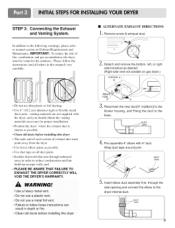
...11 in order to reduce condensation and lint build-up on pipe walls; and • PLEASE BE AWARE THAT FAILURE EXHAUST THE DRYER CORRECTLY VOID THE DRYER'S WARRANTY. Remove screw & exhaust duct. '3 /_,, Detach and remove the bottom, left, or right side knockout as possible •... 4" (10.2 cm) diameter rigid or flexible metal duct (note: venting materials are not supplied with 4" duct. Please follow these instructions can result in this dryer • ALTERNATE EXHAUST DIRECTIONS 1. DUCT TAPE 5. TO WILL WARNING! • Use a heavy metal vent. • Do not use a plastic vent. ...
...11 in order to reduce condensation and lint build-up on pipe walls; and • PLEASE BE AWARE THAT FAILURE EXHAUST THE DRYER CORRECTLY VOID THE DRYER'S WARRANTY. Remove screw & exhaust duct. '3 /_,, Detach and remove the bottom, left, or right side knockout as possible •... 4" (10.2 cm) diameter rigid or flexible metal duct (note: venting materials are not supplied with 4" duct. Please follow these instructions can result in this dryer • ALTERNATE EXHAUST DIRECTIONS 1. DUCT TAPE 5. TO WILL WARNING! • Use a heavy metal vent. • Do not use a plastic vent. ...
Owners Manual
Page 10
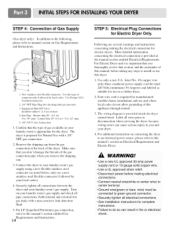
... use and where local codes do so can cause serious injury to this manual's section on Electrical Requirements and Electric Dryer. Label all connections between the dryer and your laundry room's gas supply and check all electrical connections • See installation instructions for complete instructions. &#... that you and your laundry room is requited for gas leaks with a 3/8" NPT gas connection. 2. Make sure that the type of dryer 4. Gas Conuection 1. Four-wire cord is appropriate for use this type of the gas connection pipe when you thoroughly review that you remove...
... use and where local codes do so can cause serious injury to this manual's section on Electrical Requirements and Electric Dryer. Label all connections between the dryer and your laundry room's gas supply and check all electrical connections • See installation instructions for complete instructions. &#... that you and your laundry room is requited for gas leaks with a 3/8" NPT gas connection. 2. Make sure that the type of dryer 4. Gas Conuection 1. Four-wire cord is appropriate for use this type of the gas connection pipe when you thoroughly review that you remove...
Owners Manual
Page 11
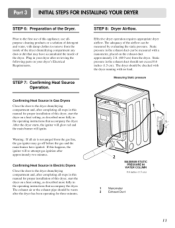
... will ignite. Warning: If all steps in the operating instructions that may have ignited. If this dryer, start the dryer on your dryer after reviewing the following parts on a heat setting, as described more fully in the operating instructions that accompany the... dryer. The adequacy of the dryer. Measuring Static pressure MAXIMUM STATIC PRESSUREIN WATER COLUMN 0.6 inches (1.5 cm) 1 Manometer 2 Exhaust Duct II STEP 8: Dryer Airflow. Prior to remove from the gas line, the gas igniter...
... will ignite. Warning: If all steps in the operating instructions that may have ignited. If this dryer, start the dryer on your dryer after reviewing the following parts on a heat setting, as described more fully in the operating instructions that accompany the... dryer. The adequacy of the dryer. Measuring Static pressure MAXIMUM STATIC PRESSUREIN WATER COLUMN 0.6 inches (1.5 cm) 1 Manometer 2 Exhaust Duct II STEP 8: Dryer Airflow. Prior to remove from the gas line, the gas igniter...
Owners Manual
Page 12
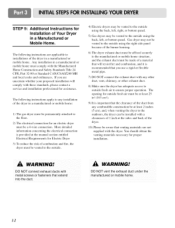
... these standards, please contact a service and installation professional for assistance. STEP 9: Additional Instructions for Installation of Your Dryer in a Manufactured or Mobile Home, The following instructions apply to any combustible construction be at the sides and back of the... screws or fasteners that you are applicable to installations of 1 inch at least 2 inches (5 cm), and, when venting the dryer to ensure proper operation. The opening for proper installation. The following instructions are uncertain whether your proposed installation will resist fire and combustion...
... these standards, please contact a service and installation professional for assistance. STEP 9: Additional Instructions for Installation of Your Dryer in a Manufactured or Mobile Home, The following instructions apply to any combustible construction be at the sides and back of the... screws or fasteners that you are applicable to installations of 1 inch at least 2 inches (5 cm), and, when venting the dryer to ensure proper operation. The opening for proper installation. The following instructions are uncertain whether your proposed installation will resist fire and combustion...
Owners Manual
Page 13
..., fused at 30 Amperes (the circuit must be moved from its own terminal block that the wiring diagram is provided inside the dryer control hood. Please contact a qualified electrician to check your home's wiring and fuses to ensure that your home has adequate electrical... power to the equipment-grounding dryer. ELECTRICAL SERVICE FOR THE DRYER SHOULD BE OF MAXIMUM RATE VOLTAGE LISTED ON THE NAMEPLATE. If over fifteen feet (4.50 m), use U.L. (Underwriters Laboratories) listed...
..., fused at 30 Amperes (the circuit must be moved from its own terminal block that the wiring diagram is provided inside the dryer control hood. Please contact a qualified electrician to check your home's wiring and fuses to ensure that your home has adequate electrical... power to the equipment-grounding dryer. ELECTRICAL SERVICE FOR THE DRYER SHOULD BE OF MAXIMUM RATE VOLTAGE LISTED ON THE NAMEPLATE. If over fifteen feet (4.50 m), use U.L. (Underwriters Laboratories) listed...
Owners Manual
Page 14
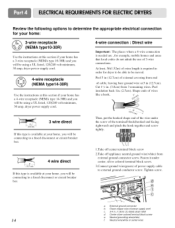
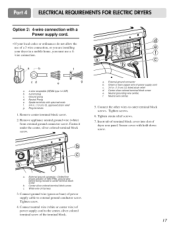
you will be connecting to external ground conductor screw. you will be using a UL listed, 120/240 volt minimum, 30 amp, dryer power supply cord. 3 wire direct If this type is available at your home. Tighten screw. At least, 5ft(l.52m) of extra length is required in (... this section if your home has a 3-wire receptacle (NEMA type 10-30R) and you will be using a UL listed, 120/240 volt minimum, 30 amp, dryer power supply cord. 4(N-wEiMreA retycpeep1ta4c-3le0R) Use the instructions at this section if your home has a 4-wire receptacle (NEMA type 14-30R) and you will...
you will be connecting to external ground conductor screw. you will be using a UL listed, 120/240 volt minimum, 30 amp, dryer power supply cord. 3 wire direct If this type is available at your home. Tighten screw. At least, 5ft(l.52m) of extra length is required in (... this section if your home has a 3-wire receptacle (NEMA type 10-30R) and you will be using a UL listed, 120/240 volt minimum, 30 amp, dryer power supply cord. 4(N-wEiMreA retycpeep1ta4c-3le0R) Use the instructions at this section if your home has a 4-wire receptacle (NEMA type 14-30R) and you will...
Owners Manual
Page 15
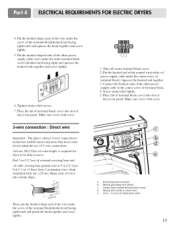
...colored terminal block screw d. Make sure cover with screw. 3-wire connection : Direct wire Important : The places wherea 4-wire connection is required for dryer to be able to the center screw of 3-wire connections. Shape ends of wires into slot of terminal block). Place the tab of terminal block...end facing rightward) and pinch the hook together and screw tightly. 1. 4. Put the hooked shape ends of the wire under the center screw of dryer rear panel. Tighten strain relief screws. 7. Make sure cover with screw. Peel 5 in (12.7cm). Then, put the hooked shape end ...
...colored terminal block screw d. Make sure cover with screw. 3-wire connection : Direct wire Important : The places wherea 4-wire connection is required for dryer to be able to the center screw of 3-wire connections. Shape ends of wires into slot of terminal block). Place the tab of terminal block...end facing rightward) and pinch the hook together and screw tightly. 1. 4. Put the hooked shape ends of the wire under the center screw of dryer rear panel. Tighten strain relief screws. 7. Make sure cover with screw. Peel 5 in (12.7cm). Then, put the hooked shape end ...
Owners Manual
Page 16
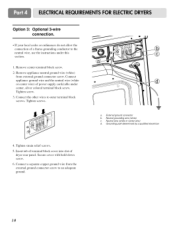
... neutral wire, use the instructions under Section 3: Optional 3-wire connection. External ground connector b. Connect the other wires to the center, silver colored terminal screw of dryer rear panel. Neutral wire (white or center wire) e. 3/4in. (!.9cm) UL-listed strain relief 3. C gf a. 3-wire receptacle (NEMA type !0-30R) b. 3-wire plug c. Neutral grounding wire...
... neutral wire, use the instructions under Section 3: Optional 3-wire connection. External ground connector b. Connect the other wires to the center, silver colored terminal screw of dryer rear panel. Neutral wire (white or center wire) e. 3/4in. (!.9cm) UL-listed strain relief 3. C gf a. 3-wire receptacle (NEMA type !0-30R) b. 3-wire plug c. Neutral grounding wire...
Owners Manual
Page 17
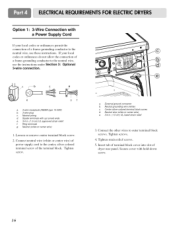
... with hold-down screw. External ground connector b. Secure cover with a Power supply cord. • If your dryer in a mobile home, you must use of power supply cord to outer terminal block screws. White wire of dryer rear panel. Tighten screw. 4. Connect neutral wire (white or center wire) of a 3 wire connection, or you...
... with hold-down screw. External ground connector b. Secure cover with a Power supply cord. • If your dryer in a mobile home, you must use of power supply cord to outer terminal block screws. White wire of dryer rear panel. Tighten screw. 4. Connect neutral wire (white or center wire) of a 3 wire connection, or you...
Owners Manual
Page 18
Option 3: Optional 3-wire connection. • If your local codes or ordinances connection of dryer rear panel. Tighten screws. o o © a. Insert tab of terminal block cover into slot of a frame-grounding neutral wire, use the instructions section. Secure cover with ...
Option 3: Optional 3-wire connection. • If your local codes or ordinances connection of dryer rear panel. Tighten screws. o o © a. Insert tab of terminal block cover into slot of a frame-grounding neutral wire, use the instructions section. Secure cover with ...
Owners Manual
Page 19
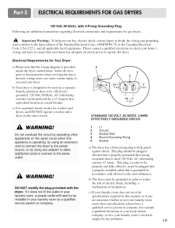
... laundry room does not meet the specifications required by this appl!ance is operating, by using a n extensio n cord to connect the dryer to ensure that is designed to reduce the risk of the National Electrical Code, ANSI/NFPA 70, or the Canadian Electrical Code, CSA ...AC (alternating current) circuit protected by a qualified service person or company. 1 L1 2 Ground 3 Neutral Side 4 Round Grounding Prong 5 Neutral a) The dryer has a three-prong plug to help prevent fire, electric shock, serious injury or death, the wiring and grounding must conform to the latest edition of...
... laundry room does not meet the specifications required by this appl!ance is operating, by using a n extensio n cord to connect the dryer to ensure that is designed to reduce the risk of the National Electrical Code, ANSI/NFPA 70, or the Canadian Electrical Code, CSA ...AC (alternating current) circuit protected by a qualified service person or company. 1 L1 2 Ground 3 Neutral Side 4 Round Grounding Prong 5 Neutral a) The dryer has a three-prong plug to help prevent fire, electric shock, serious injury or death, the wiring and grounding must conform to the latest edition of...
Owners Manual
Page 20
... compound that you require additional assistance or information. 4. have a rigid gas supply line to LP. water column. • Examples of the dryer, in death explosion, or fire. A qualified technician must be installed within at least 6 feet (1.8m) of a qualified person include licensed heating... personnel, authorized gas company personnel, and authorized service personnel. • Failure to or less than 20 feet (6. Contact your dryer. In the United States, an individual manual shutoff valve MUST be provided at test pressure equal to do so can result in accordance...
... compound that you require additional assistance or information. 4. have a rigid gas supply line to LP. water column. • Examples of the dryer, in death explosion, or fire. A qualified technician must be installed within at least 6 feet (1.8m) of a qualified person include licensed heating... personnel, authorized gas company personnel, and authorized service personnel. • Failure to or less than 20 feet (6. Contact your dryer. In the United States, an individual manual shutoff valve MUST be provided at test pressure equal to do so can result in accordance...


