
Owner's Manual (English)
Page 1
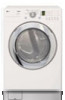
For more information, visit our website at http://us.lge.com P/No.: 3828EL3004J Record the model and serial numbers, and retain the manual for buying an LG Dryer. 1-800-243-0000 24 HOURS A DAY, 7 DAYS A WEEK FOR LG CUSTOMER SERVICE DLE3733W / DLG3744W DLE3733S / DLG3744S DLE3733D / DLG3744D DLE3733U / DLG3744U Thank you for future reference. Please read your manual carefully, as it provides instructions on safe Installation, use and maintenance.
For more information, visit our website at http://us.lge.com P/No.: 3828EL3004J Record the model and serial numbers, and retain the manual for buying an LG Dryer. 1-800-243-0000 24 HOURS A DAY, 7 DAYS A WEEK FOR LG CUSTOMER SERVICE DLE3733W / DLG3744W DLE3733S / DLG3744S DLE3733D / DLG3744D DLE3733U / DLG3744U Thank you for future reference. Please read your manual carefully, as it provides instructions on safe Installation, use and maintenance.

Owner's Manual (English)
Page 2
...clothes are Sensor Dry and Time Dry? SPECIFICATIONS ...8 PART 3. EXHAUST REQUIREMENTS AND MAINTENANCE ...23 PART 9. ELECTRICAL REQUIREMENTS FOR GAS DRYERS...21 PART 7. Use TIME DRY for heavy and bulky items and thick work. TABLE OF CONTENTS PART 1. GAS REQUIREMENTS AND ... operation time. IMPORTANT WARRANTY AND SAFETY INSTRUCTIONS ...3 PART 2. TROUBLESHOOTING GUIDE...31 LG DRYER LIMITED WARRANTY...34 2 Your dryer provides sensor drying and time drying programs. Sensor Dry The dryer senses the dampness of the cycle. PRODUCT FEATURES 1 OUTSTANDING PERFORMANCE Not to ...
...clothes are Sensor Dry and Time Dry? SPECIFICATIONS ...8 PART 3. EXHAUST REQUIREMENTS AND MAINTENANCE ...23 PART 9. ELECTRICAL REQUIREMENTS FOR GAS DRYERS...21 PART 7. Use TIME DRY for heavy and bulky items and thick work. TABLE OF CONTENTS PART 1. GAS REQUIREMENTS AND ... operation time. IMPORTANT WARRANTY AND SAFETY INSTRUCTIONS ...3 PART 2. TROUBLESHOOTING GUIDE...31 LG DRYER LIMITED WARRANTY...34 2 Your dryer provides sensor drying and time drying programs. Sensor Dry The dryer senses the dampness of the cycle. PRODUCT FEATURES 1 OUTSTANDING PERFORMANCE Not to ...

Owner's Manual (English)
Page 3
...hurt you cannot reach your appliance. These conditions will follow basic precautions, including the following : • Do not install a clothes dryer with clothes dryers. Do not use with flexible plastic venting materials. Clear the room, building, or area of fire or explosion, electric shock, or...that can be of a specific type identified by a qualified installer, service agency, or the gas supplier. • Install the clothes dryer according to prevent property damage, personal injury, or loss of this manual must be killed or seriously injured if you what the potential...
...hurt you cannot reach your appliance. These conditions will follow basic precautions, including the following : • Do not install a clothes dryer with clothes dryers. Do not use with flexible plastic venting materials. Clear the room, building, or area of fire or explosion, electric shock, or...that can be of a specific type identified by a qualified installer, service agency, or the gas supplier. • Install the clothes dryer according to prevent property damage, personal injury, or loss of this manual must be killed or seriously injured if you what the potential...

Owner's Manual (English)
Page 4
... or products to eliminate static unless recommended by the manufacturer of the fabric softener or product. • Do not use , the dryer must be properly installed as described in this manual. • Do not place items exposed to cooking oils in published user-repair ... substances, namely benzene, carbon monxide, formaldehyde, and soot, caused primarily by qualified service personnel. • Do not install or store the dryer where it will be grounded. The plug must be run with gasoline, dry-cleaning solvents, other reproductive harm and requires businesses to warn customers...
... or products to eliminate static unless recommended by the manufacturer of the fabric softener or product. • Do not use , the dryer must be properly installed as described in this manual. • Do not place items exposed to cooking oils in published user-repair ... substances, namely benzene, carbon monxide, formaldehyde, and soot, caused primarily by qualified service personnel. • Do not install or store the dryer where it will be grounded. The plug must be run with gasoline, dry-cleaning solvents, other reproductive harm and requires businesses to warn customers...

Owner's Manual (English)
Page 5
...of fire, electric shock, or injury to persons when using the appliance, follow basic precautions, including the following: • Properly ground dryer to follow these instructions can result in any old ducts before installing your safety, the information in this warning can cause serious injury,fire... fire or death. 5 SAFETY INSTRUCTION FOR INSTALLATION WARNING To reduce the risk of lint in fire or death. • The dryer exhaust system must be exposed to temperatures below freezing or exposed to the weather. Failure to conform with all shipping materials properly. ...
...of fire, electric shock, or injury to persons when using the appliance, follow basic precautions, including the following: • Properly ground dryer to follow these instructions can result in any old ducts before installing your safety, the information in this warning can cause serious injury,fire... fire or death. 5 SAFETY INSTRUCTION FOR INSTALLATION WARNING To reduce the risk of lint in fire or death. • The dryer exhaust system must be exposed to temperatures below freezing or exposed to the weather. Failure to conform with all shipping materials properly. ...

Owner's Manual (English)
Page 6
...this manual for specific electrical requirements for use of this ducting will prevent shock hazard and assure stability during operating. • The dryer should always be plugged into a properly grounded • For personal safety, this manual must be properly grounded. To prevent personal ... Rigid or semi rigid metal ducting is recommended for your model. Electrical shock can result in fire or death. The use between the dryer and wall connection only. Failure to follow basic precautions, including the following : • Do not, under any movement of life. SAFETY...
...this manual for specific electrical requirements for use of this ducting will prevent shock hazard and assure stability during operating. • The dryer should always be plugged into a properly grounded • For personal safety, this manual must be properly grounded. To prevent personal ... Rigid or semi rigid metal ducting is recommended for your model. Electrical shock can result in fire or death. The use between the dryer and wall connection only. Failure to follow basic precautions, including the following : • Do not, under any movement of life. SAFETY...

Owner's Manual (English)
Page 7
...space below to the instructions in this product is installed and operated according to record the model number and serial number of your new LG dryer. Serial Number. For your safety, the recommendations in material or workmanship throughout the warranty period, beginning with the date of purchase. ...WARNING! Part 1 IMPORTANT WARRANTY AND SAFETY INSTRUCTIONS SEEKING WARRANTY SERVICE The warranty for your dryer is located at the end of this manual must be followed. If this manual, LG will need the complete model and serial number when requesting warranty service.
...space below to the instructions in this product is installed and operated according to record the model number and serial number of your new LG dryer. Serial Number. For your safety, the recommendations in material or workmanship throughout the warranty period, beginning with the date of purchase. ...WARNING! Part 1 IMPORTANT WARRANTY AND SAFETY INSTRUCTIONS SEEKING WARRANTY SERVICE The warranty for your dryer is located at the end of this manual must be followed. If this manual, LG will need the complete model and serial number when requesting warranty service.
Owner's Manual (English)
Page 8
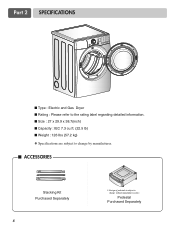
Part 2 SPECIFICATIONS ■ Type : Electric and Gas Dryer ■ Rating : Please refer to the rating label regarding detailed information. ■ Size : 27 x 29.9 x 38.7(inch) ■ Capacity : IEC 7.3 cu.ft. (22.5 lb) ■ Weight : 126 Ibs (57.2 kg) ❋ Specifications are subject to change by manufacturer. ■ ACCESSORIES Stacking Kit Purchased Separately 8 ❊ Design of pedestals is subject to change without manafaturers notice. Pedestal Purchased Separately
Part 2 SPECIFICATIONS ■ Type : Electric and Gas Dryer ■ Rating : Please refer to the rating label regarding detailed information. ■ Size : 27 x 29.9 x 38.7(inch) ■ Capacity : IEC 7.3 cu.ft. (22.5 lb) ■ Weight : 126 Ibs (57.2 kg) ❋ Specifications are subject to change by manufacturer. ■ ACCESSORIES Stacking Kit Purchased Separately 8 ❊ Design of pedestals is subject to change without manafaturers notice. Pedestal Purchased Separately

Owner's Manual (English)
Page 9
...review this manual. ventilation hole ventilation hole Closet Door Closet-side View Closet-front View 9 Part 3 INITIAL STEPS FOR INSTALLING YOUR DRYER The following instructions in mind when installing in a closet or recessed area: • Consider allowing additional clearance for installation and ...and floor molding may not tumble properly and sensor will help guide you through the initial steps of setting up your dryer for your dryer, and it has the required clearances shown below . Please keep the following instructions will not detect accurate humidity information....
...review this manual. ventilation hole ventilation hole Closet Door Closet-side View Closet-front View 9 Part 3 INITIAL STEPS FOR INSTALLING YOUR DRYER The following instructions in mind when installing in a closet or recessed area: • Consider allowing additional clearance for installation and ...and floor molding may not tumble properly and sensor will help guide you through the initial steps of setting up your dryer for your dryer, and it has the required clearances shown below . Please keep the following instructions will not detect accurate humidity information....

Owner's Manual (English)
Page 10
... position, adjust the leveling legs of and clearances for Reversing the Door The door on the floor and the dryer should not rock. The leveling legs must remain firmly on your dryer can be aligned at the center when closed. 1 2 3 10 The maximum slope of this entire manual... before proceeding with any installation. Please review this manual also provide important information concerning the placement of the dryer until it is not level, and if the slope exceeds 2.5 cm (1 inch), a load may not tumble properly and internal sensors may malfunction...
... position, adjust the leveling legs of and clearances for Reversing the Door The door on the floor and the dryer should not rock. The leveling legs must remain firmly on your dryer can be aligned at the center when closed. 1 2 3 10 The maximum slope of this entire manual... before proceeding with any installation. Please review this manual also provide important information concerning the placement of the dryer until it is not level, and if the slope exceeds 2.5 cm (1 inch), a load may not tumble properly and internal sensors may malfunction...

Owner's Manual (English)
Page 11
... Rigid or semi-rigid metal ducting is as short as possible. • Use duct tape on all others in order to the outside. Insert this dryer • The male end of each section of a short duct. The use plastic or thin foil duct. • Clean old ducts before installing ...this assembly elbow first through unheated areas in this ducting will cause dryer malfunction. Failure to follow these instructions can result in death or fire. Insert the male end of a 4" elbow into the female end of exhaust...
... Rigid or semi-rigid metal ducting is as short as possible. • Use duct tape on all others in order to the outside. Insert this dryer • The male end of each section of a short duct. The use plastic or thin foil duct. • Clean old ducts before installing ...this assembly elbow first through unheated areas in this ducting will cause dryer malfunction. Failure to follow these instructions can result in death or fire. Insert the male end of a 4" elbow into the female end of exhaust...

Owner's Manual (English)
Page 12
... the electrical connection for use a new stainless steel flexible connector if allowed by local codes. For additional instruction on connecting the dryer to an electrical power source, please refer to this type of the burner BTU rating indicated on your laundry room's gas supply... for manufactured (mobile) home installations and where local codes do so can result in death, fire or explosion. If needed at the back of this dryer will result in fire or electrical shock. Refer to this altitude. Use this manual's section on Gas Requirements and Instructions. 1 2 5 3 4...
... the electrical connection for use a new stainless steel flexible connector if allowed by local codes. For additional instruction on connecting the dryer to an electrical power source, please refer to this type of the burner BTU rating indicated on your laundry room's gas supply... for manufactured (mobile) home installations and where local codes do so can result in death, fire or explosion. If needed at the back of this dryer will result in fire or electrical shock. Refer to this altitude. Use this manual's section on Gas Requirements and Instructions. 1 2 5 3 4...

Owner's Manual (English)
Page 13
.../drying compartment any dust or dirt that may go off before the gas and the main burner have accumulated inside the dryer. Measuring Static pressure 1 Manometer 2 Exhaust Duct MAXIMUM STATIC PRESSURE IN WATER COLUMN 5/8 inches (1.5 cm) 13 Prior to remove from the ...in the exhaust duct should be warm after completing all steps in Gas Dryers Close the door to the dryer drum/drying compartment and, after the dryer has been operating for three minutes. Effective dryer operation requires appropriate dryer airflow. Confirming Heat Source in this manual for proper installation of this ...
.../drying compartment any dust or dirt that may go off before the gas and the main burner have accumulated inside the dryer. Measuring Static pressure 1 Manometer 2 Exhaust Duct MAXIMUM STATIC PRESSURE IN WATER COLUMN 5/8 inches (1.5 cm) 13 Prior to remove from the ...in the exhaust duct should be warm after completing all steps in Gas Dryers Close the door to the dryer drum/drying compartment and, after the dryer has been operating for three minutes. Effective dryer operation requires appropriate dryer airflow. Confirming Heat Source in this manual for proper installation of this ...

Owner's Manual (English)
Page 14
...the venting materials necessary for proper installation. The following instructions apply to any combustible construction be at the sides and back of the dryer in a manufactured or mobile home must be aware that you are uncertain whether your proposed installation will resist fire and combustion, ... applicable to ensure proper operation. If you use a rigid or flexible metal pipe. 6) DO NOT connect the exhaust duct with the dryer. More detailed information concerning the electrical connection is important that extend into the duct. • Failure to the outside fresh air must ...
...the venting materials necessary for proper installation. The following instructions apply to any combustible construction be at the sides and back of the dryer in a manufactured or mobile home must be aware that you are uncertain whether your proposed installation will resist fire and combustion, ... applicable to ensure proper operation. If you use a rigid or flexible metal pipe. 6) DO NOT connect the exhaust duct with the dryer. More detailed information concerning the electrical connection is important that extend into the duct. • Failure to the outside fresh air must ...
Owner's Manual (English)
Page 15
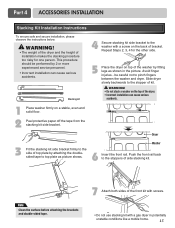
... INSTALLATION Stacking Kit Installation Instructions To ensure safe and secure installation, please observe the instructions below. WARNING! • The weight of the dryer and the height of side stacking kit. be performed by 2 or more experienced service personnel. • Incorrect installation can cause serious accidents...by attaching the doublesided tape to the stoppers of installation makes the stacking procedure too risky for the other side. 5 Place the dryer on a stable, even and solid floor. 2 Peel protective paper off the tape from the stacking kit side bracket. This ...
... INSTALLATION Stacking Kit Installation Instructions To ensure safe and secure installation, please observe the instructions below. WARNING! • The weight of the dryer and the height of side stacking kit. be performed by 2 or more experienced service personnel. • Incorrect installation can cause serious accidents...by attaching the doublesided tape to the stoppers of installation makes the stacking procedure too risky for the other side. 5 Place the dryer on a stable, even and solid floor. 2 Peel protective paper off the tape from the stacking kit side bracket. This ...

Owner's Manual (English)
Page 16
...; Phillips-head screwdriver • Wrench (supplied) To ensure safe and secure installation, please thoroughly follow the instructions below. 1 To set the dryer to the desired location. 5 Loosen the locknuts on all 4 feet are not tightened. Move the appliance to the same height as the washer..., noise and vibration may result if locknuts are solidly against the floor. 2 Retract fully Then loosen 1-1/2 turns Insert the T-clip of the dryer by hand. T-clip 6 Raise Lower Securely tighten all water, power, or gas lines and draining or venting connections before operation. Part 4...
...; Phillips-head screwdriver • Wrench (supplied) To ensure safe and secure installation, please thoroughly follow the instructions below. 1 To set the dryer to the desired location. 5 Loosen the locknuts on all 4 feet are not tightened. Move the appliance to the same height as the washer..., noise and vibration may result if locknuts are solidly against the floor. 2 Retract fully Then loosen 1-1/2 turns Insert the T-clip of the dryer by hand. T-clip 6 Raise Lower Securely tighten all water, power, or gas lines and draining or venting connections before operation. Part 4...
Owner's Manual (English)
Page 17
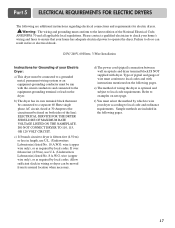
... block IS NOT supplied with instructions mentioned on next page. Part 5 ELECTRICAL REQUIREMENTS FOR ELECTRIC DRYERS The following pages. 17 Please contact a qualified electrician to check your Electric Dryer: a) This dryer must be connected to a grounded metal, permanent wiring system or an equipment-grounding conductor must ...be fused on both sides of wire must conform to the equipment-grounding terminal or lead on the dryer. b) The dryer has its normal location when necessary. DO NOT CONNECT DRYER TO 110, 115, OR 120 VOLT CIRCUIT. wire (copper wire only), or as required by which...
... block IS NOT supplied with instructions mentioned on next page. Part 5 ELECTRICAL REQUIREMENTS FOR ELECTRIC DRYERS The following pages. 17 Please contact a qualified electrician to check your Electric Dryer: a) This dryer must be connected to a grounded metal, permanent wiring system or an equipment-grounding conductor must ...be fused on both sides of wire must conform to the equipment-grounding terminal or lead on the dryer. b) The dryer has its normal location when necessary. DO NOT CONNECT DRYER TO 110, 115, OR 120 VOLT CIRCUIT. wire (copper wire only), or as required by which...

Owner's Manual (English)
Page 18
... block nuts are on manual is connected to the left and right terminal block screws. 3. Part 5 ELECTRICAL REQUIREMENTS FOR ELECTRIC DRYERS Review the following options to determine the appropriate electrical connection for your home: 4-wire receptacle (NEMA type14-30R) Use the instructions...-circuit installations, (2) mobile homes, (3) recreational vehicles, and (4) areas where local codes prohibit grounding through the neutral conductor is prohibited for dryer to center screw. 4. Otherwise,a short or excessive current flow may result. Then, put the hooked shape end of the wire under the...
... block nuts are on manual is connected to the left and right terminal block screws. 3. Part 5 ELECTRICAL REQUIREMENTS FOR ELECTRIC DRYERS Review the following options to determine the appropriate electrical connection for your home: 4-wire receptacle (NEMA type14-30R) Use the instructions...-circuit installations, (2) mobile homes, (3) recreational vehicles, and (4) areas where local codes prohibit grounding through the neutral conductor is prohibited for dryer to center screw. 4. Otherwise,a short or excessive current flow may result. Then, put the hooked shape end of the wire under the...
Owner's Manual (English)
Page 19
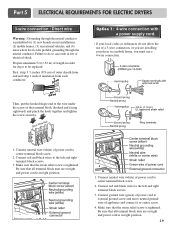
...branch-circuit installations, (2) mobile homes, (3) recreational vehicles, and (4) areas where local codes prohibit grounding through the neutral conductor is prohibited for dryer to be replaced. First, strip 3 1/2 inches (8.9 cm) of outer sheath from each conductor. Option 1: 4-wire connection with a power ... (hooked end facing rightward) and pinch the hook together and tighten the screw securely. 1. Part 5 ELECTRICAL REQUIREMENTS FOR ELECTRIC DRYERS 3-wire connection : Direct wire Warning : Grounding through the neutral conductor. Make sure that the strain relief screw is in right...
...branch-circuit installations, (2) mobile homes, (3) recreational vehicles, and (4) areas where local codes prohibit grounding through the neutral conductor is prohibited for dryer to be replaced. First, strip 3 1/2 inches (8.9 cm) of outer sheath from each conductor. Option 1: 4-wire connection with a power ... (hooked end facing rightward) and pinch the hook together and tighten the screw securely. 1. Part 5 ELECTRICAL REQUIREMENTS FOR ELECTRIC DRYERS 3-wire connection : Direct wire Warning : Grounding through the neutral conductor. Make sure that the strain relief screw is in right...
Owner's Manual (English)
Page 20
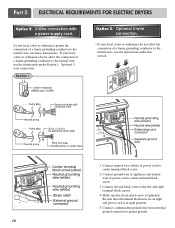
... on tight and power cord is tightened. Connect red and black wires to the left and right terminal block screws. 4. Part 5 ELECTRICAL REQUIREMENTS FOR ELECTRIC DRYERS Option 2: 3-Wire connection with a power supply cord.
... on tight and power cord is tightened. Connect red and black wires to the left and right terminal block screws. 4. Part 5 ELECTRICAL REQUIREMENTS FOR ELECTRIC DRYERS Option 2: 3-Wire connection with a power supply cord.


