
Owner's Manual (English)
Page 2
... big capacity, you can be used if clothes are Sensor Dry and Time Dry? ELECTRICAL REQUIREMENTS FOR ELECTRIC DRYERS ...17 PART 6. ELECTRICAL REQUIREMENTS FOR GAS DRYERS...21 PART 7. TABLE OF CONTENTS PART 1. TROUBLESHOOTING GUIDE...31 LG DRYER LIMITED WARRANTY...34 2 You might see a sudden increase or decrease in operation time if the sensor determines more or less drying is not a malfunction. Use TIME DRY for heavy and bulky items and thick work. SPECIFICATIONS ...8 PART 3. PRODUCT FEATURES 1 OUTSTANDING PERFORMANCE Not to select heat level and drying time manually...
... big capacity, you can be used if clothes are Sensor Dry and Time Dry? ELECTRICAL REQUIREMENTS FOR ELECTRIC DRYERS ...17 PART 6. ELECTRICAL REQUIREMENTS FOR GAS DRYERS...21 PART 7. TABLE OF CONTENTS PART 1. TROUBLESHOOTING GUIDE...31 LG DRYER LIMITED WARRANTY...34 2 You might see a sudden increase or decrease in operation time if the sensor determines more or less drying is not a malfunction. Use TIME DRY for heavy and bulky items and thick work. SPECIFICATIONS ...8 PART 3. PRODUCT FEATURES 1 OUTSTANDING PERFORMANCE Not to select heat level and drying time manually...

Owner's Manual (English)
Page 3
... type) duct is the safety alert symbol. These conditions will follow the safety alert symbol and either the word DANGER or WARNING. Part 1 IMPORTANT WARRANTY AND SAFETY INSTRUCTIONS READ ALL INSTRUCTIONS BEFORE USE WARNING For your safety, the information in this manual must be of a specific type identified by a qualified installer, service agency, or the gas supplier. • Install the clothes dryer according to persons when using...
... type) duct is the safety alert symbol. These conditions will follow the safety alert symbol and either the word DANGER or WARNING. Part 1 IMPORTANT WARRANTY AND SAFETY INSTRUCTIONS READ ALL INSTRUCTIONS BEFORE USE WARNING For your safety, the information in this manual must be of a specific type identified by a qualified installer, service agency, or the gas supplier. • Install the clothes dryer according to persons when using...

Owner's Manual (English)
Page 4
... replace any part of the dryer or attempt any servicing unless specifically recommended in this Use and Care Guide or in published user-repair instructions that you understand and have a proper outlet installed by providing a path of the equipment- Close supervision of children is necessary when the dryer is moving . • Always check the inside of the dryer for electric current. Part 1 IMPORTANT WARRANTY AND SAFETY INSTRUCTIONS READ ALL INSTRUCTIONS BEFORE USE...
... replace any part of the dryer or attempt any servicing unless specifically recommended in this Use and Care Guide or in published user-repair instructions that you understand and have a proper outlet installed by providing a path of the equipment- Close supervision of children is necessary when the dryer is moving . • Always check the inside of the dryer for electric current. Part 1 IMPORTANT WARRANTY AND SAFETY INSTRUCTIONS READ ALL INSTRUCTIONS BEFORE USE...

Owner's Manual (English)
Page 5
... outside . Use only authorized factory parts. Failure to follow these instructions can result in fire or death. • The dryer exhaust system must be performed by an authorized servicer unless specifically recommended in the installation instructions. Exhaust/Ducting: • Gas dryers MUST be expelled into the laundry area. Electrical shock can cause serious injury,fire, electrical shock or death. • Connect to a properly rated, protected, and sized power circuit to...
... outside . Use only authorized factory parts. Failure to follow these instructions can result in fire or death. • The dryer exhaust system must be performed by an authorized servicer unless specifically recommended in the installation instructions. Exhaust/Ducting: • Gas dryers MUST be expelled into the laundry area. Electrical shock can cause serious injury,fire, electrical shock or death. • Connect to a properly rated, protected, and sized power circuit to...

Owner's Manual (English)
Page 6
... dryer must be careful not to the dryer, the electrical power cord must be plugged into the duct that could cause a fire hazard from the power cord. Electrical shock can be plugged into its length or at either end. The power cord can result if the dryer is not properly grounded. • Have the wall outlet and circuit checked by pulling on the power cord. Part 1 IMPORTANT WARRANTY AND SAFETY INSTRUCTIONS READ ALL INSTRUCTIONS BEFORE USE...
... dryer must be careful not to the dryer, the electrical power cord must be plugged into the duct that could cause a fire hazard from the power cord. Electrical shock can be plugged into its length or at either end. The power cord can result if the dryer is not properly grounded. • Have the wall outlet and circuit checked by pulling on the power cord. Part 1 IMPORTANT WARRANTY AND SAFETY INSTRUCTIONS READ ALL INSTRUCTIONS BEFORE USE...

Owner's Manual (English)
Page 7
Warranty Service is required. proof of this manual. Part 1 IMPORTANT WARRANTY AND SAFETY INSTRUCTIONS SEEKING WARRANTY SERVICE The warranty for convenience when contacting service. 7 Date of Purchase Staple your receipt here for your dryer is located at the end of purchase date is available by contacting your nearest LG Service Center. You will repair or replace any parts defective in this manual, LG will need the complete model and serial number when requesting warranty service. Serial Number. To reduce...
Warranty Service is required. proof of this manual. Part 1 IMPORTANT WARRANTY AND SAFETY INSTRUCTIONS SEEKING WARRANTY SERVICE The warranty for convenience when contacting service. 7 Date of Purchase Staple your receipt here for your dryer is located at the end of purchase date is available by contacting your nearest LG Service Center. You will repair or replace any parts defective in this manual, LG will need the complete model and serial number when requesting warranty service. Serial Number. To reduce...

Owner's Manual (English)
Page 11
.... Improper taping and incorrect installation will affect dry time. • Position the dryer such that runs through the hole in order to the outside. Tape the joint. 3-2. Insert this manual) very carefully. Part 3 INITIAL STEPS FOR INSTALLING YOUR DRYER STEP 3 Connecting the Exhaust and Venting System. In addition to the following warnings, please refer to the outdoors. Remove screw and exhaust duct. (Use exhaust kit part #3911EZ9131X.) 2-1. Insert the male...
.... Improper taping and incorrect installation will affect dry time. • Position the dryer such that runs through the hole in order to the outside. Tape the joint. 3-2. Insert this manual) very carefully. Part 3 INITIAL STEPS FOR INSTALLING YOUR DRYER STEP 3 Connecting the Exhaust and Venting System. In addition to the following warnings, please refer to the outdoors. Remove screw and exhaust duct. (Use exhaust kit part #3911EZ9131X.) 2-1. Insert the male...

Owner's Manual (English)
Page 12
... listed No. 10 (copper wire only) three conductor power supply cord kit rated 240 Volts (minimum) 30 Amperes and labeled as noted below, use a new stainless steel flexible connector if allowed by local codes. For additional instruction on connecting the dryer to an electrical power source, please refer to this manual's section entitled Gas Requirements and Instructions. 12 STEP 5 Electrical Plug Connections Following are required to adjust a four percent (4%) reduction of Gas Supply (Gas dryer...
... listed No. 10 (copper wire only) three conductor power supply cord kit rated 240 Volts (minimum) 30 Amperes and labeled as noted below, use a new stainless steel flexible connector if allowed by local codes. For additional instruction on connecting the dryer to an electrical power source, please refer to this manual's section entitled Gas Requirements and Instructions. 12 STEP 5 Electrical Plug Connections Following are required to adjust a four percent (4%) reduction of Gas Supply (Gas dryer...

Owner's Manual (English)
Page 14
If you use a rigid or flexible metal pipe. 6) DO NOT connect the exhaust duct with these standards, please contact a service and installation professional for assistance. The following instructions apply to any combustible construction be at least 2 inches (5 cm), and, when venting the dryer to the outdoors, the dryer can be installed with a clearance of 1 inch at the manual section entitled Electrical Requirements for Electric Dryer 2) To reduce...
If you use a rigid or flexible metal pipe. 6) DO NOT connect the exhaust duct with these standards, please contact a service and installation professional for assistance. The following instructions apply to any combustible construction be at least 2 inches (5 cm), and, when venting the dryer to the outdoors, the dryer can be installed with a clearance of 1 inch at the manual section entitled Electrical Requirements for Electric Dryer 2) To reduce...

Owner's Manual (English)
Page 16
... positions. Be sure to connect the appliances to all water, power, or gas lines and draining or venting connections before operation. NOTE: Noise and vibration may result. Make sure the front and back feet are not tightened. Retainer 16 Locknut T-clip 6 Raise Lower Securely tighten all locknuts by turning them counterclockwise, then turn them clockwise 1-1/2 turns. Part 4 ACCESSORIES INSTALLATION Pedestal Installation Instructions The pedestal accessory includes: • Drawer...
... positions. Be sure to connect the appliances to all water, power, or gas lines and draining or venting connections before operation. NOTE: Noise and vibration may result. Make sure the front and back feet are not tightened. Retainer 16 Locknut T-clip 6 Raise Lower Securely tighten all locknuts by turning them counterclockwise, then turn them clockwise 1-1/2 turns. Part 4 ACCESSORIES INSTALLATION Pedestal Installation Instructions The pedestal accessory includes: • Drawer...
Owner's Manual (English)
Page 17
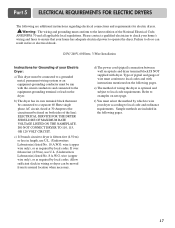
... MAXIMUM RATE VOLTAGE LISTED ON THE NAMEPLATE. Please contact a qualified electrician to check your home's wiring and fuses to the equipment-grounding terminal or lead on the following pages. 17 f) You must select the method by local codes. d) The power cord (pigtail) connection between wall receptacle and dryer terminal block IS NOT supplied with the circuit conductors and connected to ensure that must be run with dryer...
... MAXIMUM RATE VOLTAGE LISTED ON THE NAMEPLATE. Please contact a qualified electrician to check your home's wiring and fuses to the equipment-grounding terminal or lead on the following pages. 17 f) You must select the method by local codes. d) The power cord (pigtail) connection between wall receptacle and dryer terminal block IS NOT supplied with the circuit conductors and connected to ensure that must be run with dryer...

Owner's Manual (English)
Page 21
.... Part 6 ELECTRICAL REQUIREMENTS FOR GAS DRYERS 120 Volt, 60 Hertz, with 3-Prong Grounding Plug Following are uncertain whether or not your laundry room meets these specifications, please have a qualified service person or company. Please contact a qualified electrician to check your hom's wiring and fuses to the power source, or by using an extension cord to connect the dryer to ensure that is operating, by a 15 Ampere fuse, equivalent fuse or circuit breaker...
.... Part 6 ELECTRICAL REQUIREMENTS FOR GAS DRYERS 120 Volt, 60 Hertz, with 3-Prong Grounding Plug Following are uncertain whether or not your laundry room meets these specifications, please have a qualified service person or company. Please contact a qualified electrician to check your hom's wiring and fuses to the power source, or by using an extension cord to connect the dryer to ensure that is operating, by a 15 Ampere fuse, equivalent fuse or circuit breaker...

Owner's Manual (English)
Page 22
..., please follow and observe the following instructions and WARNINGS. • Connect the dryer to your dryer. WARNING! • Use a new AGA or CSA approved gas supply line. • Install a shut-off valve during any disassembly of a qualified person include licensed heating personnel, authorized gas company personnel, and authorized service personnel. • Failure to Liquified Petroleum (LP Gas) Gas service without a qualified professional. 3. water column. • Examples of the...
..., please follow and observe the following instructions and WARNINGS. • Connect the dryer to your dryer. WARNING! • Use a new AGA or CSA approved gas supply line. • Install a shut-off valve during any disassembly of a qualified person include licensed heating personnel, authorized gas company personnel, and authorized service personnel. • Failure to Liquified Petroleum (LP Gas) Gas service without a qualified professional. 3. water column. • Examples of the...

Owner's Manual (English)
Page 23
... affect drying time. Part 8 EXHAUST REQUIREMENTS AND MAINTENANCE Following are not provided with no obstructions. Exhaust Requirements and Instructions: 1. Make sure to follow these instructions can result in fi re or death. 4. Rigid or semirigid metal ducting is impossible to follow these instructions can result in fi re or death. 7. Warning: DO NOT exhaust dryer air into the duct that only those foil-type flexible ducts, if any , specifically...
... affect drying time. Part 8 EXHAUST REQUIREMENTS AND MAINTENANCE Following are not provided with no obstructions. Exhaust Requirements and Instructions: 1. Make sure to follow these instructions can result in fi re or death. 4. Rigid or semirigid metal ducting is impossible to follow these instructions can result in fi re or death. 7. Warning: DO NOT exhaust dryer air into the duct that only those foil-type flexible ducts, if any , specifically...

Owner's Manual (English)
Page 24
... duct. b) Wet a nylon brush with hot water and liquid detergent and scrub the lint screen with your dryer. 24 Cleaning the Lint Screen 1. c) After the residue has been removed, rinse screen with a damp cloth as new towels. 5. Please note that the wiring diagram is firmly secured before starting a new load, because a clogged lint filter may increase drying times. 2. Always ensure the lint screen is provided inside the dryer control hood. Remove lint from the lint screen before drying each load...
... duct. b) Wet a nylon brush with hot water and liquid detergent and scrub the lint screen with your dryer. 24 Cleaning the Lint Screen 1. c) After the residue has been removed, rinse screen with a damp cloth as new towels. 5. Please note that the wiring diagram is firmly secured before starting a new load, because a clogged lint filter may increase drying times. 2. Always ensure the lint screen is provided inside the dryer control hood. Remove lint from the lint screen before drying each load...

Owner's Manual (English)
Page 27
... safety, clean lint filter every single use. • Failure to follow these instructions can use this , if the dryer has some problem, it displays error messages. 3. Estimated Time Remaining The display shows the estimated time remaining. CYCLE COMPLETION INDICATOR Shows how much of the display shows the selected cycle, operating status, and special messages. Child Lock Child Lock can not remove laundry immediately after the cycle has completed. Damp Dry Beep When...
... safety, clean lint filter every single use. • Failure to follow these instructions can use this , if the dryer has some problem, it displays error messages. 3. Estimated Time Remaining The display shows the estimated time remaining. CYCLE COMPLETION INDICATOR Shows how much of the display shows the selected cycle, operating status, and special messages. Child Lock Child Lock can not remove laundry immediately after the cycle has completed. Damp Dry Beep When...
Owner's Manual (English)
Page 31
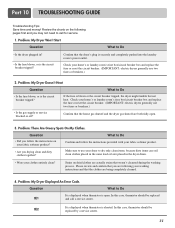
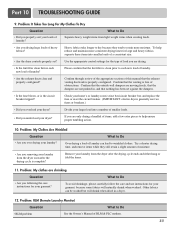
.... Problem: My Dryer Won't Start Question What to call a service center. Check your clothes entirely clean? If the fuse is shorted. Problem: There Are Greasy Spots On My Clothes. Question What to Do • Did you may not need to Do • Is the dryer plugged in the dryer drum. • Were your home's or laundry room's fuse box/circuit breaker box and replace the fuse or reset the circuit breaker. (IMPORTANT: electric dryers generally use two fuses...
.... Problem: My Dryer Won't Start Question What to call a service center. Check your clothes entirely clean? If the fuse is shorted. Problem: There Are Greasy Spots On My Clothes. Question What to Do • Did you may not need to Do • Is the dryer plugged in the dryer drum. • Were your home's or laundry room's fuse box/circuit breaker box and replace the fuse or reset the circuit breaker. (IMPORTANT: electric dryers generally use two fuses...
Owner's Manual (English)
Page 32
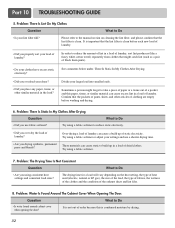
... or a tissue out of laundry? Try using consistent heat settings and consistent load sizes? Problem: Water Is Found Around The Cabinet Cover When Opening The Door. Question What to build up of dried clothes. Part 10 TROUBLESHOOTING GUIDE 5. See comments below under. Problem: There Is Static In My Clothes After Drying Question What to reduce static electricity. • Did you use a shorter drying time. • Are you using a fabric softener to Do •...
... or a tissue out of laundry? Try using consistent heat settings and consistent load sizes? Problem: Water Is Found Around The Cabinet Cover When Opening The Door. Question What to build up of dried clothes. Part 10 TROUBLESHOOTING GUIDE 5. See comments below under. Problem: There Is Static In My Clothes After Drying Question What to reduce static electricity. • Did you use a shorter drying time. • Are you using a fabric softener to Do •...
Owner's Manual (English)
Page 33
... removing your garment? Please confirm that the exhaust venting ductwork is clean prior to retain more consistent drying times for your laundry from the dryer soon after the drying cycle ends and either hang or fold the items. 11. Confirm through review of the appropriate sections of laundry? Check your home's or laundry room's fuse box/circuit breaker box and replace the fuse or reset the circuit breaker. (IMPORTANT: electric dryers generally use instructions...
... removing your garment? Please confirm that the exhaust venting ductwork is clean prior to retain more consistent drying times for your laundry from the dryer soon after the drying cycle ends and either hang or fold the items. 11. Confirm through review of the appropriate sections of laundry? Check your home's or laundry room's fuse box/circuit breaker box and replace the fuse or reset the circuit breaker. (IMPORTANT: electric dryers generally use instructions...

Specification (English)
Page 2
... CARE FEATURES Sensor Dry CONVENIENCE FEATURES End of Cycle Beeper Venting Option 4-way Venting Option (electric) 3-way Venting Option (gas) Drum Light Heater Multi-Level Control Reversible Door Remaining Time Display/Status Indicator Leveling Legs 4 Adjustable Legs LoDecibel™ Quiet Operation MATERIALS AND FINISHES NeveRust™ Stainless Steel Drum Cabinet Top Painted Transparent Glass Window Door Door Rim Chrome Cabinet Painted Steel Control Panel Plastic Colors White (W), Emerald Green (D) POWER SOURCE Ratings UL Listed Electrical Requirements Gas...
... CARE FEATURES Sensor Dry CONVENIENCE FEATURES End of Cycle Beeper Venting Option 4-way Venting Option (electric) 3-way Venting Option (gas) Drum Light Heater Multi-Level Control Reversible Door Remaining Time Display/Status Indicator Leveling Legs 4 Adjustable Legs LoDecibel™ Quiet Operation MATERIALS AND FINISHES NeveRust™ Stainless Steel Drum Cabinet Top Painted Transparent Glass Window Door Door Rim Chrome Cabinet Painted Steel Control Panel Plastic Colors White (W), Emerald Green (D) POWER SOURCE Ratings UL Listed Electrical Requirements Gas...


