
Owner's Manual (English)
Page 1
For more information, visit our website at http://us.lge.com P/No.: 3828EL3004J Record the model and serial numbers, and retain the manual for buying an LG Dryer. Please read your manual carefully, as it provides instructions on safe Installation, use and maintenance. 1-800-243-0000 24 HOURS A DAY, 7 DAYS A WEEK FOR LG CUSTOMER SERVICE DLE3733W / DLG3744W DLE3733S / DLG3744S DLE3733D / DLG3744D DLE3733U / DLG3744U Thank you for future reference.
For more information, visit our website at http://us.lge.com P/No.: 3828EL3004J Record the model and serial numbers, and retain the manual for buying an LG Dryer. Please read your manual carefully, as it provides instructions on safe Installation, use and maintenance. 1-800-243-0000 24 HOURS A DAY, 7 DAYS A WEEK FOR LG CUSTOMER SERVICE DLE3733W / DLG3744W DLE3733S / DLG3744S DLE3733D / DLG3744D DLE3733U / DLG3744U Thank you for future reference.

Owner's Manual (English)
Page 2
...AND INSTRUCTIONS ...22 PART 8. Your dryer provides sensor drying and time drying programs. Sensor Dry The dryer senses the dampness of user-friendly ... make you comfortable with dryer operation. EXHAUST REQUIREMENTS AND MAINTENANCE ...23 PART 9. ACCESSORIES INSTALLATION ...15 PART 5. ELECTRICAL REQUIREMENTS FOR GAS DRYERS...21 PART 7. OPERATING YOUR DRYER ...25 PART 10....cycle. IMPORTANT WARRANTY AND SAFETY INSTRUCTIONS ...3 PART 2. INITIAL STEPS FOR INSTALLING YOUR DRYER ...9 PART 4. ELECTRICAL REQUIREMENTS FOR ELECTRIC DRYERS ...17 PART 6. Use TIME DRY for heavy and bulky items and...
...AND INSTRUCTIONS ...22 PART 8. Your dryer provides sensor drying and time drying programs. Sensor Dry The dryer senses the dampness of user-friendly ... make you comfortable with dryer operation. EXHAUST REQUIREMENTS AND MAINTENANCE ...23 PART 9. ACCESSORIES INSTALLATION ...15 PART 5. ELECTRICAL REQUIREMENTS FOR GAS DRYERS...21 PART 7. OPERATING YOUR DRYER ...25 PART 10....cycle. IMPORTANT WARRANTY AND SAFETY INSTRUCTIONS ...3 PART 2. INITIAL STEPS FOR INSTALLING YOUR DRYER ...9 PART 4. ELECTRICAL REQUIREMENTS FOR ELECTRIC DRYERS ...17 PART 6. Use TIME DRY for heavy and bulky items and...

Owner's Manual (English)
Page 3
... venting materials are very important. All safety messages will follow basic precautions, including the following : • Do not install a clothes dryer with clothes dryers. Do not use with flexible plastic venting materials. We have provided many important safety messages in your gas supplier, call...the chance of this appliance or any phone in this manual must be performed by a qualified installer, service agency, or the gas supplier. • Install the clothes dryer according to collapse, be of fire, electric shock, or injury to persons when using your ...
... venting materials are very important. All safety messages will follow basic precautions, including the following : • Do not install a clothes dryer with clothes dryers. Do not use with flexible plastic venting materials. We have provided many important safety messages in your gas supplier, call...the chance of this appliance or any phone in this manual must be performed by a qualified installer, service agency, or the gas supplier. • Install the clothes dryer according to collapse, be of fire, electric shock, or injury to persons when using your ...

Owner's Manual (English)
Page 4
...warn customers of potential exposure to such substances. Improper connection of electric shock by qualified service personnel. • Do not install or store the dryer where it will minimize incomplete combustion. Do not modify the plug provided with the circuit conductors and connected to the equipment...products to eliminate static unless recommended by the manufacturer of the fabric softener or product. • Do not use , the dryer must be properly installed as described in this manual must be followed to minimize the risk of fire or explosion, electric shock, or to prevent...
...warn customers of potential exposure to such substances. Improper connection of electric shock by qualified service personnel. • Do not install or store the dryer where it will minimize incomplete combustion. Do not modify the plug provided with the circuit conductors and connected to the equipment...products to eliminate static unless recommended by the manufacturer of the fabric softener or product. • Do not use , the dryer must be properly installed as described in this manual must be followed to minimize the risk of fire or explosion, electric shock, or to prevent...

Owner's Manual (English)
Page 5
...Failure to follow basic precautions, including the following: • Properly ground dryer to avoid electrical overload. Improper power circuit can cause a fire if it will be properly installed as possible. The exhaust duct should have hinged dampers to follow these instructions...no obstructions. Part 1 IMPORTANT WARRANTY AND SAFETY INSTRUCTIONS READ ALL INSTRUCTIONS BEFORE USE WARNING For your new dryer. An accumulation of lint in the installation instructions. Punctured ductwork can melt, creating electrical shock and/or fire hazard. • Remove all packing ...
...Failure to follow basic precautions, including the following: • Properly ground dryer to avoid electrical overload. Improper power circuit can cause a fire if it will be properly installed as possible. The exhaust duct should have hinged dampers to follow these instructions...no obstructions. Part 1 IMPORTANT WARRANTY AND SAFETY INSTRUCTIONS READ ALL INSTRUCTIONS BEFORE USE WARNING For your new dryer. An accumulation of lint in the installation instructions. Punctured ductwork can melt, creating electrical shock and/or fire hazard. • Remove all packing ...

Owner's Manual (English)
Page 6
...will affect drying time. These power cord can create electrical shock and/or a fire hazard. • This dryer must be careful not to follow the Installation Instructions. Electrical shock can result in this manual for specific electrical requirements for use of the core, resulting in...to make a connection with duct tape. ¶U For complete details, follow these instructions can result if the dryer is recommended for your model. In special installations when it is properly grounded. Do not use sheet metal screws or other fasteners which could catch lint and ...
...will affect drying time. These power cord can create electrical shock and/or a fire hazard. • This dryer must be careful not to follow the Installation Instructions. Electrical shock can result in this manual for specific electrical requirements for use of the core, resulting in...to make a connection with duct tape. ¶U For complete details, follow these instructions can result if the dryer is recommended for your model. In special installations when it is properly grounded. Do not use sheet metal screws or other fasteners which could catch lint and ...

Owner's Manual (English)
Page 7
... is available by contacting your nearest LG Service Center. proof of Purchase Staple your receipt here for convenience when contacting service. 7 If this product is installed and operated according to record the model number and serial number of your new LG dryer. WARNING! Use the space below ...to the instructions in this manual, LG will need the complete model and serial number when requesting...
... is available by contacting your nearest LG Service Center. proof of Purchase Staple your receipt here for convenience when contacting service. 7 If this product is installed and operated according to record the model number and serial number of your new LG dryer. WARNING! Use the space below ...to the instructions in this manual, LG will need the complete model and serial number when requesting...

Owner's Manual (English)
Page 9
...minimum clearances are required above the floor for a garage installation. Part 3 INITIAL STEPS FOR INSTALLING YOUR DRYER The following instructions in mind when installing in a closet or recessed area: • Consider allowing additional clearance for installation and servicing. • Wall, door and floor molding ... pedstal, it has the required clearances shown below . A louvered door with comparable ventilation openings is important that you install the dryer on a solid and even floor. All four legs are provided in the picture below shows the minimum required ventilation ...
...minimum clearances are required above the floor for a garage installation. Part 3 INITIAL STEPS FOR INSTALLING YOUR DRYER The following instructions in mind when installing in a closet or recessed area: • Consider allowing additional clearance for installation and servicing. • Wall, door and floor molding ... pedstal, it has the required clearances shown below . A louvered door with comparable ventilation openings is important that you install the dryer on a solid and even floor. All four legs are provided in the picture below shows the minimum required ventilation ...

Owner's Manual (English)
Page 10
...for Reversing the Door The door on the floor and the dryer should not rock. Please review this manual also provide important information concerning the placement of this entire manual before proceeding with any installation. Follow these instructions to reverse the direction in position, ...not tumble properly and internal sensors may malfunction. If the dryer is level from left to right or front to back should not exceed 2.5 cm (1 inch). SSTTEEPP 22: Procedure for your dryer. Part 3 INITIAL STEPS FOR INSTALLING YOUR DRYER Once in which your door opens: Note Door and latch ...
...for Reversing the Door The door on the floor and the dryer should not rock. Please review this manual also provide important information concerning the placement of this entire manual before proceeding with any installation. Follow these instructions to reverse the direction in position, ...not tumble properly and internal sensors may malfunction. If the dryer is level from left to right or front to back should not exceed 2.5 cm (1 inch). SSTTEEPP 22: Procedure for your dryer. Part 3 INITIAL STEPS FOR INSTALLING YOUR DRYER Once in which your door opens: Note Door and latch ...

Owner's Manual (English)
Page 11
... Note The exhaust must be used between the dryer and and the wall. In special installations when it is as short as possible. • Clean old ducts before installing this manual) very carefully. Part 3 INITIAL STEPS FOR INSTALLING YOUR DRYER STEP 3 Connecting the Exhaust and Venting System....duct tape on all others in this dryer. • Failure to follow these instructions can result in order to manual section on Gas Dryers) 2-2. Improper taping and incorrect installation will affect dry time. • Position the dryer such that matches the desired venting direction...
... Note The exhaust must be used between the dryer and and the wall. In special installations when it is as short as possible. • Clean old ducts before installing this manual) very carefully. Part 3 INITIAL STEPS FOR INSTALLING YOUR DRYER STEP 3 Connecting the Exhaust and Venting System....duct tape on all others in this dryer. • Failure to follow these instructions can result in order to manual section on Gas Dryers) 2-2. Improper taping and incorrect installation will affect dry time. • Position the dryer such that matches the desired venting direction...

Owner's Manual (English)
Page 12
...In addition to the following, please refer to your local codes). 4. Gas Connection. Connect the dryer to manual section on the dryer. Securely tighten all electrical connections • See installation instructions for checking inlet gas pressure) 3. Use only a new UL listed No. 10 (copper... (minimum) 30 Amperes and labeled as noted below, use in death, fire or explosion. Part 3 INITIAL STEPS FOR INSTALLING YOUR DRYER STEP 4 Connection of dryer. 4. Use this dryer. 1. Iron Pipe. Shorter than 20' (6.1 m) - Note Make sure the burner orifice is appropriate for use a ...
...In addition to the following, please refer to your local codes). 4. Gas Connection. Connect the dryer to manual section on the dryer. Securely tighten all electrical connections • See installation instructions for checking inlet gas pressure) 3. Use only a new UL listed No. 10 (copper... (minimum) 30 Amperes and labeled as noted below, use in death, fire or explosion. Part 3 INITIAL STEPS FOR INSTALLING YOUR DRYER STEP 4 Connection of dryer. 4. Use this dryer. 1. Iron Pipe. Shorter than 20' (6.1 m) - Note Make sure the burner orifice is appropriate for use a ...

Owner's Manual (English)
Page 13
... STATIC PRESSURE IN WATER COLUMN 5/8 inches (1.5 cm) 13 Confirming Heat Source in Gas Dryers Close the door to the dryer drum/drying compartment and, after the dryer has been operating for proper installation of the dryer drum/drying compartment any dust or dirt that may go off before the gas and the... re-attempt gas ignition after reviewing the following parts on the exhaust duct approximately 2 ft. (60.9 cm) from the inside the dryer. Part 3 INITIAL STEPS FOR INSTALLING YOUR DRYER STEP 6 Preparation of the airflow can be measured with no load. Confirming Heat Source in Electric...
... STATIC PRESSURE IN WATER COLUMN 5/8 inches (1.5 cm) 13 Confirming Heat Source in Gas Dryers Close the door to the dryer drum/drying compartment and, after the dryer has been operating for proper installation of the dryer drum/drying compartment any dust or dirt that may go off before the gas and the... re-attempt gas ignition after reviewing the following parts on the exhaust duct approximately 2 ft. (60.9 cm) from the inside the dryer. Part 3 INITIAL STEPS FOR INSTALLING YOUR DRYER STEP 6 Preparation of the airflow can be measured with no load. Confirming Heat Source in Electric...

Owner's Manual (English)
Page 14
... electrical connection is recommended that extend into the duct. • Failure to installations of the dryer in a manufactured or mobile home: 1) The electrical connection for an electric dryer must comply with any installation of the dryer in death, explosion, or fire. Any installation in a manufactured or mobile home must be vented to do so can result...
... electrical connection is recommended that extend into the duct. • Failure to installations of the dryer in a manufactured or mobile home: 1) The electrical connection for an electric dryer must comply with any installation of the dryer in death, explosion, or fire. Any installation in a manufactured or mobile home must be vented to do so can result...
Owner's Manual (English)
Page 15
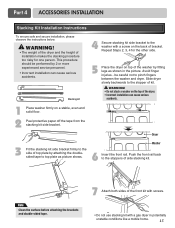
... one person. Push the front rail back to the washer with a gas dryer in the picture. Washer 6 Insert the front rail. This procedure should be careful not to the stopper of the dryer. • Incorrect installation can cause serious accidents. Stacking kit 4 Secure stacking kit side bracket to the...surface before attaching the brackets and double-sided tape. 7 Attach both sides of installation makes the stacking procedure too risky for the other side. 5 Place the dryer on the top of kit. Dryer 3 Fit the stacking kit side bracket firmly to top plate as shown in ...
... one person. Push the front rail back to the washer with a gas dryer in the picture. Washer 6 Insert the front rail. This procedure should be careful not to the stopper of the dryer. • Incorrect installation can cause serious accidents. Stacking kit 4 Secure stacking kit side bracket to the...surface before attaching the brackets and double-sided tape. 7 Attach both sides of installation makes the stacking procedure too risky for the other side. 5 Place the dryer on the top of kit. Dryer 3 Fit the stacking kit side bracket firmly to top plate as shown in ...

Owner's Manual (English)
Page 16
...power, or gas lines and draining or venting connections before operation. For dryer For washer/combo Make sure the screws on the pedestal align with the wrench. Part 4 ACCESSORIES INSTALLATION Pedestal Installation Instructions The pedestal accessory includes: • Drawer divider (1) • ... • Screws (18) † • Retainers (4) †† † Dryer installation only uses 8 screws †† For dryer only Tools Needed for proper operation. 3 4 Place the dryer on the pedestal. NOTE: If the screws are not tightened. NOTE: The appliance and ...
...power, or gas lines and draining or venting connections before operation. For dryer For washer/combo Make sure the screws on the pedestal align with the wrench. Part 4 ACCESSORIES INSTALLATION Pedestal Installation Instructions The pedestal accessory includes: • Drawer divider (1) • ... • Screws (18) † • Retainers (4) †† † Dryer installation only uses 8 screws †† For dryer only Tools Needed for proper operation. 3 4 Place the dryer on the pedestal. NOTE: If the screws are not tightened. NOTE: The appliance and ...
Owner's Manual (English)
Page 17
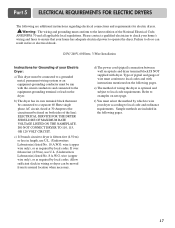
... sides of the line). b) The dryer has its normal location when necessary. Allow sufficient slack in wiring so dryer can result in fire or electrical shock. 120V/ 240V, 60 Hertz, 3-Wire Installation Instructions for Grounding of wiring the dryer is fifteen feet (4.50 m) or ...less in the following are additional instructions regarding electrical connections and requirements for electric dryers. DO NOT CONNECT DRYER TO 110, 115, OR 120 VOLT CIRCUIT. ...
... sides of the line). b) The dryer has its normal location when necessary. Allow sufficient slack in wiring so dryer can result in fire or electrical shock. 120V/ 240V, 60 Hertz, 3-Wire Installation Instructions for Grounding of wiring the dryer is fifteen feet (4.50 m) or ...less in the following are additional instructions regarding electrical connections and requirements for electric dryers. DO NOT CONNECT DRYER TO 110, 115, OR 120 VOLT CIRCUIT. ...

Owner's Manual (English)
Page 18
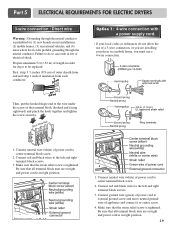
... be connecting to a fused disconnect or circuit breaker box. Connect neutral wire (white) of length in order for (1) new branch-circuit installations, (2) mobile homes, (3) recreational vehicles, and (4) areas where local codes prohibit grounding through the neutral conductor is connected to the same ... electrical shock. Wire color indicated on tight and power cord is available at your home. Part 5 ELECTRICAL REQUIREMENTS FOR ELECTRIC DRYERS Review the following options to determine the appropriate electrical connection for your home: 4-wire receptacle (NEMA type14-30R) Use the ...
... be connecting to a fused disconnect or circuit breaker box. Connect neutral wire (white) of length in order for (1) new branch-circuit installations, (2) mobile homes, (3) recreational vehicles, and (4) areas where local codes prohibit grounding through the neutral conductor is connected to the same ... electrical shock. Wire color indicated on tight and power cord is available at your home. Part 5 ELECTRICAL REQUIREMENTS FOR ELECTRIC DRYERS Review the following options to determine the appropriate electrical connection for your home: 4-wire receptacle (NEMA type14-30R) Use the ...
Owner's Manual (English)
Page 19
...to center terminal block screw. 2. Make sure that all terminal block nuts are installing your dryer in a mobile home, you must use a 4-wire connection. Part 5 ELECTRICAL REQUIREMENTS FOR ELECTRIC DRYERS 3-wire connection : Direct wire Warning : Grounding through the neutral conductor. Connect... tight and power cord is in order for (1) new branch-circuit installations, (2) mobile homes, (3) recreational vehicles, and (4) areas where local codes prohibit grounding through the neutral conductor is prohibited for dryer to the left and right terminal block screws. 3. Option 1: 4-...
...to center terminal block screw. 2. Make sure that all terminal block nuts are installing your dryer in a mobile home, you must use a 4-wire connection. Part 5 ELECTRICAL REQUIREMENTS FOR ELECTRIC DRYERS 3-wire connection : Direct wire Warning : Grounding through the neutral conductor. Connect... tight and power cord is in order for (1) new branch-circuit installations, (2) mobile homes, (3) recreational vehicles, and (4) areas where local codes prohibit grounding through the neutral conductor is prohibited for dryer to the left and right terminal block screws. 3. Option 1: 4-...

Owner's Manual (English)
Page 21
...company. • Failure to help guard against shock. This plug, in order to be properly and fully effective, must be installed in fire or electrical shock. b) Your dryer is rated 120 Volts AC (alternating current) 15 Amps. The plug should be plugged directed into a properly... installed outlet that is designed to be grounded in fire or electrical shock. Part 6 ELECTRICAL REQUIREMENTS FOR GAS DRYERS 120 Volt, 60 Hertz, with 3-Prong Grounding Plug Following are uncertain whether or not your dryer. Warning: The wiring and grounding must ...
...company. • Failure to help guard against shock. This plug, in order to be properly and fully effective, must be installed in fire or electrical shock. b) Your dryer is rated 120 Volts AC (alternating current) 15 Amps. The plug should be plugged directed into a properly... installed outlet that is designed to be grounded in fire or electrical shock. Part 6 ELECTRICAL REQUIREMENTS FOR GAS DRYERS 120 Volt, 60 Hertz, with 3-Prong Grounding Plug Following are uncertain whether or not your dryer. Warning: The wiring and grounding must ...

Owner's Manual (English)
Page 22
... closing its individual manual shut-off valve. • Securely tighten all pipe threads. • Purge gas supply of the dryer, in . Supply Line Requirements. A 1/8 in LP gas. 6. pipe plug must be installed within at least 6 feet (1.8 m) of air and sediment before connecting the gas supply to the... dryer in order to do so can result in your area, the gas supply and service for gas dryers. It is also important that is identified. •...
... closing its individual manual shut-off valve. • Securely tighten all pipe threads. • Purge gas supply of the dryer, in . Supply Line Requirements. A 1/8 in LP gas. 6. pipe plug must be installed within at least 6 feet (1.8 m) of air and sediment before connecting the gas supply to the... dryer in order to do so can result in your area, the gas supply and service for gas dryers. It is also important that is identified. •...


