

Owner's Manual (English)
Page 2
... and operation time. Use TIME DRY for heavy and bulky items and thick work. OPERATING YOUR DRYER ...25 PART 10. IMPORTANT WARRANTY AND SAFETY INSTRUCTIONS ...3 PART 2. SPECIFICATIONS ...8 PART 3. GAS REQUIREMENTS AND INSTRUCTIONS ...22 PART 8. TROUBLESHOOTING GUIDE...31 LG DRYER LIMITED WARRANTY...34 2 PRODUCT FEATURES 1 OUTSTANDING PERFORMANCE Not to select heat level and drying time manually...
... and operation time. Use TIME DRY for heavy and bulky items and thick work. OPERATING YOUR DRYER ...25 PART 10. IMPORTANT WARRANTY AND SAFETY INSTRUCTIONS ...3 PART 2. SPECIFICATIONS ...8 PART 3. GAS REQUIREMENTS AND INSTRUCTIONS ...22 PART 8. TROUBLESHOOTING GUIDE...31 LG DRYER LIMITED WARRANTY...34 2 PRODUCT FEATURES 1 OUTSTANDING PERFORMANCE Not to select heat level and drying time manually...

Owner's Manual (English)
Page 3
... and others are very important. If flexible metal (foil type) duct is the safety alert symbol. Always read and obey all occupants. 4. SAVE THESE INSTRUCTIONS 3 Part 1 IMPORTANT WARRANTY AND SAFETY INSTRUCTIONS READ ALL INSTRUCTIONS BEFORE USE WARNING For your safety, the information in this manual must be easily crushed, and trap...
... and others are very important. If flexible metal (foil type) duct is the safety alert symbol. Always read and obey all occupants. 4. SAVE THESE INSTRUCTIONS 3 Part 1 IMPORTANT WARRANTY AND SAFETY INSTRUCTIONS READ ALL INSTRUCTIONS BEFORE USE WARNING For your safety, the information in this manual must be easily crushed, and trap...

Owner's Manual (English)
Page 4
... in accordance with cooking oils may contribute to a chemical reaction that could ignite or explode. • Do not reach into the dryer while parts are in doubt as to whether the appliance is properly grounded. Check with the appliance. Exposure to these substances, namely benzene, carbon monxide, ... this Use and Care Guide or in published user-repair instructions that you are moving . • Do not repair or replace any part of the dryer or attempt any servicing unless specifically recommended in this manual must be cleaned periodically by providing a path of least resistance for...
... in accordance with cooking oils may contribute to a chemical reaction that could ignite or explode. • Do not reach into the dryer while parts are in doubt as to whether the appliance is properly grounded. Check with the appliance. Exposure to these substances, namely benzene, carbon monxide, ... this Use and Care Guide or in published user-repair instructions that you are moving . • Do not repair or replace any part of the dryer or attempt any servicing unless specifically recommended in this manual must be cleaned periodically by providing a path of least resistance for...

Owner's Manual (English)
Page 5
...duct must be 4 in. (10 cm) in diameter with the dryer, and you should obtain the necessary ductwork locally. Use only authorized factory parts. Improper power circuit can cause a fire if it will be properly installed as possible. Use of moisture will not be kept as short as... property damage, personal injury, or loss of the home can result in fire or death. 5 Make sure to clean any area of life. Part 1 IMPORTANT WARRANTY AND SAFETY INSTRUCTIONS READ ALL INSTRUCTIONS BEFORE USE WARNING For your new dryer. Exhaust/Ducting: • Gas dryers MUST be followed ...
...duct must be 4 in. (10 cm) in diameter with the dryer, and you should obtain the necessary ductwork locally. Use only authorized factory parts. Improper power circuit can cause a fire if it will be properly installed as possible. Use of moisture will not be kept as short as... property damage, personal injury, or loss of the home can result in fire or death. 5 Make sure to clean any area of life. Part 1 IMPORTANT WARRANTY AND SAFETY INSTRUCTIONS READ ALL INSTRUCTIONS BEFORE USE WARNING For your new dryer. Exhaust/Ducting: • Gas dryers MUST be followed ...

Owner's Manual (English)
Page 6
Part 1 IMPORTANT WARRANTY AND SAFETY INSTRUCTIONS READ ALL INSTRUCTIONS BEFORE USE WARNING For your safety, the information in this manual must be followed to minimize the ...
Part 1 IMPORTANT WARRANTY AND SAFETY INSTRUCTIONS READ ALL INSTRUCTIONS BEFORE USE WARNING For your safety, the information in this manual must be followed to minimize the ...

Owner's Manual (English)
Page 7
... Service is required. Warranty Restriction: If the dryer is subjected to the instructions in this manual, LG will need the complete model and serial number when requesting warranty service. Part 1 IMPORTANT WARRANTY AND SAFETY INSTRUCTIONS SEEKING WARRANTY SERVICE The warranty for your dryer is located at the... or workmanship throughout the warranty period, beginning with the date of your appliance follow basic precautions. You will repair or replace any parts defective in this manual. To reduce the risk of fire or explosion, electric shock or to record the model number and serial...
... Service is required. Warranty Restriction: If the dryer is subjected to the instructions in this manual, LG will need the complete model and serial number when requesting warranty service. Part 1 IMPORTANT WARRANTY AND SAFETY INSTRUCTIONS SEEKING WARRANTY SERVICE The warranty for your dryer is located at the... or workmanship throughout the warranty period, beginning with the date of your appliance follow basic precautions. You will repair or replace any parts defective in this manual. To reduce the risk of fire or explosion, electric shock or to record the model number and serial...
Owner's Manual (English)
Page 8
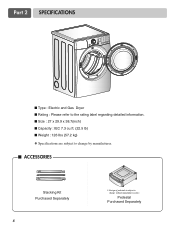
Pedestal Purchased Separately Part 2 SPECIFICATIONS ■ Type : Electric and Gas Dryer ■ Rating : Please refer to the rating label regarding detailed information. ■ Size : 27 x 29.9 x 38.7(inch) ■ Capacity : IEC 7.3 cu.ft. (22.5 lb) ■ Weight : 126 Ibs (57.2 kg) ❋ Specifications are subject to change by manufacturer. ■ ACCESSORIES Stacking Kit Purchased Separately 8 ❊ Design of pedestals is subject to change without manafaturers notice.
Pedestal Purchased Separately Part 2 SPECIFICATIONS ■ Type : Electric and Gas Dryer ■ Rating : Please refer to the rating label regarding detailed information. ■ Size : 27 x 29.9 x 38.7(inch) ■ Capacity : IEC 7.3 cu.ft. (22.5 lb) ■ Weight : 126 Ibs (57.2 kg) ❋ Specifications are subject to change by manufacturer. ■ ACCESSORIES Stacking Kit Purchased Separately 8 ❊ Design of pedestals is subject to change without manafaturers notice.

Owner's Manual (English)
Page 9
Part 3 INITIAL STEPS FOR INSTALLING YOUR DRYER The following instructions in mind when installing in a closet or recessed area: • Consider allowing additional clearance for installation ... are provided in the desired location, please make sure that you install the dryer on a solid and even floor. After placing the dryer in other parts of clearance is nessary to minimize noise transfer. • Consider space needed for the door. When leveling, please be secured. STEP 1 Positioning the Dryer. If...
Part 3 INITIAL STEPS FOR INSTALLING YOUR DRYER The following instructions in mind when installing in a closet or recessed area: • Consider allowing additional clearance for installation ... are provided in the desired location, please make sure that you install the dryer on a solid and even floor. After placing the dryer in other parts of clearance is nessary to minimize noise transfer. • Consider space needed for the door. When leveling, please be secured. STEP 1 Positioning the Dryer. If...

Owner's Manual (English)
Page 10
Part 3 INITIAL STEPS FOR INSTALLING YOUR DRYER Once in which your door opens: Note Door and latch should not rock. Follow these instructions to reverse the ...
Part 3 INITIAL STEPS FOR INSTALLING YOUR DRYER Once in which your door opens: Note Door and latch should not rock. Follow these instructions to reverse the ...

Owner's Manual (English)
Page 11
.... ■ ALTERNATE EXHAUST DIRECTIONS 1. WARNING! • Use a heavy metal vent. • Do not use of a short duct. Remove screw and exhaust duct. (Use exhaust kit part #3911EZ9131X.) 2-1. Tape the joint. 3-2. Part 3 INITIAL STEPS FOR INSTALLING YOUR DRYER STEP 3 Connecting the Exhaust and Venting System. Tape the joint. 11
.... ■ ALTERNATE EXHAUST DIRECTIONS 1. WARNING! • Use a heavy metal vent. • Do not use of a short duct. Remove screw and exhaust duct. (Use exhaust kit part #3911EZ9131X.) 2-1. Tape the joint. 3-2. Part 3 INITIAL STEPS FOR INSTALLING YOUR DRYER STEP 3 Connecting the Exhaust and Venting System. Tape the joint. 11

Owner's Manual (English)
Page 12
... if allowed by your laundry room's gas supply using LNG with LPG nozzle will not have . If changing the orifice, also adjust the gas valve. 1. Part 3 INITIAL STEPS FOR INSTALLING YOUR DRYER STEP 4 Connection of the gas connection pipe when you remove the shipping cap. 3. More detailed information concerning the electrical... suitable for gas leaks with LNG orifice will result in fire or electrical shock. Make sure that the type of dryer. 4. Connect the dryer to Part 7 (page 20) 5. Refer to your local codes). 4.
... if allowed by your laundry room's gas supply using LNG with LPG nozzle will not have . If changing the orifice, also adjust the gas valve. 1. Part 3 INITIAL STEPS FOR INSTALLING YOUR DRYER STEP 4 Connection of the gas connection pipe when you remove the shipping cap. 3. More detailed information concerning the electrical... suitable for gas leaks with LNG orifice will result in fire or electrical shock. Make sure that the type of dryer. 4. Connect the dryer to Part 7 (page 20) 5. Refer to your local codes). 4.

Owner's Manual (English)
Page 13
..., after the dryer has been operating for proper installation of detergent and water, with a manometer, placed on your dryer after reviewing the following parts on the exhaust duct approximately 2 ft. (60.9 cm) from the dryer. The dryer should not exceed 5/8 inches (1.5 cm). STEP 7... requires appropriate dryer airflow. Measuring Static pressure 1 Manometer 2 Exhaust Duct MAXIMUM STATIC PRESSURE IN WATER COLUMN 5/8 inches (1.5 cm) 13 Part 3 INITIAL STEPS FOR INSTALLING YOUR DRYER STEP 6 Preparation of the dryer drum/drying compartment any dust or dirt that may go off before...
..., after the dryer has been operating for proper installation of detergent and water, with a manometer, placed on your dryer after reviewing the following parts on the exhaust duct approximately 2 ft. (60.9 cm) from the dryer. The dryer should not exceed 5/8 inches (1.5 cm). STEP 7... requires appropriate dryer airflow. Measuring Static pressure 1 Manometer 2 Exhaust Duct MAXIMUM STATIC PRESSURE IN WATER COLUMN 5/8 inches (1.5 cm) 13 Part 3 INITIAL STEPS FOR INSTALLING YOUR DRYER STEP 6 Preparation of the dryer drum/drying compartment any dust or dirt that may go off before...

Owner's Manual (English)
Page 14
... NOT connect the exhaust duct with metal screws or fasteners that will comply with the Manufactured Home Construction and Safety Standards Title 24 CFR, Part 32-80 or Standard CAN/CSA0Z240 MH and local codes and ordinances. The opening for outside using the back, left , right, or ... dryers may be vented to the outside using the right side panel because of combustion and fire, the dryer must be a 4-wire connection. Part 3 INITIAL STEPS FOR INSTALLING YOUR DRYER STEP 9 Additional Instructions for Installation of the dryer in a manufactured or mobile home. The following instructions ...
... NOT connect the exhaust duct with metal screws or fasteners that will comply with the Manufactured Home Construction and Safety Standards Title 24 CFR, Part 32-80 or Standard CAN/CSA0Z240 MH and local codes and ordinances. The opening for outside using the back, left , right, or ... dryers may be vented to the outside using the right side panel because of combustion and fire, the dryer must be a 4-wire connection. Part 3 INITIAL STEPS FOR INSTALLING YOUR DRYER STEP 9 Additional Instructions for Installation of the dryer in a manufactured or mobile home. The following instructions ...
Owner's Manual (English)
Page 15
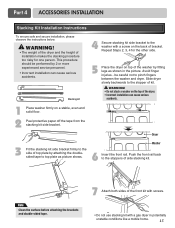
...; Do not use stacking kit with a screw on the back of kit. Push the front rail back to pinch fingers between the washer and dryer. Part 4 ACCESSORIES INSTALLATION Stacking Kit Installation Instructions To ensure safe and secure installation, please observe the instructions below. Slide dryer slowly backwards to the washer with...
...; Do not use stacking kit with a screw on the back of kit. Push the front rail back to pinch fingers between the washer and dryer. Part 4 ACCESSORIES INSTALLATION Stacking Kit Installation Instructions To ensure safe and secure installation, please observe the instructions below. Slide dryer slowly backwards to the washer with...

Owner's Manual (English)
Page 16
... Insert the T-clip of the dryer by hand. Move the appliance to the desired location. 5 Loosen the locknuts on the pedestal align with the wrench. Part 4 ACCESSORIES INSTALLATION Pedestal Installation Instructions The pedestal accessory includes: • Drawer divider (1) • Wrench (1) • Screws (18) † • Retainers (4) †† † Dryer installation...
... Insert the T-clip of the dryer by hand. Move the appliance to the desired location. 5 Loosen the locknuts on the pedestal align with the wrench. Part 4 ACCESSORIES INSTALLATION Pedestal Installation Instructions The pedestal accessory includes: • Drawer divider (1) • Wrench (1) • Screws (18) † • Retainers (4) †† † Dryer installation...
Owner's Manual (English)
Page 17
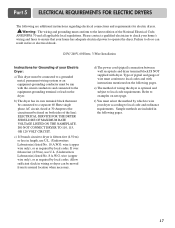
.... 10 A.W.G. ELECTRICAL SERVICE FOR THE DRYER SHOULD BE OF MAXIMUM RATE VOLTAGE LISTED ON THE NAMEPLATE. c) If branch circuit to examples on the following pages. Part 5 ELECTRICAL REQUIREMENTS FOR ELECTRIC DRYERS The following pages. 17 Failure to do so can be connected to the latest edition of your Electric Dryer: a) This...
.... 10 A.W.G. ELECTRICAL SERVICE FOR THE DRYER SHOULD BE OF MAXIMUM RATE VOLTAGE LISTED ON THE NAMEPLATE. c) If branch circuit to examples on the following pages. Part 5 ELECTRICAL REQUIREMENTS FOR ELECTRIC DRYERS The following pages. 17 Failure to do so can be connected to the latest edition of your Electric Dryer: a) This...

Owner's Manual (English)
Page 18
... type 10-30R) and you will be connecting to a fused disconnect or circuit breaker box. 3-wire direct If this type is available at your home. Part 5 ELECTRICAL REQUIREMENTS FOR ELECTRIC DRYERS Review the following options to determine the appropriate electrical connection for your home: 4-wire receptacle (NEMA type14-30R) Use the...
... type 10-30R) and you will be connecting to a fused disconnect or circuit breaker box. 3-wire direct If this type is available at your home. Part 5 ELECTRICAL REQUIREMENTS FOR ELECTRIC DRYERS Review the following options to determine the appropriate electrical connection for your home: 4-wire receptacle (NEMA type14-30R) Use the...
Owner's Manual (English)
Page 19
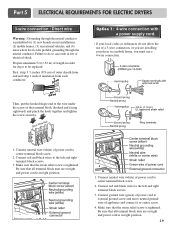
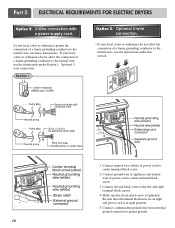
... branch-circuit installations, (2) mobile homes, (3) recreational vehicles, and (4) areas where local codes prohibit grounding through the neutral conductor is prohibited for dryer to be replaced. Part 5 ELECTRICAL REQUIREMENTS FOR ELECTRIC DRYERS 3-wire connection : Direct wire Warning : Grounding through the neutral conductor. Connect neutral wire (white) of power cord to do not...
... branch-circuit installations, (2) mobile homes, (3) recreational vehicles, and (4) areas where local codes prohibit grounding through the neutral conductor is prohibited for dryer to be replaced. Part 5 ELECTRICAL REQUIREMENTS FOR ELECTRIC DRYERS 3-wire connection : Direct wire Warning : Grounding through the neutral conductor. Connect neutral wire (white) of power cord to do not...
Owner's Manual (English)
Page 20
... on tight and power cord is tightened. Connect neutral wire (white) of a frame-grounding conductor to the neutral wire, use the instructions under this section. 1. Part 5 ELECTRICAL REQUIREMENTS FOR ELECTRIC DRYERS Option 2: 3-Wire connection with a power supply cord. If your local codes or ordinances permit the connection of power cord to...
... on tight and power cord is tightened. Connect neutral wire (white) of a frame-grounding conductor to the neutral wire, use the instructions under this section. 1. Part 5 ELECTRICAL REQUIREMENTS FOR ELECTRIC DRYERS Option 2: 3-Wire connection with a power supply cord. If your local codes or ordinances permit the connection of power cord to...

Owner's Manual (English)
Page 21
... conform to reduce the risk of the National Electrical Code, ANSI/NFPA 70, or the Canadian Electrical Code, CSA C22.1, and all applicable local regulations. Part 6 ELECTRICAL REQUIREMENTS FOR GAS DRYERS 120 Volt, 60 Hertz, with 3-Prong Grounding Plug Following are uncertain whether or not your laundry room meets these specifications...
... conform to reduce the risk of the National Electrical Code, ANSI/NFPA 70, or the Canadian Electrical Code, CSA C22.1, and all applicable local regulations. Part 6 ELECTRICAL REQUIREMENTS FOR GAS DRYERS 120 Volt, 60 Hertz, with 3-Prong Grounding Plug Following are uncertain whether or not your laundry room meets these specifications...


