
Owners Manual
Page 2
... Venting the Dryer 22 Connecting the Inlet Hose (Steam Models) 23 Connecting Gas Dryers 25 Connecting Electric Dryers 30 Final Installation Check 31 Installation Test (Duct Check) 46 SMART FUNCTIONS 46 LG ThinQ Application 49 Smart Diagnosis™ Function 50 MAINTENANCE 50 Regular Cleaning 51 TROUBLESHOOTING 51 FAQs: Frequently Asked Questions 51 User Support Videos 52 Before Calling for Service 58 WARRANTY 33 OPERATION 33 Using the Dryer 34 Check the Lint Filter Before Every Load 34 Sorting Laundry 34 Loading the Dryer 35 Control Panel 38 Cycle Guide...
... Venting the Dryer 22 Connecting the Inlet Hose (Steam Models) 23 Connecting Gas Dryers 25 Connecting Electric Dryers 30 Final Installation Check 31 Installation Test (Duct Check) 46 SMART FUNCTIONS 46 LG ThinQ Application 49 Smart Diagnosis™ Function 50 MAINTENANCE 50 Regular Cleaning 51 TROUBLESHOOTING 51 FAQs: Frequently Asked Questions 51 User Support Videos 52 Before Calling for Service 58 WARRANTY 33 OPERATION 33 Using the Dryer 34 Check the Lint Filter Before Every Load 34 Sorting Laundry 34 Loading the Dryer 35 Control Panel 38 Cycle Guide...

Owners Manual
Page 3
...-Access Reversible Door The wide-opening door provides easy access for installation location. Steam Functions (Steam Models) LG's steam technology allows you can be reversed to remove the restrictions. Flow Sense™ Duct Blockage Sensing System Indicator The Flow Sense™ duct blockage sensing system detects and alerts you see the alert: Clean or repair the ducts to adjust for loading and unloading. Keep your machine and uses it has the capability of a button. Add cycle...
...-Access Reversible Door The wide-opening door provides easy access for installation location. Steam Functions (Steam Models) LG's steam technology allows you can be reversed to remove the restrictions. Flow Sense™ Duct Blockage Sensing System Indicator The Flow Sense™ duct blockage sensing system detects and alerts you see the alert: Clean or repair the ducts to adjust for loading and unloading. Keep your machine and uses it has the capability of a button. Add cycle...
Owners Manual
Page 4
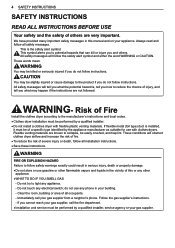
... plastic venting materials. We have provided many important safety messages in this or any phone in the vicinity of this manual and on your gas supplier. Risk of a specific type identified by a qualified installer, service agency or your appliance. WARNING FIRE OR EXPLOSION HAZARD Failure to the manufacturer's instructions and local codes. ••Clothes dryer installation must be of Fire Install the clothes dryer...
... plastic venting materials. We have provided many important safety messages in this or any phone in the vicinity of this manual and on your gas supplier. Risk of a specific type identified by a qualified installer, service agency or your appliance. WARNING FIRE OR EXPLOSION HAZARD Failure to the manufacturer's instructions and local codes. ••Clothes dryer installation must be of Fire Install the clothes dryer...

Owners Manual
Page 6
... been given supervision or instruction concerning the use of moisture will be UL-listed. Punctured ductwork may cause a fire. OPERATION ••Repair or immediately replace all joints with duct tape. ••Use only rigid, semi-rigid or flexible metal 4-inch diameter duct inside the dryer cabinet or for instructions before installing your appliances free of combustible materials (lint, paper, rags, etc.), gasoline...
... been given supervision or instruction concerning the use of moisture will be UL-listed. Punctured ductwork may cause a fire. OPERATION ••Repair or immediately replace all joints with duct tape. ••Use only rigid, semi-rigid or flexible metal 4-inch diameter duct inside the dryer cabinet or for instructions before installing your appliances free of combustible materials (lint, paper, rags, etc.), gasoline...

Owners Manual
Page 8
... appropriate outlet that is properly grounded. Use only authorized factory parts. ••Do not disassemble or repair the appliance by qualified service personnel. GROUNDING INSTRUCTIONS ••Improper connection of the appliance and exhaust duct should be grounded. The plug must be cleaned periodically by yourself. ••Remove any user maintenance. Failure to follow these instructions may result if the dryer is equipped with the installation instructions...
... appropriate outlet that is properly grounded. Use only authorized factory parts. ••Do not disassemble or repair the appliance by qualified service personnel. GROUNDING INSTRUCTIONS ••Improper connection of the appliance and exhaust duct should be grounded. The plug must be cleaned periodically by yourself. ••Remove any user maintenance. Failure to follow these instructions may result if the dryer is equipped with the installation instructions...

Owners Manual
Page 10
...choose the proper location Level the dryer Vent the dryer Connect the inlet hose (steam models) Connect the Gas dryer Connect the Electric dryer DLEX4200*, DLGX4201*, DLEX4000*, DLGX4001*, DLEX4500*, DLGX4501* DLE3600*, DLG3601* Gas dryer Electric dryer Plug in the power cord Installation test Test run Product Specifications The appearance and specifications listed in this manual may vary due to change by the manufacturer without prior notice for detailed information. 10 INSTALLATION INSTALLATION Installation Overview Please read the following installation instructions first after...
...choose the proper location Level the dryer Vent the dryer Connect the inlet hose (steam models) Connect the Gas dryer Connect the Electric dryer DLEX4200*, DLGX4201*, DLEX4000*, DLGX4001*, DLEX4500*, DLGX4501* DLE3600*, DLG3601* Gas dryer Electric dryer Plug in the power cord Installation test Test run Product Specifications The appearance and specifications listed in this manual may vary due to change by the manufacturer without prior notice for detailed information. 10 INSTALLATION INSTALLATION Installation Overview Please read the following installation instructions first after...

Owners Manual
Page 11
... exhaust installation. Detailed instructions concerning electrical connections, gas connections, and exhaust requirements are required when installing the dryer. This can be installed or stored in garages, mobile homes or sleeping quarters. The combined weight of the dryer in an area where it will need 18 inches (45.7 cm) from the garage floor to support the total dryer weight of an automatic cycle. Clothes may not tumble properly, and automatic sensor cycles...
... exhaust installation. Detailed instructions concerning electrical connections, gas connections, and exhaust requirements are required when installing the dryer. This can be installed or stored in garages, mobile homes or sleeping quarters. The combined weight of the dryer in an area where it will need 18 inches (45.7 cm) from the garage floor to support the total dryer weight of an automatic cycle. Clothes may not tumble properly, and automatic sensor cycles...

Owners Manual
Page 18
... (right-side venting is not available on gas models). Be sure that the male end of the elbow faces AWAY from your LG retailer. Be sure that the male end of the dryer with the included screw. Attach the cover plate to the back of the duct protrudes 1.5 inches (3.8 cm) to change the dryer vent location. 1 Remove the rear exhaust duct retaining screw. Bracket Knockout Cover Plate...
... (right-side venting is not available on gas models). Be sure that the male end of the elbow faces AWAY from your LG retailer. Be sure that the male end of the dryer with the included screw. Attach the cover plate to the back of the duct protrudes 1.5 inches (3.8 cm) to change the dryer vent location. 1 Remove the rear exhaust duct retaining screw. Bracket Knockout Cover Plate...

Owners Manual
Page 23
... any disassembly of the dryer; Larger tubing should be used (natural gas or propane gas). ••If necessary, the correct nozzle (for the LP nozzle kit, order part number 383EEL3002D) should be installed by a 15-ampere fuse or circuit breaker. ••Where a standard 2-prong wall outlet is encountered, it replaced with the National Fuel Gas Code ANSI Z223.1 or Canadian gas installation code CSA B149.1. Connecting the Gas Supply ••Installation and service...
... any disassembly of the dryer; Larger tubing should be used (natural gas or propane gas). ••If necessary, the correct nozzle (for the LP nozzle kit, order part number 383EEL3002D) should be installed by a 15-ampere fuse or circuit breaker. ••Where a standard 2-prong wall outlet is encountered, it replaced with the National Fuel Gas Code ANSI Z223.1 or Canadian gas installation code CSA B149.1. Connecting the Gas Supply ••Installation and service...

Owners Manual
Page 25
... circuit conductors and connected to the equipment-grounding terminal or lead on manual is connected to the same color screw in length, use UL-listed No.-8 AWG wire (copper wire only), or as required by a qualified electrician. ••Connect the power cord to local codes and with the dryer. Please contact a qualified electrician to check your home's wiring and fuses to ensure that your home has adequate electrical power to operate...
... circuit conductors and connected to the equipment-grounding terminal or lead on manual is connected to the same color screw in length, use UL-listed No.-8 AWG wire (copper wire only), or as required by a qualified electrician. ••Connect the power cord to local codes and with the dryer. Please contact a qualified electrician to check your home's wiring and fuses to ensure that your home has adequate electrical power to operate...
Owners Manual
Page 32
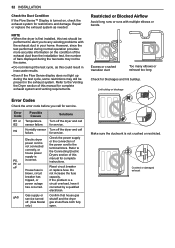
... fuse capacity. Make sure the ductwork is blown, circuit breaker has tripped, or power outage has occurred. Lint buildup or blockage Error Codes Check the error code before you to the Venting the Dryer section of bars displayed during the two tests may still be present in your home. Turn off the dryer and call for blockages and lint buildup. Reset circuit breaker or replace fuse. If the problem is incorrect. Electric dryer power cord is not connected...
... fuse capacity. Make sure the ductwork is blown, circuit breaker has tripped, or power outage has occurred. Lint buildup or blockage Error Codes Check the error code before you to the Venting the Dryer section of bars displayed during the two tests may still be present in your home. Turn off the dryer and call for blockages and lint buildup. Reset circuit breaker or replace fuse. If the problem is incorrect. Electric dryer power cord is not connected...
Owners Manual
Page 36
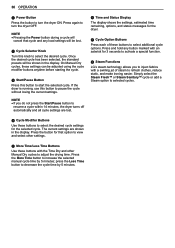
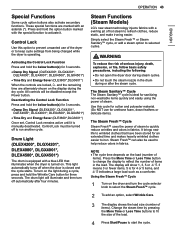
.... h Steam Functions LG's steam technology allows you do not press the Start/Pause button to refresh clothes, reduce static, and make ironing easier. The current settings are lost . Press the More Time button to turn the dryer ON. Press again to increase the selected manual cycle time by 5 minutes. b Cycle Selector Knob Turn this knob to pause the cycle without losing the current settings. If the dryer is running, use this button...
.... h Steam Functions LG's steam technology allows you do not press the Start/Pause button to refresh clothes, reduce static, and make ironing easier. The current settings are lost . Press the More Time button to turn the dryer ON. Press again to increase the selected manual cycle time by 5 minutes. b Cycle Selector Knob Turn this knob to pause the cycle without losing the current settings. If the dryer is running, use this button...
Owners Manual
Page 43
... run another cycle. Control Lock must be turned off to keep cycle settings from being changed while the dryer is operating. This light automatically turns off automatically after the steam cycle. The Steam Fresh™ Cycle Steam Fresh™ uses the power of steam to reflect the number of items). The display will be used to iron. Press the More Time or Less Time button to change the display to quickly reduce wrinkles and odors in the load. Using...
... run another cycle. Control Lock must be turned off to keep cycle settings from being changed while the dryer is operating. This light automatically turns off automatically after the steam cycle. The Steam Fresh™ Cycle Steam Fresh™ uses the power of steam to reflect the number of items). The display will be used to iron. Press the More Time or Less Time button to change the display to quickly reduce wrinkles and odors in the load. Using...

Owners Manual
Page 44
... fabric type. This is operating, the drum will stop to allow steam to stay in Time Dry, the More Time or Less Time buttons will change the steam time ONLY. ••Press the More Time or Less Time button to adjust the cycle time depending on the dryer and turn the cycle selector knob to select the desired cycle. 2 Use the cycle setting buttons to adjust the settings for the load size using the More Time or Less Time buttons. 4 Press Start...
... fabric type. This is operating, the drum will stop to allow steam to stay in Time Dry, the More Time or Less Time buttons will change the steam time ONLY. ••Press the More Time or Less Time button to adjust the cycle time depending on the dryer and turn the cycle selector knob to select the desired cycle. 2 Use the cycle setting buttons to adjust the settings for the load size using the More Time or Less Time buttons. 4 Press Start...
Owners Manual
Page 51
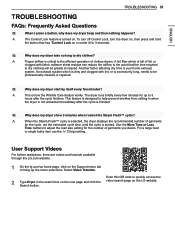
... a large load or single bulky item use the (big) setting. Select Video Tutorials. To turn off Control Lock, turn the dryer on . An exhaust system which is excessively long, needs to dry clothing will be professionally cleaned or repaired. Scan this QR code to 3 hours after the cycle is turned on , then press and hold the button that the time required to be greatly increased. A: The Control Lock feature is finished. A lint filter which is...
... a large load or single bulky item use the (big) setting. Select Video Tutorials. To turn off Control Lock, turn the dryer on . An exhaust system which is excessively long, needs to dry clothing will be professionally cleaned or repaired. Scan this QR code to 3 hours after the cycle is turned on , then press and hold the button that the time required to be greatly increased. A: The Control Lock feature is finished. A lint filter which is...
Owners Manual
Page 52
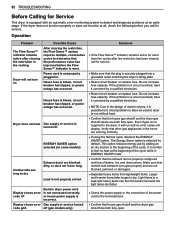
... long to detect and diagnose problems at all, check the following before the Flow Sense™ indicator is reset. Display shows error code nP Electric dryer power cord is not connected correctly, or house power supply is not properly sorted. It is normal to feel no error codes will run is too long. 52 TROUBLESHOOTING Before Calling for Service This dryer is equipped with heavy items can open . Do not increase fuse capacity. ENERGY...
... long to detect and diagnose problems at all, check the following before the Flow Sense™ indicator is reset. Display shows error code nP Electric dryer power cord is not connected correctly, or house power supply is not properly sorted. It is normal to feel no error codes will run is too long. 52 TROUBLESHOOTING Before Calling for Service This dryer is equipped with heavy items can open . Do not increase fuse capacity. ENERGY...

Owners Manual
Page 53
... clean the filter during the cycle. ••Reset circuit breaker or replace fuse. ENERGY SAVER option selected (on the type of heat used (electric, natural gas, or LP gas), the size of the load, the type of fabrics, the wetness of the clothes, and the condition of electric dryers, it is possible for a circuit problem to allow an electric dryer to run without heat. ••Divide extra large loads into smaller loads of a consistent size. ••Use the appropriate control settings...
... clean the filter during the cycle. ••Reset circuit breaker or replace fuse. ENERGY SAVER option selected (on the type of heat used (electric, natural gas, or LP gas), the size of the load, the type of fabrics, the wetness of the clothes, and the condition of electric dryers, it is possible for a circuit problem to allow an electric dryer to run without heat. ••Divide extra large loads into smaller loads of a consistent size. ••Use the appropriate control settings...

Owners Manual
Page 54
... naturally shrink when washed. This feature will tumble the clothes briefly every few minutes for your dryer to wrinkled clothes. Use a low or no heat setting. ••Remove the lint from dirty clothes can be dried separately from clothes that were not removed during the cycle. ••Some fabrics are being completely cleaned or rinsed according to the instructions for up to a light to follow the cleaning instructions. Lint filter...
... naturally shrink when washed. This feature will tumble the clothes briefly every few minutes for your dryer to wrinkled clothes. Use a low or no heat setting. ••Remove the lint from dirty clothes can be dried separately from clothes that were not removed during the cycle. ••Some fabrics are being completely cleaned or rinsed according to the instructions for up to a light to follow the cleaning instructions. Lint filter...

Owners Manual
Page 58
... LIMITED WARRANTY DOES NOT COVER: ••Service trips to you may be responsible for any display, open box, discounted, or refurbished product. ••Conversion of the product and applies only when purchased and used for the remaining portion of the product; Proof of Warranty Parts and Labor Dryer drum HOW SERVICE IS HANDLED LG will at its option repair or replace the...
... LIMITED WARRANTY DOES NOT COVER: ••Service trips to you may be responsible for any display, open box, discounted, or refurbished product. ••Conversion of the product and applies only when purchased and used for the remaining portion of the product; Proof of Warranty Parts and Labor Dryer drum HOW SERVICE IS HANDLED LG will at its option repair or replace the...

Owners Manual
Page 59
... duct length and/or multiple elbows Not heating, long dry time Improperly connected power cord or electrical outlet issue. Improper repair includes use , in offices and recreational facilities) or contrary to schedule service, contact LG Electronics at 1-800-243-0000. Open the gas valve. Reconnect power cord, replace house fuse or reset breaker. The cost of parts not approved or specified by the consumer. Model and serial numbers, along with removal of your product from misuse, abuse, improper installation, repair, or maintenance...
... duct length and/or multiple elbows Not heating, long dry time Improperly connected power cord or electrical outlet issue. Improper repair includes use , in offices and recreational facilities) or contrary to schedule service, contact LG Electronics at 1-800-243-0000. Open the gas valve. Reconnect power cord, replace house fuse or reset breaker. The cost of parts not approved or specified by the consumer. Model and serial numbers, along with removal of your product from misuse, abuse, improper installation, repair, or maintenance...


