Owners Manual
Page 13
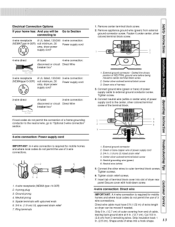
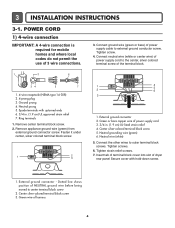
...cable must have 5 ft (i ,52 m) of wires into slot of dryer rear panel Secure cover with upturned ends 6. 3/4 in . (2.5 cm). Shape ends of extra length so dryer can be moved if needed. Remove appliance ground wire (green) from 3 remaining wires, Strip insulation back i in .... (1.9 cm) UL approved strain relief 7, Ring terminals 1, Remove center terminal block screw, 2. Center silver-colored terminal block screw 3. Neutral ...
...cable must have 5 ft (i ,52 m) of wires into slot of dryer rear panel Secure cover with upturned ends 6. 3/4 in . (2.5 cm). Shape ends of extra length so dryer can be moved if needed. Remove appliance ground wire (green) from 3 remaining wires, Strip insulation back i in .... (1.9 cm) UL approved strain relief 7, Ring terminals 1, Remove center terminal block screw, 2. Center silver-colored terminal block screw 3. Neutral ...
Owners Manual
Page 14
... cord Use where local codes permit connecting cabinet-ground conductor to the center, silver colored terminal screw of the terminal block. Remove _nter terminal block screw. 2. Fasten it under the center screw of power supply E cable to outer terminal block screws. ...terminals with hold -down screw. 6. Neutral (white or center wire) Loosen or remove center terminal biock screw. Tighten screw. 1, External ground connector 2 Green or bare copper wire of dryer rear panel. Tighten screw. 5. Squeeze hooked ends together. Neutral grounding wire (green) 3. Center...
... cord Use where local codes permit connecting cabinet-ground conductor to the center, silver colored terminal screw of the terminal block. Remove _nter terminal block screw. 2. Fasten it under the center screw of power supply E cable to outer terminal block screws. ...terminals with hold -down screw. 6. Neutral (white or center wire) Loosen or remove center terminal biock screw. Tighten screw. 1, External ground connector 2 Green or bare copper wire of dryer rear panel. Tighten screw. 5. Squeeze hooked ends together. Neutral grounding wire (green) 3. Center...
Owners Manual
Page 15
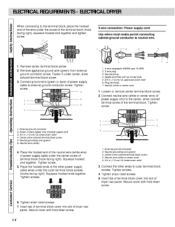
...) of outer covering from the external ground _nnector screw to neutral wire, Direct wire cable must have 5 ft (1.52 m) of dryer rear panel. Tighten screw, 3. Squeeze hooked ends together. Secure cover with outer covering. If using 3-wire cable with ground wire, cut bare wire even... back 1 in . (1.9 crn) ULqisted strain relief , Place the hooked ends of the other wires to neutral wire. 1_.Remove center terminal block screw_ 2, Remove appliance ground wire (green) from external ground connector screw, Connect appliance ground wire and the neutral wire (white or center wire)...
...) of outer covering from the external ground _nnector screw to neutral wire, Direct wire cable must have 5 ft (1.52 m) of dryer rear panel. Tighten screw, 3. Squeeze hooked ends together. Secure cover with outer covering. If using 3-wire cable with ground wire, cut bare wire even... back 1 in . (1.9 crn) ULqisted strain relief , Place the hooked ends of the other wires to neutral wire. 1_.Remove center terminal block screw_ 2, Remove appliance ground wire (green) from external ground connector screw, Connect appliance ground wire and the neutral wire (white or center wire)...
Owners Manual
Page 16
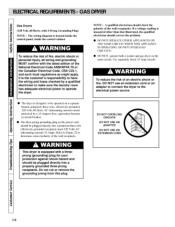
...current) 15 Amps. If a voltage reading is the customer's responsibility to operate the dryer. i O The dryer is located inside the control panel, inside the control cabinet. NOTE : A qualificd electrician should chc_ck the polarity of fire, electric shock or _rsonal injury, all wiring and grounding ... correct the problem. • 1>',)NOT OPERATE OTHER APPI,IANCES ON THE SAME CIRCUrI' WHEN THIS APPI_IANCE IS OPERATING. Do not cut or remove the grounding prong from this plug. 16 Use separately fused 15 Amp circuits. Gas Dryers (120 Volt, 60 Hertz, with 3-Prong (;rounding...
...current) 15 Amps. If a voltage reading is the customer's responsibility to operate the dryer. i O The dryer is located inside the control panel, inside the control cabinet. NOTE : A qualificd electrician should chc_ck the polarity of fire, electric shock or _rsonal injury, all wiring and grounding ... correct the problem. • 1>',)NOT OPERATE OTHER APPI,IANCES ON THE SAME CIRCUrI' WHEN THIS APPI_IANCE IS OPERATING. Do not cut or remove the grounding prong from this plug. 16 Use separately fused 15 Amp circuits. Gas Dryers (120 Volt, 60 Hertz, with 3-Prong (;rounding...
Owners Manual
Page 22
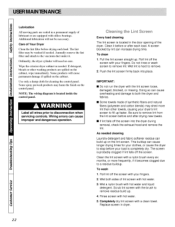
...of lint screen with your fingers. 2. Lubrication All moving p_uls arc sealcd in dryer. Doing so can cause overheating and damage to remove lint from the lint screen before your dryer's lint screen to disconnection when servicing controls. Clean the lint screen with the brush to... removal, check the exhaust hood and remove the lint, As ne_ed cleaning Laundry detergent and fabric softener residue can cause improper and dangerous operation. ©ieaning lhe Lint Screen Every load cleaning The lint screen is completely dry. The screen is local,,xi inside the control panel...
...of lint screen with your fingers. 2. Lubrication All moving p_uls arc sealcd in dryer. Doing so can cause overheating and damage to remove lint from the lint screen before your dryer's lint screen to disconnection when servicing controls. Clean the lint screen with the brush to... removal, check the exhaust hood and remove the lint, As ne_ed cleaning Laundry detergent and fabric softener residue can cause improper and dangerous operation. ©ieaning lhe Lint Screen Every load cleaning The lint screen is completely dry. The screen is local,,xi inside the control panel...
Owners Manual
Page 28
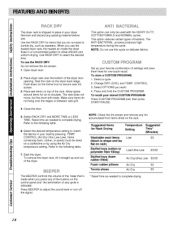
...,. 3,. Select the desired temperature setting to complete drying Make sure items do not want , 4. Change DRY LEVEL and TEMP. CONTROL. 3. To remove the dryer rack, lift it straight up your load by using the Air Dry temperature settings. Start the dryer. Select OPTIONS you press any of... 1. Open dryer door. 2 Place dryer rack over the edges or between rack grill. To recall your dryer. Place wet items on the control panel and the termination of the rack, Allow space around items for one4ouch recall, To store a CUSTOM PROGRAM. 1. Reset time as needed to complete ...
...,. 3,. Select the desired temperature setting to complete drying Make sure items do not want , 4. Change DRY LEVEL and TEMP. CONTROL. 3. To remove the dryer rack, lift it straight up your load by using the Air Dry temperature settings. Start the dryer. Select OPTIONS you press any of... 1. Open dryer door. 2 Place dryer rack over the edges or between rack grill. To recall your dryer. Place wet items on the control panel and the termination of the rack, Allow space around items for one4ouch recall, To store a CUSTOM PROGRAM. 1. Reset time as needed to complete ...
Service Manual
Page 7
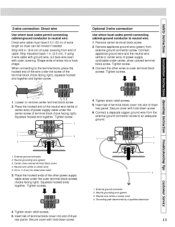
...colored terminal screw of NEUTRAL ground wire before being moved to center terminal block screw 2. Ground prong 4. Spade terminals with hold-down screw. 1. Remove appliance ground wire (green) from external ground connector screw. Green or bare copper wire of power supply cord 3. 3/4 in . (1.9 cm) UL...codes do not permit the use of power supply cable to outer terminal block screws. Remove center terminal block screw. 2. Insert tab of terminal block cover into slot of harness 6 Green wire of dryer rear panel Secure cover with upturned ends 6. 3/4 in . (1.9 cm) UL-listed strain ...
...colored terminal screw of NEUTRAL ground wire before being moved to center terminal block screw 2. Ground prong 4. Spade terminals with hold-down screw. 1. Remove appliance ground wire (green) from external ground connector screw. Green or bare copper wire of power supply cord 3. 3/4 in . (1.9 cm) UL...codes do not permit the use of power supply cable to outer terminal block screws. Remove center terminal block screw. 2. Insert tab of terminal block cover into slot of harness 6 Green wire of dryer rear panel Secure cover with upturned ends 6. 3/4 in . (1.9 cm) UL-listed strain ...
Service Manual
Page 8
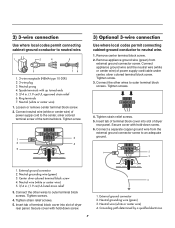
...Neutral (white or center wire) 1. Connect a separate copper ground wire from external ground connector screw. Neutral grounding wire (green) 3. Remove center terminal block screw. 2. Connect appliance ground wire and the neutral wire (white or center wire) of the terminal block. External...of terminal block cover into slot of dryer rear panel. Tighten screw. 1 3 2 4 5 3) Optional 3-wire connection Use where local codes permit connecting cabinet-ground conductor to an adequate ground. 1 2 3 1. Loosen or remove center terminal block screw. 2. 2) 3-wire connection ...
...Neutral (white or center wire) 1. Connect a separate copper ground wire from external ground connector screw. Neutral grounding wire (green) 3. Remove center terminal block screw. 2. Connect appliance ground wire and the neutral wire (white or center wire) of the terminal block. External...of terminal block cover into slot of dryer rear panel. Tighten screw. 1 3 2 4 5 3) Optional 3-wire connection Use where local codes permit connecting cabinet-ground conductor to an adequate ground. 1 2 3 1. Loosen or remove center terminal block screw. 2. 2) 3-wire connection ...

Service Manual
Page 27
Remove 3 screws on the rear Panel. 2. Pull the control panel forward. 3. Disconnect connectors. 5. Disassemble the controller assembly. 26 Remove 5 screws. 6. Open the cover protect. 4. 11 DISASSEMBLY INSTRUCTIONS Disassemble and repair the unit only after pulling out power plug from the outlet. 1.
Remove 3 screws on the rear Panel. 2. Pull the control panel forward. 3. Disconnect connectors. 5. Disassemble the controller assembly. 26 Remove 5 screws. 6. Open the cover protect. 4. 11 DISASSEMBLY INSTRUCTIONS Disassemble and repair the unit only after pulling out power plug from the outlet. 1.


