
Owner's Manual
Page 3
... fire department. This symbol alerts you to potential hazards that can happen if the instructions are known to collapse, be easily crushed, and trap lint. Part 1 IMPORTANT WARRANTY AND SAFETY INSTRUCTIONS READ ALL INSTRUCTIONS BEFORE USE WARNING For your safety, the information in this manual must be followed to minimize the...
... fire department. This symbol alerts you to potential hazards that can happen if the instructions are known to collapse, be easily crushed, and trap lint. Part 1 IMPORTANT WARRANTY AND SAFETY INSTRUCTIONS READ ALL INSTRUCTIONS BEFORE USE WARNING For your safety, the information in this manual must be followed to minimize the...
Owner's Manual
Page 4
...of the equipment- SAVE THESE INSTRUCTIONS GROUNDING INSTRUCTIONS This appliance must be exposed to the weather. • Do not reach into the dryer while parts are in doubt as they give off vapors that could cause a load to the outdoors. 4 Exposure to carry out. • Do not... must be minimized further by qualified service personnel. • Do not install or store the dryer where it will minimize incomplete combustion. Part 1 IMPORTANT WARRANTY AND SAFETY INSTRUCTIONS READ ALL INSTRUCTIONS BEFORE USE WARNING For your safety, the information in this Use and Care Guide or...
...of the equipment- SAVE THESE INSTRUCTIONS GROUNDING INSTRUCTIONS This appliance must be exposed to the weather. • Do not reach into the dryer while parts are in doubt as they give off vapors that could cause a load to the outdoors. 4 Exposure to carry out. • Do not... must be minimized further by qualified service personnel. • Do not install or store the dryer where it will minimize incomplete combustion. Part 1 IMPORTANT WARRANTY AND SAFETY INSTRUCTIONS READ ALL INSTRUCTIONS BEFORE USE WARNING For your safety, the information in this Use and Care Guide or...
Owner's Manual
Page 5
... and ordinances. Failure to follow these instructions can result in fire or death. • The dryer exhaust system must be expelled into the laundry area. Part 1 IMPORTANT WARRANTY AND SAFETY INSTRUCTIONS READ ALL INSTRUCTIONS BEFORE USE WARNING For your new dryer. Use only authorized factory... parts. The end cap should be 4 in. (10 cm) in fire or death. • The exhaust duct must be exhausted to avoid electrical overload. SAFETY INSTRUCTION ...
... and ordinances. Failure to follow these instructions can result in fire or death. • The dryer exhaust system must be expelled into the laundry area. Part 1 IMPORTANT WARRANTY AND SAFETY INSTRUCTIONS READ ALL INSTRUCTIONS BEFORE USE WARNING For your new dryer. Use only authorized factory... parts. The end cap should be 4 in. (10 cm) in fire or death. • The exhaust duct must be exhausted to avoid electrical overload. SAFETY INSTRUCTION ...
Owner's Manual
Page 6
... in this manual must be followed to minimize the risk of fire or explosion, electric shock, or to pinch, crush, or damage the power cord. Part 1 IMPORTANT WARRANTY AND SAFETY INSTRUCTIONS READ ALL INSTRUCTIONS BEFORE USE WARNING For your safety, the information in electrical shock. • Repair or replace immediately all...
... in this manual must be followed to minimize the risk of fire or explosion, electric shock, or to pinch, crush, or damage the power cord. Part 1 IMPORTANT WARRANTY AND SAFETY INSTRUCTIONS READ ALL INSTRUCTIONS BEFORE USE WARNING For your safety, the information in electrical shock. • Repair or replace immediately all...
Owner's Manual
Page 7
... fire or explosion, electric shock or to other than single family use, all warranty coverage is required. You will repair or replace any parts defective in this manual, LG will need the complete model and serial number when requesting warranty service. Model Number. To reduce the risk of purchase. Date of purchase...
... fire or explosion, electric shock or to other than single family use, all warranty coverage is required. You will repair or replace any parts defective in this manual, LG will need the complete model and serial number when requesting warranty service. Model Number. To reduce the risk of purchase. Date of purchase...
Owner's Manual
Page 8
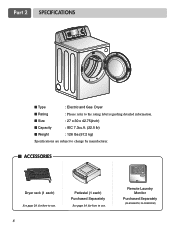
Remote Laundry Monitor Purchased Separately (DLE5944WM, DLG5955WM) Part 2 SPECIFICATIONS ■ Type : Electric and Gas Dryer ■ Rating : Please refer to the rating label regarding detailed information. ■ Size : 27 x 30 x 42.75(inch) ■ Capacity : IEC 7.3cu.ft. (22.5 lb) ■ Weight : 126 Ibs (57.2 kg) Specifications are subject to change by manufacturer. ■ ACCESSORIES Dryer rack (1 each) See page 26 for how to use. 8 Pedestal (1 each) Purchased Separately See page 14 for how to use.
Remote Laundry Monitor Purchased Separately (DLE5944WM, DLG5955WM) Part 2 SPECIFICATIONS ■ Type : Electric and Gas Dryer ■ Rating : Please refer to the rating label regarding detailed information. ■ Size : 27 x 30 x 42.75(inch) ■ Capacity : IEC 7.3cu.ft. (22.5 lb) ■ Weight : 126 Ibs (57.2 kg) Specifications are subject to change by manufacturer. ■ ACCESSORIES Dryer rack (1 each) See page 26 for how to use. 8 Pedestal (1 each) Purchased Separately See page 14 for how to use.
Owner's Manual
Page 9
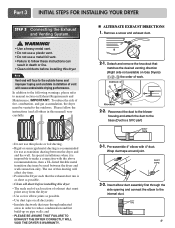
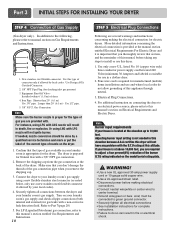
...recommendations, then a UL-listed flexible metal transition duct may be vented to reduce condensation and lint build-up on Exhaust Requirements and Maintenance. Part 3 INITIAL STEPS FOR INSTALLING YOUR DRYER STEP 3 Connecting the Exhaust and Venting System. Reconnect the duct to the blower housing and attach ...instructions (and all duct joints • Insulate ductwork that runs through the side opening and connect the elbow to the base.(Duct is a SVC part) • Do not use thin plastic or foil ducting. • Rigid or semi-rigid metal ducting is recommended for use as possible. ...
...recommendations, then a UL-listed flexible metal transition duct may be vented to reduce condensation and lint build-up on Exhaust Requirements and Maintenance. Part 3 INITIAL STEPS FOR INSTALLING YOUR DRYER STEP 3 Connecting the Exhaust and Venting System. Reconnect the duct to the blower housing and attach ...instructions (and all duct joints • Insulate ductwork that runs through the side opening and connect the elbow to the base.(Duct is a SVC part) • Do not use thin plastic or foil ducting. • Rigid or semi-rigid metal ducting is recommended for use as possible. ...
Owner's Manual
Page 10
...nozzle will not ignite burner. Confirm that you don't damage the threads of the dryer. For LP (Liquefied Petroleum) gas connection, refer to Part 7(page 20) 5. listed No. 10 (copper wire only) three conductor power supply cord kit rated 240 Volts (minimum) 30 Amperes and... wire(white or center wire) to your laundry room's gas supply using LNG with a 3/8" NPT gas connection. 2. If needed in a clothes dryer. 2. Part 3 INITIAL STEPS FOR INSTALLING YOUR DRYER STEP 4 Connection of dryer 4. Equipment Shut-Off ValveInstalled within 6' (1.8 m) of Gas Supply (Gas dryer only). If your...
...nozzle will not ignite burner. Confirm that you don't damage the threads of the dryer. For LP (Liquefied Petroleum) gas connection, refer to Part 7(page 20) 5. listed No. 10 (copper wire only) three conductor power supply cord kit rated 240 Volts (minimum) 30 Amperes and... wire(white or center wire) to your laundry room's gas supply using LNG with a 3/8" NPT gas connection. 2. If needed in a clothes dryer. 2. Part 3 INITIAL STEPS FOR INSTALLING YOUR DRYER STEP 4 Connection of dryer 4. Equipment Shut-Off ValveInstalled within 6' (1.8 m) of Gas Supply (Gas dryer only). If your...
Owner's Manual
Page 11
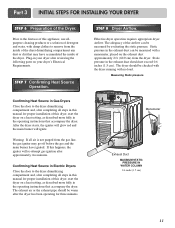
.... Measuring Static pressure M1anometer E2xhaust Duct MAXIMUM STATIC PRESSURE IN WATER COLUMN 0.6 inche (1.5 cm) 11 If this happens, the igniter will ignite. Part 3 INITIAL STEPS FOR INSTALLING YOUR DRYER STEP 6 Preparation of this dryer, start the dryer on a heat setting, as described more fully in ...inches (1.5 cm). After the dryer starts, the igniter will glow red and the main burner will re-attempt gas ignition after reviewing the following parts on the exhaust duct approximately 2 ft. (60.9 cm) from the gas line, the gas igniter may have ignited. Static pressure in the...
.... Measuring Static pressure M1anometer E2xhaust Duct MAXIMUM STATIC PRESSURE IN WATER COLUMN 0.6 inche (1.5 cm) 11 If this happens, the igniter will ignite. Part 3 INITIAL STEPS FOR INSTALLING YOUR DRYER STEP 6 Preparation of this dryer, start the dryer on a heat setting, as described more fully in ...inches (1.5 cm). After the dryer starts, the igniter will glow red and the main burner will re-attempt gas ignition after reviewing the following parts on the exhaust duct approximately 2 ft. (60.9 cm) from the gas line, the gas igniter may have ignited. Static pressure in the...
Owner's Manual
Page 12
... using the back, left , right, or bottom panel. 5) Gas dryers may be vented to the outside using the back, left , or bottom panel. Part 3 INITIAL STEPS FOR INSTALLING YOUR DRYER STEP 9 Additional Instructions for Electric Dryer 3) To reduce the risk of combustion and fire, the dryer must be vented... it is important that extend into the duct. DO NOT connect exhaust ducts with the Manufactured Home Construction and Safety Standards Title 24 CFR, Part 32-80 or Standard CAN/CSA0Z240 MH and local codes and ordinances. DO NOT vent the exhaust duct under the manufactured or mobile home. ...
... using the back, left , right, or bottom panel. 5) Gas dryers may be vented to the outside using the back, left , or bottom panel. Part 3 INITIAL STEPS FOR INSTALLING YOUR DRYER STEP 9 Additional Instructions for Electric Dryer 3) To reduce the risk of combustion and fire, the dryer must be vented... it is important that extend into the duct. DO NOT connect exhaust ducts with the Manufactured Home Construction and Safety Standards Title 24 CFR, Part 32-80 or Standard CAN/CSA0Z240 MH and local codes and ordinances. DO NOT vent the exhaust duct under the manufactured or mobile home. ...
Owner's Manual
Page 13
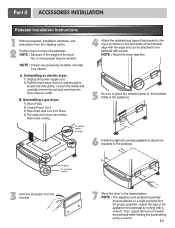
Part 4 ACCESSORIES INSTALLATION Pedestal Installation Instructions 1 4 2 1) Shut off Gas 2) Unplug Power Cord 3) Disconnect Gas Line from Dryer 4) Pull away and loosen vent clamp. Disconnect venting. 5 6 3 7 13
Part 4 ACCESSORIES INSTALLATION Pedestal Installation Instructions 1 4 2 1) Shut off Gas 2) Unplug Power Cord 3) Disconnect Gas Line from Dryer 4) Pull away and loosen vent clamp. Disconnect venting. 5 6 3 7 13

Owner's Manual
Page 14
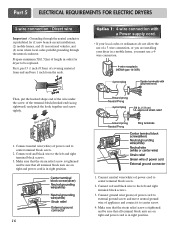
... when necessary. wire (copper wire only), or as required by local codes. Label all applicable local regulations. Allow sufficient slack in the following pages. WARNING! Part 5 ELECTRICAL REQUIREMENTS FOR ELECTRIC DRYERS Following are included in wiring so dryer can cause serious injury to examples on the dryer. wire (copper wire only...
... when necessary. wire (copper wire only), or as required by local codes. Label all applicable local regulations. Allow sufficient slack in the following pages. WARNING! Part 5 ELECTRICAL REQUIREMENTS FOR ELECTRIC DRYERS Following are included in wiring so dryer can cause serious injury to examples on the dryer. wire (copper wire only...
Owner's Manual
Page 15
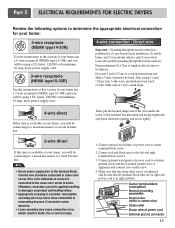
... shape end of the wire under the screw of power cord to center terminal block screw. 2. Connect red and black wire to the terminal block. Part 5 ELECTRICAL REQUIREMENTS FOR ELECTRIC DRYERS Review the following options to determine the appropriate electrical connection for your home: 4-wire receptacle (NEMA type14-30R) Use the...
... shape end of the wire under the screw of power cord to center terminal block screw. 2. Connect red and black wire to the terminal block. Part 5 ELECTRICAL REQUIREMENTS FOR ELECTRIC DRYERS Review the following options to determine the appropriate electrical connection for your home: 4-wire receptacle (NEMA type14-30R) Use the...
Owner's Manual
Page 16
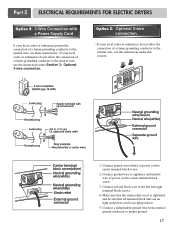
... codes or ordinances do not allow the use a 4wire connection. and be replaced. Connect neutral wire(white) of power cord to center terminal block screw. 2. Part 5 ELECTRICAL REQUIREMENTS FOR ELECTRIC DRYERS 3-wire connection : Direct wire Important : Grounding through the neutral conductor is tightened. Connect red and black wire to the left...
... codes or ordinances do not allow the use a 4wire connection. and be replaced. Connect neutral wire(white) of power cord to center terminal block screw. 2. Part 5 ELECTRICAL REQUIREMENTS FOR ELECTRIC DRYERS 3-wire connection : Direct wire Important : Grounding through the neutral conductor is tightened. Connect red and black wire to the left...
Owner's Manual
Page 17
... relief screw is in right position. 5. Connect ground wire of appliance and neutral wire of a frame-grounding conductor to the neutral wire, use these instructions. Part 5 ELECTRICAL REQUIREMENTS FOR ELECTRIC DRYERS Option 2: 3-Wire Connection with a Power Supply Cord lf your local codes or ordinances permit the connection of a frame-grounding conductor...
... relief screw is in right position. 5. Connect ground wire of appliance and neutral wire of a frame-grounding conductor to the neutral wire, use these instructions. Part 5 ELECTRICAL REQUIREMENTS FOR ELECTRIC DRYERS Option 2: 3-Wire Connection with a Power Supply Cord lf your local codes or ordinances permit the connection of a frame-grounding conductor...
Owner's Manual
Page 18
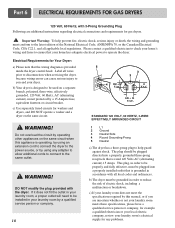
... EFFECTIVELY GROUNDED CIRCUIT WARNING! If it does not fit the outlet in your laundry room, a proper outlet will need to be installed in your dryer. Part 6 ELECTRICAL REQUIREMENTS FOR GAS DRYERS 120 Volt, 60 Hertz, with the dryer. b) The dryer must be used on a separate branch, polarized, three-wire, effectively grounded...
... EFFECTIVELY GROUNDED CIRCUIT WARNING! If it does not fit the outlet in your laundry room, a proper outlet will need to be installed in your dryer. Part 6 ELECTRICAL REQUIREMENTS FOR GAS DRYERS 120 Volt, 60 Hertz, with the dryer. b) The dryer must be used on a separate branch, polarized, three-wire, effectively grounded...
Owner's Manual
Page 19
... must comply with the National Fuel Gas Code ANSI Z223.1. In the United States, an individual manual shutoff valve MUST be used for gas dryers. Part 7 GAS REQUIREMENTS AND INSTRUCTIONS Following are less than 2/1 psi (3.45 kPa). 4. Important Warning: The gas supply and service for a gas dryer must have a qualified person...
... must comply with the National Fuel Gas Code ANSI Z223.1. In the United States, an individual manual shutoff valve MUST be used for gas dryers. Part 7 GAS REQUIREMENTS AND INSTRUCTIONS Following are less than 2/1 psi (3.45 kPa). 4. Important Warning: The gas supply and service for a gas dryer must have a qualified person...

Owner's Manual
Page 20
... the exhaust system. Make sure to follow these instructions can result in fi re or death. 6. Secure all joints with plastic or thin foil Ducting. Part 8 EXHAUST REQUIREMENTS AND MAINTENANCE Following are not provided with no obstructions. The Total length of exhaust pipe must be used. 20 To maximize operating results...
... the exhaust system. Make sure to follow these instructions can result in fi re or death. 6. Secure all joints with plastic or thin foil Ducting. Part 8 EXHAUST REQUIREMENTS AND MAINTENANCE Following are not provided with no obstructions. The Total length of exhaust pipe must be used. 20 To maximize operating results...

Owner's Manual
Page 21
... cleaned if necessary. 2. Warning: spray pre-wash products may increase drying times. 2. Cleaning the Lint Screen 1. Running the dryer with the brush to rapidly fill. Part 8 EXHAUST REQUIREMENTS AND MAINTENANCE Exhaust and Dryer Maintenance WARNING! d) After the residue has been removed, rinse screen with a clean towel, firmly replace the lint screen...
... cleaned if necessary. 2. Warning: spray pre-wash products may increase drying times. 2. Cleaning the Lint Screen 1. Running the dryer with the brush to rapidly fill. Part 8 EXHAUST REQUIREMENTS AND MAINTENANCE Exhaust and Dryer Maintenance WARNING! d) After the residue has been removed, rinse screen with a clean towel, firmly replace the lint screen...
Owner's Manual
Page 22
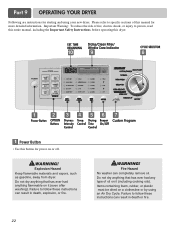
... on it (including cooking oils). Failure to person, read this entire manual, including the Important Safety Instructions, before operating this manual for more detailed information. Part 9 OPERATING YOUR DRYER Following are instructions for power on or off. Important Warning: To reduce the risk of this dryer.
... on it (including cooking oils). Failure to person, read this entire manual, including the Important Safety Instructions, before operating this manual for more detailed information. Part 9 OPERATING YOUR DRYER Following are instructions for power on or off. Important Warning: To reduce the risk of this dryer.


