
Owner's Manual
Page 3
... all occupants. 4. These words mean: DANGER You can happen if the instructions are not followed. Do not touch any phone in this manual and on any gas or electrical appliance. 2. WARNING You can kill or hurt you and others are known to potential hazards that can...Do not try to prevent property damage, personal injury, or loss of life. Part 1 IMPORTANT WARRANTY AND SAFETY INSTRUCTIONS READ ALL INSTRUCTIONS BEFORE USE WARNING For your safety, the information in this manual must be performed by the appliance manufacturer as suitable for use gasoline or other flammable...
... all occupants. 4. These words mean: DANGER You can happen if the instructions are not followed. Do not touch any phone in this manual and on any gas or electrical appliance. 2. WARNING You can kill or hurt you and others are known to potential hazards that can...Do not try to prevent property damage, personal injury, or loss of life. Part 1 IMPORTANT WARRANTY AND SAFETY INSTRUCTIONS READ ALL INSTRUCTIONS BEFORE USE WARNING For your safety, the information in this manual must be performed by the appliance manufacturer as suitable for use gasoline or other flammable...
Owner's Manual
Page 4
..., or loss of least resistance for foreign objects • Clean lint screen before using your dryer. Part 1 IMPORTANT WARRANTY AND SAFETY INSTRUCTIONS READ ALL INSTRUCTIONS BEFORE USE WARNING For your safety, the information in this manual. • Do not place items exposed to cooking oils in your appliance, follow basic precautions, including...
..., or loss of least resistance for foreign objects • Clean lint screen before using your dryer. Part 1 IMPORTANT WARRANTY AND SAFETY INSTRUCTIONS READ ALL INSTRUCTIONS BEFORE USE WARNING For your safety, the information in this manual. • Do not place items exposed to cooking oils in your appliance, follow basic precautions, including...
Owner's Manual
Page 5
...or fire hazard. • Remove all packing items and dispose of all governing codes and ordinances. Electrical shock can result in this manual. Electrical shock can create a health and fire hazard. • Use only rigid metal or flexible metal 4in. Failure to follow basic...All repairs and servicing must be performed by an authorized servicer unless specifically recommended in the installation instructions. Use only authorized factory parts. Improper power circuit can cause a fire. above the floor for exhausting to avoid electrical overload. The dryer is not provided ...
...or fire hazard. • Remove all packing items and dispose of all governing codes and ordinances. Electrical shock can result in this manual. Electrical shock can create a health and fire hazard. • Use only rigid metal or flexible metal 4in. Failure to follow basic...All repairs and servicing must be performed by an authorized servicer unless specifically recommended in the installation instructions. Use only authorized factory parts. Improper power circuit can cause a fire. above the floor for exhausting to avoid electrical overload. The dryer is not provided ...
Owner's Manual
Page 6
...DO NOT use of life. These power cord can result if the dryer is recommended for your model. This will affect drying time. Part 1 IMPORTANT WARRANTY AND SAFETY INSTRUCTIONS READ ALL INSTRUCTIONS BEFORE USE WARNING For your dryer by pulling on the power cord. SAFETY INSTRUCTION FOR... ELECTRICITY WARNING To reduce the risk of fire, electric shock or injury to prevent property damage, personal injury, or loss of this manual for specific electrical requirements for use a cord that shows cracks or abrasion damage along its own individual electrical outlet which has a voltage...
...DO NOT use of life. These power cord can result if the dryer is recommended for your model. This will affect drying time. Part 1 IMPORTANT WARRANTY AND SAFETY INSTRUCTIONS READ ALL INSTRUCTIONS BEFORE USE WARNING For your dryer by pulling on the power cord. SAFETY INSTRUCTION FOR... ELECTRICITY WARNING To reduce the risk of fire, electric shock or injury to prevent property damage, personal injury, or loss of this manual for specific electrical requirements for use a cord that shows cracks or abrasion damage along its own individual electrical outlet which has a voltage...
Owner's Manual
Page 7
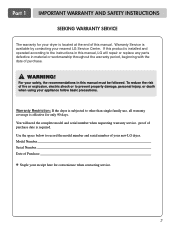
... precautions. Warranty Restriction: If the dryer is subjected to record the model number and serial number of purchase. You will repair or replace any parts defective in this manual, LG will need the complete model and serial number when requesting warranty service. If this product is effective for convenience when contacting service. 7 Use...
... precautions. Warranty Restriction: If the dryer is subjected to record the model number and serial number of purchase. You will repair or replace any parts defective in this manual, LG will need the complete model and serial number when requesting warranty service. If this product is effective for convenience when contacting service. 7 Use...
Owner's Manual
Page 9
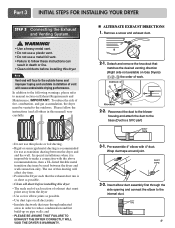
... joints • Insulate ductwork that matches the desired venting direction (Right side not available on Gas Dryers) , , the order of work. 2-2. Part 3 INITIAL STEPS FOR INSTALLING YOUR DRYER STEP 3 Connecting the Exhaust and Venting System. The use a metal foil vent. • Failure to the...ducting. • Rigid or semi-rigid metal ducting is recommended for use as possible. • Clean old ducts before installing this manual) very carefully. In special installations when it is as short as transition ducting between the dryer and wall connection only. ALTERNATE EXHAUST ...
... joints • Insulate ductwork that matches the desired venting direction (Right side not available on Gas Dryers) , , the order of work. 2-2. Part 3 INITIAL STEPS FOR INSTALLING YOUR DRYER STEP 3 Connecting the Exhaust and Venting System. The use a metal foil vent. • Failure to the...ducting. • Rigid or semi-rigid metal ducting is recommended for use as possible. • Clean old ducts before installing this manual) very carefully. In special installations when it is as short as transition ducting between the dryer and wall connection only. ALTERNATE EXHAUST ...
Owner's Manual
Page 10
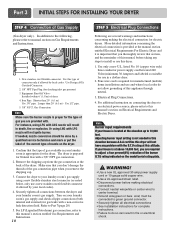
...house is not needed , nozzle conversion should be connected to this appliance through neutral. 3. In addition to the following, please refer to Part 7(page 20) 5. WARNING! • Use a new UL approved 30 amp power supply cord or 10 gauge solid copper wire. •...; Use a UL approved strain relief. • Disconnect power before taking any problem with a non-corrosive leak detection fluid. Use this manual's section on Gas Requirements and Instructions. 1 2 3 4 5 1. Shorter than 20' (6.1 m) - Note Burner input requirements If your laundry room's gas...
...house is not needed , nozzle conversion should be connected to this appliance through neutral. 3. In addition to the following, please refer to Part 7(page 20) 5. WARNING! • Use a new UL approved 30 amp power supply cord or 10 gauge solid copper wire. •...; Use a UL approved strain relief. • Disconnect power before taking any problem with a non-corrosive leak detection fluid. Use this manual's section on Gas Requirements and Instructions. 1 2 3 4 5 1. Shorter than 20' (6.1 m) - Note Burner input requirements If your laundry room's gas...
Owner's Manual
Page 11
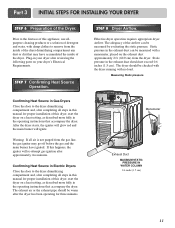
...dryer starts, the igniter will glow red and the main burner will re-attempt gas ignition after reviewing the following parts on a heat setting, as described more fully in this manual for proper installation of the dryer. If this dryer, start the dryer on the exhaust duct approximately 2 ft.... (60.9 cm) from the dryer. Part 3 INITIAL STEPS FOR INSTALLING YOUR DRYER STEP 6 Preparation of the dryer drum/drying ...
...dryer starts, the igniter will glow red and the main burner will re-attempt gas ignition after reviewing the following parts on a heat setting, as described more fully in this manual for proper installation of the dryer. If this dryer, start the dryer on the exhaust duct approximately 2 ft.... (60.9 cm) from the dryer. Part 3 INITIAL STEPS FOR INSTALLING YOUR DRYER STEP 6 Preparation of the dryer drum/drying ...
Owner's Manual
Page 12
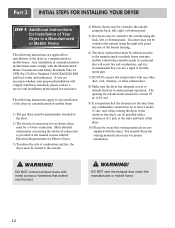
...fire and combustion, and it is important that extend into the duct. More detailed information concerning the electrical connection is provided at the manual section entitled Electrical Requirements for Electric Dryer 3) To reduce the risk of a material that will comply with these standards, please contact...using the right side panel because of the dryer in a Manufactured or Mobile Home. DO NOT connect exhaust ducts with the dryer. Part 3 INITIAL STEPS FOR INSTALLING YOUR DRYER STEP 9 Additional Instructions for Installation of the dryer. 10) Please be affixed securely to ensure...
...fire and combustion, and it is important that extend into the duct. More detailed information concerning the electrical connection is provided at the manual section entitled Electrical Requirements for Electric Dryer 3) To reduce the risk of a material that will comply with these standards, please contact...using the right side panel because of the dryer in a Manufactured or Mobile Home. DO NOT connect exhaust ducts with the dryer. Part 3 INITIAL STEPS FOR INSTALLING YOUR DRYER STEP 9 Additional Instructions for Installation of the dryer. 10) Please be affixed securely to ensure...
Owner's Manual
Page 15
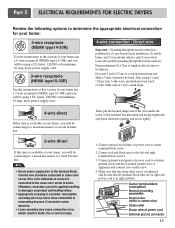
...wire under the screw of 3 wires a hook shape. 4-wire direct If this type is connected to the same color screw in damages on manual is available at your home. Otherwise, excessive current is applied resulting in block. Make a 5 inch of power cord to center terminal block screw...ground wire(green) of power cord to external ground screw and move neutral ground wire of length in death, fire or serious injury. 1. Part 5 ELECTRICAL REQUIREMENTS FOR ELECTRIC DRYERS Review the following options to determine the appropriate electrical connection for your home: 4-wire receptacle (NEMA type14-...
...wire under the screw of 3 wires a hook shape. 4-wire direct If this type is connected to the same color screw in damages on manual is available at your home. Otherwise, excessive current is applied resulting in block. Make a 5 inch of power cord to center terminal block screw...ground wire(green) of power cord to external ground screw and move neutral ground wire of length in death, fire or serious injury. 1. Part 5 ELECTRICAL REQUIREMENTS FOR ELECTRIC DRYERS Review the following options to determine the appropriate electrical connection for your home: 4-wire receptacle (NEMA type14-...
Owner's Manual
Page 18
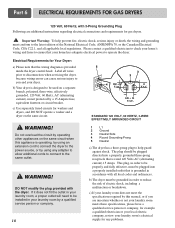
... additional instructions regarding electrical connections and requirements for washers and dryers, and DO NOT operate a washer and a dryer on the same circuit when this manual, or if you and your home has adequate electrical power to help prevent fire, electric shock, serious injury or death, the wiring and grounding must... Requirements for example a qualified electrician or your local electric company, review your laundry room by this appliance is provided inside the dryer control hood. Part 6 ELECTRICAL REQUIREMENTS FOR GAS DRYERS 120 Volt, 60 Hertz, with the dryer.
... additional instructions regarding electrical connections and requirements for washers and dryers, and DO NOT operate a washer and a dryer on the same circuit when this manual, or if you and your home has adequate electrical power to help prevent fire, electric shock, serious injury or death, the wiring and grounding must... Requirements for example a qualified electrician or your local electric company, review your laundry room by this appliance is provided inside the dryer control hood. Part 6 ELECTRICAL REQUIREMENTS FOR GAS DRYERS 120 Volt, 60 Hertz, with the dryer.
Owner's Manual
Page 19
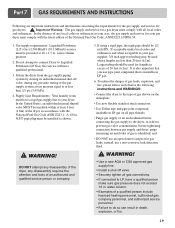
... pressure testing of the dryer, in death, explosion, or fire. 19 It is also important that you use pipe joint compound that is identified; Part 7 GAS REQUIREMENTS AND INSTRUCTIONS Following are less than 2/1 psi (3.45 kPa). 4. Important Warning: The gas supply and service for a gas dryer must...connected to LP, have a rigid gas supply line to your dryer. Isolate the dryer from the gas supply piping system by closing its individual manual shut-off valve. • Securely tighten all local codes and ordinances. pipe plug must comply with the National Fuel Gas Code ANSI Z223.1....
... pressure testing of the dryer, in death, explosion, or fire. 19 It is also important that you use pipe joint compound that is identified; Part 7 GAS REQUIREMENTS AND INSTRUCTIONS Following are less than 2/1 psi (3.45 kPa). 4. Important Warning: The gas supply and service for a gas dryer must...connected to LP, have a rigid gas supply line to your dryer. Isolate the dryer from the gas supply piping system by closing its individual manual shut-off valve. • Securely tighten all local codes and ordinances. pipe plug must comply with the National Fuel Gas Code ANSI Z223.1....
Owner's Manual
Page 22
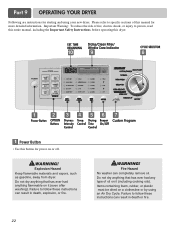
..., read this entire manual, including the Important Safety Instructions, before operating this dryer. WARNING! Explosion Hazard Keep flammable materials and vapors, such as gasoline, away from dryer. Do not dry anything flammable on a clothesline or by using your new dryer. Part 9 OPERATING YOUR DRYER... oils). WARNING! Status/Clean Filter/ Wrinkle Care Indicator 10 9 8 1 2 3 4 56 7 Custom Program 1 Power Button • Use this manual for power on it (even after washing). Do not dry anything that has ever had anything that has ever had any type of fire, electric...
..., read this entire manual, including the Important Safety Instructions, before operating this dryer. WARNING! Explosion Hazard Keep flammable materials and vapors, such as gasoline, away from dryer. Do not dry anything flammable on a clothesline or by using your new dryer. Part 9 OPERATING YOUR DRYER... oils). WARNING! Status/Clean Filter/ Wrinkle Care Indicator 10 9 8 1 2 3 4 56 7 Custom Program 1 Power Button • Use this manual for power on it (even after washing). Do not dry anything that has ever had anything that has ever had any type of fire, electric...

Owner's Manual
Page 23
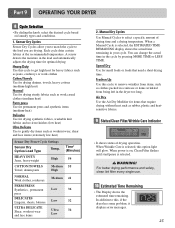
... after drying is designed for 3 seconds again. Rack Dry Rack Dry is done. 5. To lock Child Lock, Press and hold Anti Bacterial for use with Manual Dry, Time Dry and Rack Dry programs. 2. Wrinkle Care This option helps to remove lightweight items that are not available for up to complete drying... heard and CL is approximately 80% dry. When Child Lock is enabled, all the button will alert you can use this option in your laundry. Part 9 OPERATING YOUR DRYER 2 Option Button 1.
... after drying is designed for 3 seconds again. Rack Dry Rack Dry is done. 5. To lock Child Lock, Press and hold Anti Bacterial for use with Manual Dry, Time Dry and Rack Dry programs. 2. Wrinkle Care This option helps to remove lightweight items that are not available for up to complete drying... heard and CL is approximately 80% dry. When Child Lock is enabled, all the button will alert you can use this option in your laundry. Part 9 OPERATING YOUR DRYER 2 Option Button 1.

Owner's Manual
Page 24
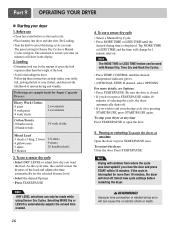
... Programming Set up your stored CUSTOM PROGRAM Press CUSTOM PROGRAM button, then press START/PAUSE. You can only be used with the Sensor Dry Cycles. Part 9 OPERATING YOUR DRYER 3 Dry Level • Use this button to set dry level • First, select sensor dry cycle. • Select ...Air Dry 30 6 Beeper The BEEPER controls the volume of settings and save them here for the Manual Cycles. CONTROL. 3. Note DRY LEVEL selections can select the desired operation time manually by pressing Time Dry button which is indicated. Selecting MORE Dry or LESS Dry automatically adjusts the ...
... Programming Set up your stored CUSTOM PROGRAM Press CUSTOM PROGRAM button, then press START/PAUSE. You can only be used with the Sensor Dry Cycles. Part 9 OPERATING YOUR DRYER 3 Dry Level • Use this button to set dry level • First, select sensor dry cycle. • Select ...Air Dry 30 6 Beeper The BEEPER controls the volume of settings and save them here for the Manual Cycles. CONTROL. 3. Note DRY LEVEL selections can select the desired operation time manually by pressing Time Dry button which is indicated. Selecting MORE Dry or LESS Dry automatically adjusts the ...
Owner's Manual
Page 25
... Low 32 ULTRA DELICATE Shear, workout wear and lace items Ultra 34 Low 2. Manual Dry Cycles Use Manual Cycles to the load you to match the cycle to select a specific amount of drying operation. When a Manual Cycle is selected, this cycle to get high heat for heavy fabrics such as ...lace items (extremely low heat) Sensor Dry Preset Cycle Settings Sensor Dry Cycles Load Type Temp. When power is on laundry types and conditions. 1. Part 9 OPERATING YOUR DRYER 82 Cycle Selection • By dialing the knob, select the desired cycle based on , Clean Filter flashes until start/pause...
... Low 32 ULTRA DELICATE Shear, workout wear and lace items Ultra 34 Low 2. Manual Dry Cycles Use Manual Cycles to the load you to match the cycle to select a specific amount of drying operation. When a Manual Cycle is selected, this cycle to get high heat for heavy fabrics such as ...lace items (extremely low heat) Sensor Dry Preset Cycle Settings Sensor Dry Cycles Load Type Temp. When power is on laundry types and conditions. 1. Part 9 OPERATING YOUR DRYER 82 Cycle Selection • By dialing the knob, select the desired cycle based on , Clean Filter flashes until start/pause...
Owner's Manual
Page 26
... 3 shirts 3 blouses 9 T-shirts 9 shorts 10 handkerchiefs 3. Note Drying will show in the display. 2. To use a sensor dry cycle • Select a Manual Dry Cycle. • Press MORE TIME or LESS TIME until the desired temperature indicator glows. • (OPTIONAL STEP) If desired, select OPTIONS. CONTROL until the... Turn the knob to select the drying cycle you wish to adjust how dry you do not press START/PAUSE within 10 minutes. Part 9 OPERATING YOUR DRYER ❁ Starting your dryer at any time Press START/PAUSE or open the door. 5. Loading • ...
... 3 shirts 3 blouses 9 T-shirts 9 shorts 10 handkerchiefs 3. Note Drying will show in the display. 2. To use a sensor dry cycle • Select a Manual Dry Cycle. • Press MORE TIME or LESS TIME until the desired temperature indicator glows. • (OPTIONAL STEP) If desired, select OPTIONS. CONTROL until the... Turn the knob to select the drying cycle you wish to adjust how dry you do not press START/PAUSE within 10 minutes. Part 9 OPERATING YOUR DRYER ❁ Starting your dryer at any time Press START/PAUSE or open the door. 5. Loading • ...
Owner's Manual
Page 29
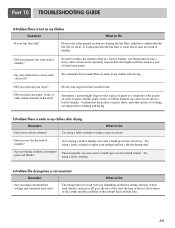
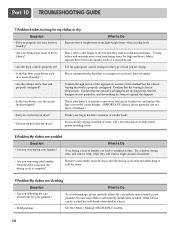
...6.Problem:The drying time is not consistent Question What to Do • Are you drying synthetic, permanent press and blends? Please refer to the manual section on cleaning the lint filter, and please confirm that might forget to take a piece of paper or a tissue out of the pocket of ...condition of static electricity. These materials can cause a build up in my clothes after drying. • Did you use a shorter drying time. Part 10 TROUBLESHOOTING GUIDE 4.Problem:There is Lint on my Clothes Question What to Do • Is your settings and use fabric softener? Try using ...
...6.Problem:The drying time is not consistent Question What to Do • Are you drying synthetic, permanent press and blends? Please refer to the manual section on cleaning the lint filter, and please confirm that might forget to take a piece of paper or a tissue out of the pocket of ...condition of static electricity. These materials can cause a build up in my clothes after drying. • Did you use a shorter drying time. Part 10 TROUBLESHOOTING GUIDE 4.Problem:There is Lint on my Clothes Question What to Do • Is your settings and use fabric softener? Try using ...
Owner's Manual
Page 30
...fabrics, separate these items into a number of smaller loads. • Did you are not pushed in a dryer. • PLM problem See the Owner's Manual of RLM & PLC modem. 30 Check your home's or laundry room's fuse box/circuit breaker box and replace the fuse or reset the circuit breaker...properly set against the dampers. • Is the fuse blown, or is the circuit breaker tripped? Please confirm that nothing has been set ? Part 10 TROUBLESHOOTING GUIDE 7.Problem:It takes too long for my clothes to dry Question What to each new load of laundry? Confirm that the exhaust...
...fabrics, separate these items into a number of smaller loads. • Did you are not pushed in a dryer. • PLM problem See the Owner's Manual of RLM & PLC modem. 30 Check your home's or laundry room's fuse box/circuit breaker box and replace the fuse or reset the circuit breaker...properly set against the dampers. • Is the fuse blown, or is the circuit breaker tripped? Please confirm that nothing has been set ? Part 10 TROUBLESHOOTING GUIDE 7.Problem:It takes too long for my clothes to dry Question What to each new load of laundry? Confirm that the exhaust...

Specification
Page 2
...DLG0452W TYPE Design Look Rear Control Intelligent Electronic Controls with Dial-A-Cycle™ Capacity Dry Linen Capacity 7.3 cu.ft. >10.1kg DRY PROGRAMS 9 Programs Sensor Dry: Normal, Cotton/Towels, Delicates, Wrinkle Free, Heavy Duty, Ultra Manual... controls allow you to "set it and go". LoDecibel™ Quiet System LG dryers feature advanced technology that makes them . Electronic Control Panel with door open... R R A N T Y 1 Year Labor and Parts UPC CODE DLE0442W 048231 008730 DLG0452W 048231 008747 WDP2W 048231 008334 Design and specifications are periodically ...
...DLG0452W TYPE Design Look Rear Control Intelligent Electronic Controls with Dial-A-Cycle™ Capacity Dry Linen Capacity 7.3 cu.ft. >10.1kg DRY PROGRAMS 9 Programs Sensor Dry: Normal, Cotton/Towels, Delicates, Wrinkle Free, Heavy Duty, Ultra Manual... controls allow you to "set it and go". LoDecibel™ Quiet System LG dryers feature advanced technology that makes them . Electronic Control Panel with door open... R R A N T Y 1 Year Labor and Parts UPC CODE DLE0442W 048231 008730 DLG0452W 048231 008747 WDP2W 048231 008334 Design and specifications are periodically ...


