
Owner's Manual
Page 3
... and obey all occupants. 4. WHAT TO DO IF YOU SMELL GAS WARNING To reduce the risk of this appliance or any phone in your building. 3. Part 1 IMPORTANT WARRANTY AND SAFETY INSTRUCTIONS READ ALL INSTRUCTIONS BEFORE USE WARNING For your safety, the information in this manual and on any electrical switches. Do...
... and obey all occupants. 4. WHAT TO DO IF YOU SMELL GAS WARNING To reduce the risk of this appliance or any phone in your building. 3. Part 1 IMPORTANT WARRANTY AND SAFETY INSTRUCTIONS READ ALL INSTRUCTIONS BEFORE USE WARNING For your safety, the information in this manual and on any electrical switches. Do...
Owner's Manual
Page 4
...; Do not tamper with a cord having an equipment-grounding conductor and a grounding plug. The plug must be plugged into the dryer while parts are in doubt as described in this manual must be followed to minimize the risk of fire or explosion, electric shock, or to prevent ... reduce the risk of least resistance for foreign objects • Clean lint screen before using your dryer. If it will minimize incomplete combustion. Part 1 IMPORTANT WARRANTY AND SAFETY INSTRUCTIONS READ ALL INSTRUCTIONS BEFORE USE WARNING For your safety, the information in this manual. • Do not ...
...; Do not tamper with a cord having an equipment-grounding conductor and a grounding plug. The plug must be plugged into the dryer while parts are in doubt as described in this manual must be followed to minimize the risk of fire or explosion, electric shock, or to prevent ... reduce the risk of least resistance for foreign objects • Clean lint screen before using your dryer. If it will minimize incomplete combustion. Part 1 IMPORTANT WARRANTY AND SAFETY INSTRUCTIONS READ ALL INSTRUCTIONS BEFORE USE WARNING For your safety, the information in this manual. • Do not ...
Owner's Manual
Page 5
...instructions can result in death, explosion, fire or burns. • Place dryer at least 18 in fire or death. 5 Use only authorized factory parts. Failure to the outside . SAFETY INSTRUCTION FOR INSTALLATION WARNING To reduce the risk of electric shock. Failure to reduce the risk of fire, electric ...follow basic precautions, including the following: • Properly ground dryer to follow this warning can cause a fire. Failure to conform with no obstructions. Part 1 IMPORTANT WARRANTY AND SAFETY INSTRUCTIONS READ ALL INSTRUCTIONS BEFORE USE WARNING For your new dryer.
...instructions can result in death, explosion, fire or burns. • Place dryer at least 18 in fire or death. 5 Use only authorized factory parts. Failure to the outside . SAFETY INSTRUCTION FOR INSTALLATION WARNING To reduce the risk of electric shock. Failure to reduce the risk of fire, electric ...follow basic precautions, including the following: • Properly ground dryer to follow this warning can cause a fire. Failure to conform with no obstructions. Part 1 IMPORTANT WARRANTY AND SAFETY INSTRUCTIONS READ ALL INSTRUCTIONS BEFORE USE WARNING For your new dryer.
Owner's Manual
Page 6
... if the dryer is recommended for your model. In special installations when it is properly grounded. Secure all power cords that matches the rating plate. Part 1 IMPORTANT WARRANTY AND SAFETY INSTRUCTIONS READ ALL INSTRUCTIONS BEFORE USE WARNING For your safety, the information in this manual must be followed to minimize the...
... if the dryer is recommended for your model. In special installations when it is properly grounded. Secure all power cords that matches the rating plate. Part 1 IMPORTANT WARRANTY AND SAFETY INSTRUCTIONS READ ALL INSTRUCTIONS BEFORE USE WARNING For your safety, the information in this manual must be followed to minimize the...
Owner's Manual
Page 7
... reduce the risk of this manual. Date of purchase date is installed and operated according to the instructions in this manual, LG will need the complete model and serial number when requesting warranty service. For your safety, the recommendations in material or workmanship throughout... is subjected to record the model number and serial number of purchase. proof of Purchase Staple your nearest LG Service Center. You will repair or replace any parts defective in this product is required. Warranty Service is effective for convenience when contacting service. 7 Use the...
... reduce the risk of this manual. Date of purchase date is installed and operated according to the instructions in this manual, LG will need the complete model and serial number when requesting warranty service. For your safety, the recommendations in material or workmanship throughout... is subjected to record the model number and serial number of purchase. proof of Purchase Staple your nearest LG Service Center. You will repair or replace any parts defective in this product is required. Warranty Service is effective for convenience when contacting service. 7 Use the...
Owner's Manual
Page 8
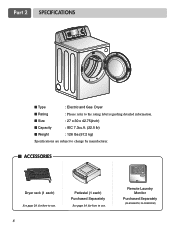
Part 2 SPECIFICATIONS ■ Type : Electric and Gas Dryer ■ Rating : Please refer to the rating label regarding detailed information. ■ Size : 27 x 30 x 42.75(inch) ■ Capacity : IEC 7.3cu.ft. (22.5 lb) ■ Weight : 126 Ibs (57.2 kg) Specifications are subject to change by manufacturer. ■ ACCESSORIES Dryer rack (1 each) See page 26 for how to use. 8 Pedestal (1 each) Purchased Separately See page 14 for how to use. Remote Laundry Monitor Purchased Separately (DLE5944WM, DLG5955WM)
Part 2 SPECIFICATIONS ■ Type : Electric and Gas Dryer ■ Rating : Please refer to the rating label regarding detailed information. ■ Size : 27 x 30 x 42.75(inch) ■ Capacity : IEC 7.3cu.ft. (22.5 lb) ■ Weight : 126 Ibs (57.2 kg) Specifications are subject to change by manufacturer. ■ ACCESSORIES Dryer rack (1 each) See page 26 for how to use. 8 Pedestal (1 each) Purchased Separately See page 14 for how to use. Remote Laundry Monitor Purchased Separately (DLE5944WM, DLG5955WM)
Owner's Manual
Page 9
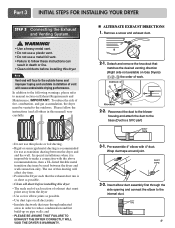
... of this ducting will cause undesirable drying performance. Reconnect the duct to the blower housing and attach the duct to the base.(Duct is a SVC part) • Do not use thin plastic or foil ducting. • Rigid or semi-rigid metal ducting is recommended for use of vent will affect dry... and wall connection only. IMPORTANT: To reduce the risk of exhaust duct must be used between the dryer and and the wall. ALTERNATE EXHAUST DIRECTIONS 1. Part 3 INITIAL STEPS FOR INSTALLING YOUR DRYER STEP 3 Connecting the Exhaust and Venting System.
... of this ducting will cause undesirable drying performance. Reconnect the duct to the blower housing and attach the duct to the base.(Duct is a SVC part) • Do not use thin plastic or foil ducting. • Rigid or semi-rigid metal ducting is recommended for use of vent will affect dry... and wall connection only. IMPORTANT: To reduce the risk of exhaust duct must be used between the dryer and and the wall. ALTERNATE EXHAUST DIRECTIONS 1. Part 3 INITIAL STEPS FOR INSTALLING YOUR DRYER STEP 3 Connecting the Exhaust and Venting System.
Owner's Manual
Page 10
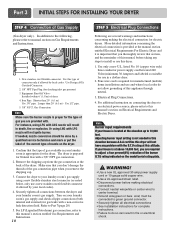
In addition to the following, please refer to Part 7(page 20) 5. Use 1/2" pipe. 5. 3/8" N.P.T. For instance, using LPG with LNG nozzle will result in this elevation because A.G.A certifies this dryer will not ignite burner. Refer ... power before taking any problem with a 3/8" NPT gas connection. 2. Longer than 20' (6.1 m) Use 3/8" pipe. Equipment Shut-Off ValveInstalled within 6' (1.8 m) of Gas Supply (Gas dryer only). Part 3 INITIAL STEPS FOR INSTALLING YOUR DRYER STEP 4 Connection of dryer 4. Confirm that the type of the dryer.
In addition to the following, please refer to Part 7(page 20) 5. Use 1/2" pipe. 5. 3/8" N.P.T. For instance, using LPG with LNG nozzle will result in this elevation because A.G.A certifies this dryer will not ignite burner. Refer ... power before taking any problem with a 3/8" NPT gas connection. 2. Longer than 20' (6.1 m) Use 3/8" pipe. Equipment Shut-Off ValveInstalled within 6' (1.8 m) of Gas Supply (Gas dryer only). Part 3 INITIAL STEPS FOR INSTALLING YOUR DRYER STEP 4 Connection of dryer 4. Confirm that the type of the dryer.
Owner's Manual
Page 11
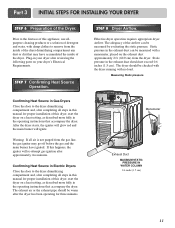
STEP 7 Confirming Heat Source Operation. Static pressure in your dryer after reviewing the following parts on a heat setting, as described more fully in the operating instructions that may have ignited. Confirming Heat Source in Electric Dryers Close ... has been operating for proper installation of this happens, the igniter will ignite. If this dryer, start the dryer on your dryer's Electrical Requirements. Part 3 INITIAL STEPS FOR INSTALLING YOUR DRYER STEP 6 Preparation of the dryer. Static pressure in this appliance, use allpurpose cleaning products or a solution of...
STEP 7 Confirming Heat Source Operation. Static pressure in your dryer after reviewing the following parts on a heat setting, as described more fully in the operating instructions that may have ignited. Confirming Heat Source in Electric Dryers Close ... has been operating for proper installation of this happens, the igniter will ignite. If this dryer, start the dryer on your dryer's Electrical Requirements. Part 3 INITIAL STEPS FOR INSTALLING YOUR DRYER STEP 6 Preparation of the dryer. Static pressure in this appliance, use allpurpose cleaning products or a solution of...
Owner's Manual
Page 12
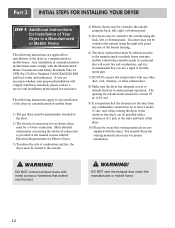
... a material that will comply with these standards, please contact a service and installation professional for proper installation. WARNING! The following instructions apply to ensure proper operation. Part 3 INITIAL STEPS FOR INSTALLING YOUR DRYER STEP 9 Additional Instructions for Installation of Your Dryer in a manufactured or mobile home must comply with the Manufactured Home...
... a material that will comply with these standards, please contact a service and installation professional for proper installation. WARNING! The following instructions apply to ensure proper operation. Part 3 INITIAL STEPS FOR INSTALLING YOUR DRYER STEP 9 Additional Instructions for Installation of Your Dryer in a manufactured or mobile home must comply with the Manufactured Home...
Owner's Manual
Page 13
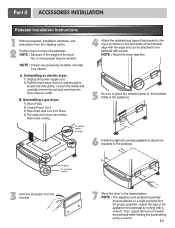
Part 4 ACCESSORIES INSTALLATION Pedestal Installation Instructions 1 4 2 1) Shut off Gas 2) Unplug Power Cord 3) Disconnect Gas Line from Dryer 4) Pull away and loosen vent clamp. Disconnect venting. 5 6 3 7 13
Part 4 ACCESSORIES INSTALLATION Pedestal Installation Instructions 1 4 2 1) Shut off Gas 2) Unplug Power Cord 3) Disconnect Gas Line from Dryer 4) Pull away and loosen vent clamp. Disconnect venting. 5 6 3 7 13

Owner's Manual
Page 14
..., because wiring errors can be moved from its own terminal block that the wiring diagram is optional and subject to examples on the following pages. Part 5 ELECTRICAL REQUIREMENTS FOR ELECTRIC DRYERS Following are included in the following pages. b) This dryer must select the method by local codes. If over fifteen feet...
..., because wiring errors can be moved from its own terminal block that the wiring diagram is optional and subject to examples on the following pages. Part 5 ELECTRICAL REQUIREMENTS FOR ELECTRIC DRYERS Following are included in the following pages. b) This dryer must select the method by local codes. If over fifteen feet...
Owner's Manual
Page 15
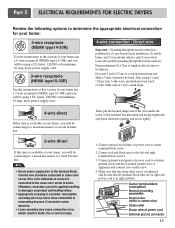
...) Use the instructions at this section if your home has a 3-wire receptacle (NEMA type 10-30R) and you will be connected to same color screw. Part 5 ELECTRICAL REQUIREMENTS FOR ELECTRIC DRYERS Review the following options to determine the appropriate electrical connection for your home: 4-wire receptacle (NEMA type14-30R) Use the...
...) Use the instructions at this section if your home has a 3-wire receptacle (NEMA type 10-30R) and you will be connected to same color screw. Part 5 ELECTRICAL REQUIREMENTS FOR ELECTRIC DRYERS Review the following options to determine the appropriate electrical connection for your home: 4-wire receptacle (NEMA type14-30R) Use the...
Owner's Manual
Page 16
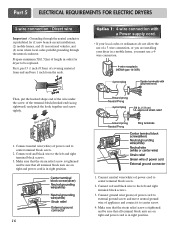
... to external ground screw and move neutral ground wire of the terminal block(hooked end facing rightward) and pinch the hook together and screw tightly. 1. Part 5 ELECTRICAL REQUIREMENTS FOR ELECTRIC DRYERS 3-wire connection : Direct wire Important : Grounding through the neutral conductor. First, peel 3 1/2 inch (8.9cm) of power cord to the left...
... to external ground screw and move neutral ground wire of the terminal block(hooked end facing rightward) and pinch the hook together and screw tightly. 1. Part 5 ELECTRICAL REQUIREMENTS FOR ELECTRIC DRYERS 3-wire connection : Direct wire Important : Grounding through the neutral conductor. First, peel 3 1/2 inch (8.9cm) of power cord to the left...
Owner's Manual
Page 17
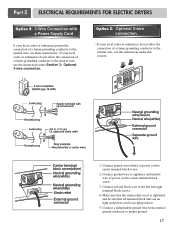
... connector to the left and right terminal block screws. 4. Connect ground wire of appliance and neutral wire of power cord to center terminal block screw. 2. Part 5 ELECTRICAL REQUIREMENTS FOR ELECTRIC DRYERS Option 2: 3-Wire Connection with a Power Supply Cord lf your local codes or ordinances permit the connection of a frame-grounding conductor...
... connector to the left and right terminal block screws. 4. Connect ground wire of appliance and neutral wire of power cord to center terminal block screw. 2. Part 5 ELECTRICAL REQUIREMENTS FOR ELECTRIC DRYERS Option 2: 3-Wire Connection with a Power Supply Cord lf your local codes or ordinances permit the connection of a frame-grounding conductor...
Owner's Manual
Page 18
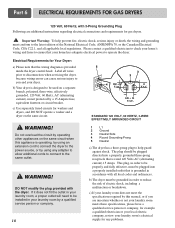
... dryer control hood. b) Your dryer is rated 120 Volts AC (alternating current) 15 Amps. STANDARD 120 VOLT, 60 HERTZ, 3-WIRE EFFECTIVELY GROUNDED CIRCUIT WARNING! WARNING! Part 6 ELECTRICAL REQUIREMENTS FOR GAS DRYERS 120 Volt, 60 Hertz, with 3-Prong Grounding Plug Following are uncertain whether or not your laundry room meets these specifications...
... dryer control hood. b) Your dryer is rated 120 Volts AC (alternating current) 15 Amps. STANDARD 120 VOLT, 60 HERTZ, 3-WIRE EFFECTIVELY GROUNDED CIRCUIT WARNING! WARNING! Part 6 ELECTRICAL REQUIREMENTS FOR GAS DRYERS 120 Volt, 60 Hertz, with 3-Prong Grounding Plug Following are uncertain whether or not your laundry room meets these specifications...
Owner's Manual
Page 19
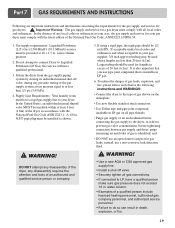
... the dryer, in accordance with the National Fuel Gas Code ANSI Z223.1. It is also important that you use pipe joint compound that is identified; Part 7 GAS REQUIREMENTS AND INSTRUCTIONS Following are less than 2/1 psi (3.45 kPa). 4. Your laundry room must comply with all gas connections. • If connected to LP...
... the dryer, in accordance with the National Fuel Gas Code ANSI Z223.1. It is also important that you use pipe joint compound that is identified; Part 7 GAS REQUIREMENTS AND INSTRUCTIONS Following are less than 2/1 psi (3.45 kPa). 4. Your laundry room must comply with all gas connections. • If connected to LP...

Owner's Manual
Page 20
... other fasteners which extend into an enclosed and unventilated area, such as possible. Failure to follow these instructions can result in fi re or death. 4. Part 8 EXHAUST REQUIREMENTS AND MAINTENANCE Following are not provided with duct tape. Use only 4-in diameter with the Outline for use with the above . The exhaust...
... other fasteners which extend into an enclosed and unventilated area, such as possible. Failure to follow these instructions can result in fi re or death. 4. Part 8 EXHAUST REQUIREMENTS AND MAINTENANCE Following are not provided with duct tape. Use only 4-in diameter with the Outline for use with the above . The exhaust...

Owner's Manual
Page 21
Part 8 EXHAUST REQUIREMENTS AND MAINTENANCE Exhaust and Dryer Maintenance WARNING! Check the weather hoods frequently to perform this type of build up on the dryer, because ...
Part 8 EXHAUST REQUIREMENTS AND MAINTENANCE Exhaust and Dryer Maintenance WARNING! Check the weather hoods frequently to perform this type of build up on the dryer, because ...
Owner's Manual
Page 22
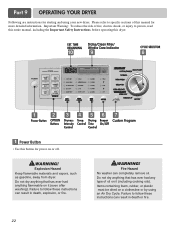
... vapors, such as gasoline, away from dryer. Do not dry anything that has ever had anything that has ever had any type of this dryer. Part 9 OPERATING YOUR DRYER Following are instructions for starting and using an Air Dry Cycle.
... vapors, such as gasoline, away from dryer. Do not dry anything that has ever had anything that has ever had any type of this dryer. Part 9 OPERATING YOUR DRYER Following are instructions for starting and using an Air Dry Cycle.


