
Owner's Manual
Page 21
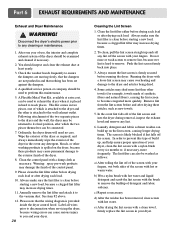
... panel with a loose lint screen may cause overheating and damage to the exterior finish of the dryer. 8. Always make sure the lint filter is attached to perform this type of the lint screen and into place. 3. Label all wires prior to disconnection when servicing the dryer,...from the lint screen before running the dryer. Laundry detergent and fabric softener residue can also be examined and cleaned if necessary. 2. The lint filter can build up , and help ensure proper operation of detergent and fabric softener. d) After the residue has been removed, rinse screen with ...
... panel with a loose lint screen may cause overheating and damage to the exterior finish of the dryer. 8. Always make sure the lint filter is attached to perform this type of the lint screen and into place. 3. Label all wires prior to disconnection when servicing the dryer,...from the lint screen before running the dryer. Laundry detergent and fabric softener residue can also be examined and cleaned if necessary. 2. The lint filter can build up , and help ensure proper operation of detergent and fabric softener. d) After the residue has been removed, rinse screen with ...
Owner's Manual
Page 29
...• Are you drying synthetic, permanent press, and blends? In order to build up of black linen pants). • Do your lint filter full? Try using a fabric softener or adjust your settings and use fabric softener? What to Do Try using consistent heat settings and consistent load... of laundry, sort lint producers (like a fuzzy white cotton towel) separately from clothes that might forget to the manual section on cleaning the lint filter, and please confirm that the pockets of pants, shirts, and other similar material in a load of laundry. • Did you place any paper...
...• Are you drying synthetic, permanent press, and blends? In order to build up of black linen pants). • Do your lint filter full? Try using a fabric softener or adjust your settings and use fabric softener? What to Do Try using consistent heat settings and consistent load... of laundry, sort lint producers (like a fuzzy white cotton towel) separately from clothes that might forget to the manual section on cleaning the lint filter, and please confirm that the pockets of pants, shirts, and other similar material in a load of laundry. • Did you place any paper...
Owner's Manual
Page 30
... and either hang or fold the items. 9.Problem:My clothes are drying. Confirm through review of the appropriate sections of this manual that the lint filter is clean prior to each new load of laundry? • Are the exhaust ducts clear and properly configured? • Is the fuse blown, or... cycle is free of laundry can be washed but will naturally shrink when washed. Confirm that nothing has been set ? • Is the lint filter clean before each new load of a consistent size. What to Do To avoid shrinkage, please carefully follow the care and use two fuses or breakers...
... and either hang or fold the items. 9.Problem:My clothes are drying. Confirm through review of the appropriate sections of this manual that the lint filter is clean prior to each new load of laundry? • Are the exhaust ducts clear and properly configured? • Is the fuse blown, or... cycle is free of laundry can be washed but will naturally shrink when washed. Confirm that nothing has been set ? • Is the lint filter clean before each new load of a consistent size. What to Do To avoid shrinkage, please carefully follow the care and use two fuses or breakers...
Service Manual
Page 31
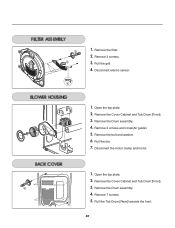
Disconnect electro sensor. 1. Remove the Cover Cabinet and Tub Drum [Front]. 3. Pull the fan. 7. Remove the Drum assembly. 4. Remove the Drum assembly. 4. Remove the Cover Cabinet and Tub Drum [Front]. 3. Pull the grill. 4. 1. Remove the filter. 2. Open the top plate. 2. Remove the bolt and washer. 6. Disconnect the motor clamp and motor. 1. Open the top plate. 2. Remove 2 screws and cover(Air guide). 5. Pull the Tub Drum [Rear] towards the front. 30 Remove 3 screws. 3. Remove 7 screws. 5.
Disconnect electro sensor. 1. Remove the Cover Cabinet and Tub Drum [Front]. 3. Pull the fan. 7. Remove the Drum assembly. 4. Remove the Drum assembly. 4. Remove the Cover Cabinet and Tub Drum [Front]. 3. Pull the grill. 4. 1. Remove the filter. 2. Open the top plate. 2. Remove the bolt and washer. 6. Disconnect the motor clamp and motor. 1. Open the top plate. 2. Remove 2 screws and cover(Air guide). 5. Pull the Tub Drum [Rear] towards the front. 30 Remove 3 screws. 3. Remove 7 screws. 5.
Service Manual
Page 32
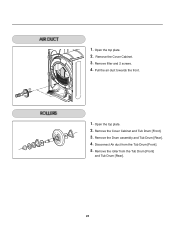
Remove the Drum assembly and Tub Drum [Rear]. 4. Open the top plate. 2. Pull the air duct towards the front. 1. 1. Disconnect Air duct from the Tub Drum [Front] and Tub Drum [Rear]. 31 Remove the Cover Cabinet. 3. Remove filter and 2 screws. 4. Remove the Cover Cabinet and Tub Drum [Front]. 3. Remove the roller from the Tub Drum [Front]. 5. Open the top plate. 2.
Remove the Drum assembly and Tub Drum [Rear]. 4. Open the top plate. 2. Pull the air duct towards the front. 1. 1. Disconnect Air duct from the Tub Drum [Front] and Tub Drum [Rear]. 31 Remove the Cover Cabinet. 3. Remove filter and 2 screws. 4. Remove the Cover Cabinet and Tub Drum [Front]. 3. Remove the roller from the Tub Drum [Front]. 5. Open the top plate. 2.


