

Owners Manual
Page 3
... the Dryer 12 Reversing the Door 20 Installing the Side Vent Kit 21 Venting the Dryer 24 Connecting Gas Dryers 26 Connecting Electric Dryers 30 Final Installation Check 31 Installation Test (Duct Check) 33 OPERATION 33 Using the Dryer 34 Check the Lint Filter Before Every Load 34 Sorting Loads 34 Loading the Dryer 35 Using the LG EasyLoadTM 36 Control Panel 38 Cycle Guide 40 Cycle Settings and Options 42 Steam Functions (Steam Models) 43 Steam Cycle Guide 44 SMART FUNCTIONS 44 LG SmartThinQ Application 47 Smart Diagnosis™ Function 48 mAINTENANCE 48 Regular Cleaning 49 Troubleshooting...
... the Dryer 12 Reversing the Door 20 Installing the Side Vent Kit 21 Venting the Dryer 24 Connecting Gas Dryers 26 Connecting Electric Dryers 30 Final Installation Check 31 Installation Test (Duct Check) 33 OPERATION 33 Using the Dryer 34 Check the Lint Filter Before Every Load 34 Sorting Loads 34 Loading the Dryer 35 Using the LG EasyLoadTM 36 Control Panel 38 Cycle Guide 40 Cycle Settings and Options 42 Steam Functions (Steam Models) 43 Steam Cycle Guide 44 SMART FUNCTIONS 44 LG SmartThinQ Application 47 Smart Diagnosis™ Function 48 mAINTENANCE 48 Regular Cleaning 49 Troubleshooting...
Owners Manual
Page 4
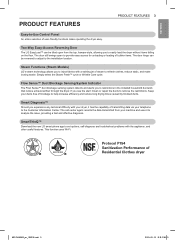
... long drying times caused by blocked ducts. Simply select the Steam Fresh™ cycle or Wrinkle Care cycle. The door still swings open from your ducts free of bulkier items. The door hinge can be reversed to adjust to refresh clothes, reduce static, and make operating the dryer easy. ENGLISH PRODUCT FEATURES PRODUCT FEATURES 3 Easy-to set options, self-diagnose and troubleshoot problems with the appliance, and other useful features. Two-Way Easy-Access Reversing Door...
... long drying times caused by blocked ducts. Simply select the Steam Fresh™ cycle or Wrinkle Care cycle. The door still swings open from your ducts free of bulkier items. The door hinge can be reversed to adjust to refresh clothes, reduce static, and make operating the dryer easy. ENGLISH PRODUCT FEATURES PRODUCT FEATURES 3 Easy-to set options, self-diagnose and troubleshoot problems with the appliance, and other useful features. Two-Way Easy-Access Reversing Door...

Owners Manual
Page 5
...light any appliance. • Do not touch any phone in the vicinity of Fire Install the clothes dryer according to the product if you do not immediately follow all occupants. • Immediately call the fire department. -Installation and service must be easily crushed, and trap lint. Follow the gas supplier's instructions... or property damage. -Do not store or use with flexible plastic venting materials. Clothes dryer installation must be slightly injured or cause damage to the manufacturer's instructions and local codes. We have provided many important safety messages in...
...light any appliance. • Do not touch any phone in the vicinity of Fire Install the clothes dryer according to the product if you do not immediately follow all occupants. • Immediately call the fire department. -Installation and service must be easily crushed, and trap lint. Follow the gas supplier's instructions... or property damage. -Do not store or use with flexible plastic venting materials. Clothes dryer installation must be slightly injured or cause damage to the manufacturer's instructions and local codes. We have provided many important safety messages in...
Owners Manual
Page 6
... dryer. Failure to follow this Owner's Manual. There is recommended for exhausting to follow these instructions may result in fire or death. •• The exhaust duct must be performed by authorized service personnel unless specifically recommended in any old ducts before installing your dryer. Electric shock may result in use , the dryer must be exhausted to conform with all joints with duct tape. An accumulation of lint...
... dryer. Failure to follow this Owner's Manual. There is recommended for exhausting to follow these instructions may result in fire or death. •• The exhaust duct must be performed by authorized service personnel unless specifically recommended in any old ducts before installing your dryer. Electric shock may result in use , the dryer must be exhausted to conform with all joints with duct tape. An accumulation of lint...
Owners Manual
Page 7
... a risk of a tumble dryer cycle occurs without heat (cool down period). Install all clothes dryers in fire or death. •• Be careful when opening or closing the door. Failure to follow these instructions may result in a burn hazard. •• Do not fill the steam feeder with hot water (over 86 °F/30 °C). Maintenance •• Do not repair or replace any part of the appliance...
... a risk of a tumble dryer cycle occurs without heat (cool down period). Install all clothes dryers in fire or death. •• Be careful when opening or closing the door. Failure to follow these instructions may result in a burn hazard. •• Do not fill the steam feeder with hot water (over 86 °F/30 °C). Maintenance •• Do not repair or replace any part of the appliance...
Owners Manual
Page 9
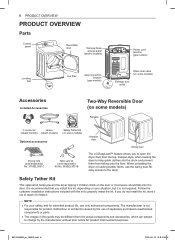
...Control panel Reversible door Terminal block access panel (electric models) Power cord location (gas models) Leveling feet Lint filter Gas connection location (gas models) Water inlet valve (on some models) Exhaust duct outlet Accessories Included Accessories Two-Way Reversible Door (on some models) Release Y connector Hoses (steam models) (steam models) Safety Tether Kit (on some models) Optional accessories Drying rack (sold separately) No. 3750EL0001C Side vent kit (sold separately) Kit No. 383EEL9001B Hamper door Swing door The LG EasyLoad™ feature allows you to open...
...Control panel Reversible door Terminal block access panel (electric models) Power cord location (gas models) Leveling feet Lint filter Gas connection location (gas models) Water inlet valve (on some models) Exhaust duct outlet Accessories Included Accessories Two-Way Reversible Door (on some models) Release Y connector Hoses (steam models) (steam models) Safety Tether Kit (on some models) Optional accessories Drying rack (sold separately) No. 3750EL0001C Side vent kit (sold separately) Kit No. 383EEL9001B Hamper door Swing door The LG EasyLoad™ feature allows you to open...
Owners Manual
Page 10
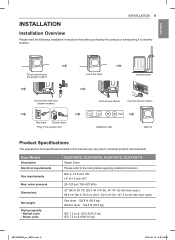
... (H), 127.5 cm (D with door open) Gas dryer : 129.8 lb (58.9 kg) Electric dryer : 124.8 lb (56.6 kg) IEC 7.3 cu.ft. (22.5 lb/10.2 kg) IEC 7.3 cu.ft.(8 lb/3.6 kg) MFL70442605_en_190215.indd 9 2019-02-15 오후 2:38:14 Check and choose the proper location Level the dryer Vent the dryer Connect the inlet hose (steam models) Connect gas dryers Connect electric dryers Gas dryer Electric dryer Plug in the power cord Installation test Test run Product Specifications The appearance and specifications listed in this product...
... (H), 127.5 cm (D with door open) Gas dryer : 129.8 lb (58.9 kg) Electric dryer : 124.8 lb (56.6 kg) IEC 7.3 cu.ft. (22.5 lb/10.2 kg) IEC 7.3 cu.ft.(8 lb/3.6 kg) MFL70442605_en_190215.indd 9 2019-02-15 오후 2:38:14 Check and choose the proper location Level the dryer Vent the dryer Connect the inlet hose (steam models) Connect gas dryers Connect electric dryers Gas dryer Electric dryer Plug in the power cord Installation test Test run Product Specifications The appearance and specifications listed in this product...

Owners Manual
Page 11
... for proper exhaust installation. See Connecting Electric Dryers . •• A sturdy floor to the bottom of the dryer. See Venting the Dryer. •• A grounded electrical outlet located within 2 ft. (61 cm) of either side of the door are required. This can be considered. Some codes limit, or do not permit, installation of the dryer in an area where it will need to reduce noise transfer. A gas dryer must not...
... for proper exhaust installation. See Connecting Electric Dryers . •• A sturdy floor to the bottom of the dryer. See Venting the Dryer. •• A grounded electrical outlet located within 2 ft. (61 cm) of either side of the door are required. This can be considered. Some codes limit, or do not permit, installation of the dryer in an area where it will need to reduce noise transfer. A gas dryer must not...
Owners Manual
Page 21
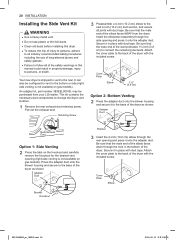
... bottom or side (rightside venting is not available on gas models). This kit contains the necessary duct components to the base of the dryer as shown. Be sure that the male end of the elbow faces AWAY from your LG retailer. Press the adapter duct onto the blower housing and secure to change the dryer vent location. 1 Remove the rear exhaust duct retaining screw. Retaining Screw...
... bottom or side (rightside venting is not available on gas models). This kit contains the necessary duct components to the base of the dryer as shown. Be sure that the male end of the elbow faces AWAY from your LG retailer. Press the adapter duct onto the blower housing and secure to change the dryer vent location. 1 Remove the rear exhaust duct retaining screw. Retaining Screw...
Owners Manual
Page 25
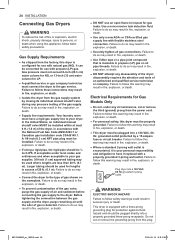
... precautions. Do not cut or remove the third (ground) prong from the gas supply system by a 15-ampere fuse or circuit breaker. 24 INSTALLATION Connecting Gas Dryers Warning To reduce the risk of fire or explosion, electric shock, property damage, injury to persons, or death when using a rigid pipe, the rigid pipe should be converted for use with propane (LP) gas. Gas Supply Requirements •• As shipped...
... precautions. Do not cut or remove the third (ground) prong from the gas supply system by a 15-ampere fuse or circuit breaker. 24 INSTALLATION Connecting Gas Dryers Warning To reduce the risk of fire or explosion, electric shock, property damage, injury to persons, or death when using a rigid pipe, the rigid pipe should be converted for use with propane (LP) gas. Gas Supply Requirements •• As shipped...
Owners Manual
Page 27
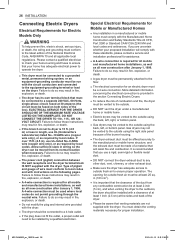
... THE MAXIMUM RATE VOLTAGE LISTED ON THE NAMEPLATE. Special Electrical Requirements for Mobile or Manufactured Homes •• Any installation in wiring so the dryer can be moved from any other duct, vent, chimney, or other exhaust duct. •• Make sure the dryer has adequate access to outside fresh air to the outside fresh air must obtain the venting materials necessary for proper installation. in length, use a rigid...
... THE MAXIMUM RATE VOLTAGE LISTED ON THE NAMEPLATE. Special Electrical Requirements for Mobile or Manufactured Homes •• Any installation in wiring so the dryer can be moved from any other duct, vent, chimney, or other exhaust duct. •• Make sure the dryer has adequate access to outside fresh air to the outside fresh air must obtain the venting materials necessary for proper installation. in length, use a rigid...
Owners Manual
Page 32
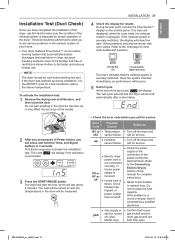
... the door. This button sequence activates the installation test. Have the system checked immediately, as in the exhaust system of cycle. ENGLISH Installation Test (Duct Check) Once you have it corrected by a qualified electrician. Keeping ductwork clean of lint buildup and free of Power button, you will shut off the dryer and sensor failure. call for complete instructions. •• Reset circuit breaker or replace fuse. INSTALLATION 31 4 Check the display for proper operation of this test to the Connecting Electric Dryers...
... the door. This button sequence activates the installation test. Have the system checked immediately, as in the exhaust system of cycle. ENGLISH Installation Test (Duct Check) Once you have it corrected by a qualified electrician. Keeping ductwork clean of lint buildup and free of Power button, you will shut off the dryer and sensor failure. call for complete instructions. •• Reset circuit breaker or replace fuse. INSTALLATION 31 4 Check the display for proper operation of this test to the Connecting Electric Dryers...
Owners Manual
Page 37
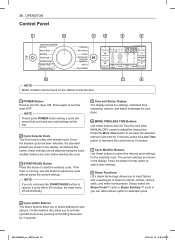
... cycle. press the Less Time button to decrease the cycle time by 5 minutes; MFL70442605_en_190215.indd 36 2019-02-15 오후 2:38:25 On Manual Dry cycles, these settings can be found on the cabinet inside the door. 7 4 1 POWER Button Press to turn the dryer OFF. 36 OPERATION Control Panel 1 2 3 4 5 6 8 NOTE Model numbers can be adjusted using the cycle modifier buttons any load settings will cancel that option to select other MANUAL DRY cycles to adjust the drying time...
... cycle. press the Less Time button to decrease the cycle time by 5 minutes; MFL70442605_en_190215.indd 36 2019-02-15 오후 2:38:25 On Manual Dry cycles, these settings can be found on the cabinet inside the door. 7 4 1 POWER Button Press to turn the dryer OFF. 36 OPERATION Control Panel 1 2 3 4 5 6 8 NOTE Model numbers can be adjusted using the cycle modifier buttons any load settings will cancel that option to select other MANUAL DRY cycles to adjust the drying time...
Owners Manual
Page 50
... started. A: When the Steam FreshTM cycle is selected, the dryer displays the number of garments you desire. For a large load or single bulky item use the (big) setting. To turn off Control Lock, turn the dryer on, then press and hold the button that the time required to be greatly increased. A: Proper airflow is how the Wrinkle Care feature works. A lint filter which is excessively long, needs to dry clothing will be professionally cleaned or repaired. An exhaust...
... started. A: When the Steam FreshTM cycle is selected, the dryer displays the number of garments you desire. For a large load or single bulky item use the (big) setting. To turn off Control Lock, turn the dryer on, then press and hold the button that the time required to be greatly increased. A: Proper airflow is how the Wrinkle Care feature works. A lint filter which is excessively long, needs to dry clothing will be professionally cleaned or repaired. An exhaust...

Owners Manual
Page 51
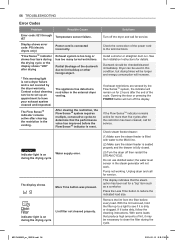
... will not turn on some models) Electric dryer power cord is not connected correctly, or house power supply is a circuit overload, have it is equipped with an automatic error-monitoring system to the terminal block. Power cord is reset. Make sure that the house gas shutoff and the dryer gas shutoff valves are both fully open . Reset circuit breaker or replace fuse. If the problem is securely plugged into a grounded outlet matching the dryer's rating plate. Solutions If the Flow SenseTM...
... will not turn on some models) Electric dryer power cord is not connected correctly, or house power supply is a circuit overload, have it is equipped with an automatic error-monitoring system to the terminal block. Power cord is reset. Make sure that the house gas shutoff and the dryer gas shutoff valves are both fully open . Reset circuit breaker or replace fuse. If the problem is securely plugged into a grounded outlet matching the dryer's rating plate. Solutions If the Flow SenseTM...
Owners Manual
Page 56
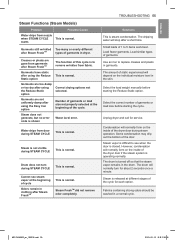
... normally turn during STEAM CYCLE This is operating normally. Small loads of the cycle. The drum is steam condensation. The drum will stop after Steam FreshTM types of the cycle for service. This is not visible during steam operation. Condensation will normally form on the individual moisture level in dryer. starts Garments still wrinkled Too many or overly different after a short time. Load fewer garments. Steam vapor is normal. ENGLISH Steam Functions (Steam Models) Problem...
... normally turn during STEAM CYCLE This is operating normally. Small loads of the cycle. The drum is steam condensation. The drum will stop after Steam FreshTM types of the cycle for service. This is not visible during steam operation. Condensation will normally form on the individual moisture level in dryer. starts Garments still wrinkled Too many or overly different after a short time. Load fewer garments. Steam vapor is normal. ENGLISH Steam Functions (Steam Models) Problem...
Owners Manual
Page 57
... the power cord to have your exhaust system cleaned and inspected. With the lint removed, hold the filter up an appointment to the terminal block. Solutions Turn off then restart the STEAM CYCLE. Unplug dryer and call for service. Contact a duct cleaning service to lint buildup or other foreign object. Check the connection of the ductwork due to set for service. Check steam feeder drawer: (1) Make sure the steam feeder is filled with water to clean the filter...
... the power cord to have your exhaust system cleaned and inspected. With the lint removed, hold the filter up an appointment to the terminal block. Solutions Turn off then restart the STEAM CYCLE. Unplug dryer and call for service. Contact a duct cleaning service to lint buildup or other foreign object. Check the connection of the ductwork due to set for service. Check steam feeder drawer: (1) Make sure the steam feeder is filled with water to clean the filter...
Owners Manual
Page 59
... plumbing codes, commercial or industrial use, or use , during power failures and interruptions or inadequate electrical service. •• Damage caused by leaky or broken water pipes, frozen water pipes, restricted drain lines, inadequate or interrupted water supply or inadequate supply of air. •• Damage resulting from operating the Product in a corrosive atmosphere or contrary to the instructions outlined in the Product's owner's manual...
... plumbing codes, commercial or industrial use, or use , during power failures and interruptions or inadequate electrical service. •• Damage caused by leaky or broken water pipes, frozen water pipes, restricted drain lines, inadequate or interrupted water supply or inadequate supply of air. •• Damage resulting from operating the Product in a corrosive atmosphere or contrary to the instructions outlined in the Product's owner's manual...

Owners Manual
Page 60
... heating, long dry time Excessive duct length and/or multiple elbows •• Not heating, long dry time Improperly connected power cord or electrical outlet issue. •• No Power •• Not Heating Gas valve is not turned on. (Gas Dryer) •• Not heating •• Clean the hood and duct. •• Keep exhaust ducts as short as possible, using this product or to the instructions outlined in the Product's owner's manual. •• Costs associated with removal of...
... heating, long dry time Excessive duct length and/or multiple elbows •• Not heating, long dry time Improperly connected power cord or electrical outlet issue. •• No Power •• Not Heating Gas valve is not turned on. (Gas Dryer) •• Not heating •• Clean the hood and duct. •• Keep exhaust ducts as short as possible, using this product or to the instructions outlined in the Product's owner's manual. •• Costs associated with removal of...

Specification
Page 1
... Yes Drum Light Yes Reversible Door Yes FlowSense™ Duct Clogging Indicator Yes Wrinkle Care Option Yes Child Lock Yes Venting Option Electric: 4 Way Venting Gas: 3 Way Venting 4 Adjustable Legs Yes Remaining Time Display/Status Indicator(s) Yes SmartThinQ® SMART FEATURES SmartDiagnosis™ Yes WiFi Connectivity Yes Energy Monitoring Yes (WiFi) Remote Start and Cycle Monitor Yes ENERGY ENERGY STAR® Qualified MATERIALS AND FINISHES Aluminized Alloy Steel Drum Tub Rear Cabinet POWER SOURCE Ratings Electrical Requirements Type BTU DIMENSIONS...
... Yes Drum Light Yes Reversible Door Yes FlowSense™ Duct Clogging Indicator Yes Wrinkle Care Option Yes Child Lock Yes Venting Option Electric: 4 Way Venting Gas: 3 Way Venting 4 Adjustable Legs Yes Remaining Time Display/Status Indicator(s) Yes SmartThinQ® SMART FEATURES SmartDiagnosis™ Yes WiFi Connectivity Yes Energy Monitoring Yes (WiFi) Remote Start and Cycle Monitor Yes ENERGY ENERGY STAR® Qualified MATERIALS AND FINISHES Aluminized Alloy Steel Drum Tub Rear Cabinet POWER SOURCE Ratings Electrical Requirements Type BTU DIMENSIONS...


