
Owners Manual
Page 2
... 3 PRODUCT FEATURES 4 SAFETY INSTRUCTIONS 5 IMPORTANT SAFETY INSTRUCTIONS 7 GROUNDING INSTRUCTIONS 8 CALIFORNIA SAFE DRINKING WATER AND TOXIC ENFORCEMENT ACT 9 PRODUCT OVERVIEW 9 Parts 9 Accessories 9 Safety Tether Kit 9 Two-Way Reversible Door (on some models) 10 INSTALLATION 10 Installation Overview 10 Product Specifications 11 Installation Location ... Using the Dryer 35 Check the Lint Filter Before Every Load 35 Sorting Loads 35 Loading the Dryer 36 Using the LG EasyLoadTM 37 Control Panel 39 Cycle Guide 40 Cycle Settings and Options 43 Steam Functions (Steam Models) 44 smart features ...
... 3 PRODUCT FEATURES 4 SAFETY INSTRUCTIONS 5 IMPORTANT SAFETY INSTRUCTIONS 7 GROUNDING INSTRUCTIONS 8 CALIFORNIA SAFE DRINKING WATER AND TOXIC ENFORCEMENT ACT 9 PRODUCT OVERVIEW 9 Parts 9 Accessories 9 Safety Tether Kit 9 Two-Way Reversible Door (on some models) 10 INSTALLATION 10 Installation Overview 10 Product Specifications 11 Installation Location ... Using the Dryer 35 Check the Lint Filter Before Every Load 35 Sorting Loads 35 Loading the Dryer 36 Using the LG EasyLoadTM 37 Control Panel 39 Cycle Guide 40 Cycle Settings and Options 43 Steam Functions (Steam Models) 44 smart features ...
Owners Manual
Page 5
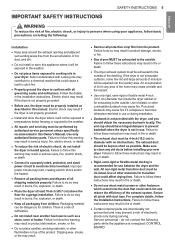
... or death. •• Connect to a properly rated, protected, and sized power circuit to the outside . Use only authorized factory parts. Failure to do not contact the following : Installation •• Keep area around the exhaust opening and adjacent surrounding areas free from the...8226;• Keep all shipping materials properly. Failure to follow these instructions may result in fire or death. •• Certain internal parts are intentionally not gronunded and may result in product deformation, smoke, or fire. •• Do not place candles, smoking materials,...
... or death. •• Connect to a properly rated, protected, and sized power circuit to the outside . Use only authorized factory parts. Failure to do not contact the following : Installation •• Keep area around the exhaust opening and adjacent surrounding areas free from the...8226;• Keep all shipping materials properly. Failure to follow these instructions may result in fire or death. •• Certain internal parts are intentionally not gronunded and may result in product deformation, smoke, or fire. •• Do not place candles, smoking materials,...
Owners Manual
Page 6
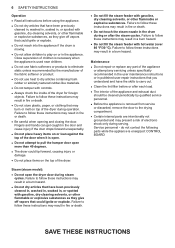
...8226;• Do not fill the steam feeder with hot water (over 86 °F/30 °C). Maintenance •• Do not repair or replace any part of the dryer for foreign objects. Failure to play on or in the appliance. Close supervision of the fabric softener or product. •• Do... filter before or after the steam cycles. Failure to pull the hamper door open the dryer door during steam cycles. do not contact the following parts while the appliance is energized: CONTROL BOARD Steam (steam model): •• Do not open more than 40 degrees. •• The dryer could...
...8226;• Do not fill the steam feeder with hot water (over 86 °F/30 °C). Maintenance •• Do not repair or replace any part of the dryer for foreign objects. Failure to play on or in the appliance. Close supervision of the fabric softener or product. •• Do... filter before or after the steam cycles. Failure to pull the hamper door open the dryer door during steam cycles. do not contact the following parts while the appliance is energized: CONTROL BOARD Steam (steam model): •• Do not open more than 40 degrees. •• The dryer could...
Owners Manual
Page 9
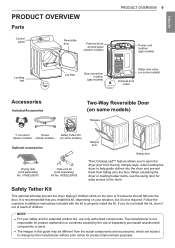
... improvement purposes. The manufacturer is recommended that you install this guide may be different from falling onto the floor. ENGLISH PRODUCT OVERVIEW Parts Control panel Reversible door Terminal block access panel (electric models) PRODUCT OVERVIEW 9 Power cord location (gas models) Leveling feet Lint ...Optional accessories Drying rack (sold separately) No. 3750EL0001C Side vent kit (sold separately) Kit No. 383EEL9001B Hamper door Swing door The LG EasyLoad™ feature allows you to open the dryer door from the top, hamper-style, when loading the dryer to help guide ...
... improvement purposes. The manufacturer is recommended that you install this guide may be different from falling onto the floor. ENGLISH PRODUCT OVERVIEW Parts Control panel Reversible door Terminal block access panel (electric models) PRODUCT OVERVIEW 9 Power cord location (gas models) Leveling feet Lint ...Optional accessories Drying rack (sold separately) No. 3750EL0001C Side vent kit (sold separately) Kit No. 383EEL9001B Hamper door Swing door The LG EasyLoad™ feature allows you to open the dryer door from the top, hamper-style, when loading the dryer to help guide ...
Owners Manual
Page 13
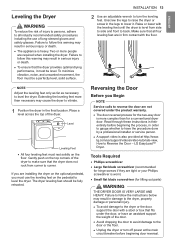
...tight or your Phillips screwdriver is also provided at the main circuit breaker before beginning the process, in their entirety before beginning door reversal. LG EasyLoad™ Dryer. Tools Required •• Phillips screwdriver •• Large flat blade screwdriver (recommended for a conventional dryer door.... use of the dryer to make sure that fits under the product warranty. •• The door reversal process for lifting out parts) Warning THE DRYER DOOR IS VERY LARGE AND HEAVY. Reversing the Door Before you must be fully retracted. Failure to reverse the...
...tight or your Phillips screwdriver is also provided at the main circuit breaker before beginning the process, in their entirety before beginning door reversal. LG EasyLoad™ Dryer. Tools Required •• Phillips screwdriver •• Large flat blade screwdriver (recommended for a conventional dryer door.... use of the dryer to make sure that fits under the product warranty. •• The door reversal process for lifting out parts) Warning THE DRYER DOOR IS VERY LARGE AND HEAVY. Reversing the Door Before you must be fully retracted. Failure to reverse the...

Owners Manual
Page 15
... the position from the hinge bracket at the bottom of the eight screws on the opposite side, where the latch mechanism was attached. c. Set the parts aside. b. Remove the two screws from which you removed the latch hole cover, using the two screws removed in step 2. Doing so could result in...
... the position from the hinge bracket at the bottom of the eight screws on the opposite side, where the latch mechanism was attached. c. Set the parts aside. b. Remove the two screws from which you removed the latch hole cover, using the two screws removed in step 2. Doing so could result in...

Owners Manual
Page 17
... door. You will now be a mirror image of the door, with the default set-up for a detailed diagram and identification of the inner structure and parts of the door. (The diagram shows the "before view" of the illustration.) Top interlock buttons Inner lock rods Upper hinge assembly Upper hinge pivot Glass...
... door. You will now be a mirror image of the door, with the default set-up for a detailed diagram and identification of the inner structure and parts of the door. (The diagram shows the "before view" of the illustration.) Top interlock buttons Inner lock rods Upper hinge assembly Upper hinge pivot Glass...

Owners Manual
Page 21
... and safety glasses. •• Failure to follow all joints with the included screw. It can also be purchased from the dryer. An adapter kit, part number 383EEL9001B, may be configured to vent to the base of the dryer as shown. Pull out the exhaust duct. Insert the elbow/duct assembly... result in property damage, injury to the rear. This kit contains the necessary duct components to the back of the elbow faces AWAY from your LG retailer. Be sure that the male end of the dryer with the included screw. Attach the cover plate to change the dryer vent location. 1 ...
... and safety glasses. •• Failure to follow all joints with the included screw. It can also be purchased from the dryer. An adapter kit, part number 383EEL9001B, may be configured to vent to the base of the dryer as shown. Pull out the exhaust duct. Insert the elbow/duct assembly... result in property damage, injury to the rear. This kit contains the necessary duct components to the back of the elbow faces AWAY from your LG retailer. Be sure that the male end of the dryer with the included screw. Attach the cover plate to change the dryer vent location. 1 ...

Owners Manual
Page 26
... room's gas supply. 6 Check all pipe connections (both internal and external) for natural gas when shipped from the factory for the LP nozzle kit, order part number 383EEL3002D) should be installed by a qualified service technician. 4 Securely tighten all connections between the dryer and your laundry room's gas supply. 5 Turn on the...
... room's gas supply. 6 Check all pipe connections (both internal and external) for natural gas when shipped from the factory for the LP nozzle kit, order part number 383EEL3002D) should be installed by a qualified service technician. 4 Securely tighten all connections between the dryer and your laundry room's gas supply. 5 Turn on the...

Owners Manual
Page 27
... (pigtail) connection between the wall receptacle and the dryer terminal block IS NOT supplied with the Manufactured Home Construction and Safety Standards Title 24 CFR, Part 3280 or Standard CAN/ CSA Z240 MH and local codes and ordinances. DO NOT CONNECT THE DRYER TO 110-, 115-, OR 120VOLT CIRCUIT. INSTALLATION 27...
... (pigtail) connection between the wall receptacle and the dryer terminal block IS NOT supplied with the Manufactured Home Construction and Safety Standards Title 24 CFR, Part 3280 or Standard CAN/ CSA Z240 MH and local codes and ordinances. DO NOT CONNECT THE DRYER TO 110-, 115-, OR 120VOLT CIRCUIT. INSTALLATION 27...

Owners Manual
Page 62
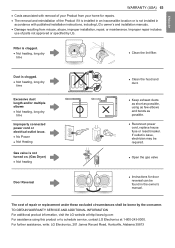
...or contrary to the instructions outlined in materials or workmanship and is used within one (1) week of Warranty HOW SERVICE IS HANDLED Parts and Labor LG will at its option repair or replace the product. THIS WARRANTY IS IN LIEU OF ANY OTHER WARRANTY, EXPRESS OR IMPLIED, ... unauthorized repairs/installation. •• Failure of the product to perform during the warranty period set forth below, LG will provide parts and labor to repair or replace defective parts. This warranty gives you specific legal rights and you . Warranty Period One (1) year from defects in the Product...
...or contrary to the instructions outlined in materials or workmanship and is used within one (1) week of Warranty HOW SERVICE IS HANDLED Parts and Labor LG will at its option repair or replace the product. THIS WARRANTY IS IN LIEU OF ANY OTHER WARRANTY, EXPRESS OR IMPLIED, ... unauthorized repairs/installation. •• Failure of the product to perform during the warranty period set forth below, LG will provide parts and labor to repair or replace defective parts. This warranty gives you specific legal rights and you . Warranty Period One (1) year from defects in the Product...
Owners Manual
Page 63
...the hood and duct. •• Keep exhaust ducts as short as possible, using this product or to schedule service, contact LG Electronics at http://www.lg.com For assistance using as few elbows and bends as possible. •• Reconnect power cord, replace house fuse or reset breaker.... TO OBTAIN WARRANTY SERVICE AND ADDITIONAL INFORMATION For additional product information, visit the LG website at 1-800-243-0000. The cost of parts not approved or specified by the consumer. Duct is clogged. •• Not heating, long dry time Excessive ...
...the hood and duct. •• Keep exhaust ducts as short as possible, using this product or to schedule service, contact LG Electronics at http://www.lg.com For assistance using as few elbows and bends as possible. •• Reconnect power cord, replace house fuse or reset breaker.... TO OBTAIN WARRANTY SERVICE AND ADDITIONAL INFORMATION For additional product information, visit the LG website at 1-800-243-0000. The cost of parts not approved or specified by the consumer. Duct is clogged. •• Not heating, long dry time Excessive ...


