
Owners Manual
Page 2
...Accessories 9 Safety Tether Kit 9 Two-Way Reversible Door (on some models) 10 INSTALLATION 10 Installation Overview 10 Product Specifications 11 Installation Location Requirements 11 Clearances 13 Leveling the Dryer 13 Reversing the Door 21 Installing the Side Vent Kit 22 Venting the Dryer 25 Connecting Gas Dryers 27 Connecting ...Electric Dryers 31 Final Installation Check 32 Installation Test (Duct Check) 34 OPERATION 34 Using the Dryer 35 Check the Lint Filter Before Every Load 35 Sorting Loads 35 Loading the Dryer 36 Using the LG EasyLoadTM 37 Control Panel 39 Cycle Guide...
...Accessories 9 Safety Tether Kit 9 Two-Way Reversible Door (on some models) 10 INSTALLATION 10 Installation Overview 10 Product Specifications 11 Installation Location Requirements 11 Clearances 13 Leveling the Dryer 13 Reversing the Door 21 Installing the Side Vent Kit 22 Venting the Dryer 25 Connecting Gas Dryers 27 Connecting ...Electric Dryers 31 Final Installation Check 32 Installation Test (Duct Check) 34 OPERATION 34 Using the Dryer 35 Check the Lint Filter Before Every Load 35 Sorting Loads 35 Loading the Dryer 36 Using the LG EasyLoadTM 37 Control Panel 39 Cycle Guide...

Owners Manual
Page 3
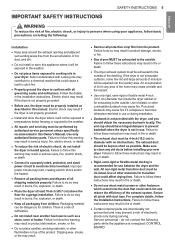
...the dryer without items falling on the Android operating system (OS). C C C Smart DiagnosisTM Should you to the installation location. Two-way Easy-access Reversing Door The LG EasyLoadTM can be tilted open to provide easy access for unloading or loading of bulkier items. The door hinge can ...be reversed to adjust to restrictions in the installed household ductwork that reduce exhaust airflow through the dryer. ...
...the dryer without items falling on the Android operating system (OS). C C C Smart DiagnosisTM Should you to the installation location. Two-way Easy-access Reversing Door The LG EasyLoadTM can be tilted open to provide easy access for unloading or loading of bulkier items. The door hinge can ...be reversed to adjust to restrictions in the installed household ductwork that reduce exhaust airflow through the dryer. ...

Owners Manual
Page 4
...vapors and liquids in this manual and on your building. c. Immediately call the fire department. •• Installation and service must be performed by a qualified installer, service agency or your gas supplier. This symbol alerts you to the manufacturer's instructions and local codes. •...injury or death, follow the safety alert symbol and either the word DANGER, WARNING, or CAUTION. All safety messages will follow all installation instructions. •• Save these instructions. b. do not follow instructions. Always read and obey all occupants. All safety messages ...
...vapors and liquids in this manual and on your building. c. Immediately call the fire department. •• Installation and service must be performed by a qualified installer, service agency or your gas supplier. This symbol alerts you to the manufacturer's instructions and local codes. •...injury or death, follow the safety alert symbol and either the word DANGER, WARNING, or CAUTION. All safety messages will follow all installation instructions. •• Save these instructions. b. do not follow instructions. Always read and obey all occupants. All safety messages ...
Owners Manual
Page 5
... this warning may cause fire if it collapses or becomes otherwise restricted in this manual. Make sure to do not contact the following : Installation •• Keep area around the exhaust opening and adjacent surrounding areas free from the accumulation of lint, dust, and dirt. •...the exhaust system. Failure to the outside of the dwelling. Failure to follow this warning may present a risk of electronic shock only during installation. •• Ductwork is not properly grounded. •• Before use between the dryer and the wall. Failure to do so ...
... this warning may cause fire if it collapses or becomes otherwise restricted in this manual. Make sure to do not contact the following : Installation •• Keep area around the exhaust opening and adjacent surrounding areas free from the accumulation of lint, dust, and dirt. •...the exhaust system. Failure to the outside of the dwelling. Failure to follow this warning may present a risk of electronic shock only during installation. •• Ductwork is not properly grounded. •• Before use between the dryer and the wall. Failure to do so ...

Owners Manual
Page 7
... your model. This provides the best performance and also prevents overloading house wiring circuits which has a voltage rating that have a proper outlet installed by providing a path of least resistance for your dryer by a qualified electrician to do so may create an electric shock hazard and/or... sure the outlet is properly grounded. Electrical shock may result in this dryer must be plugged into an appropriate outlet that is properly installed and grounded in accordance with a qualified electrician or service person if you are in a risk of fire and electric shock. •...
... your model. This provides the best performance and also prevents overloading house wiring circuits which has a voltage rating that have a proper outlet installed by providing a path of least resistance for your dryer by a qualified electrician to do so may create an electric shock hazard and/or... sure the outlet is properly grounded. Electrical shock may result in this dryer must be plugged into an appropriate outlet that is properly installed and grounded in accordance with a qualified electrician or service person if you are in a risk of fire and electric shock. •...
Owners Manual
Page 9
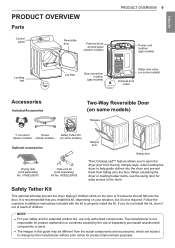
... this kit, depending on your safety and for extended product life, use the swing door for product improvement purposes. Follow the customer installation instructions included with the kit to change by the use of children. Safety Tether Kit This optional kit helps prevent the dryer tipping ...models) Optional accessories Drying rack (sold separately) No. 3750EL0001C Side vent kit (sold separately) Kit No. 383EEL9001B Hamper door Swing door The LG EasyLoad™ feature allows you to open the dryer door from the top, hamper-style, when loading the dryer to the drum. When unloading...
... this kit, depending on your safety and for extended product life, use the swing door for product improvement purposes. Follow the customer installation instructions included with the kit to change by the use of children. Safety Tether Kit This optional kit helps prevent the dryer tipping ...models) Optional accessories Drying rack (sold separately) No. 3750EL0001C Side vent kit (sold separately) Kit No. 383EEL9001B Hamper door Swing door The LG EasyLoad™ feature allows you to open the dryer door from the top, hamper-style, when loading the dryer to the drum. When unloading...
Owners Manual
Page 10
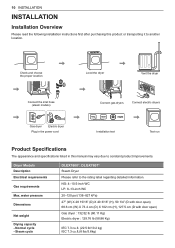
...the dryer Connect the inlet hose (steam models) Connect gas dryers Connect electric dryers Gas dryer Electric dryer Plug in the power cord Installation test Test run Product Specifications The appearance and specifications listed in this product or transporting it to another location. NG: 4-10.5-inch... : 129.76 lb (58.86 Kg) IEC 7.3 cu.ft. (22.5 lb/10.2 kg) IEC 7.3 cu.ft.(8 lbs/3.6kg) 10 INSTALLATION INSTALLATION Installation Overview Please read the following installation instructions first after purchasing this manual may vary due to the rating label regarding detailed information.
...the dryer Connect the inlet hose (steam models) Connect gas dryers Connect electric dryers Gas dryer Electric dryer Plug in the power cord Installation test Test run Product Specifications The appearance and specifications listed in this product or transporting it to another location. NG: 4-10.5-inch... : 129.76 lb (58.86 Kg) IEC 7.3 cu.ft. (22.5 lb/10.2 kg) IEC 7.3 cu.ft.(8 lbs/3.6kg) 10 INSTALLATION INSTALLATION Installation Overview Please read the following installation instructions first after purchasing this manual may vary due to the rating label regarding detailed information.
Owners Manual
Page 11
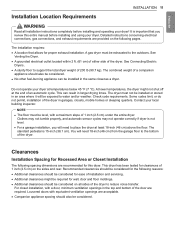
... the entire dryer. Contact your dryer at temperatures below 45 °F (7 °C). NOTE •• The floor must not be installed or stored in an area where it will need 18-inch (46 cm) from the garage floor to the bottom of the dryer. ... concerning electrical connections, gas connections, and exhaust requirements are recommended for the following pages. Check code requirements. Clearances Installation Spacing for Recessed Area or Closet Installation The following spacing dimensions are provided on the sides and rear. See Connecting Electric Dryers . •• A...
... the entire dryer. Contact your dryer at temperatures below 45 °F (7 °C). NOTE •• The floor must not be installed or stored in an area where it will need 18-inch (46 cm) from the garage floor to the bottom of the dryer. ... concerning electrical connections, gas connections, and exhaust requirements are recommended for the following pages. Check code requirements. Clearances Installation Spacing for Recessed Area or Closet Installation The following spacing dimensions are provided on the sides and rear. See Connecting Electric Dryers . •• A...

Owners Manual
Page 12
...spacing 7"* (17.8 cm) 7"* (17.8 cm) 5"* (12.7 cm) 28 15/16" (73.4 cm) 1"* (2.5 cm) 1" (2.5 cm) 27" (68.6 cm) 1" (2.5 cm) Installation Spacing for Recessed Area or Closet 3" (7.6 cm) 48 in.2 (310 cm2) 21 1/4" (54 cm) 14" max.* (35.6 cm) 18" min. (45.7 cm) 24 in.2 (155...If there is allowed 1" (2.5 cm) 27" (68.6 cm) 1" (2.5 cm) Installation Spacing for Cabinet For cabinet installation with doors must have both an upper and lower vent to another. 12 INSTALLATION Closet Ventilation Requirements Closets with a door, minimum ventilation openings in the top of the cabinet...
...spacing 7"* (17.8 cm) 7"* (17.8 cm) 5"* (12.7 cm) 28 15/16" (73.4 cm) 1"* (2.5 cm) 1" (2.5 cm) 27" (68.6 cm) 1" (2.5 cm) Installation Spacing for Recessed Area or Closet 3" (7.6 cm) 48 in.2 (310 cm2) 21 1/4" (54 cm) 14" max.* (35.6 cm) 18" min. (45.7 cm) 24 in.2 (155...If there is allowed 1" (2.5 cm) 27" (68.6 cm) 1" (2.5 cm) Installation Spacing for Cabinet For cabinet installation with doors must have both an upper and lower vent to another. 12 INSTALLATION Closet Ventilation Requirements Closets with a door, minimum ventilation openings in the top of the cabinet...
Owners Manual
Page 13
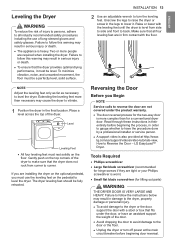
...; Large flat blade screwdriver (recommended for hinge screws if they are not covered under the door, or have the procedure done by a professional installer or service person. •• A support video is worn) •• Small flat blade screwdriver (for a conventional dryer door. Gently...with the floor. Read through these instructions in their entirety before beginning door reversal. lg.com/us/support/videos/video-tutorials-view, How to all four leveling feet are required when installing the dryer. Level Leveling Feet •• All four leveling feet must rest ...
...; Large flat blade screwdriver (recommended for hinge screws if they are not covered under the door, or have the procedure done by a professional installer or service person. •• A support video is worn) •• Small flat blade screwdriver (for a conventional dryer door. Gently...with the floor. Read through these instructions in their entirety before beginning door reversal. lg.com/us/support/videos/video-tutorials-view, How to all four leveling feet are required when installing the dryer. Level Leveling Feet •• All four leveling feet must rest ...

Owners Manual
Page 14
.... Set the door aside face down on the cabinet. Rotate the hinge cover 180 degrees and install it up with a flat blade screwdriver, being careful not to scratch the paint. b. 14 INSTALLATION Door Reversal Instructions NOTE The instructions here are accessible. 2 Remove the four hinge screws. c....from a right to a left / right references will be reversed, and you removed the latch hole cover, using a flat blade screwdriver. Install the latch mechanism in the new locations, remount the inner door frame onto the outer door frame with a flat blade screwdriver, being careful ...
.... Set the door aside face down on the cabinet. Rotate the hinge cover 180 degrees and install it up with a flat blade screwdriver, being careful not to scratch the paint. b. 14 INSTALLATION Door Reversal Instructions NOTE The instructions here are accessible. 2 Remove the four hinge screws. c....from a right to a left / right references will be reversed, and you removed the latch hole cover, using a flat blade screwdriver. Install the latch mechanism in the new locations, remount the inner door frame onto the outer door frame with a flat blade screwdriver, being careful ...

Owners Manual
Page 15
...Warning Be sure to remove the two screws and the latch mechanism on the face of the cabinet. Rotate the hinge cover 180 degrees and install it up with a flat blade screwdriver, being careful not to repair the dryer. Hinge cover latch mechanism Hinge Upper hinge Latch hole cover Hinge.... c. Reverse the hinge and the hinge bracket at the bottom right and remove the hinge bracket. d. Remove the lower of the door before installing the hinge screws. CAUTION Do NOT remove any of the eight screws on the front panel of the door to scratch the paint. ENGLISH 7 ...
...Warning Be sure to remove the two screws and the latch mechanism on the face of the cabinet. Rotate the hinge cover 180 degrees and install it up with a flat blade screwdriver, being careful not to repair the dryer. Hinge cover latch mechanism Hinge Upper hinge Latch hole cover Hinge.... c. Reverse the hinge and the hinge bracket at the bottom right and remove the hinge bracket. d. Remove the lower of the door before installing the hinge screws. CAUTION Do NOT remove any of the eight screws on the front panel of the door to scratch the paint. ENGLISH 7 ...

Owners Manual
Page 16
... reinstall it in step d on the right side. Warning The edges of the door. Install the hinge bracket removed in the hole on the door cover that secure the door strike... bracket hinge ON THE DOOR: 4 Lift off the door cover with the help of the door cover and install it on the bottom left . Hole plug Set the door cover aside. With the door laid inside of ... cover may be sharp. Carefully lift off the door cover. Switch the door strike and the blank cover, installing them on the inside facing up on a protected surface, remove the twelve screws on the opposite sides from ...
... reinstall it in step d on the right side. Warning The edges of the door. Install the hinge bracket removed in the hole on the door cover that secure the door strike... bracket hinge ON THE DOOR: 4 Lift off the door cover with the help of the door cover and install it on the bottom left . Hole plug Set the door cover aside. With the door laid inside of ... cover may be sharp. Carefully lift off the door cover. Switch the door strike and the blank cover, installing them on the inside facing up on a protected surface, remove the twelve screws on the opposite sides from ...

Owners Manual
Page 17
... various components inside the door. You will now be a mirror image of the door, with the default set-up for a right side hinge swing. ENGLISH INSTALLATION 17 6 Reverse the components inside the door.
... various components inside the door. You will now be a mirror image of the door, with the default set-up for a right side hinge swing. ENGLISH INSTALLATION 17 6 Reverse the components inside the door.

Owners Manual
Page 18
... the lock rod aside. 9 Remove the top lock rod. Rotate the hinge assembly 180 degrees and install it on the right) and set aside. Lift out the upper hinge filler (on the upper right... upper hinge pivot. Carefully lift the upper hinge assembly (on the left side. Make sure to install the hinge assembly. Do not confuse these with the interlock button and to the lock rod. The... spring should remain attached to keep the two together. Upper hinge filler 18 INSTALLATION 7 Lift out the gray interlock button in step 11 will need to remove it from the hinge...
... the lock rod aside. 9 Remove the top lock rod. Rotate the hinge assembly 180 degrees and install it on the right) and set aside. Lift out the upper hinge filler (on the upper right... upper hinge pivot. Carefully lift the upper hinge assembly (on the left side. Make sure to install the hinge assembly. Do not confuse these with the interlock button and to the lock rod. The... spring should remain attached to keep the two together. Upper hinge filler 18 INSTALLATION 7 Lift out the gray interlock button in step 11 will need to remove it from the hinge...

Owners Manual
Page 19
... rod should now be to align the lock rod with the spring on the right) and lift the hinge bracket out. INSTALLATION 19 c. a. Rotate the lower hinge assembly 180 degrees and install it on the right. Rotate the top lock rod (removed in step 10) 180 degrees end for end from the... lower hinge assembly on the door while compressing the spring inside the recess. Flip over and install it to bypass the center handle, making sure to the right of the door. Tab d. If they are not aligned properly, the door will not...
... rod should now be to align the lock rod with the spring on the right) and lift the hinge bracket out. INSTALLATION 19 c. a. Rotate the lower hinge assembly 180 degrees and install it on the right. Rotate the top lock rod (removed in step 10) 180 degrees end for end from the... lower hinge assembly on the door while compressing the spring inside the recess. Flip over and install it to bypass the center handle, making sure to the right of the door. Tab d. If they are not aligned properly, the door will not...

Owners Manual
Page 20
...sure to check that the top and side lock rods are properly aligned where they meet. Make sure the three gray interlock buttons are properly installed and that the lock rods and interlock buttons are properly aligned and that the door opens, closes and latches properly in the proper position and... and door cover, if necessary. Test the swing of the cabinet. 16 Reinstall the door cover. The interlock rods should be in both directions. Install the hinge on the opposite side of it. 17 Now, pick up the upper hinge pivot removed earlier and rotate it with the interlock buttons...
...sure to check that the top and side lock rods are properly aligned where they meet. Make sure the three gray interlock buttons are properly installed and that the lock rods and interlock buttons are properly aligned and that the door opens, closes and latches properly in the proper position and... and door cover, if necessary. Test the swing of the cabinet. 16 Reinstall the door cover. The interlock rods should be in both directions. Install the hinge on the opposite side of it. 17 Now, pick up the upper hinge pivot removed earlier and rotate it with the interlock buttons...

Owners Manual
Page 21
... Kit Warning •• Use a heavy metal vent. •• Do not use plastic or thin foil ducts. •• Clean old ducts before installing this manual could result in property damage, injury to the base of the dryer as shown. Adapter Duct Rear Exhaust Duct Option 1: Side Venting 2 Press... for the desired vent opening and press it onto the adapter duct. Be sure that the male end of the elbow faces AWAY from your LG retailer. Secure it in this dryer. •• To reduce the risk of injury to persons, adhere to all industry recommended safety procedures including...
... Kit Warning •• Use a heavy metal vent. •• Do not use plastic or thin foil ducts. •• Clean old ducts before installing this manual could result in property damage, injury to the base of the dryer as shown. Adapter Duct Rear Exhaust Duct Option 1: Side Venting 2 Press... for the desired vent opening and press it onto the adapter duct. Be sure that the male end of the elbow faces AWAY from your LG retailer. Secure it in this dryer. •• To reduce the risk of injury to persons, adhere to all industry recommended safety procedures including...

Owners Manual
Page 22
...possible. Failure to follow these instructions may result in fire or death. •• Gas dryers MUST exhaust to the outdoors. 22 INSTALLATION Venting the Dryer Warning To reduce the risk of fire or explosion, electric shock, property damage, injury to persons or death when using...m) NOTE Deduct 6 ft. (1.8 m) for use more than four 90° elbows. Ductwork Wall Cap Type Recommended 4" (10.2 cm) 4" (10.2 cm) Use only for short run installations 21/2" (6.35 cm) Number of 90° Elbows 0 1 2 3 4 0 1 2 3 4 Maximum length of flexible metal duct must be 4-inch (10.2 cm) in fire ...
...possible. Failure to follow these instructions may result in fire or death. •• Gas dryers MUST exhaust to the outdoors. 22 INSTALLATION Venting the Dryer Warning To reduce the risk of fire or explosion, electric shock, property damage, injury to persons or death when using...m) NOTE Deduct 6 ft. (1.8 m) for use more than four 90° elbows. Ductwork Wall Cap Type Recommended 4" (10.2 cm) 4" (10.2 cm) Use only for short run installations 21/2" (6.35 cm) Number of 90° Elbows 0 1 2 3 4 0 1 2 3 4 Maximum length of flexible metal duct must be 4-inch (10.2 cm) in fire ...

Owners Manual
Page 23
... (10.2 cm) diameter rigid, semi-rigid or flexible metal ductwork. •• The exhaust duct run should be covered by the dryer warranty. Correct Venting INSTALLATION 23 Incorrect Venting ENGLISH Routing And Connecting Ductwork NOTE Follow the guidelines below to reduce condensation and lint buildup on all duct joints. ••...
... (10.2 cm) diameter rigid, semi-rigid or flexible metal ductwork. •• The exhaust duct run should be covered by the dryer warranty. Correct Venting INSTALLATION 23 Incorrect Venting ENGLISH Routing And Connecting Ductwork NOTE Follow the guidelines below to reduce condensation and lint buildup on all duct joints. ••...


