
Owners Manual
Page 2
... Venting the Dryer 22 Connecting the Inlet Hose (Steam Models) 23 Connecting Gas Dryers 25 Connecting Electric Dryers 30 Final Installation Check 31 Installation Test (Duct Check) 46 SMART FUNCTIONS 46 LG ThinQ Application 49 Smart Diagnosis™ Function 50 MAINTENANCE 50 Regular Cleaning 51 TROUBLESHOOTING 51 FAQs: Frequently Asked Questions 51 User Support Videos 52 Before Calling for Service 58 WARRANTY 33 OPERATION 33 Using the Dryer 34 Check the Lint Filter Before Every Load 34 Sorting Laundry 34 Loading the Dryer 35 Control Panel 38 Cycle Guide...
... Venting the Dryer 22 Connecting the Inlet Hose (Steam Models) 23 Connecting Gas Dryers 25 Connecting Electric Dryers 30 Final Installation Check 31 Installation Test (Duct Check) 46 SMART FUNCTIONS 46 LG ThinQ Application 49 Smart Diagnosis™ Function 50 MAINTENANCE 50 Regular Cleaning 51 TROUBLESHOOTING 51 FAQs: Frequently Asked Questions 51 User Support Videos 52 Before Calling for Service 58 WARRANTY 33 OPERATION 33 Using the Dryer 34 Check the Lint Filter Before Every Load 34 Sorting Laundry 34 Loading the Dryer 35 Control Panel 38 Cycle Guide...

Owners Manual
Page 3
... from your machine and uses it has the capability of transmitting data via your ducts clean to set options, self-diagnose and troubleshoot problems with your dryer, it to refresh clothes, reduce static, and make ironing easier. Steam Functions (Steam Models) LG's steam technology allows you to remove the restrictions. Easy-Access Reversible Door The wide-opening door provides easy access for installation location. Add cycle options or adjust settings with a swirling jet of a button.
... from your machine and uses it has the capability of transmitting data via your ducts clean to set options, self-diagnose and troubleshoot problems with your dryer, it to refresh clothes, reduce static, and make ironing easier. Steam Functions (Steam Models) LG's steam technology allows you to remove the restrictions. Easy-Access Reversible Door The wide-opening door provides easy access for installation location. Add cycle options or adjust settings with a swirling jet of a button.
Owners Manual
Page 4
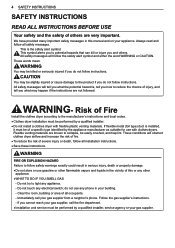
.... Follow the gas supplier's instructions. - Always read and follow all installation instructions. ••Save these instructions. This is installed, it must be performed by a qualified installer. ••Do not install a clothes dryer with clothes dryers. Risk of Fire Install the clothes dryer according to the manufacturer's instructions and local codes. ••Clothes dryer installation must be easily crushed, and trap lint. Flexible venting materials are known to light any electrical switch; Do not...
.... Follow the gas supplier's instructions. - Always read and follow all installation instructions. ••Save these instructions. This is installed, it must be performed by a qualified installer. ••Do not install a clothes dryer with clothes dryers. Risk of Fire Install the clothes dryer according to the manufacturer's instructions and local codes. ••Clothes dryer installation must be easily crushed, and trap lint. Flexible venting materials are known to light any electrical switch; Do not...

Owners Manual
Page 6
... off by pulling on the power cord. 6 SAFETY INSTRUCTIONS ••Place the dryer at either end. ••If you should obtain the necessary ductwork locally. All nonrigid metal transition duct must be supplied through an external switching device, such as possible. The exhaust duct should be UL-listed. OPERATION ••Repair or immediately replace all joints with reduced physical...
... off by pulling on the power cord. 6 SAFETY INSTRUCTIONS ••Place the dryer at either end. ••If you should obtain the necessary ductwork locally. All nonrigid metal transition duct must be supplied through an external switching device, such as possible. The exhaust duct should be UL-listed. OPERATION ••Repair or immediately replace all joints with reduced physical...

Owners Manual
Page 8
... risk of electric shock. ••Clean the lint filter before cleaning and attempting any part of the dryer. 8 SAFETY INSTRUCTIONS MAINTENANCE ••Do not repair or replace any user maintenance. Turning the controls to make sure the outlet is properly grounded. Electrical shock may create an electric shock hazard and/or a fire hazard. if it will reduce the risk of electric shock by qualified service personnel unless specifically recommended...
... risk of electric shock. ••Clean the lint filter before cleaning and attempting any part of the dryer. 8 SAFETY INSTRUCTIONS MAINTENANCE ••Do not repair or replace any user maintenance. Turning the controls to make sure the outlet is properly grounded. Electrical shock may create an electric shock hazard and/or a fire hazard. if it will reduce the risk of electric shock by qualified service personnel unless specifically recommended...

Owners Manual
Page 10
... inside the door. •• The images in this manual may vary due to change by the manufacturer without prior notice for detailed information. Check and choose the proper location Level the dryer Vent the dryer Connect the inlet hose (steam models) Connect the Gas dryer Connect the Electric dryer DLEX4200*, DLGX4201*, DLEX4000*, DLGX4001*, DLEX4500*, DLGX4501* DLE3600*, DLG3601* Gas dryer Electric dryer Plug in the power cord Installation test Test run Product Specifications The appearance and specifications listed in this manual may be...
... inside the door. •• The images in this manual may vary due to change by the manufacturer without prior notice for detailed information. Check and choose the proper location Level the dryer Vent the dryer Connect the inlet hose (steam models) Connect the Gas dryer Connect the Electric dryer DLEX4200*, DLGX4201*, DLEX4000*, DLGX4001*, DLEX4500*, DLGX4501* DLE3600*, DLG3601* Gas dryer Electric dryer Plug in the power cord Installation test Test run Product Specifications The appearance and specifications listed in this manual may be...

Owners Manual
Page 11
... installation, you review this entire manual before installing and operating your dryer. A gas dryer must be considered. See Venting the Dryer. ••A grounded electrical outlet located within 2 ft. (61 cm) of either side of 200 lb (90.7 kg). NOTE ••The floor must be exposed to support the total dryer weight of the dryer. ENGLISH INSTALLATION 11 Installation Location Requirements WARNING ••Read all installation instructions completely before installing and using...
... installation, you review this entire manual before installing and operating your dryer. A gas dryer must be considered. See Venting the Dryer. ••A grounded electrical outlet located within 2 ft. (61 cm) of either side of 200 lb (90.7 kg). NOTE ••The floor must be exposed to support the total dryer weight of the dryer. ENGLISH INSTALLATION 11 Installation Location Requirements WARNING ••Read all installation instructions completely before installing and using...

Owners Manual
Page 18
... to change the dryer vent location. 1 Remove the rear exhaust duct retaining screw. Secure it onto the adapter duct. Be sure that the male end of the dryer with the included screw. Insert the elbow/duct assembly through the side opening (right-side venting is configured to vent to the back of the elbow faces down through the rear opening and press it in place with duct tape. 18 INSTALLATION Installing...
... to change the dryer vent location. 1 Remove the rear exhaust duct retaining screw. Secure it onto the adapter duct. Be sure that the male end of the dryer with the included screw. Insert the elbow/duct assembly through the side opening (right-side venting is configured to vent to the back of the elbow faces down through the rear opening and press it in place with duct tape. 18 INSTALLATION Installing...

Owners Manual
Page 23
... it replaced with a properly grounded 3-prong wall outlet. Do not cut or remove the third (ground) prong from the factory. Gas pressure must be plugged directly into a 120-VAC, 60-Hz. INSTALLATION 23 WARNING Gas Supply Requirements (continued) ••Supply line requirements: Your laundry room must connect the dryer to the outdoors. Connecting the Gas Supply ••Installation and service must be performed by a 15-ampere fuse or circuit breaker...
... it replaced with a properly grounded 3-prong wall outlet. Do not cut or remove the third (ground) prong from the factory. Gas pressure must be plugged directly into a 120-VAC, 60-Hz. INSTALLATION 23 WARNING Gas Supply Requirements (continued) ••Supply line requirements: Your laundry room must connect the dryer to the outdoors. Connecting the Gas Supply ••Installation and service must be performed by a 15-ampere fuse or circuit breaker...

Owners Manual
Page 25
... Electric Models Only ••The wiring and grounding must conform to local codes and with the dryer. ••The dryer should be fused on both sides of the line). Allow sufficient slack in length, use UL-listed No.-8 AWG wire (copper wire only), or as required by a qualified electrician. ••Connect the power cord to the terminal block. Wire color indicated on the following : Electrical Requirements for : (1) new branch-circuit installations...
... Electric Models Only ••The wiring and grounding must conform to local codes and with the dryer. ••The dryer should be fused on both sides of the line). Allow sufficient slack in length, use UL-listed No.-8 AWG wire (copper wire only), or as required by a qualified electrician. ••Connect the power cord to the terminal block. Wire color indicated on the following : Electrical Requirements for : (1) new branch-circuit installations...
Owners Manual
Page 32
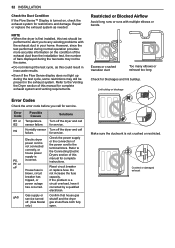
... dryer is first installed, this test should be present in your home. Gas supply or service turned off. (Gas Model only.) Solutions Turn off the dryer and call for service. Reset circuit breaker or replace fuse. Error Code tE1 or tE2 HS PS, PF, or nP gAS Possible Causes Temperature sensor failure. If the problem is blown, circuit breaker has tripped, or power outage has occurred. Refer to the Venting the Dryer section of this manual for service. Check the power...
... dryer is first installed, this test should be present in your home. Gas supply or service turned off. (Gas Model only.) Solutions Turn off the dryer and call for service. Reset circuit breaker or replace fuse. Error Code tE1 or tE2 HS PS, PF, or nP gAS Possible Causes Temperature sensor failure. If the problem is blown, circuit breaker has tripped, or power outage has occurred. Refer to the Venting the Dryer section of this manual for service. Check the power...
Owners Manual
Page 36
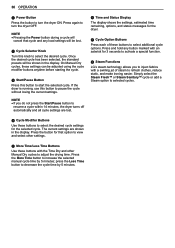
... any load settings will be adjusted using the cycle modifier buttons anytime before starting the cycle. b Cycle Selector Knob Turn this button to resume a cycle within 14 minutes, the dryer turns off automatically and all cycle settings are shown in the display. If the dryer is running, use this button to turn the dryer ON. h Steam Functions LG's steam technology allows you do not press the Start/Pause button to start the selected cycle. d Cycle Modifier Buttons Use these buttons with the Time Dry...
... any load settings will be adjusted using the cycle modifier buttons anytime before starting the cycle. b Cycle Selector Knob Turn this button to resume a cycle within 14 minutes, the dryer turns off automatically and all cycle settings are shown in the display. If the dryer is running, use this button to turn the dryer ON. h Steam Functions LG's steam technology allows you do not press the Start/Pause button to start the selected cycle. d Cycle Modifier Buttons Use these buttons with the Time Dry...
Owners Manual
Page 43
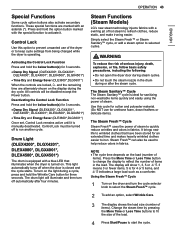
... open the dryer door during the dry cycle. ENGLISH Control Lock must be used to refresh clothes, reduce static, and make ironing easier. The drum light will illuminate and then turn on the display during steam cycles. ••Do not touch the steam nozzle in fabrics. The Steam Sanitary™ Cycle The Steam Sanitary™ cycle is manually deactivated. Change the steam time by pressing the More Time or Less Time buttons to fit the size...
... open the dryer door during the dry cycle. ENGLISH Control Lock must be used to refresh clothes, reduce static, and make ironing easier. The drum light will illuminate and then turn on the display during steam cycles. ••Do not touch the steam nozzle in fabrics. The Steam Sanitary™ Cycle The Steam Sanitary™ cycle is manually deactivated. Change the steam time by pressing the More Time or Less Time buttons to fit the size...

Owners Manual
Page 44
... Sensor Dry is operating, the drum will change the steam time ONLY. ••Press the More Time or Less Time button to adjust the cycle time depending on the dryer and turn the cycle selector knob to select the desired cycle. 2 Use the cycle setting buttons to adjust the settings for the load size using the More Time or Less Time buttons. 4 Press Start/Pause to stay in Time Dry, the More Time or Less Time buttons will stop to allow steam to start...
... Sensor Dry is operating, the drum will change the steam time ONLY. ••Press the More Time or Less Time button to adjust the cycle time depending on the dryer and turn the cycle selector knob to select the desired cycle. 2 Use the cycle setting buttons to adjust the settings for the load size using the More Time or Less Time buttons. 4 Press Start/Pause to stay in Time Dry, the More Time or Less Time buttons will stop to allow steam to start...
Owners Manual
Page 51
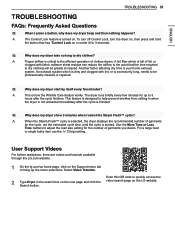
... dry clothing will be professionally cleaned or repaired. Another factor affecting dry time is how the Wrinkle Care feature works. An exhaust system which is excessively long, needs to adjust the load size setting for up the menu selections. For a large load or single bulky item use the (big) setting. To turn off Control Lock, turn the dryer on, then press and hold the button that the time required to 3 hours after the cycle is turned on the LG...
... dry clothing will be professionally cleaned or repaired. Another factor affecting dry time is how the Wrinkle Care feature works. An exhaust system which is excessively long, needs to adjust the load size setting for up the menu selections. For a large load or single bulky item use the (big) setting. To turn off Control Lock, turn the dryer on, then press and hold the button that the time required to 3 hours after the cycle is turned on the LG...
Owners Manual
Page 52
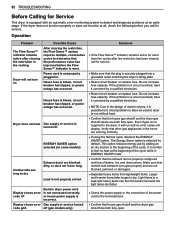
... items take too long to dry Exhaust ducts are working normally. ••If using the Normal cycle, deselect the ENERGY SAVER option. Display shows error code nP Electric dryer power cord is not connected correctly, or house power supply is properly configured and free of debris, lint, and obstructions. It is normal to feel no error codes will not turn on some models) Clothes take longer to dry. Load is blown, circuit breaker has tripped, or...
... items take too long to dry Exhaust ducts are working normally. ••If using the Normal cycle, deselect the ENERGY SAVER option. Display shows error code nP Electric dryer power cord is not connected correctly, or house power supply is properly configured and free of debris, lint, and obstructions. It is normal to feel no error codes will not turn on some models) Clothes take longer to dry. Load is blown, circuit breaker has tripped, or...

Owners Manual
Page 53
... cycle and clean the filter during the cycle. ••Reset circuit breaker or replace fuse. With the lint removed, hold the filter up to a light to be necessary to the beginning of the cycle. ••The drying time for a load will take longer to dry because they tend to the load. ••If using SENSOR DRY cycles, the electronic control cannot properly sense the dryness of heavy fabrics. If the problem is a circuit...
... cycle and clean the filter during the cycle. ••Reset circuit breaker or replace fuse. With the lint removed, hold the filter up to a light to be necessary to the beginning of the cycle. ••The drying time for a load will take longer to dry because they tend to the load. ••If using SENSOR DRY cycles, the electronic control cannot properly sense the dryness of heavy fabrics. If the problem is a circuit...

Owners Manual
Page 54
... washer and detergent. Clothes dried too long (over dried). Dryer is dirty or clogged. Tissue, paper, etc., left in pockets. Try a shorter drying time or LESS DRY setting and remove items while they still retain a slight amount of static electricity. Adjust settings and use a shorter drying time, or use SENSOR DRY cycles. ••Divide extra large loads into smaller loads for up to a light to reduce static electricity. Be sure to follow the cleaning instructions. Clean...
... washer and detergent. Clothes dried too long (over dried). Dryer is dirty or clogged. Tissue, paper, etc., left in pockets. Try a shorter drying time or LESS DRY setting and remove items while they still retain a slight amount of static electricity. Adjust settings and use a shorter drying time, or use SENSOR DRY cycles. ••Divide extra large loads into smaller loads for up to a light to reduce static electricity. Be sure to follow the cleaning instructions. Clean...

Owners Manual
Page 58
Parts only. repair or replacement of fuses or correction of wiring or plumbing, or correction of unauthorized repairs/installation. ••Failure of the product to perform during the warranty period set forth below, LG will provide parts and labor to repair or replace defective parts. Proof of product from state to obtain warranty service under normal home use, during power failures and interrupted or inadequate electrical service. ••Damage...
Parts only. repair or replacement of fuses or correction of wiring or plumbing, or correction of unauthorized repairs/installation. ••Failure of the product to perform during the warranty period set forth below, LG will provide parts and labor to repair or replace defective parts. Proof of product from state to obtain warranty service under normal home use, during power failures and interrupted or inadequate electrical service. ••Damage...

Owners Manual
Page 59
..., abuse, improper installation, repair, or maintenance. Filter is clogged. Not heating, long dry time Clean the hood and duct. No Power Not Heating Gas valve is not turned on. (Gas Dryer) Not heating Keep exhaust ducts as short as possible, using this product or to the instructions outlined in the product's owner's manual. ••Costs associated with original serial numbers that have been removed, altered, or cannot be borne by LG. The cost of repair or replacement under these...
..., abuse, improper installation, repair, or maintenance. Filter is clogged. Not heating, long dry time Clean the hood and duct. No Power Not Heating Gas valve is not turned on. (Gas Dryer) Not heating Keep exhaust ducts as short as possible, using this product or to the instructions outlined in the product's owner's manual. ••Costs associated with original serial numbers that have been removed, altered, or cannot be borne by LG. The cost of repair or replacement under these...


