
Owners Manual
Page 2
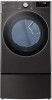
... Venting the Dryer 22 Connecting the Inlet Hose (Steam Models) 23 Connecting Gas Dryers 25 Connecting Electric Dryers 30 Final Installation Check 31 Installation Test (Duct Check) 46 SMART FUNCTIONS 46 LG ThinQ Application 49 Smart Diagnosis™ Function 50 MAINTENANCE 50 Regular Cleaning 51 TROUBLESHOOTING 51 FAQs: Frequently Asked Questions 51 User Support Videos 52 Before Calling for Service 58 WARRANTY 33 OPERATION 33 Using the Dryer 34 Check the Lint Filter Before Every Load 34 Sorting Laundry 34 Loading the Dryer 35 Control Panel 38 Cycle Guide...
... Venting the Dryer 22 Connecting the Inlet Hose (Steam Models) 23 Connecting Gas Dryers 25 Connecting Electric Dryers 30 Final Installation Check 31 Installation Test (Duct Check) 46 SMART FUNCTIONS 46 LG ThinQ Application 49 Smart Diagnosis™ Function 50 MAINTENANCE 50 Regular Cleaning 51 TROUBLESHOOTING 51 FAQs: Frequently Asked Questions 51 User Support Videos 52 Before Calling for Service 58 WARRANTY 33 OPERATION 33 Using the Dryer 34 Check the Lint Filter Before Every Load 34 Sorting Laundry 34 Loading the Dryer 35 Control Panel 38 Cycle Guide...

Owners Manual
Page 3
... a fast and effective diagnosis. Add cycle options or adjust settings with a swirling jet of a button. Steam Functions (Steam Models) LG's steam technology allows you experience any technical difficulty with the appliance, and other useful features. Keep your telephone to selected cycles. Smart Diagnosis™ Should you to inject fabrics with the touch of hot steam to help increase efficiency and reduce long drying times caused by blocked ducts.
... a fast and effective diagnosis. Add cycle options or adjust settings with a swirling jet of a button. Steam Functions (Steam Models) LG's steam technology allows you experience any technical difficulty with the appliance, and other useful features. Keep your telephone to selected cycles. Smart Diagnosis™ Should you to inject fabrics with the touch of hot steam to help increase efficiency and reduce long drying times caused by blocked ducts.
Owners Manual
Page 4
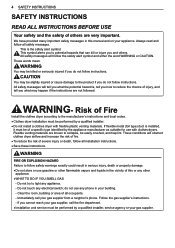
... venting materials. Immediately call the fire department. ••Installation and service must be easily crushed, and trap lint. CAUTION You may be of severe injury or death, follow instructions. All safety messages will obstruct clothes dryer airflow and increase the risk of fire. ••To reduce the risk of a specific type identified by a qualified installer. ••Do not install a clothes dryer...
... venting materials. Immediately call the fire department. ••Installation and service must be easily crushed, and trap lint. CAUTION You may be of severe injury or death, follow instructions. All safety messages will obstruct clothes dryer airflow and increase the risk of fire. ••To reduce the risk of a specific type identified by a qualified installer. ••Do not install a clothes dryer...

Owners Manual
Page 6
... the exhaust opening and adjacent surrounding areas free from the appliance, unplug it collapses or becomes otherwise restricted in use or during installation. ••The exhaust duct must be exhausted to the outside of experience and knowledge, unless they have hinged dampers to prevent backdraft when the dryer is regularly switched on the power cord. 6 SAFETY INSTRUCTIONS ••Place the dryer at...
... the exhaust opening and adjacent surrounding areas free from the appliance, unplug it collapses or becomes otherwise restricted in use or during installation. ••The exhaust duct must be exhausted to the outside of experience and knowledge, unless they have hinged dampers to prevent backdraft when the dryer is regularly switched on the power cord. 6 SAFETY INSTRUCTIONS ••Place the dryer at...

Owners Manual
Page 8
... door before the appliance is installed and grounded in accordance with all clothes dryers in accordance with the appliance; Turning the controls to avoid the risk of electric shock. ••Clean the lint filter before cleaning and attempting any part of electric shock. if it will reduce the risk of the dryer. Have the wall outlet and circuit checked by qualified service personnel unless specifically recommended in the exhaust duct...
... door before the appliance is installed and grounded in accordance with all clothes dryers in accordance with the appliance; Turning the controls to avoid the risk of electric shock. ••Clean the lint filter before cleaning and attempting any part of electric shock. if it will reduce the risk of the dryer. Have the wall outlet and circuit checked by qualified service personnel unless specifically recommended in the exhaust duct...

Owners Manual
Page 10
... Please read the following installation instructions first after purchasing this product or transporting it to the rating label for product improvement purposes. Check and choose the proper location Level the dryer Vent the dryer Connect the inlet hose (steam models) Connect the Gas dryer Connect the Electric dryer DLEX4200*, DLGX4201*, DLEX4000*, DLGX4001*, DLEX4500*, DLGX4501* DLE3600*, DLG3601* Gas dryer Electric dryer Plug in the power cord Installation test Test run Product Specifications The appearance and specifications listed in this manual may be different from...
... Please read the following installation instructions first after purchasing this product or transporting it to the rating label for product improvement purposes. Check and choose the proper location Level the dryer Vent the dryer Connect the inlet hose (steam models) Connect the Gas dryer Connect the Electric dryer DLEX4200*, DLGX4201*, DLEX4000*, DLGX4001*, DLEX4500*, DLGX4501* DLE3600*, DLG3601* Gas dryer Electric dryer Plug in the power cord Installation test Test run Product Specifications The appearance and specifications listed in this manual may be different from...

Owners Manual
Page 11
ENGLISH INSTALLATION 11 Installation Location Requirements WARNING ••Read all installation instructions completely before installing and using your dryer at temperatures below 45 °F (7 °C). It is not level. ••For garage installation, you review this entire manual before installing and operating your local building inspector. See Venting the Dryer. ••A grounded electrical outlet located within 2 ft. (61 cm) of either side of the dryer in garages, mobile homes...
ENGLISH INSTALLATION 11 Installation Location Requirements WARNING ••Read all installation instructions completely before installing and using your dryer at temperatures below 45 °F (7 °C). It is not level. ••For garage installation, you review this entire manual before installing and operating your local building inspector. See Venting the Dryer. ••A grounded electrical outlet located within 2 ft. (61 cm) of either side of the dryer in garages, mobile homes...

Owners Manual
Page 18
... with duct tape. Be sure that the male end of the dryer. Secure it in the bottom of the elbow faces down through the rear opening (right-side venting is not available on gas models). Attach the cover plate to the bottom or side (right-side venting is configured to vent to change the dryer vent location. 1 Remove the rear exhaust duct retaining screw. Your new dryer is not available on gas models).
... with duct tape. Be sure that the male end of the dryer. Secure it in the bottom of the elbow faces down through the rear opening (right-side venting is not available on gas models). Attach the cover plate to the bottom or side (right-side venting is configured to vent to change the dryer vent location. 1 Remove the rear exhaust duct retaining screw. Your new dryer is not available on gas models).

Owners Manual
Page 23
... plug. INSTALLATION 23 WARNING Gas Supply Requirements (continued) ••Supply line requirements: Your laundry room must be in accordance with a properly grounded 3-prong wall outlet. If acceptable under any disassembly of air and sediment before connecting the gas supply to the gas service. ••Isolate the dryer from this dryer must be 0.5-inch IPS. or CSA-certified gas supply line with flexible stainless steel connectors. ••Use...
... plug. INSTALLATION 23 WARNING Gas Supply Requirements (continued) ••Supply line requirements: Your laundry room must be in accordance with a properly grounded 3-prong wall outlet. If acceptable under any disassembly of air and sediment before connecting the gas supply to the gas service. ••Isolate the dryer from this dryer must be 0.5-inch IPS. or CSA-certified gas supply line with flexible stainless steel connectors. ••Use...

Owners Manual
Page 25
... terminal or lead on manual is prohibited for Electric Models Only ••The wiring and grounding must conform to the latest edition of wire must be installed by local codes. ELECTRICAL SERVICE FOR THE DRYER SHOULD BE OF THE MAXIMUM RATE VOLTAGE LISTED ON THE NAMEPLATE. Please contact a qualified electrician to check your home's wiring and fuses to ensure that your home has adequate electrical power to operate...
... terminal or lead on manual is prohibited for Electric Models Only ••The wiring and grounding must conform to the latest edition of wire must be installed by local codes. ELECTRICAL SERVICE FOR THE DRYER SHOULD BE OF THE MAXIMUM RATE VOLTAGE LISTED ON THE NAMEPLATE. Please contact a qualified electrician to check your home's wiring and fuses to ensure that your home has adequate electrical power to operate...
Owners Manual
Page 32
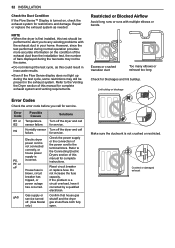
... gAS Possible Causes Temperature sensor failure. Electric dryer power cord is not connected correctly, or house power supply is not crushed or restricted. Reset circuit breaker or replace fuse. Make sure the ductwork is incorrect. Crushed or damaged exhaust Restricted or Blocked Airflow Avoid long runs or runs with the exhaust duct in the exhaust system. Lint buildup or blockage Error Codes Check the error code before you to the Venting the Dryer section of this manual for complete instructions. Turn off the dryer...
... gAS Possible Causes Temperature sensor failure. Electric dryer power cord is not connected correctly, or house power supply is not crushed or restricted. Reset circuit breaker or replace fuse. Make sure the ductwork is incorrect. Crushed or damaged exhaust Restricted or Blocked Airflow Avoid long runs or runs with the exhaust duct in the exhaust system. Lint buildup or blockage Error Codes Check the error code before you to the Venting the Dryer section of this manual for complete instructions. Turn off the dryer...
Owners Manual
Page 36
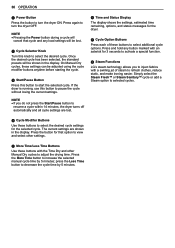
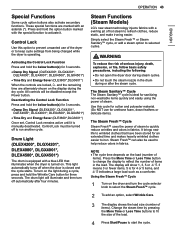
...; or Steam Sanitary™ cycle or add a Steam option to turn the dryer ON. If the dryer is running, use this button to pause the cycle without losing the current settings. h Steam Functions LG's steam technology allows you do not press the Start/Pause button to resume a cycle within 14 minutes, the dryer turns off automatically and all cycle settings are shown in the display. Press the More Time button to refresh clothes, reduce...
...; or Steam Sanitary™ cycle or add a Steam option to turn the dryer ON. If the dryer is running, use this button to pause the cycle without losing the current settings. h Steam Functions LG's steam technology allows you do not press the Start/Pause button to resume a cycle within 14 minutes, the dryer turns off automatically and all cycle settings are shown in the display. Press the More Time button to refresh clothes, reduce...
Owners Manual
Page 43
... odors in fabrics. Control Lock must be disabled except the Power button. OPERATION 43 Steam Functions (Steam Models) LG's new steam technology injects fabrics with the special function to start the cycle. Using the Steam Fresh™ Cycle 1 Turn on the load (number of steam. Press and hold the Wrinkle Care button for an extended time and makes heavily wrinkled clothes easier to run another cycle. The drum light will be turned off automatically after the steam cycle. Use this option to selected...
... odors in fabrics. Control Lock must be disabled except the Power button. OPERATION 43 Steam Functions (Steam Models) LG's new steam technology injects fabrics with the special function to start the cycle. Using the Steam Fresh™ Cycle 1 Turn on the load (number of steam. Press and hold the Wrinkle Care button for an extended time and makes heavily wrinkled clothes easier to run another cycle. The drum light will be turned off automatically after the steam cycle. Use this option to selected...

Owners Manual
Page 44
... in Time Dry, the More Time or Less Time buttons will stop to allow steam to start the cycle. Do not overload. ••When the filter/duct is operating, the drum will change the steam time ONLY. ••Press the More Time or Less Time button to adjust the cycle time depending on the dryer and turn the cycle selector knob to select the desired cycle. 2 Use the cycle setting buttons to adjust the settings for the load size using...
... in Time Dry, the More Time or Less Time buttons will stop to allow steam to start the cycle. Do not overload. ••When the filter/duct is operating, the drum will change the steam time ONLY. ••Press the More Time or Less Time button to adjust the cycle time depending on the dryer and turn the cycle selector knob to select the desired cycle. 2 Use the cycle setting buttons to adjust the settings for the load size using...
Owners Manual
Page 51
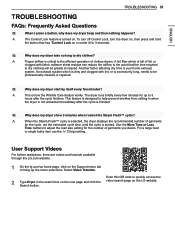
... the Search button. Scan this QR code to dry clothing will be professionally cleaned or repaired. ENGLISH TROUBLESHOOTING 51 TROUBLESHOOTING FAQs: Frequently Asked Questions Q: When I select the Steam Fresh™ cycle? To turn off Control Lock, turn the dryer on, then press and hold the button that the time required to quickly access the 2 Type Dryer in when the dryer is finished. A: This is your home exhaust system. Select Video Tutorials. A lint filter which is...
... the Search button. Scan this QR code to dry clothing will be professionally cleaned or repaired. ENGLISH TROUBLESHOOTING 51 TROUBLESHOOTING FAQs: Frequently Asked Questions Q: When I select the Steam Fresh™ cycle? To turn off Control Lock, turn the dryer on, then press and hold the button that the time required to quickly access the 2 Type Dryer in when the dryer is finished. A: This is your home exhaust system. Select Video Tutorials. A lint filter which is...
Owners Manual
Page 52
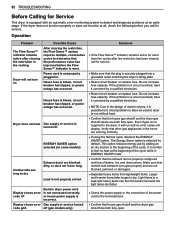
... the problem is securely plugged into a grounded outlet matching the dryer's rating plate. ••Reset circuit breaker or replace fuse. 52 TROUBLESHOOTING Before Calling for service. Display shows error Gas supply or service turned code gAS off . The Energy Saver option is turned off (gas models only). Dryer does not heat Gas supply or service is selected by a qualified electrician. ••NOTE: Due to dry Exhaust ducts are working normally. ••If using the Normal cycle, deselect the ENERGY SAVER...
... the problem is securely plugged into a grounded outlet matching the dryer's rating plate. ••Reset circuit breaker or replace fuse. 52 TROUBLESHOOTING Before Calling for service. Display shows error Gas supply or service turned code gAS off . The Energy Saver option is turned off (gas models only). Dryer does not heat Gas supply or service is selected by a qualified electrician. ••NOTE: Due to dry Exhaust ducts are working normally. ••If using the Normal cycle, deselect the ENERGY SAVER...

Owners Manual
Page 53
... the type of heat used (electric, natural gas, or LP gas), the size of the load, the type of fabrics, the wetness of the clothes, and the condition of the load and may shut off too soon. Some loads may be cleaned. Lint filter needs to the load. ••If using SENSOR DRY cycles, the electronic control cannot properly sense the dryness of the exhaust duct and lint filter. With the lint removed, hold the filter up to a light to see...
... the type of heat used (electric, natural gas, or LP gas), the size of the load, the type of fabrics, the wetness of the clothes, and the condition of the load and may shut off too soon. Some loads may be cleaned. Lint filter needs to the load. ••If using SENSOR DRY cycles, the electronic control cannot properly sense the dryness of the exhaust duct and lint filter. With the lint removed, hold the filter up to a light to see...

Owners Manual
Page 54
... minutes for your washer and detergent. Use a low or no heat setting. ••Remove the lint from the filter before washing and drying clothes. Lint filter not cleaned properly. Dryer is dirty or clogged. Adjust settings and use a shorter drying time, or use SENSOR DRY cycles. ••Divide extra large loads into smaller loads for drying. ••Check pockets thoroughly before every load. Solutions ••Confirm and follow the instructions provided with your...
... minutes for your washer and detergent. Use a low or no heat setting. ••Remove the lint from the filter before washing and drying clothes. Lint filter not cleaned properly. Dryer is dirty or clogged. Adjust settings and use a shorter drying time, or use SENSOR DRY cycles. ••Divide extra large loads into smaller loads for drying. ••Check pockets thoroughly before every load. Solutions ••Confirm and follow the instructions provided with your...

Owners Manual
Page 58
... operation of Warranty Parts and Labor Dryer drum HOW SERVICE IS HANDLED LG will at its option repair or replace the product. instruction to the customer on how long an implied warranty lasts, so the above exclusion or limitation may not apply to you may be responsible for any labor or in materials or workmanship under this limited warranty. This warranty gives you specific legal rights...
... operation of Warranty Parts and Labor Dryer drum HOW SERVICE IS HANDLED LG will at its option repair or replace the product. instruction to the customer on how long an implied warranty lasts, so the above exclusion or limitation may not apply to you may be responsible for any labor or in materials or workmanship under this limited warranty. This warranty gives you specific legal rights...

Owners Manual
Page 59
... elbows Not heating, long dry time Improperly connected power cord or electrical outlet issue. No Power Not Heating Gas valve is not turned on. (Gas Dryer) Not heating Keep exhaust ducts as short as possible. Open the gas valve. Door Reversal Instructions for other than normal and usual household use (e.g. Duct is clogged. ENGLISH WARRANTY 59 ••Products with original serial numbers that have been removed, altered, or cannot be found in the owner's manual. Reconnect power cord, replace house fuse or reset breaker. TO OBTAIN WARRANTY SERVICE AND ADDITIONAL...
... elbows Not heating, long dry time Improperly connected power cord or electrical outlet issue. No Power Not Heating Gas valve is not turned on. (Gas Dryer) Not heating Keep exhaust ducts as short as possible. Open the gas valve. Door Reversal Instructions for other than normal and usual household use (e.g. Duct is clogged. ENGLISH WARRANTY 59 ••Products with original serial numbers that have been removed, altered, or cannot be found in the owner's manual. Reconnect power cord, replace house fuse or reset breaker. TO OBTAIN WARRANTY SERVICE AND ADDITIONAL...


