Owners Manual
Page 2
...Product Specifications 11 Installation Location Requirements 12 Clearances 14 Leveling the Dryer 15 Reversing the Door 16 Installing the Side Vent Kit 17 Stacking the Dryer 18 Venting the Dryer 20 Connecting the Inlet Hose (Steam Models) 21 Connecting Gas Dryers 23 Connecting Electric Dryers 28 ... 37 Cycle Guide 41 Cycle Modifier Buttons 41 Option Buttons 42 Special Functions 43 Steam Functions (Steam Models) 45 SMART FUNCTIONS 45 LG ThinQ Application 48 Smart Diagnosis™ Function 49 MAINTENANCE 49 Regular Cleaning 50 TROUBLESHOOTING 50 FAQs: Frequently Asked Questions 50 User Support...
...Product Specifications 11 Installation Location Requirements 12 Clearances 14 Leveling the Dryer 15 Reversing the Door 16 Installing the Side Vent Kit 17 Stacking the Dryer 18 Venting the Dryer 20 Connecting the Inlet Hose (Steam Models) 21 Connecting Gas Dryers 23 Connecting Electric Dryers 28 ... 37 Cycle Guide 41 Cycle Modifier Buttons 41 Option Buttons 42 Special Functions 43 Steam Functions (Steam Models) 45 SMART FUNCTIONS 45 LG ThinQ Application 48 Smart Diagnosis™ Function 49 MAINTENANCE 49 Regular Cleaning 50 TROUBLESHOOTING 50 FAQs: Frequently Asked Questions 50 User Support...

Owners Manual
Page 4
... with clothes dryers. These conditions will follow safety warnings exactly could result in your gas supplier. If you do not use with flexible plastic venting materials. Flexible venting materials are very important. WARNING FIRE OR EXPLOSION HAZARD Failure to the product if you and others are known to reduce the chance of...
... with clothes dryers. These conditions will follow safety warnings exactly could result in your gas supplier. If you do not use with flexible plastic venting materials. Flexible venting materials are very important. WARNING FIRE OR EXPLOSION HAZARD Failure to the product if you and others are known to reduce the chance of...

Owners Manual
Page 5
...or has missing or broken parts, including a damaged cord or plug. ••Do not install a clothes dryer with flexible plastic venting materials. ENGLISH SAFETY INSTRUCTIONS 5 IMPORTANT SAFETY INSTRUCTIONS WARNING To reduce the risk of explosion, fire, death, electric shock, scalding or injury ...8226;•Before use, the appliance must be properly installed as in a different location, call qualified service personnel for play. Flexible venting materials are known to avoid electrical overload. ••To reduce the risk of long sleeved gloves and safety glasses. •...
...or has missing or broken parts, including a damaged cord or plug. ••Do not install a clothes dryer with flexible plastic venting materials. ENGLISH SAFETY INSTRUCTIONS 5 IMPORTANT SAFETY INSTRUCTIONS WARNING To reduce the risk of explosion, fire, death, electric shock, scalding or injury ...8226;•Before use, the appliance must be properly installed as in a different location, call qualified service personnel for play. Flexible venting materials are known to avoid electrical overload. ••To reduce the risk of long sleeved gloves and safety glasses. •...
Owners Manual
Page 7
.... ••Do not let your dryer. Close supervision of your body, such as they give off vapors that may be minimized further by properly venting the dryer to the outdoors. ••Do not place items exposed to ventilate the area immediately. ••Under certain conditions, hydrogen gas may...
.... ••Do not let your dryer. Close supervision of your body, such as they give off vapors that may be minimized further by properly venting the dryer to the outdoors. ••Do not place items exposed to ventilate the area immediately. ••Under certain conditions, hydrogen gas may...
Owners Manual
Page 9
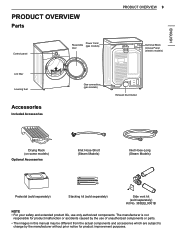
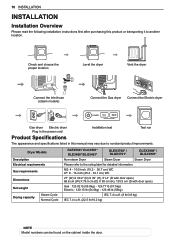
... Drying Rack (on some models) Optional Accessories Inlet Hose-Short (Steam Models) Inlet Hose-Long (Steam Models) Pedestal (sold separately) Stacking kit (sold separately) Side vent kit (sold separately) Kit No. 383EEL9001B NOTE • For your safety and extended product life, use of unauthorized components or parts. • The images in...
... Drying Rack (on some models) Optional Accessories Inlet Hose-Short (Steam Models) Inlet Hose-Long (Steam Models) Pedestal (sold separately) Stacking kit (sold separately) Side vent kit (sold separately) Kit No. 383EEL9001B NOTE • For your safety and extended product life, use of unauthorized components or parts. • The images in...
Owners Manual
Page 10
...* DLEX3700* / DLGX3701* DLEX3900* / DLGX3901* Non-steam Dryer Steam Dryer Steam Dryer Please refer to another location. Check and choose the proper location Level the dryer Vent the dryer Connect the inlet hose (steam models) Connect the Gas dryer Connect the Electric dryer Gas dryer Electric dryer Plug in the power cord...
...* DLEX3700* / DLGX3701* DLEX3900* / DLGX3901* Non-steam Dryer Steam Dryer Steam Dryer Please refer to another location. Check and choose the proper location Level the dryer Vent the dryer Connect the inlet hose (steam models) Connect the Gas dryer Connect the Electric dryer Gas dryer Electric dryer Plug in the power cord...

Owners Manual
Page 11
.... • The dryer must be considered. NOTE • The floor must not be installed or stored in garages, closets, mobile homes or sleeping quarters. See Venting the Dryer. ••A grounded electrical outlet located within 2 ft. (61 cm) of either side of 1 inch (2.5 cm) under the entire dryer. It is 15...
.... • The dryer must be considered. NOTE • The floor must not be installed or stored in garages, closets, mobile homes or sleeping quarters. See Venting the Dryer. ••A grounded electrical outlet located within 2 ft. (61 cm) of either side of 1 inch (2.5 cm) under the entire dryer. It is 15...
Owners Manual
Page 12
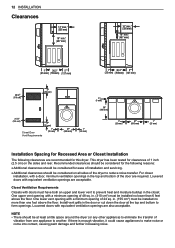
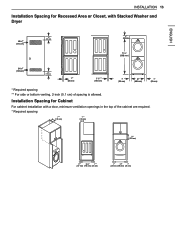
... and moisture buildup in the closet. If there is enough vibration, it could cause appliances to eliminate the transfer of the door are acceptable. Install vent grills in . (155 cm2) must be installed no more than 6 feet above the floor. 12 INSTALLATION Clearances 14" max.* (356 mm) 18" ...25 mm) (765mm) (127 mm) 1"* 30.2" 5"** (25 mm) (765mm) (127 mm) 48 in.2* (310 cm2) 3"* (76 mm) 24 in.2* (155 cm2) 3"* (76 mm) Closet Door Vent Requirements 1" (25 mm) 27" (686 mm) 1" (25 mm) 0" (0 mm) 39" (990 mm) 1" (25 mm) 27" (686 mm) 1" (25 mm) Installation Spacing for Recessed Area ...
... and moisture buildup in the closet. If there is enough vibration, it could cause appliances to eliminate the transfer of the door are acceptable. Install vent grills in . (155 cm2) must be installed no more than 6 feet above the floor. 12 INSTALLATION Clearances 14" max.* (356 mm) 18" ...25 mm) (765mm) (127 mm) 1"* 30.2" 5"** (25 mm) (765mm) (127 mm) 48 in.2* (310 cm2) 3"* (76 mm) 24 in.2* (155 cm2) 3"* (76 mm) Closet Door Vent Requirements 1" (25 mm) 27" (686 mm) 1" (25 mm) 0" (0 mm) 39" (990 mm) 1" (25 mm) 27" (686 mm) 1" (25 mm) Installation Spacing for Recessed Area ...
Owners Manual
Page 13
... ventilation openings in .2* (155 cm2) 3"* (76 mm) 1"* (25 mm) 5 ½" ** (140 mm) 1" (25 mm) 27" (686 mm) 1" (25 mm) * Required spacing ** For side or bottom venting, 2-inch (5.1 cm) of the cabinet are required. * Required spacing 7" * (178 mm) 7" * (178 mm) 9" * (229 mm) 5"* 30.2" 1"* (127 mm) (765 mm) (25 mm) 1" 27" 1" (25 mm...
... ventilation openings in .2* (155 cm2) 3"* (76 mm) 1"* (25 mm) 5 ½" ** (140 mm) 1" (25 mm) 27" (686 mm) 1" (25 mm) * Required spacing ** For side or bottom venting, 2-inch (5.1 cm) of the cabinet are required. * Required spacing 7" * (178 mm) 7" * (178 mm) 9" * (229 mm) 5"* 30.2" 1"* (127 mm) (765 mm) (25 mm) 1" 27" 1" (25 mm...

Owners Manual
Page 16
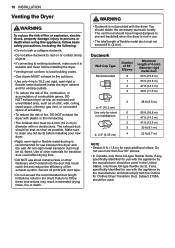
...the male end of the elbow faces AWAY from your LG retailer. Adapter Duct Rear Exhaust Duct Option 1: Side Venting 2 Press the tabs on the knockout and carefully remove the knockout for the desired vent opening (right-side venting is configured to vent to the rear. Be sure that the male end ..., death or property damage, follow basic precautions, including the following: • Use long-sleeved gloves and safety glasses. • Use a heavy metal vent. • Do not use plastic or thin foil ducts. • Clean old ducts before installing this dryer. Attach the cover plate to change the ...
...the male end of the elbow faces AWAY from your LG retailer. Adapter Duct Rear Exhaust Duct Option 1: Side Venting 2 Press the tabs on the knockout and carefully remove the knockout for the desired vent opening (right-side venting is configured to vent to the rear. Be sure that the male end ..., death or property damage, follow basic precautions, including the following: • Use long-sleeved gloves and safety glasses. • Use a heavy metal vent. • Do not use plastic or thin foil ducts. • Clean old ducts before installing this dryer. Attach the cover plate to change the ...
Owners Manual
Page 17
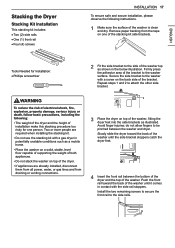
... side bracket stoppers catch the dryer feet. 4 Insert the front rail between the washer and dryer. Avoid finger injuries; Remove paper backing from draining or venting connections. 3 Place the dryer on the back side of the bracket to the side of the washer is clean and dry. Repeat steps 1 and 2 to...
... side bracket stoppers catch the dryer feet. 4 Insert the front rail between the washer and dryer. Avoid finger injuries; Remove paper backing from draining or venting connections. 3 Place the dryer on the back side of the bracket to the side of the washer is clean and dry. Repeat steps 1 and 2 to...
Owners Manual
Page 18
...manufacturer and that could affect drying time. • DO NOT use sheet metal screws or other materials for each additional elbow. The vent hood should have hinged dampers to prevent backdraft when the dryer is suitable and clean before installing your new dryer. • Rigid... any , specifically identified for use with the appliance by the manufacturer should obtain the necessary ductwork locally. WARNING • Ductwork is recommended for venting outside. • To reduce the risk of fire, combustion, or accumulation of flexible metal duct must be used . Do not use . ...
...manufacturer and that could affect drying time. • DO NOT use sheet metal screws or other materials for each additional elbow. The vent hood should have hinged dampers to prevent backdraft when the dryer is suitable and clean before installing your new dryer. • Rigid... any , specifically identified for use with the appliance by the manufacturer should obtain the necessary ductwork locally. WARNING • Ductwork is recommended for venting outside. • To reduce the risk of fire, combustion, or accumulation of flexible metal duct must be used . Do not use . ...
Owners Manual
Page 19
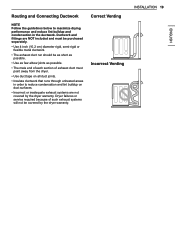
... elbow joints as possible. • The male end of each section of such exhaust systems will not be covered by the dryer warranty. Correct Venting Incorrect Venting INSTALLATION 19 ENGLISH Dryer failures or service required because of exhaust duct must point away from the dryer. • Use duct tape on all duct...
... elbow joints as possible. • The male end of each section of such exhaust systems will not be covered by the dryer warranty. Correct Venting Incorrect Venting INSTALLATION 19 ENGLISH Dryer failures or service required because of exhaust duct must point away from the dryer. • Use duct tape on all duct...
Owners Manual
Page 22
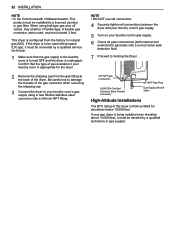
... natural gas (NG). When using a new flexible stainless steel connector with propane (LP) gas, it must not exceed 3 feet. Confirm that the gas supply to Venting the Dryer. 3/8" NPT gas Connection AGA/CSA-Certified Stainless Steel Flexible Connector 1/8" NPT Pipe Plug Gas Supply Shutoff Valve High-Altitude Installations The BTU rating...
... natural gas (NG). When using a new flexible stainless steel connector with propane (LP) gas, it must not exceed 3 feet. Confirm that the gas supply to Venting the Dryer. 3/8" NPT gas Connection AGA/CSA-Certified Stainless Steel Flexible Connector 1/8" NPT Pipe Plug Gas Supply Shutoff Valve High-Altitude Installations The BTU rating...
Owners Manual
Page 28
... When the dryer starts, the igniter should not exceed 0.6 inch (1.5 cm). You must be at least 2 inches (5 cm), and when venting the dryer to ensure proper operation. Static pressure in the exhaust duct can be measured by evaluating the static pressure. ELECTRIC MODELS Close the dryer... right side panel because of the duct from the dryer. Checking Airflow Effective dryer operation requires proper airflow. It is recommended that venting materials are in firm contact with the Manufactured Home Construction and Safety Standards Title 24 CFR, Part 3280 or Standard CAN/ CSA ...
... When the dryer starts, the igniter should not exceed 0.6 inch (1.5 cm). You must be at least 2 inches (5 cm), and when venting the dryer to ensure proper operation. Static pressure in the exhaust duct can be measured by evaluating the static pressure. ELECTRIC MODELS Close the dryer... right side panel because of the duct from the dryer. Checking Airflow Effective dryer operation requires proper airflow. It is recommended that venting materials are in firm contact with the Manufactured Home Construction and Safety Standards Title 24 CFR, Part 3280 or Standard CAN/ CSA ...
Owners Manual
Page 30
...the dryer is a circuit overload, have it corrected by a qualified electrician. Turn off the dryer and call for complete exhaust system and venting requirements. • Your dryer features Flow Sense™, an innovative sensing system that house gas shutoff and the dryer gas shutoff are displayed ...test performed during the test cycle, some restrictions may still be performed to alert you call for complete instructions. Refer to the Venting the Dryer section of the power cord to dry faster and reduces energy use. Repair or replace the exhaust system as this ...
...the dryer is a circuit overload, have it corrected by a qualified electrician. Turn off the dryer and call for complete exhaust system and venting requirements. • Your dryer features Flow Sense™, an innovative sensing system that house gas shutoff and the dryer gas shutoff are displayed ...test performed during the test cycle, some restrictions may still be performed to alert you call for complete instructions. Refer to the Venting the Dryer section of the power cord to dry faster and reduces energy use. Repair or replace the exhaust system as this ...
Owners Manual
Page 46
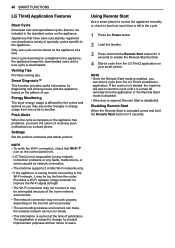
...Start is subject to change for diagnosing and solving issues with the appliance based on your smart phone. 46 SMART FUNCTIONS LG ThinQ Application Features Dryer Cycle Download new and specialized cycles that have the option of receiving push notifications on a smart phone...the machine will wait to enable the Remote Start function. 4 Start a cycle from the LG ThinQ smartphone application. Purchase a Wi-Fi repeater (range extender) to the appliance. Venting Tips Provides venting tips. Energy Monitoring The dryer energy usage is affected by network connection. • The ...
...Start is subject to change for diagnosing and solving issues with the appliance based on your smart phone. 46 SMART FUNCTIONS LG ThinQ Application Features Dryer Cycle Download new and specialized cycles that have the option of receiving push notifications on a smart phone...the machine will wait to enable the Remote Start function. 4 Start a cycle from the LG ThinQ smartphone application. Purchase a Wi-Fi repeater (range extender) to the appliance. Venting Tips Provides venting tips. Energy Monitoring The dryer energy usage is affected by network connection. • The ...
Owners Manual
Page 49
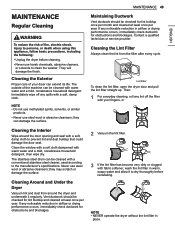
... that could damage the door seal. Contact a qualified technician or service provider. Never use steel wool or abrasive cleansers; MAINTENANCE 49 Maintaining Ductwork Vent ductwork should be checked for lint buildup and cleaned at least once per year. They will damage the finish. Clean the window with a soft...following: • Unplug the dryer before reinstalling. Immediately wipe off the filter with warm water and a mild, nonabrasive household detergent, then wipe dry. Vent ductwork should be checked for lint buildup once per month and cleaned at least once per year.
... that could damage the door seal. Contact a qualified technician or service provider. Never use steel wool or abrasive cleansers; MAINTENANCE 49 Maintaining Ductwork Vent ductwork should be checked for lint buildup and cleaned at least once per year. They will damage the finish. Clean the window with a soft...following: • Unplug the dryer before reinstalling. Immediately wipe off the filter with warm water and a mild, nonabrasive household detergent, then wipe dry. Vent ductwork should be checked for lint buildup once per month and cleaned at least once per year.
Owners Manual
Page 51
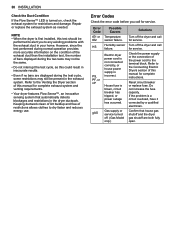
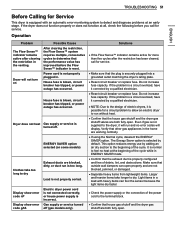
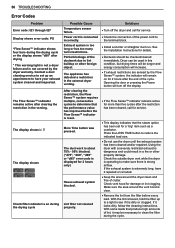
... to dry. If the dryer does not function properly or does not function at an early stage. Power cord is not properly plugged in the venting. Dryer does not heat Gas supply or service is turned off (gas models only). Display show error code nP Display show error code gAS Electric...
... to dry. If the dryer does not function properly or does not function at an early stage. Power cord is not properly plugged in the venting. Dryer does not heat Gas supply or service is turned off (gas models only). Display show error code nP Display show error code gAS Electric...
Owners Manual
Page 56
...but drying times will be longer and energy consumption will increase. ••If exhaust restrictions are sensed by the dryer warranty. Check vent hood for service. ••This display indicates that produce high amounts of clutter. Contact a duct cleaning service to reduce the indicated ...performance value has improved before every load. The Flow Sense™ indicator remains active after clearing the restriction in the external dryer venting. Exhaust system is not covered by the Flow Sense™ system, the indicator will turn off the dryer and call for ...
...but drying times will be longer and energy consumption will increase. ••If exhaust restrictions are sensed by the dryer warranty. Check vent hood for service. ••This display indicates that produce high amounts of clutter. Contact a duct cleaning service to reduce the indicated ...performance value has improved before every load. The Flow Sense™ indicator remains active after clearing the restriction in the external dryer venting. Exhaust system is not covered by the Flow Sense™ system, the indicator will turn off the dryer and call for ...


