Owners Manual
Page 2
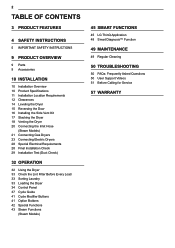
... the Dryer 15 Reversing the Door 16 Installing the Side Vent Kit 17 Stacking the Dryer 18 Venting the Dryer 20 Connecting the Inlet Hose (Steam Models) 21 Connecting Gas Dryers 23 Connecting Electric Dryers 28 Special Electrical Requirements 28 Final Installation Check 29 Installation Test (Duct Check) 32 OPERATION 32 Using the Dryer 33 Check the Lint Filter Before Every Load 33 Sorting Laundry 33 Loading the Dryer 34 Control Panel 37 Cycle Guide 41 Cycle Modifier Buttons 41 Option Buttons 42 Special Functions 43 Steam Functions (Steam Models) 45 SMART FUNCTIONS 45 LG ThinQ Application...
... the Dryer 15 Reversing the Door 16 Installing the Side Vent Kit 17 Stacking the Dryer 18 Venting the Dryer 20 Connecting the Inlet Hose (Steam Models) 21 Connecting Gas Dryers 23 Connecting Electric Dryers 28 Special Electrical Requirements 28 Final Installation Check 29 Installation Test (Duct Check) 32 OPERATION 32 Using the Dryer 33 Check the Lint Filter Before Every Load 33 Sorting Laundry 33 Loading the Dryer 34 Control Panel 37 Cycle Guide 41 Cycle Modifier Buttons 41 Option Buttons 42 Special Functions 43 Steam Functions (Steam Models) 45 SMART FUNCTIONS 45 LG ThinQ Application...

Owners Manual
Page 3
... exhaust airflow through the dryer. Smart Diagnosis™ Should you see the alert: Clean or repair the ducts to select the desired dry cycle. Flow Sense™ Duct Blockage Sensing System Indicator The Flow Sense™ duct blockage sensing system detects and alerts you to inject fabrics with your telephone to selected cycles. Easy-Access Reversible Door The wide-opening door provides easy access for installation location. LG ThinQ Download the new LG...
... exhaust airflow through the dryer. Smart Diagnosis™ Should you see the alert: Clean or repair the ducts to select the desired dry cycle. Flow Sense™ Duct Blockage Sensing System Indicator The Flow Sense™ duct blockage sensing system detects and alerts you to inject fabrics with your telephone to selected cycles. Easy-Access Reversible Door The wide-opening door provides easy access for installation location. LG ThinQ Download the new LG...

Owners Manual
Page 4
... light any electrical switch; WARNING FIRE OR EXPLOSION HAZARD Failure to collapse, be performed by the appliance manufacturer as suitable for use gasoline or other appliance. ••WHAT TO DO IF YOU SMELL GAS - Immediately call the fire department. ••Installation and service must be slightly injured or cause damage to reduce the chance of a specific type...
... light any electrical switch; WARNING FIRE OR EXPLOSION HAZARD Failure to collapse, be performed by the appliance manufacturer as suitable for use gasoline or other appliance. ••WHAT TO DO IF YOU SMELL GAS - Immediately call the fire department. ••Installation and service must be slightly injured or cause damage to reduce the chance of a specific type...
Owners Manual
Page 6
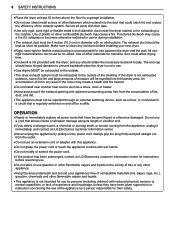
... regularly switched on the power cord. Make sure to clean any area of the home may create a health and fire hazard. ••Do not install near another heat source such as a stove, oven or heater. ••Keep area around your new dryer. ••Rigid, semi-rigid or flexible metal ducting is not exhausted outdoors, some fine lint and...
... regularly switched on the power cord. Make sure to clean any area of the home may create a health and fire hazard. ••Do not install near another heat source such as a stove, oven or heater. ••Keep area around your new dryer. ••Rigid, semi-rigid or flexible metal ducting is not exhausted outdoors, some fine lint and...
Owners Manual
Page 8
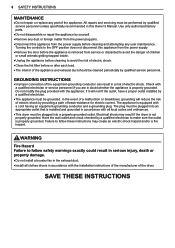
... risk of electric shock. ••Clean the lint filter before cleaning and attempting any part of the dryer. SAVE THESE INSTRUCTIONS In the event of a malfunction or breakdown, grounding will not fit the outlet, have a proper outlet installed by providing a path of the appliance and exhaust duct should be grounded. 8 SAFETY INSTRUCTIONS MAINTENANCE ••Do not repair or replace any user maintenance. Check with a qualified electrician or service personnel...
... risk of electric shock. ••Clean the lint filter before cleaning and attempting any part of the dryer. SAVE THESE INSTRUCTIONS In the event of a malfunction or breakdown, grounding will not fit the outlet, have a proper outlet installed by providing a path of the appliance and exhaust duct should be grounded. 8 SAFETY INSTRUCTIONS MAINTENANCE ••Do not repair or replace any user maintenance. Check with a qualified electrician or service personnel...
Owners Manual
Page 10
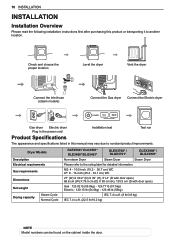
.../10.2 kg) NOTE Model numbers can be found on the cabinet inside the door. Check and choose the proper location Level the dryer Vent the dryer Connect the inlet hose (steam models) Connect the Gas dryer Connect the Electric dryer Gas dryer Electric dryer Plug in the power cord Installation test Test run Product Specifications The appearance and specifications listed in this product or transporting it to another location. 10 INSTALLATION INSTALLATION Installation Overview Please read the following installation instructions first after purchasing this manual may vary due to...
.../10.2 kg) NOTE Model numbers can be found on the cabinet inside the door. Check and choose the proper location Level the dryer Vent the dryer Connect the inlet hose (steam models) Connect the Gas dryer Connect the Electric dryer Gas dryer Electric dryer Plug in the power cord Installation test Test run Product Specifications The appearance and specifications listed in this product or transporting it to another location. 10 INSTALLATION INSTALLATION Installation Overview Please read the following installation instructions first after purchasing this manual may vary due to...

Owners Manual
Page 16
...; Use a heavy metal vent. • Do not use plastic or thin foil ducts. • Clean old ducts before installing this dryer. Attach the cover plate to the base of the dryer as shown. 16 INSTALLATION Installing the Side Vent Kit WARNING To reduce the risk of the dryer with the included screw. Press the adapter duct onto the blower housing and secure to change the dryer vent location. 1 Remove the rear exhaust duct retaining...
...; Use a heavy metal vent. • Do not use plastic or thin foil ducts. • Clean old ducts before installing this dryer. Attach the cover plate to the base of the dryer as shown. 16 INSTALLATION Installing the Side Vent Kit WARNING To reduce the risk of the dryer with the included screw. Press the adapter duct onto the blower housing and secure to change the dryer vent location. 1 Remove the rear exhaust duct retaining...
Owners Manual
Page 21
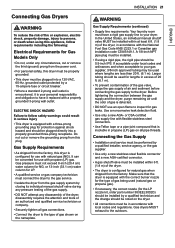
... be converted for use an open flame to inspect for gas leaks. It can be plugged directly into a 120-VAC, 60-Hz. Before tightening the connection between the gas supply and the dryer, purge remaining air until the odor of gas is equipped with propane (LP) gas. ELECTRIC SHOCK HAZARD Failure to follow requirements including the following: Electrical Requirements for Gas Models Only • Do not, under local codes and...
... be converted for use an open flame to inspect for gas leaks. It can be plugged directly into a 120-VAC, 60-Hz. Before tightening the connection between the gas supply and the dryer, purge remaining air until the odor of gas is equipped with propane (LP) gas. ELECTRIC SHOCK HAZARD Failure to follow requirements including the following: Electrical Requirements for Gas Models Only • Do not, under local codes and...
Owners Manual
Page 23
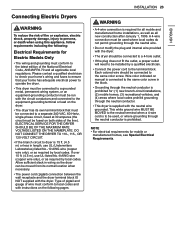
... codes and with instructions on the dryer. • The dryer has its normal location when necessary. • The power cord (pigtail) connection between the wall receptacle and the dryer terminal block IS NOT supplied with the dryer. • The dryer should be used , or where grounding through the neutral conductor is prohibited for Electric Models Only • The wiring and grounding must conform to be fused on manual is connected...
... codes and with instructions on the dryer. • The dryer has its normal location when necessary. • The power cord (pigtail) connection between the wall receptacle and the dryer terminal block IS NOT supplied with the dryer. • The dryer should be used , or where grounding through the neutral conductor is prohibited for Electric Models Only • The wiring and grounding must conform to be fused on manual is connected...
Owners Manual
Page 28
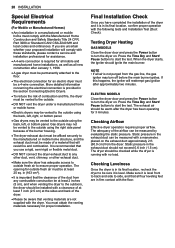
...;Electric dryers may be vented to the outside fresh air to start the test. Press the Time Dry and Start/ Pause buttons to start the test. The adequacy of the dryer and it is level. Checking Levelness Once the dryer is in the exhaust duct should be a 4-wire connection. 28 INSTALLATION Special Electrical Requirements (For Mobile or Manufactured Homes) ••Any installation in its final location, confirm proper operation with a manometer, placed on the exhaust duct...
...;Electric dryers may be vented to the outside fresh air to start the test. Press the Time Dry and Start/ Pause buttons to start the test. The adequacy of the dryer and it is level. Checking Levelness Once the dryer is in the exhaust duct should be a 4-wire connection. 28 INSTALLATION Special Electrical Requirements (For Mobile or Manufactured Homes) ••Any installation in its final location, confirm proper operation with a manometer, placed on the exhaust duct...
Owners Manual
Page 30
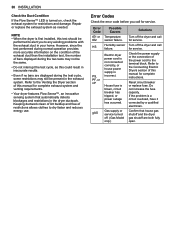
... the fuse capacity. Error Code tE1 or tE2 HS PS, PF, or nP gAS Possible Causes Temperature sensor failure. NOTE • When the dryer is first installed, this manual for service. Electric dryer power cord is not connected correctly, or house power supply is turned on the condition of the exhaust duct than the installation test, the number of this could result in inaccurate results. • Even if no bars are both fully open...
... the fuse capacity. Error Code tE1 or tE2 HS PS, PF, or nP gAS Possible Causes Temperature sensor failure. NOTE • When the dryer is first installed, this manual for service. Electric dryer power cord is not connected correctly, or house power supply is turned on the condition of the exhaust duct than the installation test, the number of this could result in inaccurate results. • Even if no bars are both fully open...
Owners Manual
Page 43
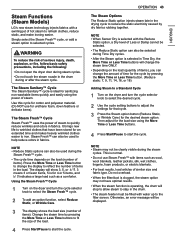
... to wrinkled clothes that cycle. 3 Press the Steam option button (Reduce Static, or Wrinkle Care) for the load size using the power of steam to fit the size of serious injury, death, explosion, or fire, follow basic safety precautions, including the following: • Do not open the dryer door during or after the steam cycle. The display will change the display to reflect the number of items in the drying cycle to...
... to wrinkled clothes that cycle. 3 Press the Steam option button (Reduce Static, or Wrinkle Care) for the load size using the power of steam to fit the size of serious injury, death, explosion, or fire, follow basic safety precautions, including the following: • Do not open the dryer door during or after the steam cycle. The display will change the display to reflect the number of items in the drying cycle to...
Owners Manual
Page 50
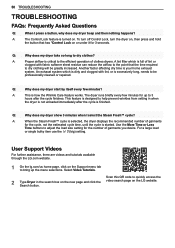
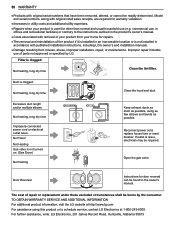
... started. A lint filter which is dirty and clogged with fabric softener sheet residue can reduce the airflow to adjust the load size setting for the cycle, not the estimated cycle time, until the cycle is finished. Q: Why does my dryer take so long to dry clothing will be professionally cleaned or repaired. A: When the Steam Fresh™ cycle is not unloaded immediately after the cycle finishes. Use the More Time or Less Time buttons...
... started. A lint filter which is dirty and clogged with fabric softener sheet residue can reduce the airflow to adjust the load size setting for the cycle, not the estimated cycle time, until the cycle is finished. Q: Why does my dryer take so long to dry clothing will be professionally cleaned or repaired. A: When the Steam Fresh™ cycle is not unloaded immediately after the cycle finishes. Use the More Time or Less Time buttons...
Owners Manual
Page 51
... a circuit problem to allow an electric dryer to dry Exhaust ducts are both fully open. Even if gas is not supplied to feel no error codes will display. Operation Problem The Flow Sense™ indicator remains active after the restriction has been cleared, call for service. Display show error code nP Display show error code gAS Electric dryer power cord is not connected correctly, or house power supply is not properly plugged in. Do not increase fuse capacity. The Energy...
... a circuit problem to allow an electric dryer to dry Exhaust ducts are both fully open. Even if gas is not supplied to feel no error codes will display. Operation Problem The Flow Sense™ indicator remains active after the restriction has been cleared, call for service. Display show error code nP Display show error code gAS Electric dryer power cord is not connected correctly, or house power supply is not properly plugged in. Do not increase fuse capacity. The Energy...
Owners Manual
Page 52
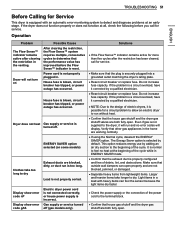
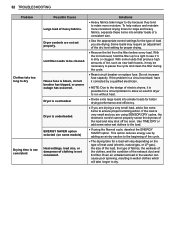
... fuse capacity. Use TIME DRY or add some extra wet clothes to the load. ••If using SENSOR DRY cycles, the electronic control cannot properly sense the dryness of load you are drying. To help reduce and maintain more moisture. Dryer controls are using the Normal cycle, deselect the ENERGY SAVER option. Lint filter needs to be necessary to pause the cycle and clean the filter during the cycle. ••Reset circuit breaker or replace fuse. 52 TROUBLESHOOTING Problem Clothes take too long...
... fuse capacity. Use TIME DRY or add some extra wet clothes to the load. ••If using SENSOR DRY cycles, the electronic control cannot properly sense the dryness of load you are drying. To help reduce and maintain more moisture. Dryer controls are using the Normal cycle, deselect the ENERGY SAVER option. Lint filter needs to be necessary to pause the cycle and clean the filter during the cycle. ••Reset circuit breaker or replace fuse. 52 TROUBLESHOOTING Problem Clothes take too long...

Owners Manual
Page 53
.... Adjust settings and use a shorter drying time, or use SENSOR DRY cycles. ••Divide extra large loads into smaller loads for up to a light to see if it may require pre-treating prior to wrinkled clothes. Dryer is dirty or clogged. Use a low or no heat setting. ••Remove the lint from dirty clothes can be washed but will naturally shrink when washed. Overdrying a load of moisture. ••Use the WRINKLE CARE option...
.... Adjust settings and use a shorter drying time, or use SENSOR DRY cycles. ••Divide extra large loads into smaller loads for up to a light to see if it may require pre-treating prior to wrinkled clothes. Dryer is dirty or clogged. Use a low or no heat setting. ••Remove the lint from dirty clothes can be washed but will naturally shrink when washed. Overdrying a load of moisture. ••Use the WRINKLE CARE option...

Owners Manual
Page 57
... warranty gives you specific legal rights and you . WARRANTY 57 ENGLISH WARRANTY ARBITRATION NOTICE: THIS LIMITED WARRANTY CONTAINS AN ARBITRATION PROVISION THAT REQUIRES YOU AND LG TO RESOLVE DISPUTES BY BINDING ARBITRATION INSTEAD OF IN COURT, UNLESS YOU CHOOSE TO OPT OUT. Warranty Period One (1) year from date of Warranty Parts and Labor Dryer drum HOW SERVICE IS HANDLED LG will at its option repair or replace...
... warranty gives you specific legal rights and you . WARRANTY 57 ENGLISH WARRANTY ARBITRATION NOTICE: THIS LIMITED WARRANTY CONTAINS AN ARBITRATION PROVISION THAT REQUIRES YOU AND LG TO RESOLVE DISPUTES BY BINDING ARBITRATION INSTEAD OF IN COURT, UNLESS YOU CHOOSE TO OPT OUT. Warranty Period One (1) year from date of Warranty Parts and Labor Dryer drum HOW SERVICE IS HANDLED LG will at its option repair or replace...
Owners Manual
Page 58
...door reversal can be required. Not heating, long dry time Clean the lint filter. Excessive duct length and/or multiple elbows Not heating, long dry time Improperly connected power cord or electrical outlet issue. Open the gas valve. If outlet is used for repairs. ••The removal and reinstallation of parts not approved or specified by the consumer. The cost of repair or replacement under these excluded circumstances shall be readily determined. Model and serial numbers, along with published installation instructions, including LG's owner's and installation manuals...
...door reversal can be required. Not heating, long dry time Clean the lint filter. Excessive duct length and/or multiple elbows Not heating, long dry time Improperly connected power cord or electrical outlet issue. Open the gas valve. If outlet is used for repairs. ••The removal and reinstallation of parts not approved or specified by the consumer. The cost of repair or replacement under these excluded circumstances shall be readily determined. Model and serial numbers, along with published installation instructions, including LG's owner's and installation manuals...
Specification
Page 1
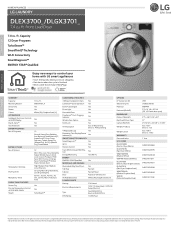
... Steel Drum Yes Tub Rear Painted Cabinet Painted Steel Door Round w/ Chrome trim All Available Colors White (W), Graphite Steel (V) POWER SOURCE Ratings CSA Listed Electrical Requirements 120V, 15 Amps (Gas) / 240V 30 Amps (Electric) Type Gas (DLGX3701_) Electric (DLEX3700_) BTU Rating 10,000 Feet OPTIONS LP Conversion Kit Side Venting Kit Pedestal Pedestal (WxHxD) DIMENSIONS Product (WxHxD) Depth with Door Open Carton (WxHxD) Weight (Product) Weight Carton WARRANTY Parts and Labor UPC CODES DLEX3700W (Electric Dryer White) DLGX3701W (Gas Dryer White) WM3700HWA (Washer White...
... Steel Drum Yes Tub Rear Painted Cabinet Painted Steel Door Round w/ Chrome trim All Available Colors White (W), Graphite Steel (V) POWER SOURCE Ratings CSA Listed Electrical Requirements 120V, 15 Amps (Gas) / 240V 30 Amps (Electric) Type Gas (DLGX3701_) Electric (DLEX3700_) BTU Rating 10,000 Feet OPTIONS LP Conversion Kit Side Venting Kit Pedestal Pedestal (WxHxD) DIMENSIONS Product (WxHxD) Depth with Door Open Carton (WxHxD) Weight (Product) Weight Carton WARRANTY Parts and Labor UPC CODES DLEX3700W (Electric Dryer White) DLGX3701W (Gas Dryer White) WM3700HWA (Washer White...
Specification
Page 2
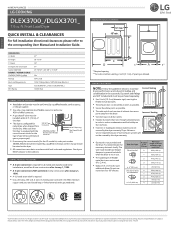
... or service required because of the dryer. • natural gas when shipped from the dryer. CONNECTING ELECTRIC DRYERS • A 4-wire connection is required for the LP nozzle kit, order part number be noted on new construction after January 1, 1996. • A UL-listed strain relief is required. • Use a 30-amp, 240-volt, 4-wire, UL-listed power cord with #10 AWG-minimum copper conductor and closed loop or forked terminals with Door Open Carton (WxHxD) ENERGY / POWER SOURCE Ratings Electrical Requirements Type BTU Rating...
... or service required because of the dryer. • natural gas when shipped from the dryer. CONNECTING ELECTRIC DRYERS • A 4-wire connection is required for the LP nozzle kit, order part number be noted on new construction after January 1, 1996. • A UL-listed strain relief is required. • Use a 30-amp, 240-volt, 4-wire, UL-listed power cord with #10 AWG-minimum copper conductor and closed loop or forked terminals with Door Open Carton (WxHxD) ENERGY / POWER SOURCE Ratings Electrical Requirements Type BTU Rating...


