Owners Manual
Page 1
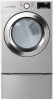
ENGLISH ESPAÑOL DLE3500*, DLG3501* DLE3460*, DLG3461* DLEX3700*, DLGX3701* DLEX3900*, DLGX3901* MFL67652521 Rev.10_022820 www.lg.com Copyright © 2018 - 2020 LG Electronics Inc. All Rights Reserved. OWNER'S MANUAL DRYER Read this owner's manual thoroughly before operating the appliance and keep it handy for reference at all times.
ENGLISH ESPAÑOL DLE3500*, DLG3501* DLE3460*, DLG3461* DLEX3700*, DLGX3701* DLEX3900*, DLGX3901* MFL67652521 Rev.10_022820 www.lg.com Copyright © 2018 - 2020 LG Electronics Inc. All Rights Reserved. OWNER'S MANUAL DRYER Read this owner's manual thoroughly before operating the appliance and keep it handy for reference at all times.
Owners Manual
Page 2
...Electrical Requirements 28 Final Installation Check 29 Installation Test (Duct Check) 32 OPERATION 32 Using the Dryer 33 Check the Lint Filter Before Every Load 33 Sorting Laundry 33 Loading the Dryer 34 Control Panel 37 Cycle Guide 41 Cycle Modifier Buttons 41 Option Buttons 42 Special Functions ...43 Steam Functions (Steam Models) 45 SMART FUNCTIONS 45 LG ThinQ Application 48 Smart Diagnosis™ Function 49 MAINTENANCE 49 ...
...Electrical Requirements 28 Final Installation Check 29 Installation Test (Duct Check) 32 OPERATION 32 Using the Dryer 33 Check the Lint Filter Before Every Load 33 Sorting Laundry 33 Loading the Dryer 34 Control Panel 37 Cycle Guide 41 Cycle Modifier Buttons 41 Option Buttons 42 Special Functions ...43 Steam Functions (Steam Models) 45 SMART FUNCTIONS 45 LG ThinQ Application 48 Smart Diagnosis™ Function 49 MAINTENANCE 49 ...

Owners Manual
Page 3
... 3 Easy-to-Use Control Panel Rotate the cycle selector knob to restrictions in the installed household ductwork that reduce exhaust airflow through the dryer. Easy-Access Reversible Door The wide-opening door provides easy access for installation location. The door hinge can add a Steam option to ...repair the ducts to adjust for loading and unloading. This function uses Wi-Fi. DE S IG N ER TIFIED Steam Functions (Steam Models) LG's steam technology allows you can be reversed to remove the restrictions. Simply select the Steam Fresh™ cycle, or you to inject fabrics with...
... 3 Easy-to-Use Control Panel Rotate the cycle selector knob to restrictions in the installed household ductwork that reduce exhaust airflow through the dryer. Easy-Access Reversible Door The wide-opening door provides easy access for installation location. The door hinge can add a Steam option to ...repair the ducts to adjust for loading and unloading. This function uses Wi-Fi. DE S IG N ER TIFIED Steam Functions (Steam Models) LG's steam technology allows you can be reversed to remove the restrictions. Simply select the Steam Fresh™ cycle, or you to inject fabrics with...

Owners Manual
Page 4
...plastic venting materials. CAUTION You may be of a specific type identified by a qualified installer. ••Do not install a clothes dryer with clothes dryers. Immediately call the fire department. ••Installation and service must be easily crushed, and trap lint. All safety messages will ...- This is installed, it must be slightly injured or cause damage to the manufacturer's instructions and local codes. ••Clothes dryer installation must be killed or seriously injured if you do not use gasoline or other appliance. ••WHAT TO DO IF YOU...
...plastic venting materials. CAUTION You may be of a specific type identified by a qualified installer. ••Do not install a clothes dryer with clothes dryers. Immediately call the fire department. ••Installation and service must be easily crushed, and trap lint. All safety messages will ...- This is installed, it must be slightly injured or cause damage to the manufacturer's instructions and local codes. ••Clothes dryer installation must be killed or seriously injured if you do not use gasoline or other appliance. ••WHAT TO DO IF YOU...

Owners Manual
Page 5
...including the following: INSTALLATION ••Before use, the appliance must be properly installed as described in this appliance if it will obstruct clothes dryer airflow and increase the risk of children. ENGLISH SAFETY INSTRUCTIONS 5 IMPORTANT SAFETY INSTRUCTIONS WARNING To reduce the risk of explosion, fire, death, ..., malfunctioning, partially disassembled, or has missing or broken parts, including a damaged cord or plug. ••Do not install a clothes dryer with clothes dryers. Flexible venting materials are known to collapse, be easily crushed, and trap lint.
...including the following: INSTALLATION ••Before use, the appliance must be properly installed as described in this appliance if it will obstruct clothes dryer airflow and increase the risk of children. ENGLISH SAFETY INSTRUCTIONS 5 IMPORTANT SAFETY INSTRUCTIONS WARNING To reduce the risk of explosion, fire, death, ..., malfunctioning, partially disassembled, or has missing or broken parts, including a damaged cord or plug. ••Do not install a clothes dryer with clothes dryers. Flexible venting materials are known to collapse, be easily crushed, and trap lint.
Owners Manual
Page 6
... ducting is not provided with duct tape. ••Use only rigid, semi-rigid or flexible metal 4-inch diameter duct inside the dryer cabinet or for exhausting to a circuit that could affect drying time. ••Ductwork is recommended for instructions before installing your appliances .... ••If the product has been submerged, contact an LG Electronics customer information center for use between the dryer and the wall. Do not use . ••Gas dryers MUST be exhausted to the outside . ••The dryer exhaust system must be 4 inches (10.2 cm) in any...
... ducting is not provided with duct tape. ••Use only rigid, semi-rigid or flexible metal 4-inch diameter duct inside the dryer cabinet or for exhausting to a circuit that could affect drying time. ••Ductwork is recommended for instructions before installing your appliances .... ••If the product has been submerged, contact an LG Electronics customer information center for use between the dryer and the wall. Do not use . ••Gas dryers MUST be exhausted to the outside . ••The dryer exhaust system must be 4 inches (10.2 cm) in any...
Owners Manual
Page 7
...textured rubber-like materials. ••Do not store plastic, paper, or clothing that may be minimized further by properly venting the dryer to the outdoors. ••Do not place items exposed to four potentially hazardous substances, namely benzene, carbon monoxide, formaldehyde, and ...the appliance. ••Do not use fabric softeners or products to eliminate static unless recommended by the incomplete combustion of a tumble dryer cycle occurs without heat (cool down period). STEAM (Steam models) ••Do not open flame during operation. ••...
...textured rubber-like materials. ••Do not store plastic, paper, or clothing that may be minimized further by properly venting the dryer to the outdoors. ••Do not place items exposed to four potentially hazardous substances, namely benzene, carbon monoxide, formaldehyde, and ...the appliance. ••Do not use fabric softeners or products to eliminate static unless recommended by the incomplete combustion of a tumble dryer cycle occurs without heat (cool down period). STEAM (Steam models) ••Do not open flame during operation. ••...
Owners Manual
Page 8
...this appliance from the power supply before the appliance is properly grounded. Failure to follow these instructions may result if the dryer is equipped with the installation instructions of the manufacturer of the appliance. GROUNDING INSTRUCTIONS ••Improper connection of the equipment...accordance with a cord having an equipment-grounding conductor and a grounding plug. Do not modify the plug provided with all clothes dryers in a risk of least resistance for electric current. WARNING Fire Hazard Failure to follow safety warnings exactly could result in serious...
...this appliance from the power supply before the appliance is properly grounded. Failure to follow these instructions may result if the dryer is equipped with the installation instructions of the manufacturer of the appliance. GROUNDING INSTRUCTIONS ••Improper connection of the equipment...accordance with a cord having an equipment-grounding conductor and a grounding plug. Do not modify the plug provided with all clothes dryers in a risk of least resistance for electric current. WARNING Fire Hazard Failure to follow safety warnings exactly could result in serious...
Owners Manual
Page 10
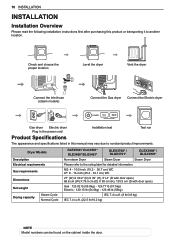
Check and choose the proper location Level the dryer Vent the dryer Connect the inlet hose (steam models) Connect the Gas dryer Connect the Electric dryer Gas dryer Electric dryer Plug in the power cord Installation test Test run Product...INSTALLATION Installation Overview Please read the following installation instructions first after purchasing this manual may vary due to constant product improvements. Dryer Models Description Electrical requirements Gas requirements Dimensions Net weight Drying capacity Steam Cycle Normal Cycle DLE3500*/ DLG3501* DLE3460*/DLG3461* DLEX3700...
Check and choose the proper location Level the dryer Vent the dryer Connect the inlet hose (steam models) Connect the Gas dryer Connect the Electric dryer Gas dryer Electric dryer Plug in the power cord Installation test Test run Product...INSTALLATION Installation Overview Please read the following installation instructions first after purchasing this manual may vary due to constant product improvements. Dryer Models Description Electrical requirements Gas requirements Dimensions Net weight Drying capacity Steam Cycle Normal Cycle DLE3500*/ DLG3501* DLE3460*/DLG3461* DLEX3700...

Owners Manual
Page 11
... weight of a companion appliance should also be considered. ••No other fuel-burning appliance can result in longer drying times. • The dryer must not be installed or stored in an area where it will need 18 inches (45.7 cm) from the garage floor to support the total...water and/or weather. • Check code requirements that limit, or do not permit, installation of 200 lb (90.7 kg). See Connecting Electric Dryers. ••A sturdy floor to the bottom of an automatic cycle. Clothes may not tumble properly, and automatic sensor cycles may not operate correctly if...
... weight of a companion appliance should also be considered. ••No other fuel-burning appliance can result in longer drying times. • The dryer must not be installed or stored in an area where it will need 18 inches (45.7 cm) from the garage floor to support the total...water and/or weather. • Check code requirements that limit, or do not permit, installation of 200 lb (90.7 kg). See Connecting Electric Dryers. ••A sturdy floor to the bottom of an automatic cycle. Clothes may not tumble properly, and automatic sensor cycles may not operate correctly if...
Owners Manual
Page 12
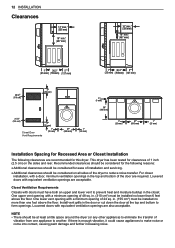
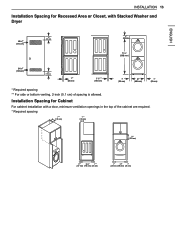
...lower vent to prevent heat and moisture buildup in the door or cut down the door at least a little space around the dryer (or any other appliance) to make noise or come into contact, causing paint damage and further increasing noise. If there is...mm) Installation Spacing for Recessed Area or Closet Installation The following reasons: ••Additional clearances should be considered for this dryer. For closet installation, with a minimum opening of installation and servicing. ••Additional clearances should be considered for the following clearances are acceptable.
...lower vent to prevent heat and moisture buildup in the door or cut down the door at least a little space around the dryer (or any other appliance) to make noise or come into contact, causing paint damage and further increasing noise. If there is...mm) Installation Spacing for Recessed Area or Closet Installation The following reasons: ••Additional clearances should be considered for this dryer. For closet installation, with a minimum opening of installation and servicing. ••Additional clearances should be considered for the following clearances are acceptable.
Owners Manual
Page 13
...) (765 mm) (25 mm) 1" 27" 1" (25 mm) (686 mm) (25 mm) ENGLISH INSTALLATION 13 Installation Spacing for Cabinet For cabinet installation with Stacked Washer and Dryer 48 in.2* (310 cm2) 3"* (76 mm) 6"* (152 mm) 77 ½" (1968 mm) 24 in the top of spacing is allowed.
...) (765 mm) (25 mm) 1" 27" 1" (25 mm) (686 mm) (25 mm) ENGLISH INSTALLATION 13 Installation Spacing for Cabinet For cabinet installation with Stacked Washer and Dryer 48 in.2* (310 cm2) 3"* (76 mm) 6"* (152 mm) 77 ½" (1968 mm) 24 in the top of spacing is allowed.
Owners Manual
Page 14
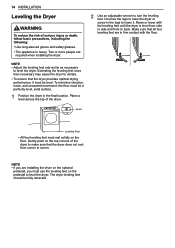
...Make sure that all four leveling feet are in firm contact with the leveling feet until the dryer is heavy. Two or more than necessary may cause the dryer to vibrate. • To ensure that the dryer does not rock from side to side and front to back. NOTE • If you are... required when installing the dryer. Place a level across the top of the dryer. 2 Use an adjustable wrench to level the dryer. To minimize vibration, noise, and unwanted movement, the floor must be level. Gently push on the pedestal ...
...Make sure that all four leveling feet are in firm contact with the leveling feet until the dryer is heavy. Two or more than necessary may cause the dryer to vibrate. • To ensure that the dryer does not rock from side to side and front to back. NOTE • If you are... required when installing the dryer. Place a level across the top of the dryer. 2 Use an adjustable wrench to level the dryer. To minimize vibration, noise, and unwanted movement, the floor must be level. Gently push on the pedestal ...
Owners Manual
Page 15
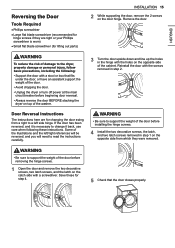
...screws, two latch screws, and the latch on the opposite side of the door. • Avoid dropping the door. • Unplug the dryer or turn off power at the main circuit breaker before installing the hinge screws. 4 Install the two decorative screws, the latch, and two latch... screws removed in step 2. Reinstall the door with a screwdriver. WARNING • Be sure to the dryer, property damage or personal injury, follow basic precautions, including the following these for step 4. 5 Check that fits under the door, or have an assistant...
...screws, two latch screws, and the latch on the opposite side of the door. • Avoid dropping the door. • Unplug the dryer or turn off power at the main circuit breaker before installing the hinge screws. 4 Install the two decorative screws, the latch, and two latch... screws removed in step 2. Reinstall the door with a screwdriver. WARNING • Be sure to the dryer, property damage or personal injury, follow basic precautions, including the following these for step 4. 5 Check that fits under the door, or have an assistant...

Owners Manual
Page 16
... remove the knockout for the desired vent opening (right-side venting is not available on gas models). Be sure that the male end of the dryer as shown. Retaining Screw 3 Preassemble a 4-inch (10.2 cm) elbow to connect the remaining ductwork. Cover Plate Elbow 1½" (38 mm) Option 2: Bottom Venting 2 ...onto the blower housing and secure it in place with the included screw. Secure it to the base of the elbow faces AWAY from your LG retailer. Pull out the exhaust duct. It can also vent to the back of the elbow faces down through the rear opening and press...
... remove the knockout for the desired vent opening (right-side venting is not available on gas models). Be sure that the male end of the dryer as shown. Retaining Screw 3 Preassemble a 4-inch (10.2 cm) elbow to connect the remaining ductwork. Cover Plate Elbow 1½" (38 mm) Option 2: Bottom Venting 2 ...onto the blower housing and secure it in place with the included screw. Secure it to the base of the elbow faces AWAY from your LG retailer. Pull out the exhaust duct. It can also vent to the back of the elbow faces down through the rear opening and press...
Owners Manual
Page 17
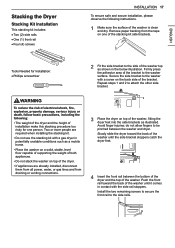
...8226;•Four (4) screws INSTALLATION 17 To ensure safe and secure installation, please observe the following : • The weight of the dryer and the height of installation make this stacking procedure too risky for Installation: ••Phillips screwdriver 2 Fit the side bracket to ...the washer with a gas dryer in potentially unstable conditions such as a mobile home. • Place the washer on a solid, stable, level floor capable of supporting...
...8226;•Four (4) screws INSTALLATION 17 To ensure safe and secure installation, please observe the following : • The weight of the dryer and the height of installation make this stacking procedure too risky for Installation: ••Phillips screwdriver 2 Fit the side bracket to ...the washer with a gas dryer in potentially unstable conditions such as a mobile home. • Place the washer on a solid, stable, level floor capable of supporting...
Owners Manual
Page 18
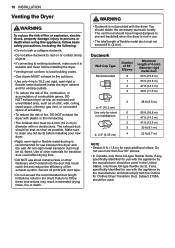
...if any , specifically identified for venting outside. • To reduce the risk of fire, combustion, or accumulation of combustible gases, DO NOT exhaust dryer air into the duct that comply with the appliance by the manufacturer should be used . Secure all joints with duct tape. • Do not... recommended duct length limitations noted in extended drying times, fire or death. The vent hood should be UL-listed. 18 INSTALLATION Venting the Dryer WARNING To reduce the risk of fire or explosion, electric shock, property damage, injury to persons or death when using this appliance, follow...
...if any , specifically identified for venting outside. • To reduce the risk of fire, combustion, or accumulation of combustible gases, DO NOT exhaust dryer air into the duct that comply with the appliance by the manufacturer should be used . Secure all joints with duct tape. • Do not... recommended duct length limitations noted in extended drying times, fire or death. The vent hood should be UL-listed. 18 INSTALLATION Venting the Dryer WARNING To reduce the risk of fire or explosion, electric shock, property damage, injury to persons or death when using this appliance, follow...
Owners Manual
Page 19
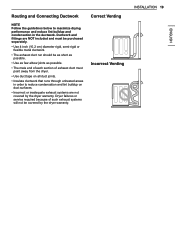
... service required because of exhaust duct must point away from the dryer. • Use duct tape on all duct joints. • Insulate ductwork that runs through unheated areas in order to maximize drying performance and reduce lint .... • Use as few elbow joints as possible. • The male end of each section of such exhaust systems will not be covered by the dryer warranty. Correct Venting Incorrect Venting INSTALLATION 19 ENGLISH Ductwork and fittings are not covered by the...
... service required because of exhaust duct must point away from the dryer. • Use duct tape on all duct joints. • Insulate ductwork that runs through unheated areas in order to maximize drying performance and reduce lint .... • Use as few elbow joints as possible. • The male end of each section of such exhaust systems will not be covered by the dryer warranty. Correct Venting Incorrect Venting INSTALLATION 19 ENGLISH Ductwork and fittings are not covered by the...
Owners Manual
Page 20
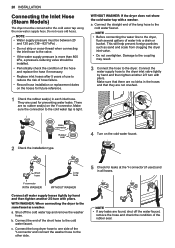
... failure. • Record hose installation or replacement dates on the hoses for preventing water leaks. 20 INSTALLATION Connecting the Inlet Hose (Steam Models) The dryer must be between 20 and 120 psi (138-827 kPa) . • Do not strip or cross-thread when connecting the inlet hose to the ... several gallons of the short hose to the cold water faucet. Connect the straight end of the Y-connector and connect the washer hose to the dryer. NOTE • If any leaks are not crushed. 1 Check the rubber seal(s) in all water supply hoses tightly by hand and then tighten another 2/3...
... failure. • Record hose installation or replacement dates on the hoses for preventing water leaks. 20 INSTALLATION Connecting the Inlet Hose (Steam Models) The dryer must be between 20 and 120 psi (138-827 kPa) . • Do not strip or cross-thread when connecting the inlet hose to the ... several gallons of the short hose to the cold water faucet. Connect the straight end of the Y-connector and connect the washer hose to the dryer. NOTE • If any leaks are not crushed. 1 Check the rubber seal(s) in all water supply hoses tightly by hand and then tighten another 2/3...
Owners Manual
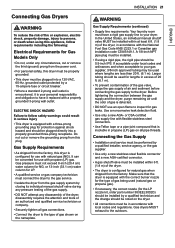
Page 21
... (6.1 m). It can be converted for Gas Models Only • Do not, under local codes and ordinances and when acceptable to your dryer. disassembly requires the attention and tools of an authorized and qualified service technician or company. • Securely tighten all pipe threads. Use ... the correct nozzle (for protection against shock hazard and should be plugged directly into a 120-VAC, 60-Hz. Gas dryers MUST exhaust to the dryer. Connecting Gas Dryers WARNING To reduce the risk of fire or explosion, electric shock, property damage, injury to persons, or death when using...
... (6.1 m). It can be converted for Gas Models Only • Do not, under local codes and ordinances and when acceptable to your dryer. disassembly requires the attention and tools of an authorized and qualified service technician or company. • Securely tighten all pipe threads. Use ... the correct nozzle (for protection against shock hazard and should be plugged directly into a 120-VAC, 60-Hz. Gas dryers MUST exhaust to the dryer. Connecting Gas Dryers WARNING To reduce the risk of fire or explosion, electric shock, property damage, injury to persons, or death when using...


